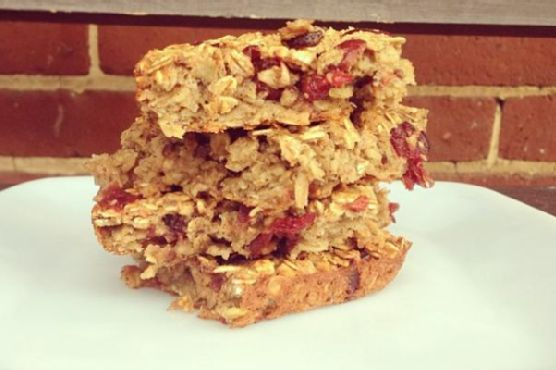
It was one of those chilly mornings where you can feel the crisp air sneaking through the cracks of your window, coaxing you to stay under the covers just a little longer. But I was determined to start my day with something as cozy as my fluffy duvet, so I headed to the kitchen and decided to whip up my favorite baked oatmeal with dried cranberries. This dish is a lifesaver on mornings like this because it warms you up from the inside out, and it’s the kind of comfort food that feels indulgent but is actually packed with goodness. Plus, it’s the perfect dish to make ahead for the week. I promise, once you try this, you’ll look forward to getting out of bed just for breakfast!
Jump to Recipe
What You’ll Need
I love this recipe because it uses a lot of pantry staples, so you’re likely to have everything you need on hand. Plus, the dried cranberries add that tart sweetness that makes every bite exciting.
- 2 cups dry oats
- 1 teaspoon baking powder
- 1/2 teaspoon cinnamon
- 1/4 teaspoon salt
- 1/4 cup flaxseeds
- 2 cups unsweetened almond milk
- 2 bananas, mashed
- 2 eggs
- 1 teaspoon vanilla extract
- 1/2 cup dried cranberries
How to Make Baked Oatmeal with Dried Cranberries
- Preheat your oven to 350°F (175°C). The warmth will soon fill your kitchen, hinting at the deliciousness to come.
- In a large bowl, mix the dry ingredients: oats, baking powder, cinnamon, salt, and flaxseeds. Stir until everything is well combined — you want the flaxseeds to be evenly distributed like little gems throughout the mixture.
- In a separate bowl, whisk together the liquid ingredients: almond milk, mashed bananas, eggs, and vanilla extract. Whisk until the mix is smooth and the bananas are well incorporated, giving off that lovely, sweet aroma.
- Pour the liquid mixture into the bowl of dry ingredients. Mix well until the oats are thoroughly soaked and the liquid is evenly distributed. It’ll look like a big, soupy mess, but don’t worry, it will transform in the oven!
- Spray a baking pan with non-stick spray. The size of the pan will determine the thickness of your oatmeal bars, so choose according to your preference. I like using a smaller pan to get thicker, chewier bars.
- Pour the oatmeal mixture into the prepared pan, spreading it out evenly. Sprinkle the dried cranberries on top, letting them fall where they may, like little jewels peeking out.
- Bake in the preheated oven for about 45 minutes. Your kitchen will be filled with the warm, inviting scent of cinnamon and baked bananas. The top should be slightly golden and the center set.
- Once done, let it cool for a few minutes before slicing. This is the hardest part, but trust me, it’s worth the wait!
- Enjoy a slice warm, perhaps with a drizzle of maple syrup or a dollop of yogurt. It’s the breakfast that feels like a hug!
Cook’s Notes
Baked oatmeal is incredibly forgiving, but here are a few tips to ensure success. If you prefer a sweeter dish, add a bit of honey or maple syrup to the wet ingredients. You can store leftovers in the fridge for up to a week, making it perfect for meal prep. Just reheat a slice in the microwave or enjoy it cold — both ways are delicious. If you find your oatmeal drying out in the fridge, a splash of almond milk during reheating will do the trick.
Make It Your Own
Here’s where you can let your creativity shine! Try these variations to keep things exciting:
- Swap the dried cranberries for chopped nuts like almonds or walnuts for a bit of crunch.
- If you’re a chocolate lover, sprinkle in some dark chocolate chips for a decadent twist.
- Trade the almond milk for coconut milk for a tropical flair.
- Mix in some fresh berries like blueberries or raspberries before baking for a burst of freshness in every bite.
If you try this, I’d love to hear how it turns out — drop a comment or tag me! I’m always excited to see how you make these recipes your own. Enjoy every cozy, delicious bite!
Related update: Baked Oatmeal with Dried Cranberries
Related update: Broccoli Rabe and Breaded Veal Scallopini
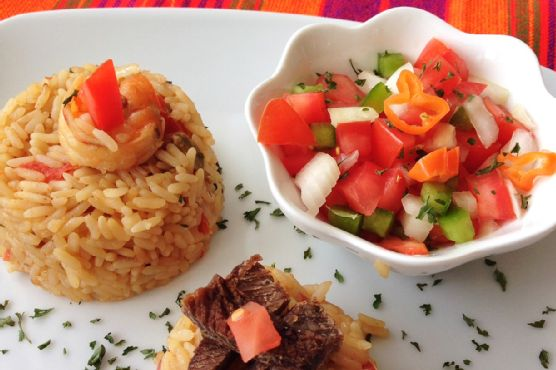
Imagine this: It’s a chilly, rainy Tuesday evening. I find myself staring into the pantry, looking for something that’ll warm me up, body and soul. I have a little bit of goat meat, some shrimp, and the usual pantry spices that seem to multiply on their own. It’s the kind of evening where you crave something comforting yet exotic, and that’s when I remember — Kenyan Pilau. It’s one of those dishes that sounds impressive but is surprisingly easy to whip up. The aroma of spices mingling in the kitchen is enough to make anyone feel like a culinary genius. It’s perfect for those weeknight dinners when you want to travel the world without leaving your kitchen.
Jump to Recipe
What You’ll Need
Trust me, you might already have most of these ingredients lounging around in your kitchen. And the hero of this dish? It’s definitely the spice mix that elevates a simple rice dish into something extraordinary.
- Black whole peppercorns
- Cardamom pods
- Cinnamon sticks
- Cumin seed powder
- Garlic
- Ginger
- Goat meat
- Onion
- Canned rice
- Salt
- Dressed shrimp
- Tomatoes
- Cooking spoon of vegetable oil
How to Make Kenyan Pilau
- First things first, season the goat meat well and set it to boil. You want it tender, like it’s ready to fall apart at a fork’s touch.
- Chop all your lovely spices — the peppercorns, cardamom, and cinnamon — and give them a good crush. This is where the magic begins.
- Heat up a cooking spoon of vegetable oil in a large pot. Once shimmering, add sliced onions and sauté until they’re golden brown, releasing a sweet aroma.
- Add the boiled goat meat to the pot and allow it to brown just a little more. This is where you start to feel like a pro chef.
- Stir in your crushed spices, letting their fragrance envelop the kitchen. Then, add the canned rice and chopped tomatoes, giving it all a good mix.
- Add the dressed shrimp, followed by 2 cups of water. Reduce the heat, cover the pot, and let it steam. Check occasionally to ensure the water is absorbed and the rice is soft.
- Once the rice is perfect, increase the heat briefly and stir to ensure all those fantastic spices soak into every grain. Serve it alongside some Kachumbari or your favorite salad.
Cook’s Notes
A little tip from my kitchen to yours: make sure you don’t rush the browning process for the onions and meat. This step deepens the flavor of the Pilau significantly. Feel free to make this dish ahead of time; it keeps well in the fridge for a couple of days and the flavors only get better. Just reheat gently to avoid drying out the rice. If you find yourself with leftovers, good news — they can be transformed into a delightful next-day lunch. Just add a splash of water before reheating to fluff it up again.
Make It Your Own
This Kenyan Pilau is versatile, and you can easily tweak it to fit your taste or pantry stock. Here are some ideas:
- Swap the goat meat with chicken thighs for a lighter version.
- Substitute the shrimp with crispy tofu for a vegetarian twist.
- Try using basmati rice instead of canned rice for a fragrant touch.
- Add a handful of peas or diced carrots for a pop of color and sweetness.
If you try this, I’d love to hear how it turns out—drop a comment or tag me! Whether you stick to the script or make it your own, this Kenyan Pilau is set to be a crowd-pleaser at your table. Happy cooking!
Related update: Kenyan Pilau

Last Tuesday, I found myself staring into the fridge, bleary-eyed and snacky, with no desire to make a big mess just to satisfy my craving for something warm and flavorful. It had been a long day, and I needed dinner on the table, pronto. Arroz Con Pollo fluttered into my mind like an old friend, promising that elusive blend of comfort and flavor without a crazy ingredient list. This one-pan wonder is my go-to for nights like this—simple enough for a weeknight but lush enough to feel like a treat. The best part? It’s a forgiving recipe that lets you swap in what you’ve got on hand. By the way, if you’re in a rush to get cooking, feel free to skip down to the nitty-gritty details. Jump to Recipe
What You’ll Need
Chances are you already have most of these ingredients chilling in your pantry or fridge. Here’s what you’ll need:
- Butter
- Garlic
- Chicken breasts
- Ground cumin
- Ground coriander
- Ground turmeric
- Onion
- Bell pepper
- Canned diced chiles
- Canned diced tomatoes
- Chicken broth
- Dried rice
- Chili powder
- Salt
- Onion powder
- Shredded cheese
How to Make Arroz Con Pollo
- Start by heating up a large pan over medium heat and melt the butter until it’s sizzling and aromatic.
- Add in the garlic and let it cook for a minute or two until it’s fragrant and just beginning to turn golden.
- Sprinkle your chicken breasts with about 1 teaspoon each of cumin, coriander, and turmeric. Toss them in the pan and cook until they are browned and cooked through.
- Once your chicken is fully cooked, toss in your diced onion and bell pepper. Stir everything together and let it cook for about 3 to 4 minutes, until the veggies start to soften.
- Add the canned diced chiles and tomatoes. Give it all a good swirl to combine.
- Pour in the chicken broth and add your dried rice. Stir gently to make sure everything is mixed well.
- Sprinkle in the remaining teaspoon of chili powder, cumin, and coriander, along with the salt, remaining turmeric, and onion powder.
- Bring the pot to a boil, then reduce the heat to low, cover, and let it simmer for about 20 minutes or until the liquid is absorbed and the rice is cooked through.
- Once the rice is perfectly cooked, grab your shredded cheese and generously spread it across the top of the chicken mixture. Cover the pan for another minute or two until the cheese melts completely into gooey perfection.
Cook’s Notes
This dish is pretty forgiving, but here are a few notes to make sure it’s perfect every time. If you find your pan getting too dry during the simmer, just add a splash more broth or water. Cooking times can vary depending on your stove and pot, so keep an eye on the rice after the 15-minute mark. If you want to prep ahead, you can chop your veggies and measure out spices a day in advance. Leftovers? They make for an awesome lunch the next day. Just store it in an airtight container in the fridge, and it should be good for about 3 days.
Make It Your Own
- Swap the chicken for crispy tofu if you’re leaning towards a plant-based version.
- Add in some frozen peas or corn during the last 5 minutes of cooking for a pop of sweetness and color.
- Use smoked paprika instead of chili powder for a smoky twist.
- Throw in some sliced olives or capers for a briny kick.
If you try this, I’d love to hear how it turns out—drop a comment or tag me! Remember, the best part of cooking is making it your own, so don’t be afraid to tweak it to suit your taste buds.
Related update: Arroz Con Pollo
Related update: Kenyan Pilau