Vanilla Cream Cakes, Easy and Fluffy Holiday Cakes | Made by Meaghan Moineau

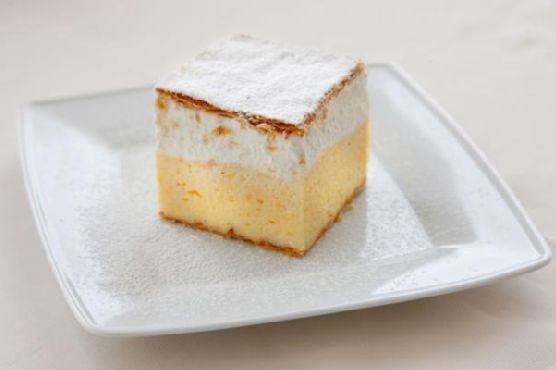
Vanilla Cream Cakes: Easy and Fluffy Holiday Treats

Intro

There’s something magical about the holiday season that awakens the inner child in all of us. It’s a time when the air is filled with the sweet aroma of baked goods, and the kitchen becomes the heart of the home. Growing up, I remember my grandmother’s kitchen as a warm haven, especially during the holidays. She would bake her famous vanilla cream cakes, and the entire family would gather around the table, eagerly awaiting the first bite. These cakes were not just desserts; they were a symbol of love, warmth, and togetherness. Inspired by those cherished memories, I’m thrilled to share a recipe that brings a modern twist to my grandmother’s classic vanilla cream cakes. These fluffy, easy-to-make delights are perfect for any holiday gathering.

Why You’ll Love It

This recipe is a delightful combination of simplicity and indulgence. The vanilla cream cakes are light, fluffy, and melt in your mouth. They are perfect for those who want to enjoy a sweet treat without spending hours in the kitchen. The use of puff pastry not only simplifies the process but also adds a crisp, buttery texture that complements the creamy filling beautifully. Whether you’re hosting a holiday party or simply want to treat your family to something special, these cakes are sure to impress.

Ingredients

  • 500g puff pastry
  • 6 eggs
  • 200g sugar
  • 1 tablespoon rum
  • 6 liters whole milk
  • 1 packet vanilla sugar
  • 200g all-purpose flour
  • 250g heavy whipping cream
  • Powdered sugar for dusting

Instructions

  1. Preheat your oven to 200°C (390°F). Prepare a baking dish approximately 14 inches long, 10 inches wide, and 3.2 inches deep.
  2. Roll the puff pastry thinly to fit the size of your baking dish. You’ll need half for the bottom layer and half for the top layer of the cakes.
  3. Bake the pastry for 10-15 minutes until it turns golden brown. Allow the top layer to cool completely and leave the bottom layer in the baking dish.
  4. Separate the egg yolks from the whites, placing the whites in a large bowl.
  5. In a smaller bowl, combine egg yolks with sugar, vanilla sugar, and rum. Mix for 1-2 minutes, then add flour and 1/4 of the milk, mixing until smooth.
  6. Beat the egg whites until they reach a firm consistency. Gradually add sugar and continue beating until very firm.
  7. In a large pot, bring the remaining milk to a boil. Slowly add the egg yolk mixture, whisking constantly, and cook for 5 minutes until thick.
  8. Remove from heat and gradually pour the hot mixture into the egg whites, whisking constantly to achieve a thick consistency.
  9. Pour the mixture over the bottom layer of pastry in the baking dish, ensuring it fills every corner. Allow it to cool, preferably overnight in the refrigerator.
  10. Beat the heavy whipping cream with sugar until it forms stiff peaks. Spread over the cooled mixture.
  11. Cut the cooled top layer of pastry into 15 squares and place them on the whipped cream layer.
  12. Before serving, cut the cake into squares and dust with powdered sugar.

Tips

To ensure the perfect texture, make sure your egg whites are beaten to a very firm consistency. When combining the hot mixture with the egg whites, working with a partner can make the process easier. Don’t rush this step; it’s crucial for achieving the right consistency.

Variations & Substitutions

For a different flavor profile, consider adding a hint of almond extract to the creamy filling. You can also substitute the rum with an equal amount of your favorite liqueur or omit it entirely for a non-alcoholic version. If you’re looking for a gluten-free option, try using gluten-free puff pastry and flour.

Storage

These vanilla cream cakes are best enjoyed fresh but can be stored in an airtight container in the refrigerator for up to three days. The puff pastry may lose some of its crispness over time, but the flavors will remain delightful.

FAQ

Can I make these cakes in advance?

Yes, you can prepare the cake up to the whipped cream layer and store it in the refrigerator overnight. Add the top pastry layer and dust with powdered sugar just before serving.

What if I don’t have vanilla sugar?

If you don’t have vanilla sugar on hand, you can substitute it with an equal amount of regular sugar and add a teaspoon of vanilla extract to the egg yolk mixture.

Can I use a different type of milk?

Whole milk is recommended for the best texture and flavor, but you can use 2% milk if needed. Avoid using skim milk as it may not provide the desired creaminess.

Nutrition

Each serving of vanilla cream cake is rich in flavor and provides a delightful balance of carbohydrates, fats, and proteins. While these cakes are a treat, it’s important to enjoy them in moderation, especially if you’re mindful of your calorie intake during the holiday season.

Conclusion

Vanilla cream cakes are a wonderful way to bring a touch of nostalgia and warmth to your holiday celebrations. With their easy preparation and delightful taste, they are sure to become a favorite in your family, just as they were in mine. I hope this recipe brings you as much joy and togetherness as it has brought to my family over the years. Happy baking and happy holidays!

Related update: Vanilla Cream Cakes, Easy and Fluffy Holiday Cakes

Related update: Ginger Molasses Rounds

Candy Cane Chocolate Marshmallows | Made by Meaghan Moineau

Candy Cane Chocolate Marshmallows

Intro

As the holiday season approaches, there’s a unique joy in the air, one that brings with it the aroma of nostalgia and sweet treats. I remember my childhood days when my grandmother would hand us candy canes every Christmas, and we’d spend hours trying to perfect our hot chocolate game. Those candy canes weren’t just sweet delights; they were the essence of our festive spirit. Today, I want to share a recipe that combines those cherished memories with a modern twist: Candy Cane Chocolate Marshmallows. This delicious treat is perfect for sharing with family and friends or simply enjoying alone with a good book by the fireplace.

Why You’ll Love It

This recipe is a delightful fusion of flavors and textures that will take your taste buds on a festive journey. The cool and minty candy canes complement the rich, velvety chocolate, while the fluffy marshmallow center adds a delightful contrast. It’s a simple yet decadent treat that is perfect for gifting or enjoying as a cozy dessert on a chilly evening. Plus, it’s an easy recipe that you can whip up in no time, making it ideal for last-minute holiday preparations.

Ingredients

  • Candy canes
  • Dark chocolate
  • Marshmallows
  • Milk chocolate

Instructions

  1. Crush candy canes using the bottom of a glass, a mallet, or any tool that works for you. Aim for a mix of fine and chunky pieces for a textured coating.
  2. Set up a double boiler to melt the chocolate. If you don’t have one, you can place a heatproof bowl over a pot of simmering water, ensuring the bowl doesn’t touch the water.
  3. Break the dark chocolate and milk chocolate into small pieces and melt them together in the double boiler, stirring occasionally until smooth.
  4. Using a skewer or a fork, dip each marshmallow into the melted chocolate, ensuring it’s evenly coated.
  5. Roll the chocolate-covered marshmallow in the crushed candy cane pieces, pressing slightly to ensure the candy adheres well.
  6. Place the coated marshmallows on a sheet of wax paper to set.
  7. Chill the marshmallows in the refrigerator for at least an hour or until the chocolate has fully hardened.
  8. Store the marshmallows in an airtight container to maintain freshness.
  9. Enjoy these marshmallows on their own or dunk them into a steaming mug of hot chocolate for an extra indulgent treat.

Tips

To make the process even smoother, here are a few tips:

  • Choose high-quality chocolate for the best flavor. A mix of dark and milk chocolate provides a rich and balanced taste.
  • If you’re short on time, you can crush the candy canes in advance and store them in a sealed bag to maintain freshness.
  • To add an extra layer of flavor, consider adding a drop of peppermint extract to the melted chocolate.

Variations & Substitutions

Feel free to get creative with this recipe. Here are some variations and substitutions you might enjoy:

  • Chocolate Variations: Use white chocolate for a sweeter, creamier coating, or try a flavored chocolate bar for a unique twist.
  • Marshmallow Options: Consider using flavored marshmallows, such as peppermint or vanilla, to add an extra dimension of taste.
  • Nutty Crunch: Add chopped nuts, like almonds or pistachios, to the crushed candy canes for a nutty crunch.

Storage

Store your Candy Cane Chocolate Marshmallows in an airtight container in a cool, dry place. They should last for up to two weeks, although they are often too delicious to resist for that long! If you live in a warmer climate, consider storing them in the refrigerator to prevent the chocolate from melting.

FAQ

Can I use regular chocolate chips instead of chocolate bars?

Yes, you can use chocolate chips if you prefer. They melt just as well and are often more convenient. However, be sure to choose high-quality chips for the best flavor.

How can I prevent the chocolate from seizing while melting?

Ensure that no water or steam comes into contact with the chocolate as it melts. Use a dry bowl and utensils, and melt the chocolate slowly over low heat. Stir continuously to promote even melting.

Can I use this recipe for other holidays?

Absolutely! Simply swap the candy cane pieces for other festive toppings. For example, you could use colored sprinkles for Easter or crushed gingerbread cookies for a cozy winter treat.

Nutrition

These Candy Cane Chocolate Marshmallows are a delightful indulgence. While they are a treat best enjoyed in moderation, they offer a moment of festive joy. Remember, the holidays are about balance and enjoyment!

Conclusion

Candy Cane Chocolate Marshmallows are a festive delight that brings together the best of holiday flavors in one delightful treat. Whether you’re sharing them at a holiday gathering, gifting them to friends, or enjoying them on a quiet evening at home, they are sure to bring smiles and warm memories. I hope this recipe adds a touch of sweetness to your holiday season, just as it has to mine. Happy cooking, and enjoy every delicious bite!

Related update: Candy Cane Chocolate Marshmallows

Related update: Coconut Almond Cheesecake

Related update: Cheesy Potato Corn Scones

Candy Cane Chocolate Marshmallows | Made by Meaghan Moineau

Candy Cane Chocolate Marshmallows | Made by Meaghan Moineau

A Sweet Holiday Treat: Candy Cane Chocolate Marshmallows


Description

Step into the holiday season with a delicious twist on a classic treat: Candy Cane Chocolate Marshmallows. This delightful dessert marries the rich flavors of dark and milk chocolate with the festive crunch of candy canes. Perfect for satisfying sweet cravings or adding a touch of magic to your holiday gatherings, these marshmallows are sure to become a cherished tradition. Easy to make and even easier to enjoy, they are a wonderful way to celebrate the season with family and friends.

Ingredients

- Candy canes

- Dark chocolate


- Marshmallows


- Milk chocolate


Instructions

1. Crush the Candy Canes: Begin by crushing the candy canes into small pieces using the bottom of a glass, a mallet, or any other tool at your disposal. The goal is to create a festive, crunchy topping for your marshmallows.
2. Melt the Chocolate: Set up a double boiler or another method to melt your chocolate without letting it touch the water. Melt together the dark and milk chocolate until smooth and silky.
3. Dip the Marshmallows: Carefully dip each marshmallow into the melted chocolate, ensuring it's well-coated. Immediately roll the chocolate-covered marshmallow in the crushed candy canes, pressing gently so the pieces adhere.
4. Set and Chill: Place each coated marshmallow on wax paper and let them chill in the refrigerator for at least an hour, or until the chocolate hardens completely.
5. Store and Enjoy: Once hardened, store your Candy Cane Chocolate Marshmallows in an airtight container. Enjoy them on their own or dunk them into a steaming mug of hot chocolate for an extra indulgent treat.

A Nostalgic Family Memory


Every holiday season, my family gathered at my grandmother’s cozy kitchen, a place filled with warmth and the aroma of holiday spices. One year, my little sister, in her eagerness to help, accidentally dropped a whole bag of candy canes on the floor. Instead of getting upset, my grandmother saw an opportunity. She took out a rolling pin and showed us how to crush the candy canes into a fine, colorful dust.


We spent the afternoon dipping marshmallows into rich, melted chocolate and rolling them in the crushed candy canes. The kitchen echoed with laughter and the occasional Christmas carol as we created these delightful treats. That day, what could have been a small disaster turned into a cherished family tradition. Every time I make Candy Cane Chocolate Marshmallows, I'm reminded of that cozy kitchen, the laughter, and the sweet spirit of the holidays.


Difficulty: 3/10

This recipe is simple and straightforward, perfect for novice and seasoned cooks alike, making it an ideal project for family bonding.

Classification: Dessert


Candy Cane Chocolate Marshmallows are a delectable dessert, perfect for holiday parties, cozy nights by the fire, or as a sweet homemade gift for loved ones. Enjoy creating this festive treat and making memories that will last a lifetime.

Read more about Appetizers

Read more about Main Dishes

Read more about Desserts