“`html
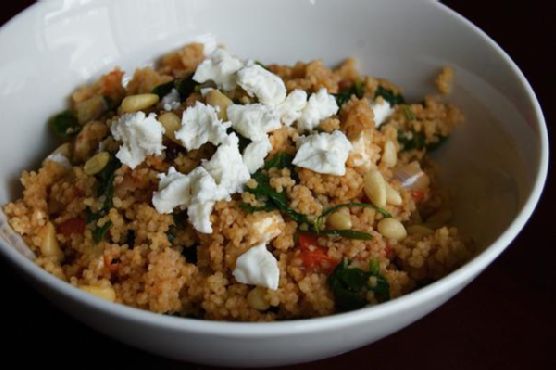
Spinach, Tomato & Onion Couscous
Intro
There’s something special about recipes that transcend time and place, and this Spinach, Tomato & Onion Couscous is one such dish. It always takes me back to summer evenings at my grandmother’s kitchen. I remember the gentle hum of conversation blending with the sound of sizzling onions and the fragrant aroma of tomatoes and spices enveloping the room. It was in those moments that I learned the magic of simple, fresh ingredients coming together to create something greater than the sum of its parts. This couscous dish is a modern twist on the flavors I grew up with—a warm, comforting, and nutritious meal that never fails to bring joy to the table.
Why You’ll Love It
This couscous recipe is a delightful combination of flavors and textures. The earthy spinach pairs beautifully with the sweet, juicy tomatoes and the sharp, creamy feta. Toasted pine nuts add a satisfying crunch, while the whole-wheat couscous serves as a wholesome base. It’s quick to prepare, making it perfect for busy weeknights, yet it’s elegant enough to serve at a dinner party. Whether you’re a seasoned cook or just starting out, you’ll appreciate how effortless and rewarding this dish is to make.
Ingredients
- 1 cup whole-wheat couscous
- 2 tablespoons olive oil
- 1 medium red onion, thinly sliced
- 2 cups fresh spinach, washed and dried
- 2 medium tomatoes, diced
- 1/4 cup pine nuts
- 1/2 cup crumbled feta cheese
- 1 1/2 cups water
- 1 teaspoon salt, divided
- Salt and pepper, to taste
Instructions
- Bring the water, along with half the salt, to a boil in a small pan.
- Once boiling, add the couscous, stir, and cover with a lid. Remove the pot from the heat, and allow it to sit for 5 to 7 minutes while you cook the vegetables.
- Heat a large pan over medium-high heat and add the 2 tablespoons of olive oil. Once the oil is hot, add the onions and sauté until they begin to brown.
- Add the tomatoes and remaining salt and sauté until they begin to wilt, about 20 to 30 seconds.
- Add the spinach and sauté just until it wilts but remains bright green.
- Stir the pine nuts into the vegetable mixture and remove the pan from the heat. Season with salt and pepper to taste.
- Pour the couscous into a large bowl, add the sautéed vegetables along with the crumbled feta, and toss everything together.
- Top with the extra crumbled feta and enjoy while hot.
Tips
For best results, use fresh spinach and ripe tomatoes. If you prefer a stronger flavor, consider using sun-dried tomatoes instead of fresh ones. Toasting the pine nuts before adding them to the dish enhances their flavor profile. Be sure not to overcook the spinach; it should be just wilted and maintain its vibrant green color.
Variations & Substitutions
While this recipe is delicious as is, there are plenty of ways to make it your own. You can substitute quinoa or bulgur for the couscous if you’re looking for a gluten-free option. Add a pinch of red pepper flakes if you enjoy a bit of spice. For a Mediterranean twist, consider adding sliced olives or roasted red peppers. If you’re vegan, you can skip the feta or use a plant-based cheese alternative.
Storage
This dish is best enjoyed fresh, but you can store leftovers in an airtight container in the refrigerator for up to 3 days. To reheat, warm it gently in a pan over low heat or in the microwave. If the couscous has absorbed too much moisture, you can add a splash of water or olive oil to restore its texture.
FAQ
Can I make this dish ahead of time?
Yes, you can prepare the couscous and the vegetable mixture separately and store them in the refrigerator. When you’re ready to serve, combine them and reheat gently. This can save you time, especially if you’re hosting a gathering.
What can I serve with Spinach, Tomato & Onion Couscous?
This dish is versatile and pairs well with grilled chicken, fish, or tofu. A simple green salad or roasted vegetables would complement it nicely. You can also serve it as a standalone vegetarian main course.
Is this recipe kid-friendly?
Absolutely! The flavors are mild and approachable, making it a hit with kids. You might want to chop the spinach and tomatoes into smaller pieces for younger children. It’s a great way to introduce them to new vegetables and whole grains.
Nutrition
This recipe is not only delicious but also nutritious. It’s packed with fiber from the whole-wheat couscous and spinach, healthy fats from the olive oil and pine nuts, and protein from the feta cheese. It’s a well-rounded meal that will keep you satisfied and nourished.
Conclusion
Spinach, Tomato & Onion Couscous is more than just a meal; it’s an experience that brings together the warmth of family gatherings and the joy of sharing good food. I hope this recipe brings as much happiness to your kitchen as it does to mine. Whether you’re making it for a casual dinner or a special occasion, it’s sure to be a hit. Enjoy the rich flavors, the vibrant colors, and the comforting nostalgia in every bite. Happy cooking!
“`
Related update: Spinach, Tomato & Onion Couscous
Related update: Ratatouille With Brie