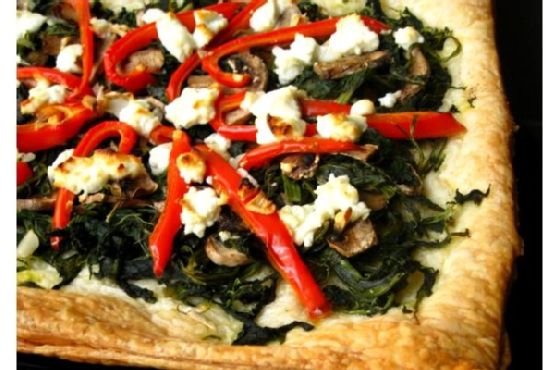
Eggplant Pizzette: A Delightful Twist on a Classic Dish
Intro
Eggplant pizzette has always held a special place in my heart. I vividly remember visiting my grandmother’s kitchen on summer afternoons, the air thick with the scent of fresh basil and the sizzle of tomatoes simmering on the stove. As a child, I would eagerly await her signature eggplant pizzette, a dish that never failed to bring the family together around the table. This recipe, inspired by her culinary magic, offers a modern twist on a cherished classic, ideal for both intimate gatherings and solo indulgence.
Why You’ll Love It
Eggplant pizzette is an innovative and delightful dish that brings together the best of both worlds: the comforting flavors of pizza and the health benefits of fresh vegetables. Whether you’re a lifelong vegetarian or simply looking to incorporate more plant-based meals into your diet, this recipe is a winner. It’s simple to prepare, requires minimal ingredients, and is perfect for a quick appetizer or a light, satisfying meal. You’ll love the way the creamy eggplant pairs with the fresh, zesty tomatoes and aromatic herbs, all topped with a layer of melted Swiss cheese for that extra touch of indulgence.
Ingredients
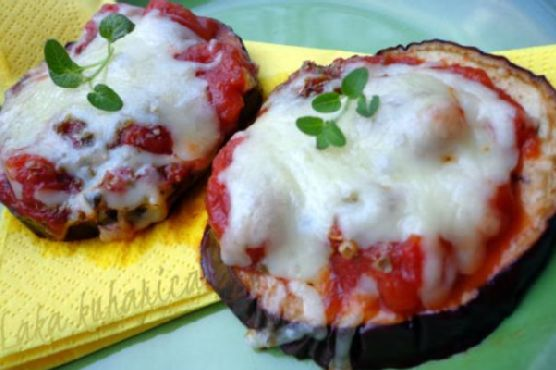
- Round eggplant
- Tomatoes
- Swiss cheese
- Fresh basil leaves
- Fresh oregano leaves
Instructions
- Preheat your oven to 230°C (450°F) and prepare a non-stick pan by greasing it lightly with olive oil.
- Slice the eggplant into rounds, about 1/2 inch thick, and arrange them in the prepared pan.
- Bake the eggplant rounds in the oven for 10 minutes. This will soften them and bring out their natural flavors.
- Remove the pan from the oven, leaving the baked eggplant inside to retain its warmth.
- On each eggplant round, place a spoonful of chopped tomatoes, ensuring even coverage.
- Sprinkle fresh basil and oregano leaves over the tomatoes for a burst of herbal aroma.
- Top each round with a generous amount of grated Swiss cheese.
- Return the pan to the oven and bake for an additional 5 minutes. Watch closely until the cheese is melted and golden brown.
- Remove from the oven and allow to cool slightly before serving. Enjoy your pizzette warm or cooled as a delightful appetizer or small meal.
Tips
To make your eggplant pizzette truly shine, ensure that the eggplants are fresh and firm to the touch. If you prefer a slightly thicker texture, you can leave the eggplant rounds a bit thicker, but adjust the initial baking time accordingly. Also, feel free to experiment with the cheese; while Swiss cheese is recommended for its mild flavor, mozzarella or provolone can be great substitutes for a different taste experience.
Variations & Substitutions
The beauty of eggplant pizzette is its versatility. You can easily customize it to suit your taste preferences or dietary needs. For a vegan version, simply replace the Swiss cheese with your favorite plant-based cheese. If you’re looking for a spicier kick, add a sprinkle of red pepper flakes or a dash of hot sauce. Additionally, you can incorporate other toppings like olives, roasted red peppers, or caramelized onions to add more depth to the dish.
Storage
If you have leftovers, store them in an airtight container in the refrigerator for up to three days. To reheat, place the pizzette in a preheated oven at 180°C (350°F) for about 5 minutes, or until they are warmed through. Avoid microwaving, as it may cause the eggplant to become too soggy.
FAQ
Can I make the eggplant pizzette ahead of time?
Yes, you can prepare the eggplant rounds and toppings ahead of time. Assemble them right before the second baking stage to ensure the cheese melts perfectly and the flavors remain vibrant.
What can I serve with eggplant pizzette?
Eggplant pizzette pairs beautifully with a fresh green salad or a light pasta dish. You can also serve them alongside a charcuterie board for a more substantial appetizer spread.
Is eggplant a good substitute for pizza dough?
Absolutely! Eggplant offers a nutritious and gluten-free alternative to traditional pizza dough. It’s lower in calories and carbohydrates, making it a healthier option without compromising on flavor.
Nutrition
Eggplant pizzette is a nutritious dish, rich in fiber and essential vitamins. Eggplants are a good source of antioxidants and can help in maintaining heart health. Fresh tomatoes and herbs add to the nutritional profile with vitamins C and K, while Swiss cheese provides a good dose of calcium and protein.
Conclusion
Eggplant pizzette is more than just a recipe; it’s a culinary journey that marries tradition with creativity. Whether you’re recreating a childhood memory or discovering a new favorite dish, this recipe promises satisfaction in every bite. Enjoy this delightful twist on a classic, and don’t forget to share the experience with loved ones. Cooking is, after all, an act of love, and what better way to express it than with delicious food!
Related update: Eggplant pizzette
Related update: Honey Dijon Roasted Brussels Sprout