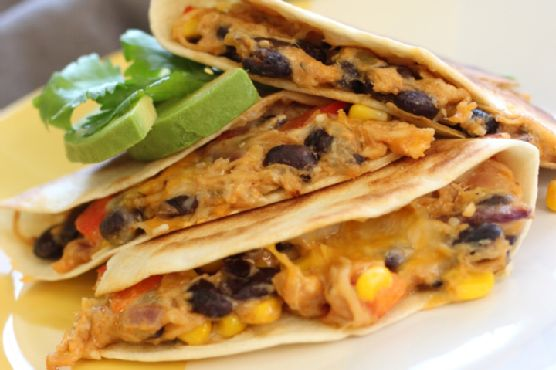
Ginger Lentils With Carrots and Fresh Herbs | Made by Meaghan Moineau

Ginger Lentils With Carrots and Fresh Herbs | Made by Meaghan Moineau

A Symphony of Flavors: Ginger Lentils with Carrots and Fresh Herbs


A Culinary Journey Down Memory Lane


Have you ever stumbled upon a dish that not only tantalizes your taste buds but also transports you back to cherished moments from the past? Our recipe for Ginger Lentils with Carrots and Fresh Herbs is one such culinary masterpiece. It's a delightful blend of vibrant ingredients that tells a story of tradition, warmth, and nostalgia, all in one bowl.


Description


Discover the zestful symphony of flavors in our Ginger Lentils with Carrots and Fresh Herbs. This dish combines the earthy richness of lentils with the zesty brightness of fresh ginger, creating a harmonious balance that is both comforting and invigorating. Carrots, sautéed with aromatic cumin seeds, add a subtle sweetness, while fresh mint leaves lend a refreshing touch. The creamy avocado and tangy lemon juice bring all the elements together, creating a dish that is as wholesome as it is delicious. Perfect as a main dish, this recipe is a celebration of seasonal produce and simple, nourishing ingredients.


Ingredients


- 1 avocado, diced


- 2 medium carrots, peeled and sliced


- 1 teaspoon cumin seeds


- 1 tablespoon fresh ginger, peeled and grated


- A handful of fresh mint leaves, chopped


- Juice of 1 lemon


- 1 cup lentils, cooked


- 1 tablespoon raw honey


- Sea salt, to taste


Instructions


1. Begin by peeling and slicing the carrots. In a skillet, sauté the carrot slices with cumin seeds over medium heat for about 15 minutes, or until they are tender and aromatic. Remove from the heat and let them cool.


2. While the carrots are cooling, peel and grate the fresh ginger. In a small bowl, combine the grated ginger with the juice of one lemon, raw honey, fresh mint, and sea salt. Taste the dressing and adjust the seasoning to your liking.


3. In a large mixing bowl, combine the sautéed carrots, cooked lentils, and diced avocado. Pour the ginger-mint dressing over the mixture and toss gently to ensure everything is well coated.


4. Serve immediately, and enjoy the medley of flavors and textures.


A Nostalgic Family Memory


As I prepare this dish, I'm reminded of lazy Sunday afternoons spent in my grandmother's kitchen. Her home was always filled with the comforting aroma of spices and the sound of laughter. She had a knack for turning simple ingredients into extraordinary dishes, much like this one. I remember sitting at her kitchen table, eagerly waiting for a taste of whatever she was cooking. It was in her kitchen that I learned the art of balancing flavors and appreciating the beauty of fresh, wholesome ingredients.


This recipe is a tribute to those times and to the love and warmth that my grandmother infused into every meal she made. Each bite of these ginger lentils brings me back to those cherished moments, reminding me of the importance of family, tradition, and good food.


Difficulty


Rated 4 out of 10, this recipe is accessible to cooks of all skill levels.


Classification


This flavorful dish makes a satisfying and nutritious main dish, perfect for a cozy dinner or a special family gathering.


---


Whether you're cooking for your family or simply seeking a delicious meal to enjoy on your own, our Ginger Lentils with Carrots and Fresh Herbs is sure to delight. With its vibrant ingredients and nostalgic roots, it's more than just a dish—it's a journey back to the heart of home cooking.

Read more about Appetizers

Read more about Main Dishes

Read more about Desserts

Lemon Chickpea & Tomato Stew | Made by Meaghan Moineau

Lemon Chickpea & Tomato Stew | Made by Meaghan Moineau

Delightful Comfort: Lemon Chickpea & Tomato Stew
Description:

Indulge in the heartwarming flavors of our Lemon Chickpea & Tomato Stew, a dish that combines the vibrant essence of fresh ingredients with the nostalgia of cherished family gatherings. This stew, lovingly crafted with aromatic herbs and zesty lemon, offers a delightful culinary experience that transports you back to cozy family dinners. Perfect as a main dish, it pairs wonderfully with warm crusty bread, making it a comforting choice for any occasion.


---


A Nostalgic Journey Through Flavor

The aroma of lemon zest mingling with garlic and oregano wafting through the kitchen instantly takes me back to my grandmother's cozy home on a chilly autumn evening. She would often prepare her signature Lemon Chickpea & Tomato Stew, a dish that became a staple at our family gatherings. As the stew simmered gently on the stove, we would gather around the kitchen table, the warmth of the oven-dried tomatoes and the subtle heat of the jalapeño chili creating an inviting atmosphere.


I remember my grandmother recounting tales of her own childhood, how this dish was a symbol of love and togetherness in her home. The tangy burst of fresh lemon zest combined with the hearty chickpeas and rich chicken broth created a symphony of flavors that brought comfort to the soul. Each spoonful was a reminder of the love and laughter shared around the table, a tradition I now carry forward with my own family.


---


Lemon Chickpea & Tomato Stew Recipe
Ingredients:

- Olive oil


- 1 shallot, finely chopped


- 2 garlic cloves, minced


- 1 canned chickpeas, drained and rinsed


- 1 jalapeño chili, sliced


- 1/2 teaspoon dried oregano


- 1 bay leaf, broken


- 1/4 teaspoon crushed red pepper


- Salt & pepper to taste


- 4 cups chicken broth


- Zest and juice of 1 fresh lemon


- 1/2 cup dried oven tomatoes


- 2 cups fresh spinach, loosely packed


Instructions:

1. In a large saucepan, heat the olive oil over medium heat. Add the shallot and garlic, cooking until soft, about 5 minutes.


2. Stir in the chickpeas, jalapeño chili, oregano, bay leaf, and crushed red pepper. Season with salt and pepper. Cook, stirring frequently, until the herbs are fragrant and the chickpeas are hot and starting to brown, about 5-7 minutes.


3. Pour in the chicken broth, lemon zest, and lemon juice. Bring to a boil, then reduce the heat and simmer until the broth is reduced by half, about 20 minutes.


4. Stir in the dried oven tomatoes, garlic, and spinach. Simmer for an additional 5 minutes.


5. Remove the bay leaf, adjust seasoning with salt and pepper, and serve hot with warm crusty bread.


Difficulty Rating: 4/10
Classification: Main Dish

This Lemon Chickpea & Tomato Stew is not just a meal; it's a heartfelt tribute to family traditions and the joy of sharing a delicious dish with loved ones. Its simple preparation and rich flavor profile make it an ideal choice for any home cook looking to create lasting memories around the dinner table. Enjoy this delightful stew and let it become a cherished part of your own family gatherings.

Read more about Appetizers

Read more about Main Dishes

Read more about Desserts

Roasted Brussels Sprouts With Red Onions and Pancetta | Made by Meaghan Moineau

Roasted Brussels Sprouts With Red Onions and Pancetta | Made by Meaghan Moineau

**Title: "A Taste of Home: Roasted Brussels Sprouts with Red Onions and Pancetta"**


**Description: Discover the heartwarming flavors of Roasted Brussels Sprouts with Red Onions and Pancetta, a recipe that combines savory pancetta, aromatic garlic, and crispy bread crumbs for a delightful dish. Perfect as an appetizer or a comforting main dish, this recipe will transport you to cherished family gatherings with every bite.**


---


There's something undeniably comforting about the aroma of roasted Brussels sprouts wafting through the kitchen. It’s a scent that transports me back to cozy family gatherings during the chilly months, where we would gather around the dining table, eager to dig into a meal that always felt like a warm embrace. One dish that stood out amidst the spread was my grandmother's Roasted Brussels Sprouts with Red Onions and Pancetta. It wasn’t just a dish; it was a staple that held a special place in our hearts and on our plates.


**Ingredients:**


- Brussels sprouts


- Pancetta


- Garlic


- Olive oil


- Bread


**Instructions:**


1. Preheat your oven to 350 degrees Fahrenheit. In a large plastic zippered bag, toss the Brussels sprouts with 3 pressed garlic cloves and 2 tablespoons of olive oil. Shake well to ensure even coating.


2. Empty the contents into an ovenproof dish and roast for 40 minutes. The Brussels sprouts should be tender with a slight char that enhances their natural sweetness.


3. While the Brussels sprouts are roasting, heat 1/4 cup of olive oil in a pan. Once heated, sauté a slice of bread until browned on both sides. Set aside to cool and become crisp.


4. When the Brussels sprouts are done, return to the pan used for the bread. Add the red onions and sauté for about 3 minutes. Be cautious not to let them become fully tender; they should retain a subtle crunch.


5. Introduce the pancetta to the pan, allowing it to heat through for an additional minute. The pancetta should be aromatic and slightly crispy.


6. Add the roasted Brussels sprouts to the pan and heat through for another 3 minutes. This will allow the flavors to meld beautifully.


7. Remove from heat. In a food processor, blend the sautéed bread with 1-2 cloves of garlic. This will create a fragrant, crunchy topping.


8. Sprinkle the garlic bread crumbs over the Brussels sprouts mixture and finish with a final drizzle of olive oil for added richness.


What I love about this dish is its simplicity and the way it brings people together. My grandmother used to say that the secret ingredient was love, and I wholeheartedly believe her. The combination of the savory pancetta with the slight bitterness of the Brussels sprouts, balanced by the sweetness of the onions and the crunch of the garlic-infused bread crumbs, creates a symphony of flavors that is both nostalgic and comforting.


This recipe, with its robust flavors and comforting taste, is rated a 4 out of 10 in difficulty—making it accessible to both novice and experienced cooks. It can be served as a delightful appetizer to whet the appetite, or as a main dish that stands proudly at the center of any meal.


So, if you are looking to recreate a dish that is as rich in flavor as it is in family history, give this Roasted Brussels Sprouts with Red Onions and Pancetta a try. It’s not just about cooking; it’s about creating memories that will be cherished for generations to come.

Read more about Appetizers

Read more about Main Dishes

Read more about Desserts

Cheesy Spinach Stuffed Shells | Made by Meaghan Moineau

Cheesy Spinach Stuffed Shells | Made by Meaghan Moineau

### Title: Delightfully Cheesy Spinach Stuffed Shells: A Comforting Family Classic


#### Description: Dive into the rich flavors of Cheesy Spinach Stuffed Shells, a wholesome and delicious main dish that brings families together. Discover the simple steps to create this comforting meal, and enjoy a nostalgic tale of family gatherings centered around this beloved recipe. Perfect for a cozy night in, this dish is sure to become a cherished favorite.


---


### Cheesy Spinach Stuffed Shells: A Wholesome Family Favorite


There's something undeniably comforting about a pan of cheesy, saucy stuffed shells fresh out of the oven. The aroma fills the kitchen, and suddenly, it feels as though every corner of the house is wrapped in a warm, loving embrace. This recipe for Cheesy Spinach Stuffed Shells is not just about the delightful combination of flavors, but it’s also about the memories it creates and the love it represents.


#### Ingredients:


- Jumbo shells


- Cooked frozen spinach


- Wheat germ


- Shredded parmesan cheese


- Pecans


- Shredded Mexican cheese


- Diced green onions


- Salt


- Dried basil


- Eggs


- Water


- Alfredo sauce


- Spaghetti sauce


#### Instructions:


1. **Prepare the Shells**: Begin by pre-boiling your jumbo shells in a large pot of salted water. Cook them for about 9 minutes, then drain them face down on a paper towel to remove excess moisture.


2. **Create the Filling**: While the shells cook, prepare the filling by microwaving the frozen spinach according to the package instructions, without adding water. Once thawed, mix in wheat germ, parmesan cheese, shredded Mexican cheese, chopped pecans, and diced green onions. Season with salt, pepper, and dried basil to taste. For a unique twist, a pinch of nutmeg can be added as well.


3. **Combine Ingredients**: Add in two eggs and a splash of water, mixing until the eggs are fully incorporated into the spinach mixture. Stuff each shell with this delicious filling.


4. **Assemble the Dish**: Grease an 8 x 8 (or 9 x 1) baking pan with cooking spray. Spread a layer of Alfredo sauce on the bottom, followed by spaghetti sauce. Arrange the stuffed shells over the sauce, then top with the remaining sauce.


5. **Bake and Serve**: Place the dish in a preheated 350-degree oven, uncovered, and bake for 30-35 minutes until the sauce is bubbly. Serve hot, and enjoy!


#### Nostalgic Family Memory:


I remember the first time my grandmother taught me how to make these Cheesy Spinach Stuffed Shells. It was a chilly Sunday afternoon, and the entire family was gathered at her cozy kitchen. The snow was gently falling outside, but inside, the warmth from the oven and the laughter shared over mixing bowls made the world feel just right.


Grandma had a way of making cooking feel like an art, and her love for family meals was evident in every dish she prepared. As we stuffed the shells together, she shared stories of her childhood and how her own mother would prepare this dish for family gatherings. It was a tradition passed down through generations, each shell filled with not just ingredients but with love and memories.


#### Difficulty: 4/10


#### Classification: Main Dish


This recipe for Cheesy Spinach Stuffed Shells is an easy-to-follow main dish perfect for a family dinner or a cozy night in. With its simple instructions and familiar flavors, it's a delightful way to bring everyone together around the dinner table. Whether you're creating new memories or reminiscing about old ones, this dish is sure to become a cherished part of your family's culinary tradition.

Read more about Appetizers

Read more about Main Dishes

Read more about Desserts

Spicy Seasoned Loaded Guacamole | Made by Meaghan Moineau

Spicy Seasoned Loaded Guacamole | Made by Meaghan Moineau

**Title: Unleashing Flavor: The Art of Crafting Spicy Seasoned Loaded Guacamole**


**Description:**


Dive into the vibrant world of flavors with our Spicy Seasoned Loaded Guacamole. This recipe transforms simple avocados into a fiesta of tastes with the perfect balance of heat and zest. Join me on a nostalgic journey as I share a cherished family memory linked to this beloved appetizer. With a difficulty rating of 3 out of 10, this dish is perfect for any occasion, whether you’re hosting a party or simply enjoying a cozy night in.


---


**Blog Post:**


When it comes to appetizers that steal the show, guacamole is undeniably a front-runner. There's something magical about the creamy texture of avocados enhanced by a medley of spices and fresh ingredients. Today, I invite you to experience a personal favorite: Spicy Seasoned Loaded Guacamole. This recipe not only excites the taste buds but also carries a piece of my family history, making it all the more special.


### A Nostalgic Journey


Growing up, Sunday afternoons were a sacred time in my family. It was a day dedicated to relaxation, laughter, and, most importantly, coming together over good food. My grandmother, a culinary wizard, always had the knack for taking simple ingredients and turning them into something extraordinary. Her guacamole was legendary, and I still remember the first time I watched her make it.


In her sunlit kitchen, the air was thick with anticipation. As she mashed the avocados with a well-loved fork, she would tell stories of her childhood in Mexico, where avocados were a staple at every meal. Her secret, she revealed with a wink, was a splash of white wine vinegar—a twist that added unexpected brightness to the dish.


The entire family would gather around the table, eagerly scooping up the guacamole with homemade tortilla chips. The conversation flowed as freely as the laughter, each bite a reminder of our shared heritage and the love that bound us together. Those afternoons left an indelible mark on my heart, and every time I make this guacamole, I feel my grandmother’s presence, guiding my hands and warming my spirit.


### Crafting the Perfect Guacamole


**Ingredients:**


- 2 ripe avocados


- 1 tablespoon lime juice


- 1 teaspoon white wine vinegar


- 1/4 cup finely chopped red onion


- 1 finely chopped serrano pepper (adjust for desired heat)


- 2 tablespoons chopped cilantro


- 1/2 cup diced Roma tomato


- Salt and black pepper to taste


- 1/2 teaspoon cumin


- 1/4 teaspoon garlic powder


**Instructions:**


1. In a medium bowl, begin by mashing the avocados until smooth yet chunky, achieving that perfect creamy consistency.


2. Mix in the lime juice and white wine vinegar, which not only enhance the flavor but also keep the guacamole vibrant and green.


3. Stir in the salt, black pepper, cumin, and garlic powder, ensuring each spice is evenly distributed to create a harmonious blend.


4. Incorporate the red onion, serrano pepper, cilantro, and diced Roma tomato, stirring gently to maintain the integrity of the ingredients.


5. Serve immediately for the freshest taste, or cover with plastic wrap directly on the surface to prevent browning if preparing ahead.


### Why You'll Love It


This Spicy Seasoned Loaded Guacamole is more than just an appetizer—it's an experience. The heat from the serrano pepper, the tang of vinegar and lime, and the aromatic spices come together in a dance of flavors that is as exciting as it is comforting. It’s a dish that invites you to slow down, savor each bite, and perhaps even create your own cherished memories around the table.


With a difficulty rating of 3 out of 10, this recipe is accessible to chefs of all levels, ensuring that anyone can recreate this family treasure. Whether you're hosting a lively gathering or enjoying a quiet evening, this guacamole is sure to impress.


So, next time you find yourself reaching for avocados at the market, remember this recipe and the warmth of shared stories and flavors. It’s a reminder that the simplest ingredients often hold the most profound connections. Enjoy!

Read more about Appetizers

Read more about Main Dishes

Read more about Desserts

Gingerbread | Made by Meaghan Moineau

Gingerbread | Made by Meaghan Moineau

**Title: "Grandma's Timeless Gingerbread: A Warm Slice of Family Tradition"**


**Description:** Dive into the rich, aromatic world of gingerbread with this classic recipe that has been lovingly passed down through generations. Infused with the comforting flavors of molasses and spices, this gingerbread is not just a dessert—it's a piece of family history. Perfect for creating new memories or reliving cherished ones, this recipe is simple enough for a cozy weekend bake and special enough for festive gatherings.


---


There's something magical about the smell of gingerbread baking in the oven. For me, it immediately conjures up memories of my grandmother's kitchen, a warm haven filled with the symphony of spices and laughter. Every holiday season, my family comes together to recreate Grandma’s legendary gingerbread, a tradition that binds us across time and generations.


**Ingredients:**


- 1 cup molasses


- 1 teaspoon salt


- 2 eggs


- 1/2 cup salad oil


- 1 cup sugar


- 1 teaspoon soda


- 1 cup boiling water


- 2 1/2 cups flour


- 1 teaspoon ginger


- 1 teaspoon cinnamon


**Instructions:**


1. **Begin the Journey:** Start by preheating your oven to 350 degrees. In a large mixing bowl, combine the molasses, salad oil, sugar, ginger, cinnamon, and salt. Stir together these ingredients, allowing their fragrances to mingle and fill the air with nostalgia.


2. **Add a Touch of Love:** Crack in the eggs and beat the mixture until smooth. This step was always my favorite as a child, eagerly watching the transformation under Grandma's expert hands.


3. **The Secret Ingredient:** Dissolve the soda in 1/8 cup of boiling water, then stir it into the mixture. This little trick was Grandma’s secret to creating a perfectly airy texture.


4. **Create the Canvas:** Gradually add the flour and the remaining water, stirring gently. The batter will be thin, but don't worry—it's exactly how it should be.


5. **Bake to Perfection:** Pour the batter into a 9"x13" pan and bake until done. The anticipation builds as the spicy aroma wafts through every corner of the house.


6. **Optional Glaze:** To add an extra layer of decadence, prepare the glaze. Melt 1 stick of butter in a saucepan, add 1/4 cup milk and 1 cup brown sugar, and bring to a boil. Let it bubble away for about four minutes before drizzling generously over the gingerbread.


**Nostalgic Memory:**


One chilly afternoon, as the snowflakes danced outside, I sat by the kitchen table watching Grandma prepare her famous gingerbread. She shared stories of her childhood, her eyes twinkling with joy. Each slice of gingerbread was a gateway to the past, a comforting reminder of the enduring bonds of family. There was something inherently special about knowing that this simple recipe had brought warmth to so many generations before me.


**Difficulty Rating:** 3/10


**Classification:** Dessert


---


Whether served hot with a dollop of whipped cream or enjoyed cold with a steaming cup of tea, this gingerbread is more than just a dessert; it's a testament to the enduring power of family traditions. As you bake, may the memories of loved ones fill your heart and home with warmth and cheer. Happy baking!

Read more about Appetizers

Read more about Main Dishes

Read more about Desserts

White Chocolate Macadamia Banana Bread

# White Chocolate Macadamia Banana Bread: A Sweet Nostalgia

There's something profoundly comforting about the aroma of banana bread wafting through the house. It's a scent that encapsulates warmth, love, and a touch of nostalgia. Today, I'm excited to share a recipe that elevates the classic banana bread to a whole new level of decadence: White Chocolate Macadamia Banana Bread. This delightful treat is perfect for dessert or a sweet afternoon snack, and it comes with a story close to my heart.

## A Slice of Family History

Growing up, my grandmother was the matriarch of our kitchen, known for her unrivaled baking skills and a knack for turning simple ingredients into magic. Every Sunday, her home transformed into a cozy bakery, with breads and pastries lining the countertops. Among her repertoire, banana bread was a staple, a reliable comfort that never failed to bring smiles to our faces.

One day, Grandma decided to experiment with her classic banana bread recipe. Inspired by a visit to the local bakery, she added chunks of creamy white chocolate and crunchy macadamia nuts to her trusty mix. The result was a revelation—a loaf that was simultaneously familiar and new, rich with the sweetness of white chocolate and the buttery crunch of macadamia nuts. It quickly became a family favorite, a recipe passed down through generations, always reminding us of those warm Sundays in Grandma's kitchen.

## White Chocolate Macadamia Banana Bread Recipe

### Ingredients

- Granulated sugar

- Butter

- Banana

- Milk

- Low-fat cream cheese

- Eggs

- All-purpose flour

- Baking soda

- Kosher salt

- Salted macadamia nuts

- White chocolate chips

### Instructions

1. **Preheat the Oven**: Set your oven to 350 degrees Fahrenheit.

2. **Prepare the Wet Ingredients**: In the bowl of an electric mixer, combine the granulated sugar and butter. Beat at medium speed until the mixture becomes fluffy.

3. **Mix in the Additions**: On low speed, add the banana, milk, cream cheese, and eggs. Continue mixing until everything is well combined.

4. **Prepare the Dry Ingredients**: In a separate small bowl, whisk together the all-purpose flour, baking soda, and kosher salt.

5. **Combine Wet and Dry Ingredients**: Keeping the mixer on low speed, slowly add the dry ingredients to the wet ingredients. Beat just until the mixture is blended.

6. **Add the Extras**: Stir in the salted macadamia nuts and white chocolate chips briefly to distribute them evenly throughout the batter.

7. **Bake the Bread**: Pour the batter into a 9x5 inch metal loaf pan coated with cooking spray. Bake at 350 degrees for 1 hour or until a toothpick inserted into the center comes out clean.

8. **Cool and Enjoy**: Allow the bread to cool in the pan for 10 minutes on a wire rack. Then, remove it from the pan and let it cool completely on the rack before slicing and serving.

## Difficulty Rating

This recipe scores a 4 out of 10 on the difficulty scale. It's straightforward enough for novice bakers to tackle, yet it results in a beautifully moist and flavorful loaf that feels like a professional bake.

## A Dessert to Remember

Whether you're looking to recreate cherished family memories or simply indulge in a slice of something sweet and satisfying, this White Chocolate Macadamia Banana Bread is the perfect dessert to try. With its rich flavors and heartwarming story, it's sure to become a beloved addition to your baking repertoire, just as it did in my family. Enjoy a slice of nostalgia with every bite!

Creamy White Chili

I remember the first time I tried my grandma's Creamy White Chili. It was a cold winter day and she had spent hours in the kitchen preparing this warm and comforting dish for our family. The aroma of the chicken, beans, and spices filled the house, creating a cozy and inviting atmosphere. As we all sat down to enjoy this delicious meal together, I knew that this recipe would become a family favorite for years to come.

Ingredients:

- 1 lb chicken, diced

- 1 onion, chopped

- 2 cloves garlic, minced

- 1 can great northern beans, drained and rinsed

- 1 can chicken broth

- 1 can green chilies

- 1 tsp cumin

- 1 tsp oregano

- 1/2 tsp black pepper

- 1/2 tsp salt

- 1/2 cup heavy whipping cream

- 1/4 cup sour cream

- 1/4 cup shredded cheddar cheese

- 1 tbsp olive oil

Instructions:

1. In a heavy saucepan, sauté chicken, onion, and garlic in olive oil until chicken is cooked.

2. Add chicken broth, beans, green chilies, cumin, oregano, black pepper, and salt. Simmer on low heat for 20 minutes.

3. Remove from heat and stir in heavy whipping cream and sour cream.

4. Top with shredded cheddar cheese before serving.

Making this Creamy White Chili recipe is relatively easy, with a difficulty rating of 5 out of 10. It is a hearty and satisfying main dish that is perfect for a cozy family dinner or a gathering with friends. The creamy texture and flavorful spices make it a standout dish that will become a favorite in your household as well. Enjoy!