Glazed pork chops | Made by Meaghan Moineau

Glazed Pork Chops

Intro

There’s something inherently comforting about a well-cooked pork chop. It takes me back to my childhood, where weekends meant family gatherings and the aroma of sizzling pork filling the air. My grandmother had a way with pork chops that was legendary in our family. Her secret? A perfectly balanced glaze that complemented the savory richness of the meat. Today, I’m excited to share a recipe inspired by those cherished memories, with a modern twist that brings out the best in each ingredient. These glazed pork chops are sure to become a favorite in your household, just as they were in mine.

Why You’ll Love It

This recipe for glazed pork chops is a delightful combination of sweet and savory flavors that will leave your taste buds singing. The succulent pork, paired with a rich glaze of honey, soy sauce, and balsamic vinegar, creates a dish that’s both satisfying and elegant. It’s a perfect choice for a weeknight dinner yet impressive enough to serve to guests. The simplicity of the preparation ensures that you can enjoy all the deliciousness without spending hours in the kitchen. Plus, the combination of tender meat and a luscious glaze is simply irresistible.

Ingredients

  • Balsamic vinegar
  • Black pepper
  • Butter
  • Cornstarch
  • Garlic cloves
  • Fresh green onions
  • Honey
  • Lean boneless pork chops
  • Soy sauce

Instructions

  1. Press one side of each chop into the black pepper.
  2. Heat a nonstick grill skillet until hot. Add pork chops, pepper side down, and cook about 4 minutes or until browned.
  3. Reduce heat to medium, turn pork chops, and cook for 6-8 minutes longer.
  4. When done, take the skillet from the heat, cover the pork chops, and set aside.
  5. Meanwhile, mix honey, soy sauce, balsamic vinegar, and cornstarch until smooth. Add the cracked pepper and stir.
  6. Melt the butter in a small pan, add garlic, and cook for 30 seconds, stirring constantly.
  7. Stir the honey mixture into the pan, let it boil, and cook for 1 minute, stirring.
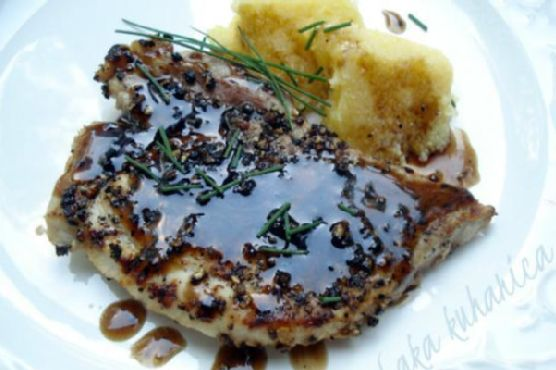
  8. Spoon the sauce over the pork chops, sprinkle with fresh chives or green onions, and serve with polenta and a green salad.

Tips

For the best results, make sure your pork chops are of even thickness. This ensures they cook evenly and stay juicy. If you have thicker chops, you may need to adjust the cooking time slightly. Also, when making the glaze, keep stirring to prevent the cornstarch from clumping. Fresh garlic will provide the best flavor, so try to avoid using pre-minced varieties.

Variations & Substitutions

If you’re looking to switch up the flavors, consider using maple syrup in place of honey for a deeper, more caramel-like flavor profile. For those who prefer a bit of heat, a pinch of red pepper flakes in the glaze can add a delightful kick. Soy sauce can be substituted with tamari for a gluten-free option, and if you’re out of balsamic vinegar, apple cider vinegar makes a tangy alternative.

Storage

Leftover glazed pork chops can be stored in an airtight container in the refrigerator for up to three days. To reheat, place them in a skillet over medium-low heat until warmed through. You can also freeze the cooked chops for up to three months; just be sure to thaw them in the refrigerator overnight before reheating.

FAQ

Can I use bone-in pork chops for this recipe?

Yes, you can certainly use bone-in pork chops. Keep in mind that they may require a bit more cooking time to ensure they are cooked through. The bone can also add extra flavor to the meat.

What side dishes go well with glazed pork chops?

These glazed pork chops pair beautifully with polenta and a fresh green salad, as mentioned in the recipe. Other excellent side options include roasted vegetables, mashed potatoes, or a simple rice pilaf to soak up the delicious glaze.

Nutrition

This recipe is not only delicious but can be part of a balanced meal. Pork is a great source of lean protein, and the glaze, while indulgent, uses natural sweeteners like honey. Just be mindful of portion sizes, especially if you’re watching your sugar intake.

Conclusion

These glazed pork chops are a delightful homage to a classic comfort food, with a modern twist that elevates them to something truly special. Whether you’re cooking for family, friends, or just treating yourself to a night in, this recipe is sure to deliver on flavor and satisfaction. I hope these pork chops bring warmth and joy to your table, just as they have to mine. Enjoy!

Related update: Glazed pork chops

Related update: Thai Street Vendor Salmon Skewers

Ground Turkey Stuffed Peppers | Made by Meaghan Moineau

Ground Turkey Stuffed Peppers

Intro

Growing up, Sundays at my grandmother’s house were always filled with the comforting aroma of hearty meals cooking on the stove. One of her signature dishes was stuffed peppers, a recipe she had perfected over decades. The vibrant colors of the peppers, filled to the brim with savory goodness, never failed to bring the whole family to the table. I’ve since adapted this beloved recipe to include ground turkey, making it a bit leaner while still preserving the rich flavors that made it a family favorite. Today, I’m excited to share this cherished recipe with you, hoping it brings warmth and joy to your home as it has to mine.

Why You’ll Love It

This Ground Turkey Stuffed Peppers recipe is more than just a meal; it’s a comforting, wholesome experience. The combination of tender bell peppers filled with a savory mixture of ground turkey, rice, and spices creates a delightful balance of flavors and textures. You’ll love how this dish is not only delicious but also nutritious, making it perfect for a family dinner or a cozy night in. Plus, the ease of preparation in a slow cooker or stove-top pot makes it an accessible recipe for cooks of all levels.

Ingredients

  • 6 large bell peppers
  • 1 teaspoon black pepper
  • 1 can (15 oz) canned tomato sauce
  • 1 can (14.5 oz) diced canned tomatoes
  • 1 tablespoon dried parsley
  • 2 large eggs
  • 3 cloves garlic, minced
  • 1 pound ground turkey
  • 1/2 pound ground beef
  • 1 medium diced onion
  • 1/2 cup grated parmesan cheese, plus more for topping
  • 1 cup cooked rice
  • 1 tablespoon sugar
  • 1 can (10.75 oz) canned tomato soup
  • 2 tablespoons Worcestershire sauce

Instructions

  1. Begin by cooking the rice according to package instructions. Allow it to cool slightly.
  2. In a large mixing bowl, combine the cooked rice, ground turkey, ground beef, diced onion, minced garlic, eggs, black pepper, and half of the grated parmesan cheese. Knead together until evenly mixed.
  3. Prepare the bell peppers by cutting off their tops and removing the seeds and membranes inside.
  4. Stuff each pepper with the meat and rice mixture, pressing it down gently to fill completely.
  5. In a separate bowl, mix together the canned tomato sauce, diced tomatoes, sugar, Worcestershire sauce, and dried parsley. This will be your sauce.
  6. Place the stuffed peppers in your slow cooker or a large stove-top pot. Spoon some of the sauce over each pepper, then pour the remaining sauce around them.
  7. Cover and cook on medium/low heat for about an hour, or until the peppers are tender and the filling is cooked through.
  8. Before serving, top each pepper with a sprinkle of the remaining parmesan cheese and a bit of parsley for garnish.
  9. Serve warm and enjoy the comforting flavors of this classic dish.

Tips

To ensure your peppers stand upright, trim just a small slice off the bottom if necessary. Be careful not to cut too much or the filling may spill out during cooking. If you prefer a bit more spice, consider adding a pinch of red pepper flakes to the filling mixture.

Variations & Substitutions

Feel free to make this recipe your own by trying different variations. Substitute ground turkey with ground chicken or use all ground beef if you prefer a richer flavor. For a vegetarian option, replace the meat with a blend of mushrooms and zucchini. You can also swap white rice for brown rice or quinoa for a healthier twist.

Storage

These stuffed peppers can be stored in an airtight container in the refrigerator for up to 3 days. They also freeze well; just place them in a freezer-safe container for up to 2 months. To reheat, simply thaw overnight in the fridge and warm them in the oven at 350°F (175°C) until heated through.

FAQ

Can I prepare the stuffed peppers ahead of time?

Absolutely! You can prepare the stuffed peppers up to the point of cooking, cover them tightly, and store them in the refrigerator for up to 24 hours before cooking. This makes it an excellent option for meal prepping or entertaining.

What can I serve with stuffed peppers?

Stuffed peppers are quite filling on their own, but they pair wonderfully with a side salad or some crusty bread. You can also serve them with a light soup for a complete and satisfying meal.

Can I use a different type of cheese?

Certainly! While parmesan adds a nice savory touch, feel free to use mozzarella, cheddar, or even feta cheese for a different flavor profile. Just sprinkle it on top before serving for a deliciously cheesy finish.

Nutrition

Each serving of these Ground Turkey Stuffed Peppers is packed with protein from the turkey and beef, fiber from the bell peppers, and essential nutrients from the tomatoes and rice. While exact nutritional values will vary based on portion sizes and specific ingredient brands, this dish is generally low in carbohydrates and fat, making it a healthy choice for a balanced diet.

Conclusion

I hope this recipe for Ground Turkey Stuffed Peppers brings a sense of nostalgia and warmth to your table, just as it has to mine over the years. It’s a simple yet satisfying dish that combines the best of flavors and traditions. Whether you’re making it for a family gathering or a weeknight dinner, these stuffed peppers are sure to delight. Enjoy the process of cooking and, most importantly, the joy of sharing a comforting meal with loved ones.

Related update: Ground Turkey Stuffed Peppers

Traditional Garlic and Herb Crusted Prime Rib Roast | Made by Meaghan Moineau

Traditional Garlic and Herb Crusted Prime Rib Roast

Intro

There’s something incredibly comforting about a perfectly cooked prime rib roast. It brings to mind family gatherings and festive celebrations, where the aroma of roasted garlic and herbs fills the air. For me, this dish is synonymous with my grandmother’s holiday dinners. I remember the warmth of her kitchen, where she would spend hours preparing the meal, her hands expertly working with the ingredients, and her love infused in every bite. Today, I want to share this cherished recipe with you, so you can create your own delicious memories.

Why You’ll Love It

This Traditional Garlic and Herb Crusted Prime Rib Roast is a showstopper at any dinner table. Here are a few reasons why you’ll adore this recipe:

  • Flavorful Crust: The combination of fresh herbs and garlic creates a savory crust that locks in the meat’s juices, making every bite tender and flavorful.
  • Simple Preparation: Despite its impressive appearance, this recipe requires minimal preparation, allowing you to spend more time with your guests.
  • Perfect for Special Occasions: Whether it’s a holiday feast or a special family dinner, this prime rib roast is sure to impress and satisfy.

Ingredients

  • 2 tablespoons fresh parsley leaves, chopped
  • 2 tablespoons fresh rosemary leaves, chopped
  • 2 tablespoons fresh tarragon leaves, chopped
  • 2 tablespoons fresh thyme leaves, chopped
  • 6 cloves garlic, minced
  • 1 tablespoon kosher salt
  • 1 tablespoon black pepper
  • 1/4 cup olive oil
  • 1 boneless prime rib roast (about 5-6 pounds)
  • 3-4 bay leaves

Instructions

  1. Three hours before you want to begin cooking, take the roast out of the fridge and place it on a cutting board at room temperature. This helps the meat cook more evenly.
  2. Preheat the oven to 325 degrees F (165 degrees C).
  3. Prepare the roast by removing excess fat from the bottom and trimming the layer of fat from the top side, leaving a thin layer for flavor.
  4. In a bowl, combine the minced garlic, chopped parsley, rosemary, tarragon, thyme, kosher salt, and black pepper. Add the olive oil and mix until a paste forms.
  5. Evenly apply the garlic herb rub on all sides of the roast, pressing it gently to adhere.
  6. Tie the roast with kitchen string at 1-inch intervals. Insert a bay leaf underneath each string across the top of the roast.
  7. Place the roast on a rack in a roasting pan, fat side up. Roast in the preheated oven until the internal temperature reaches 120 degrees F (49 degrees C) for medium-rare, about 2 1/2 hours. If you prefer medium, take the roast out when the thermometer reads 130 degrees F (54 degrees C).
  8. Remove the roast from the oven and let it rest for 10 minutes before carving. This allows the juices to redistribute for a more tender and flavorful result.

Tips

  • Room Temperature: Allowing the meat to come to room temperature before roasting helps it cook more evenly.
  • Use a Meat Thermometer: To achieve your desired doneness, always rely on a meat thermometer rather than cooking times alone.
  • Resting Time: Letting the roast rest is crucial as it allows the internal juices to settle, resulting in a juicier roast.

Variations & Substitutions

This recipe is versatile, and there are several ways to make it your own:

  • Herb Variations: Feel free to experiment with other herbs such as oregano or sage if you prefer different flavors.
  • Garlic Lovers: Increase the amount of garlic if you love a stronger garlic flavor.
  • Spicy Kick: Add a pinch of cayenne pepper to the rub for a bit of heat.

Storage

Leftover prime rib roast can be stored in an airtight container in the refrigerator for up to 3 days. To reheat, slice the meat and warm in a 250-degree F oven until just heated through, being careful not to overcook.

FAQ

Can I prepare the garlic herb crust ahead of time?

Absolutely! You can prepare the garlic herb crust up to a day in advance. Store it in an airtight container in the refrigerator until you’re ready to apply it to the roast.

What should I serve with the prime rib roast?

This roast pairs beautifully with classic sides such as mashed potatoes, roasted vegetables, or a fresh green salad. Don’t forget the au jus or horseradish sauce for an extra touch of flavor!

Nutrition

While I don’t have exact nutritional information for this recipe, rest assured that this prime rib roast is a high-protein, flavorful indulgence. As with any rich dish, enjoy it in moderation and balance it with plenty of vegetables and whole grains for a well-rounded meal.

Conclusion

Crafting this Traditional Garlic and Herb Crusted Prime Rib Roast is not just about creating a delicious meal; it’s about making memories and bringing loved ones together. Whether you’re a seasoned cook or a beginner, this recipe is a wonderful way to celebrate life’s special moments. I hope it becomes as cherished in your home as it is in mine. Happy cooking and enjoy every savory bite!

Related update: Traditional Garlic and Herb Crusted Prime Rib Roast