Cheesy Chicken Enchilada Quinoa Casserole | Made by Meaghan Moineau

Cheesy Chicken Enchilada Quinoa Casserole | Made by Meaghan Moineau

Title: Savor the Memories: How Cheesy Chicken Enchilada Quinoa Casserole Became a Family Favorite
Description: Dive into the flavors of our Cheesy Chicken Enchilada Quinoa Casserole, a delightful main dish that brings comfort and nostalgia to your dining table. This easy-to-follow recipe combines the heartiness of quinoa and chicken with the zest of enchilada sauce and spices, creating a meal that is as memorable as it is delicious. Gather around, as we share a cherished family story that makes this dish even more special.

---


There’s something magical about the aroma of a sizzling casserole wafting through the house. It has a way of drawing family members to the kitchen, eyes wide with anticipation and mouths watering in delight. For my family, the Cheesy Chicken Enchilada Quinoa Casserole has been that trademark dish, one that not only satisfies our cravings but also brings us closer together.


The story of how this dish became a staple in our household begins with a family reunion at my grandmother’s old country home. It was a tumultuous time—the kind where every room buzzed with laughter, children played hide and seek in the garden, and the adults gathered around the kitchen, catching up over steaming mugs of coffee. It was during this reunion that my aunt introduced us to her latest culinary creation—a dish she dubbed the Cheesy Chicken Enchilada Quinoa Casserole.


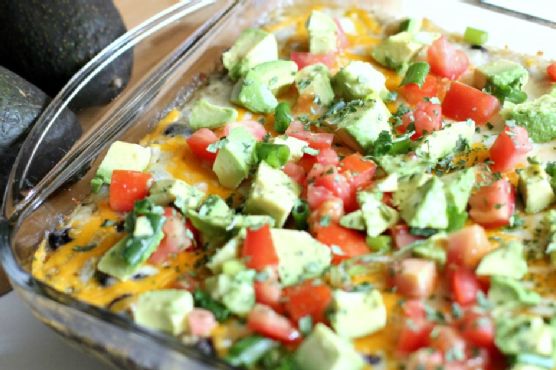
As she pulled the casserole dish from the oven, the golden-brown top layer of cheese bubbled and hissed, releasing a symphony of scents that hinted at the adventure of flavors beneath. It was a simple yet effective recipe—a blend of cooked quinoa, shredded chicken, and canned black beans, all enveloped in a luscious verde enchilada sauce. The addition of spices like cumin, chili powder, and both black and white pepper gave it a subtle kick, while the fresh toppings of avocado, Roma tomatoes, and cilantro brought a refreshing finish.


We gathered around the dining table, plates in hand, eager to taste the dish that had been the talk of the afternoon. As the first forkful hit my tongue, I was enveloped in a warm, cheesy embrace, the tang of tomatoes mingling with the smoky cumin and the slight heat of chili. Each bite was a revelation, a harmonious blend of textures and flavors that felt both exotic and comfortingly familiar.


That day, the Cheesy Chicken Enchilada Quinoa Casserole became more than just a meal—it became a family tradition. It’s a dish that reminds us of those special gatherings, of the laughter shared, and of the simple joy of being together. Now, whenever we whip up this casserole, it’s not just about feeding our bodies but nourishing our souls, evoking memories of home and togetherness.


Difficulty Level: 4/10 - This dish is quite simple to prepare, making it perfect for both beginner and experienced cooks looking for a quick, satisfying meal.
Classification: Main Dish

Whether you’re looking to create new memories or revisit old ones, this Cheesy Chicken Enchilada Quinoa Casserole is sure to become a cherished part of your family’s culinary repertoire. So, gather your loved ones, set the table, and let the magic of this dish bring everyone together, one delicious bite at a time.
Read more about Appetizers

Read more about Main Dishes

Read more about Desserts

Roasted Beet Hummus | Made by Meaghan Moineau

Roasted Beet Hummus | Made by Meaghan Moineau

Title: A Vibrant Twist on a Classic: Roasted Beet Hummus
Description: Dive into the colorful world of roasted beet hummus, a delightful fusion of flavors that will elevate your appetizer game. This easy-to-make dish combines earthy beets with the creamy texture of traditional hummus, creating a visually stunning and deliciously nutritious treat. Join us as we explore how this vibrant dish became a beloved family favorite, and learn how you can bring this healthy appetizer to your own table.

---


Hummus has been a staple in my family's kitchen for as long as I can remember. Every family gathering, big or small, featured a bowl of this creamy, luscious dip. The traditional hummus, while delicious, took a vibrant turn one summer when my grandmother decided to add roasted beets to the mix. Little did we know, this experiment would become a cherished family tradition.


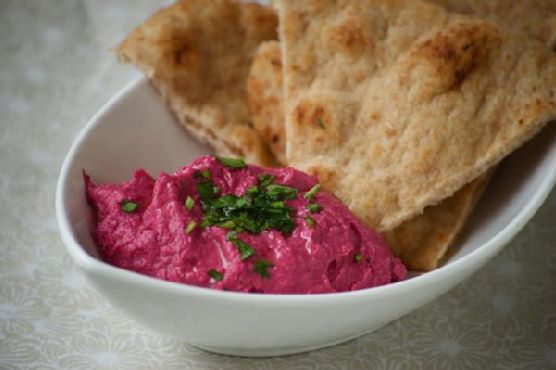
The summer of the beet hummus was one I’ll never forget. It was a particularly hot July, and my grandparents had invited the whole family over for a weekend barbecue. As we sat around the old wooden table in their backyard, my grandmother emerged from the kitchen with a bowl of hummus that was a vivid shade of magenta. Our eyes widened at the sight, curiosity piqued by this colorful concoction.


As we dipped warm pita bread into the hummus, the combination of flavors was unlike anything we had experienced before. The earthiness of the beets melded perfectly with the creamy chickpeas and tahini, while a hint of garlic and cumin added depth. A squeeze of fresh lemon juice provided a touch of brightness, making each bite refreshing yet satisfying.


From that day forward, roasted beet hummus became a staple at our family gatherings. Its vibrant color and unique flavor always sparked conversations and brought smiles to our faces. It was a dish that not only tasted wonderful but also held the power to bring us together, reminding us of that long, laughter-filled summer afternoon.


Recipe for Roasted Beet Hummus:
Ingredients:

- 2 medium-sized red roasted beets


- 1 can (15 oz) cooked chickpeas, drained and rinsed


- 2 cloves garlic, minced


- 1 teaspoon ground cumin


- Juice of 1 lemon


- 3 tablespoons olive oil (plus more as needed)


- 1 teaspoon salt (or to taste)


- 3 tablespoons tahini sesame seed paste


Instructions:

1. Begin by roasting your beets until they are tender. Once cooled, peel and chop them into smaller pieces.


2. Place the roasted beets, garlic, cumin, lemon juice, salt, and tahini in a food processor or blender. Pulse until well blended and smooth.


3. Add the cooked chickpeas and olive oil to the processor. Pulse until the mixture is just incorporated. If needed, add more olive oil to reach your desired consistency.


4. Taste and adjust seasoning as needed. If you prefer a thinner hummus, gradually add more olive oil while blending.


5. Serve your roasted beet hummus with warm pita or flatbread and enjoy the burst of flavors.


Difficulty Rating: 3/10
Classification: Appetizer

Roasted beet hummus is not only a feast for the eyes but also a nutritious and flavorful appetizer that’s easy to prepare. It's perfect for any gathering and is sure to become a favorite in your home, just as it did in ours. Whether you’re a seasoned cook or a kitchen novice, this dish is a delightful way to bring people together and create lasting memories.

Read more about Appetizers

Read more about Main Dishes

Read more about Desserts

Spinach Salad with Strawberry Vinaigrette | Made by Meaghan Moineau

Spinach Salad with Strawberry Vinaigrette | Made by Meaghan Moineau

**Title: A Taste of Spring: Spinach Salad with Strawberry Vinaigrette**


**Description: Discover a refreshing and vibrant salad that's as easy to make as it is delicious. Our Spinach Salad with Strawberry Vinaigrette is a delightful blend of fresh ingredients that promises to bring a burst of flavor to your table. Dive into a nostalgic story that makes this dish a cherished family favorite.**


---


**A Taste of Spring: Spinach Salad with Strawberry Vinaigrette**


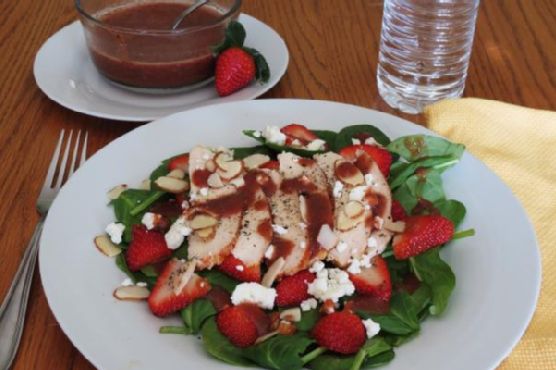
When the first warm breeze of spring swept through our small town, it was always a signal for my family to gather in my grandmother's garden. Her backyard was a sanctuary of bursting colors, with rows of strawberries glistening like jewels under the sun and spinach leaves swaying gently in the breeze. Among the many dishes that graced our family table, none heralded the arrival of spring quite like our Spinach Salad with Strawberry Vinaigrette.


**Ingredients:**


- Fresh spinach leaves


- Strawberries, sliced


- Almonds, toasted


- Feta cheese, crumbled


- Cooked chicken, sliced


- Shallot, finely chopped


- Fresh thyme, finely chopped


- Ground pepper, to taste


**For the Strawberry Vinaigrette:**


- Strawberries, puréed


- Balsamic vinegar


- Dijon mustard


- Water


**Instructions:**


1. **Prepare the Vinaigrette:** In a small bowl, mix the puréed strawberries with balsamic vinegar, dijon mustard, and a splash of water. Whisk until smooth and set aside.


2. **Assemble the Salad:** On a large plate, layer the fresh spinach leaves. Top with sliced strawberries, toasted almonds, crumbled feta cheese, and cooked chicken.


3. **Add Flavor:** Sprinkle finely chopped shallot and fresh thyme over the salad. Season with ground pepper to taste.


4. **Drizzle and Serve:** Generously drizzle the strawberry vinaigrette over the salad. Serve immediately and enjoy a taste of spring.


**A Nostalgic Family Memory**


As children, my siblings and I would race barefoot through the garden, eager to pick the ripest strawberries. My grandmother would laugh at our stained fingers and delighted giggles as we tried to sneak a few berries into our mouths. Once the basket was full, she'd lead us to the kitchen, where we'd help her prepare this simple yet extraordinary salad.


Around the dinner table, stories of past springs would unfold, each tale more vibrant with the flavors of our meal. The combination of sweet strawberries, tangy vinaigrette, and savory chicken created a symphony on our plates, one that still resonates with me today.


**Difficulty: 2/10**


This recipe is delightfully easy, perfect for beginner cooks or anyone looking for a quick, nutritious meal.


**Classification: Main Dish**


Whether served as a light lunch or a refreshing dinner, this Spinach Salad with Strawberry Vinaigrette is a versatile main dish that embodies the essence of spring. Enjoy this dish with loved ones, and perhaps, create your own cherished memories around the table.

Read more about Appetizers

Read more about Main Dishes

Read more about Desserts

Grilled Ham and Cheese French Toast For A Quick Weeknight Dinner | Made by Meaghan Moineau

Grilled Ham and Cheese French Toast For A Quick Weeknight Dinner | Made by Meaghan Moineau

# Grilled Ham and Cheese French Toast: A Quick and Delicious Weeknight Dinner Delight


## Description


Discover the recipe for Grilled Ham and Cheese French Toast, a delightful twist on a classic sandwich that's perfect for a quick weeknight dinner. With layers of lean turkey ham, low-fat Jarlsberg cheese, and a tangy kick from dill pickles, all enveloped in a crisp, golden French toast crust, this dish is sure to be a family favorite. Follow our step-by-step guide to create this mouthwatering meal that combines the comfort of French toast with the savory satisfaction of a grilled cheese sandwich. Easy to make and full of flavor, this recipe is rated 4 out of 10 in difficulty and is classified as a Main Dish.


## Ingredients


- Buttermilk


- Egg whites


- Dijon mustard


- Wheat bread


- Low-fat Jarlsberg cheese


- Lean turkey ham


- Dill pickles


- Low-fat light Smart Balance Heart Right spread


## Instructions


1. **Preheat and Prepare:** Preheat your oven to 350 degrees Fahrenheit. In a shallow bowl or pie plate, whisk together the buttermilk and egg whites. Set aside.


2. **Assemble the Sandwiches:** Spread Dijon mustard on one side of each slice of wheat bread. On 4 slices, place a slice of low-fat Jarlsberg cheese. Arrange lean turkey ham over the cheese. Add 3-4 thin slices of dill pickle to each sandwich. Top with the remaining slices of bread, mustard side down.


3. **Cook the Sandwiches:** Melt 1 tablespoon of reduced-fat butter in a large nonstick pan over medium heat. Dip 2 sandwiches into the buttermilk mixture, ensuring both sides are coated but not soaked. Allow excess to drip back into the dish. Add the sandwiches to the pan, cover, and cook for 3-5 minutes.


4. **Finish Cooking:** Uncover, flip the sandwiches, press down with a spatula, cover again, and cook for an additional 2-3 minutes until golden brown and the cheese is melted. Remove the sandwiches, place them on a baking sheet, and keep warm in the oven.


5. **Repeat and Serve:** Repeat the cooking process with the remaining sandwiches. Once all are cooked, slice each sandwich in half and serve with a fork and knife.


## A Taste of Nostalgia


Growing up, Sunday evenings were always a special time in our household. After a busy weekend, my family would gather around the kitchen table, eager for the comforting aroma of a home-cooked meal. My mother often made her famous Grilled Ham and Cheese French Toast, and it quickly became a family tradition. We would watch her expertly whip up the buttermilk and egg mixture, spreading mustard with a flourish and layering the ham and cheese with precision. The sound of the sandwiches sizzling in the pan was our cue to gather around, forks in hand, ready to dig in. Those evenings were filled with laughter, shared stories, and the simple joy of a delicious meal. Creating this dish now brings back those cherished memories, and I hope it becomes a beloved tradition for your family too.


## Difficulty and Classification


This Grilled Ham and Cheese French Toast is rated a 4 out of 10 in difficulty, making it an easy-to-follow recipe even for novice cooks. It is classified as a Main Dish, perfect for a satisfying and quick weeknight meal. Enjoy the delightful blend of flavors and the nostalgic comfort it brings to your dinner table.

Read more about Appetizers

Read more about Main Dishes

Read more about Desserts

Creamy White Chili

I remember the first time I tried my grandma's Creamy White Chili. It was a cold winter day and she had spent hours in the kitchen preparing this warm and comforting dish for our family. The aroma of the chicken, beans, and spices filled the house, creating a cozy and inviting atmosphere. As we all sat down to enjoy this delicious meal together, I knew that this recipe would become a family favorite for years to come.

Ingredients:

- 1 lb chicken, diced

- 1 onion, chopped

- 2 cloves garlic, minced

- 1 can great northern beans, drained and rinsed

- 1 can chicken broth

- 1 can green chilies

- 1 tsp cumin

- 1 tsp oregano

- 1/2 tsp black pepper

- 1/2 tsp salt

- 1/2 cup heavy whipping cream

- 1/4 cup sour cream

- 1/4 cup shredded cheddar cheese

- 1 tbsp olive oil

Instructions:

1. In a heavy saucepan, sauté chicken, onion, and garlic in olive oil until chicken is cooked.

2. Add chicken broth, beans, green chilies, cumin, oregano, black pepper, and salt. Simmer on low heat for 20 minutes.

3. Remove from heat and stir in heavy whipping cream and sour cream.

4. Top with shredded cheddar cheese before serving.

Making this Creamy White Chili recipe is relatively easy, with a difficulty rating of 5 out of 10. It is a hearty and satisfying main dish that is perfect for a cozy family dinner or a gathering with friends. The creamy texture and flavorful spices make it a standout dish that will become a favorite in your household as well. Enjoy!