Delicious Chinese Potstickers: A Culinary Adventure
Intro
Growing up, Chinese potstickers were a staple in my household. I remember the comforting aroma wafting through the kitchen as my grandmother expertly folded each dumpling with swift, practiced motions. We would gather around the kitchen table, sharing stories and laughter as we eagerly awaited the moment we could dig into these delectable treats. There’s something about these crispy, juicy dumplings that instantly transports me back to those warm family gatherings. Today, I’m excited to share this cherished recipe with you so you can create your own memories around the table with these scrumptious Chinese potstickers.
Why You’ll Love It
This Chinese potsticker recipe is a delightful blend of flavors and textures that will satisfy your cravings for a savory, mouthwatering treat. They’re not only delicious but also fun to make, especially if you involve family or friends in the dumpling-folding process. The fragrant filling, coupled with the crispiness of the wrapper, makes them an irresistible dish that you’ll want to make again and again. Plus, they’re perfect for serving at parties, family dinners, or simply as a comforting snack.
Ingredients
- 200g lean ground pork (or ground chicken)
- 100g canned water chestnuts (or spinach/cabbage)
- 1 teaspoon sea salt
- 1 teaspoon fine sugar
- 1/2 teaspoon ground black pepper
- 2 teaspoons light soy sauce
- 2 teaspoons sesame oil
- 1 tablespoon Shaoxing Huatiao wine
- 2 to 3 tablespoons finely chopped scallions or spring onions
- Dumpling wrappers
- Plain flour, for dusting
- 2 to 3 tablespoons vegetable oil
- 1/3 cup water
Instructions
- Place 200g of ground pork in a large mixing bowl. If preferred, pork may be substituted with ground chicken.
- Add 1 teaspoon of sea salt, 1 teaspoon of fine sugar, 1/2 teaspoon of ground black pepper, 2 teaspoons of light soy sauce, 2 teaspoons of sesame oil, and 1 tablespoon of Shaoxing Huatiao wine.
- Place 100g of canned water chestnuts in a chopper/blender and chop them into small pieces. Add the chopped water chestnuts to the pork mixture. If preferred, use spinach or cabbage in place of water chestnuts.
- Add 2 to 3 tablespoons of finely chopped scallions or spring onions to the pork mixture. Combine all the filling ingredients well.
- Thaw the dumpling wrappers if they are frozen and keep them well covered until ready to use. Dust a dish and the table generously with flour.
- Fill each dumpling wrapper with about 1.5 teaspoons of the prepared pork filling. Prepare a bowl of water for sealing the wrappers.
- Dip a finger into the water and lightly wet the rim of each dumpling wrapper. Bring the wrapper together till the opposite ends meet, then gently push the filling into the wrapper and pinch the top tip to seal it.
- From the center, fold a pleat on one side and bring it to the other side of the dumpling. Repeat to create two more pleats, ensuring each side has three pleats. Repeat on the other end of the dumpling.
- Place the prepared dumplings in a well-floured dish, ensuring they do not touch each other. Set aside or freeze until ready to cook.
- To cook, add 2 to 3 tablespoons of vegetable oil to a very hot frying pan. Cook potstickers in batches, ensuring the flat surfaces face down.
- Pan fry until the bottoms are golden brown, then add 1/3 cup of water to the pan. Cover immediately and steam for 4 to 5 minutes.
- Once the water evaporates, remove the cover and let the dumplings sit in the hot pan for another minute to crisp up the base.
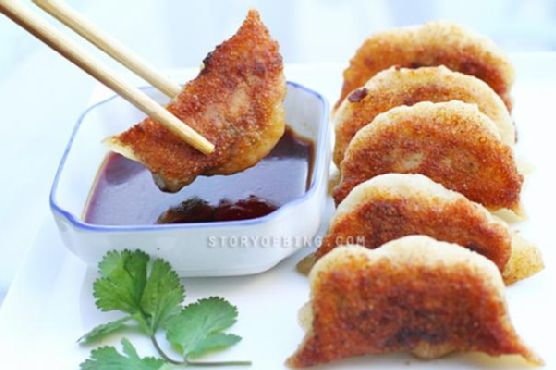
- Gently transfer the potstickers to a plate and serve immediately with a vinegar dip made with balsamic or black Chinese vinegar and thinly sliced ginger. Soy sauce, chili oil, or sesame oil can also be added to the dipping sauce.
Tips
When making potstickers, it’s important to ensure all the edges are sealed tightly to prevent the filling from spilling out. If you’re new to pleating dumplings, practice makes perfect! Don’t worry if your first few attempts aren’t perfect—each potsticker will still taste delicious. Additionally, make sure to use a non-stick pan to ensure the dumplings don’t stick during cooking. And remember, patience is key when frying and steaming to achieve that perfect crispy bottom.
Variations & Substitutions
This potsticker recipe is highly versatile and can be adapted to suit your tastes. You can swap the pork for ground chicken, turkey, or even shrimp for a different protein profile. Vegetarians can enjoy these dumplings by substituting the meat with finely chopped mushrooms or tofu. Feel free to experiment with different vegetables like finely chopped carrots or bell peppers for added color and texture in the filling. Additionally, you can spice things up by adding a pinch of chili flakes or a few drops of chili oil to the filling for a hint of heat.
Storage
Uncooked potstickers can be stored in the freezer for future enjoyment. Simply place them on a baking sheet in a single layer, making sure they don’t touch each other, and freeze until solid. Once frozen, transfer them to a zip-top bag or airtight container for long-term storage. Cooked potstickers can be refrigerated in an airtight container for up to three days. To reheat, simply pan fry them again until heated through.
FAQ
Can I make potstickers in advance?
Yes! Potstickers can be made in advance and stored in the freezer. Just follow the instructions up to the cooking step, then freeze the uncooked dumplings. When you’re ready to enjoy them, simply cook them directly from frozen, adding a couple of extra minutes to the steaming time.
What dipping sauce pairs well with potstickers?
Potstickers are traditionally enjoyed with a simple vinegar dipping sauce made from balsamic or black Chinese vinegar and thinly sliced ginger. You can also add soy sauce, chili oil, or sesame oil for extra flavor. Feel free to experiment with different combinations to find your perfect dipping sauce!
Can I use homemade dumpling wrappers?
Absolutely! Homemade dumpling wrappers can add a personal touch to your potstickers. If you have the time and inclination, making your own wrappers can be a fun and rewarding experience. Just make sure to roll them out thinly and evenly for best results.
Nutrition
While nutritional content can vary, a typical serving of Chinese potstickers (3-4 dumplings) may contain around 200 calories, with a balance of protein, carbohydrates, and fats. They’re a great source of protein and can be part of a balanced diet when enjoyed in moderation.
Conclusion
Chinese potstickers are more than just a delightful treat; they’re a gateway to cherished memories and shared experiences around the table. Making these dumplings at home allows you to bring a taste of traditional Chinese cuisine into your own kitchen. Whether you’re a seasoned home cook or a beginner looking to try something new, this recipe offers a wonderful opportunity to explore your culinary skills. So gather your ingredients, call your loved ones, and embark on a delicious adventure with these homemade Chinese potstickers. Enjoy the flavors, the process, and most importantly, the company as you savor every bite!
Related update: Chinese Potstickers
Related update: Korean Sweet n Sour Chicken