Mummy Meatballs with Spaghetti
Intro
When my kids were young, Halloween was always a cherished time filled with giggles, costumes, and whimsical meals. One of the highlights of the season was our tradition of making Mummy Meatballs with Spaghetti. I still remember their wide eyes and delighted laughter as they helped wrap the meatballs in “bandages” of rice noodles, eagerly anticipating the spooky feast to come. Now, I’m thrilled to share this beloved family recipe with you. It’s a dish that combines hearty meatballs with playful presentation, making it perfect for a Halloween dinner or any time you want to add a bit of fun to your meal.
Why You’ll Love It
This recipe is more than just a clever presentation; it’s a delicious and hearty meal that brings smiles to both kids and adults alike. The meatballs are juicy and flavorful, with a perfect blend of Italian seasoning and parmesan cheese, while the spaghetti provides a comforting base. The “mummy” wrapping adds an element of surprise and whimsy, making it a great hit at Halloween parties. Plus, it’s a wonderful way to involve the whole family in the kitchen. The process of assembling the mummies encourages creativity and fun, turning meal prep into a delightful activity.
Ingredients
- 1 pound lean ground beef
- 1/4 cup bread crumbs
- 1 egg
- 1 teaspoon garlic paste
- 1 teaspoon Italian seasoning
- 1/4 cup grated parmesan cheese
- Salt, to taste
- Black pepper, to taste
- 8 green pimiento stuffed olives
- 8 ounces cooked spaghetti noodles
- 2 cups spaghetti sauce
- 4 ounces cooked extra wide egg noodles
Instructions
- In a large bowl, combine the lean ground beef, bread crumbs, egg, garlic paste, Italian seasoning, parmesan cheese, salt, and black pepper. Mix until well combined.
- Preheat your oven to 350°F (175°C) and grease an 8-hole muffin tin.
- Using an ice cream scoop, divide the meatball mixture into the muffin tin, ensuring each portion is evenly distributed.
- Bake the meatballs for 35 minutes or until they reach an internal temperature of 160°F (71°C) using an instant-read thermometer.
- Once cooked, drain the meatballs on a cookie rack.
- While the meatballs are baking, heat the spaghetti sauce in a saucepan over medium heat.
- Cook the spaghetti and rice noodles separately according to package directions.
- Drain the spaghetti and keep it warm, then cool the rice noodles in cold water and drain.
- Slice the meatballs in half horizontally to create two pieces, each with a flat surface.
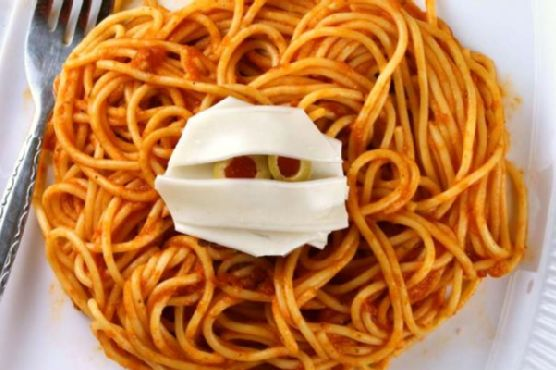
- Pat the rice noodles dry with paper towels, then layer them over the top of each meatball half to resemble mummy bandages. Tuck sliced olives in for eyes.
- Let the meatballs sit for about 15 minutes so they become more tacky and hold together better.
- Reheat the meatballs by microwaving them on a microwave-safe plate for a minute.
- Carefully place each mummy meatball onto a nest of sauced spaghetti and serve immediately.
Tips
For best results, make sure to pat the rice noodles dry thoroughly to ensure they stick to the meatballs effectively. You can use a paper towel to gently press and remove excess moisture. If you’re working with young children, let them help by arranging the rice noodles and olives – it’s a fun way to get them involved. Lastly, if you want a richer flavor, consider simmering your spaghetti sauce with a splash of red wine or additional herbs before serving.
Variations & Substitutions
Feel free to experiment with this recipe based on your dietary preferences or ingredient availability. You can substitute ground turkey or chicken for the beef if you prefer a lighter option. For a gluten-free version, use gluten-free bread crumbs and spaghetti noodles. Vegetarians can substitute the meatballs with plant-based alternatives and use vegan cheese. You can also spice up the meatballs by adding a pinch of red pepper flakes for a bit of heat.
Storage
Leftover mummy meatballs can be stored in an airtight container in the refrigerator for up to three days. To reheat, simply microwave them until warmed through or place them in a preheated oven at 350°F (175°C) for about 10 minutes. If you have extra spaghetti and sauce, store them separately to maintain the best texture.
FAQ
Can I make the meatballs ahead of time?
Yes, you can prepare the meatballs in advance. Simply follow the recipe to bake them, then allow them to cool and store them in the refrigerator. When ready to serve, reheat them in the oven or microwave, then assemble the mummies with rice noodles and olives.
What can I serve with Mummy Meatballs?
These meatballs pair wonderfully with a simple side salad or garlic bread. If you’re hosting a Halloween party, consider serving them alongside other themed dishes like “witch’s brew” soup or “ghostly” mashed potatoes for a complete festive meal.
Can I freeze the meatballs?
Absolutely! You can freeze the baked meatballs before assembling them into mummies. Simply place them in a freezer-safe container and store them for up to two months. Thaw in the refrigerator overnight before reheating and assembling.
Nutrition
This recipe offers a balanced meal with protein from the meatballs and carbohydrates from the pasta. The inclusion of parmesan cheese adds calcium, while the olives contribute healthy fats. To enhance the nutritional profile, consider serving with a side of steamed vegetables or a fresh salad.
Conclusion
Mummy Meatballs with Spaghetti is a delightful dish that brings joy and nostalgia to the table. Whether you’re crafting a fun Halloween meal or simply indulging in a playful dinner, this recipe is sure to be a hit. With its flavorful meatballs, creative presentation, and versatility, it’s a meal that’s as enjoyable to make as it is to eat. I hope this recipe becomes as cherished in your home as it has been in ours. Enjoy the smiles and laughter it brings, and happy cooking!
Related update: Mummy Meatballs with Spaghetti
Related update: Turkey Pot Pie With Cornbread Crust