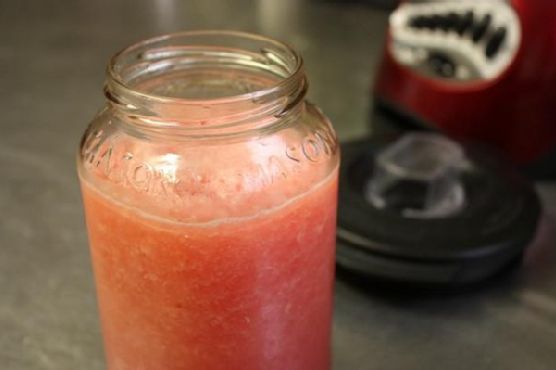
Spiked Watermelon lemonade | Made by Meaghan Moineau
Title: Sip into Summer: The Irresistible Charm of Spiked Watermelon LemonadeDescription: Indulge in the refreshing taste of summer with our Spiked Watermelon Lemonade. This delightful concoction combines the sweetness of watermelon, the tang of fresh lemon juice, the aromatic notes of mint, and the smooth edge of gin. Perfect for a leisurely afternoon or a festive gathering, this recipe will transport you to sunlit memories and create new ones with every sip.
---
Summer is a season that always brings back fond memories of family gatherings, laughter, and the simple joys of life. One particular memory that stands out is when my family would gather at my grandmother’s house for her annual summer barbecue. The backyard would be filled with the scent of sizzling grills, the sound of children playing, and the vibrant colors of a summer in full bloom. And at the heart of these gatherings was her signature Spiked Watermelon Lemonade—a drink that seemed to capture the very essence of summer.
Creating this drink always took a bit of time, but it was a labor of love. As a child, I would watch my grandmother with wide eyes as she carefully prepared the ingredients. The kitchen would be filled with the sweet aroma of fresh watermelon and the invigorating scent of mint. She would always let me help squeeze the lemons, my small hands sticky with juice, while she prepared the mint-infused syrup. The anticipation built as the mint steeped for what felt like an eternity to my young mind.
Finally, the moment would come to blend everything together. The sound of the blender whirring was like a starting bell, signaling the beginning of the festivities. My grandmother would always let me have the first taste, a sip that was both tart and sweet, with a hint of mint that danced on my tongue. As the adults enjoyed theirs with a splash of gin, I was content with my virgin version, feeling every bit as sophisticated.
Now, years later, I've taken up the mantle of making this drink for my own family gatherings. While I’ve added my own twist with a generous splash of gin, the essence remains the same. It continues to be a crowd-pleaser, a conversation starter, and a vessel for nostalgia—each sip a reminder of those sun-kissed days in my grandmother’s backyard.
Recipe Difficulty: 4/10
Classification: Beverage
Ingredients:
- 1 cup sugar
- 2 cups water (divided)
- A handful of fresh mint leaves
- 1 cup freshly squeezed lemon juice
- 4 cups cubed watermelon
- 1 cup gin
Instructions:
1. In a small saucepan, combine sugar and 1 cup of water. Add a handful of fresh mint leaves.
2. Cook over medium heat, stirring continuously, until the sugar is completely dissolved.
3. Remove from heat, cover the saucepan, and allow the mixture to sit for at least an hour to infuse the mint flavor.
4. In a blender, combine the freshly squeezed lemon juice with the cubed watermelon and blend until smooth.
5. Gradually add the mint simple syrup to the watermelon mixture, 1/4 cup at a time, until you reach your desired level of sweetness, approximately one cup.
6. Pour the mixture into a large pitcher. Add the remaining cup of cold water and the gin, then fill with the watermelon mixture.
7. Stir well to combine.
Whether you’re hosting a barbecue, enjoying a quiet afternoon on the porch, or simply reminiscing about summers past, this Spiked Watermelon Lemonade is sure to delight. So go ahead, take a sip, and let it transport you to sunlit memories and create new ones with every refreshing taste.