Mango Fried Rice | Made by Meaghan Moineau

Mango Fried Rice: A Tropical Twist on a Classic Dish

Intro

There’s something truly magical about the aroma of fried rice wafting through the kitchen. It takes me back to my childhood, when my grandmother would whip up a batch of her signature fried rice every Sunday. The sizzling sounds, the vibrant colors, and the rich, savory flavors were always the highlight of our weekend meals. It was a dish that brought our family together, and each bite was a reminder of the love and care that went into it.

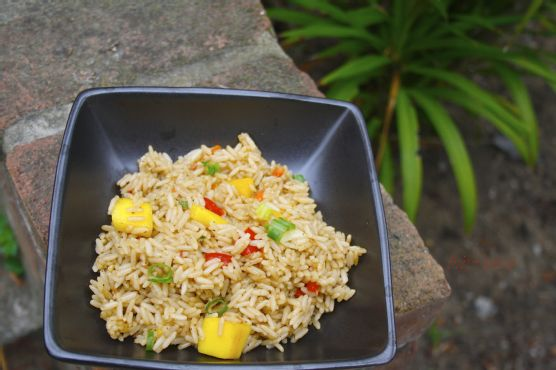
Today, I’m excited to share a unique twist on this beloved dish: Mango Fried Rice. This recipe combines the traditional elements of fried rice with the sweet, tropical flavor of fresh mango. It’s a delightful fusion that will transport your taste buds to a sunny, exotic paradise. Whether you’re looking to impress guests or simply want to enjoy a special meal at home, Mango Fried Rice is a must-try!

Why You’ll Love It

  • Flavorful Fusion: The combination of savory rice and sweet mango creates a harmonious balance that’s both refreshing and satisfying.
  • Easy to Make: This recipe is straightforward and doesn’t require any complicated techniques, making it perfect for both novice and experienced cooks.
  • Versatile: You can easily customize this dish with different vegetables or proteins to suit your preferences.
  • Healthy: Packed with fresh ingredients, this dish is a nutritious choice for any meal of the day.

Ingredients

  • Chicken stock
  • Seasoning cubes
  • Mango, cubed
  • Rice
  • Vegetables (e.g., bell peppers, carrots, peas)
  • Scotch bonnet pepper, chopped

Instructions

  1. Wash your rice thoroughly and place it in a pot. Add a small amount of water, just enough to cover the rice, and bring it to a boil over medium heat.
  2. Once the rice is slightly soft and the initial water has evaporated, reduce the heat. Pour in the chicken stock and continue to cook until the stock is fully absorbed and the rice is tender.
  3. If your chicken stock is freshly made, it should contain some chicken fat, so you won’t need to add additional oil to the rice.
  4. Increase the heat and stir in the chopped vegetables and scotch bonnet pepper. Add the seasoning cube and mix well to combine.
  5. Finally, gently fold in the cubed mango, allowing it to warm through. Serve the Mango Fried Rice warm, paired with your favorite protein. Chicken is a great choice, but feel free to get creative!

Tips

  • Use Fresh Mango: For the best flavor, ensure that the mango is ripe and juicy.
  • Adjust the Heat: If you prefer a milder dish, reduce the amount of scotch bonnet pepper or omit it entirely.
  • Rice Texture: Be careful not to overcook the rice in the initial boiling stage, as it will continue to cook in the chicken stock.

Variations & Substitutions

This Mango Fried Rice recipe is incredibly versatile. Here are some ideas to make it your own:

  • Protein Swap: Replace chicken with shrimp, tofu, or beef for a different protein option.
  • Vegetable Variety: Include other vegetables like broccoli, snap peas, or mushrooms for added nutrition and texture.
  • Grain Alternative: Use quinoa or cauliflower rice for a low-carb option.

Storage

Store any leftovers in an airtight container in the refrigerator for up to 3 days. To reheat, simply microwave or stir-fry in a pan on the stove until warmed through. Note that the mango may become softer upon reheating.

FAQ

Can I use frozen mango for this recipe?

Yes, you can use frozen mango if fresh mango is unavailable. Just be sure to thaw it completely and drain any excess water before adding it to the rice.

Is there a substitute for scotch bonnet pepper?

If you can’t find scotch bonnet pepper, you can substitute it with habanero pepper or a milder chili pepper like jalapeño, depending on your heat preference.

Can I make this dish vegan?

Absolutely! Simply replace the chicken stock with vegetable stock and omit any animal-based protein. The mango and vegetable combination is delicious on its own.

Nutrition

This Mango Fried Rice is not only delicious but also nutritious. It’s rich in vitamins A and C from the mango and vegetables, while the rice provides essential carbohydrates for energy. Depending on your choice of protein, you can also add a healthy dose of protein and healthy fats to the meal.

Conclusion

Mango Fried Rice is a delightful dish that brings together the best of both worlds: the savory comfort of classic fried rice and the sweet, tropical essence of mango. It’s a versatile recipe that can be tailored to suit any dietary preference, making it a fantastic addition to your culinary repertoire. Whether you’re serving it for a family dinner or a special occasion, this dish is sure to impress with its vibrant flavors and beautiful presentation. So gather your ingredients, channel your inner chef, and enjoy this tropical twist on a beloved classic!

Related update: Mango Fried Rice

Related update: Cheese and Leek Strata

Tomato and Bacon Pizza With Rice Crust | Made by Meaghan Moineau

Tomato and Bacon Pizza With Rice Crust

Intro

There’s something undeniably comforting about the aroma of fresh pizza wafting through the kitchen. It takes me back to my childhood, when my grandmother would let me help her prepare her signature pizzas every Sunday. As I stood on tiptoes to reach the counter, she would gently guide my hands as I sprinkled cheese and laid out the toppings. Her secret ingredient was always love, and it’s a lesson I’ve carried with me into my own kitchen. Today, I’m excited to share a unique twist on a classic favorite: Tomato and Bacon Pizza with Rice Crust. This recipe combines savory flavors with a satisfying crunch, offering a delightful spin on the traditional pizza experience.

Why You’ll Love It

This Tomato and Bacon Pizza with Rice Crust brings together the flavors of crispy turkey bacon, juicy tomatoes, and melty mozzarella cheese on a distinctive rice crust. The rice crust is not only a fun alternative to traditional pizza dough, but it’s also naturally gluten-free, making it a great option for those with dietary restrictions. The addition of Italian seasoning adds an aromatic touch that complements the savory toppings perfectly. Whether you’re looking for a new family favorite or a crowd-pleaser for your next gathering, this pizza is sure to impress.

Ingredients

  • 1 bell pepper, sliced
  • 2 cups cooked rice
  • 1 large egg
  • 1 teaspoon Italian seasoning
  • 1 cup shredded mozzarella cheese
  • 2 medium tomatoes, sliced
  • 6 slices of turkey bacon, cooked and crumbled

Instructions

  1. Preheat your oven to 400°F (200°C).
  2. In a large bowl, combine the cooked rice, egg, and Italian seasoning. Mix well until the ingredients are fully incorporated.
  3. Grease a 10-inch pizza pan lightly with oil or non-stick spray. Press the rice mixture onto the pan evenly to form the crust.
  4. Spread the crumbled turkey bacon over the rice crust, followed by the sliced tomatoes and bell pepper.
  5. Sprinkle the shredded mozzarella cheese evenly over the toppings.
  6. Bake in the preheated oven for about 20 minutes, or until the cheese is melted and bubbly.
  7. Once baked, remove from the oven, allow to cool slightly, slice, and serve warm.

Tips

For the best results, make sure your rice is well-cooked and slightly sticky, which helps the crust hold together better. If you find the rice mixture too loose, you can add a tablespoon of flour or gluten-free flour blend to help bind it. Additionally, consider using a pizza stone if you have one, as it can help achieve a crispier crust.

Variations & Substitutions

If you’re looking to switch things up, there are plenty of variations you can try with this recipe. For a vegetarian option, skip the turkey bacon and add more vegetables like mushrooms or spinach. You can also substitute the mozzarella cheese for dairy-free cheese if you’re catering to a dairy-free diet. Experiment with different herbs and spices in the crust for a unique flavor twist, such as adding a pinch of garlic powder or dried basil.

Storage

Leftover pizza can be stored in an airtight container in the refrigerator for up to 3 days. To reheat, place slices in a preheated oven at 350°F (175°C) for about 10 minutes or until warmed through. For a quick option, you can also use the microwave, though the crust will be less crispy.

FAQ

Can I use brown rice instead of white rice for the crust?

Absolutely! Brown rice is a great alternative and will add a nuttier flavor and extra nutrients to your pizza crust. Just ensure it’s cooked thoroughly before mixing it into the crust.

How can I make this recipe vegetarian or vegan?

To make a vegetarian version, simply omit the turkey bacon and consider adding extra veggies. For a vegan option, use a flax egg (1 tablespoon ground flaxseed mixed with 2.5 tablespoons water) in place of the egg and substitute a plant-based cheese for the mozzarella.

Nutrition

This recipe is packed with flavor yet mindful of nutritional needs. While specific values can vary based on the exact ingredients used, a slice of this pizza offers a good balance of protein from the turkey bacon and egg, healthy fats from the cheese, and fiber from the rice and vegetables. It’s a delicious way to enjoy a meal that’s both satisfying and nourishing.

Conclusion

This Tomato and Bacon Pizza with Rice Crust is a wonderful fusion of flavors and textures that pays homage to the comforting tradition of homemade pizza while offering a fresh, modern twist. Whether you’re enjoying it with family on a cozy night in or sharing it with friends at a lively gathering, this pizza is sure to become a beloved staple in your recipe collection. Remember, the best ingredient in any dish is love—so sprinkle it generously as you create this delightful meal. Enjoy!

Related update: Tomato and Bacon Pizza With Rice Crust

Related update: Mango Fried Rice

No-Bake Green Tea Tofu Cheesecake | Made by Meaghan Moineau

No-Bake Green Tea Tofu Cheesecake

Intro

There’s something truly magical about the delicate balance of flavors in a well-made cheesecake. I remember the first time I tasted a green tea cheesecake at a quaint little café in Tokyo. It was a rainy afternoon, and the cozy atmosphere was filled with the aroma of freshly brewed matcha. The cheesecake was unlike anything I had ever tasted—light, creamy, and infused with the subtle bitterness of green tea. Years later, inspired by that unforgettable experience, I decided to recreate it in my own kitchen. This No-Bake Green Tea Tofu Cheesecake is a tribute to that memory, and it has since become a favorite in my household.

Why You’ll Love It

This No-Bake Green Tea Tofu Cheesecake is a delightful fusion of traditional Japanese flavors and classic cheesecake. It’s perfect for those who appreciate the earthy taste of matcha combined with the creamy texture of cheesecake. The addition of tofu not only makes it a healthier alternative but also gives the cheesecake a uniquely smooth texture. Plus, it’s a no-bake recipe, which means no need to heat up your kitchen—perfect for warm days or when you’re short on time.

Ingredients

  • 8″ springform cake pan, lined and greased
  • Marie biscuits
  • Butter
  • 200g tofu, wrapped in cheesecloth
  • 2 tsp gelatine powder
  • 5 tbsp water
  • 2 tbsp green tea powder (matcha)
  • 250g cream cheese
  • 100g natural yogurt or sour cream
  • 100ml soya milk or fresh milk
  • 100g icing sugar
  • 1 tsp vanilla extract

Instructions

  1. Line and grease an 8″ springform cake pan.
  2. Crush the marie biscuits into fine crumbs and mix with melted butter. Press the mixture onto the base of the cake pan to form the crust.
  3. Wrap the tofu in cheesecloth and press out the water by placing a heavy object on top for about 15 minutes.
  4. Soak the gelatine powder in water and set aside for about 5 minutes.
  5. Mix the green tea powder with 5 tablespoons of hot water and set aside.
  6. In a food processor, blend the cream cheese, pressed tofu, yogurt, soya milk, icing sugar, and vanilla extract until very smooth.
  7. Heat the gelatine mixture in a double boiler until melted, then add it to the cream cheese mixture and blend well.
  8. Pour three-quarters of the cream cheese mixture into one bowl and one-quarter into another.
  9. Add the green tea mixture to the one-quarter portion of the cream cheese mixture and mix well.
  10. Spoon the plain and green tea cream cheese fillings alternately into the prepared pan until all the mixtures are used up. Gently shake the pan to level the surface.
  11. To create swirls, gently run a chopstick in a circular motion through the mixture.
  12. Chill the cake in the refrigerator for at least 4 hours or overnight.
  13. For perfect slices, cut the cheesecake with a hot knife.

Tips

To ensure the cheesecake sets properly, make sure to chill it for at least 4 hours. A hot knife will help you achieve clean slices. Simply dip the knife in hot water, wipe it dry, and slice.

Variations & Substitutions

If you’re not a fan of matcha, you can substitute it with cocoa powder for a chocolate twist. Additionally, you can use graham crackers instead of marie biscuits for the crust. For a dairy-free version, opt for dairy-free cream cheese and yogurt.

Storage

This cheesecake can be stored in the refrigerator, covered, for up to 5 days. For longer storage, it can be frozen. Wrap it tightly in plastic wrap and then in aluminum foil before freezing. Thaw in the refrigerator before serving.

FAQ

Can I use agar-agar instead of gelatine?

Yes, you can substitute agar-agar for gelatine, but the texture may slightly differ. Use the same amount and follow the package instructions for best results.

Is it necessary to press the tofu?

Yes, pressing the tofu is essential to remove excess water, which helps achieve the desired creamy texture in the cheesecake.

What type of green tea powder should I use?

It’s best to use high-quality matcha powder, as it will provide a vibrant color and authentic flavor to the cheesecake.

Nutrition

This cheesecake is a lighter alternative to traditional cheesecakes due to the use of tofu and reduced sugar. However, nutritional values will vary based on the ingredients used.

Conclusion

This No-Bake Green Tea Tofu Cheesecake is a delicious and unique dessert that brings a touch of elegance and a hint of nostalgia to any occasion. Whether you’re a long-time fan of matcha or new to this delightful flavor, you’ll appreciate the balance of creamy textures and subtle sweetness. It’s a perfect treat to impress guests or to enjoy as a special indulgence for yourself. I hope this recipe brings you as much joy and fond memories as it does for me. Enjoy!

Related update: No-Bake Green Tea Tofu Cheesecake

Related update: Cinnamon Sugar Fried Apples

Related update: Caramel Macchiato Cake

Baked Chicken Thighs with Satay Sauce and Tomato Salad | Made by Meaghan Moineau

Baked Chicken Thighs with Satay Sauce and Tomato Salad

Intro

There’s something incredibly comforting about the aroma of spices wafting through the kitchen, taking me back to my childhood when family gatherings were centered around food. My grandmother had a knack for transforming simple ingredients into a feast, and her love for cooking was infectious. It was during one of those warm summer afternoons, with the sun streaming through the kitchen window, that I first tasted the magic of satay sauce. Today’s recipe for Baked Chicken Thighs with Satay Sauce and Tomato Salad is a tribute to those cherished moments, combining the rich flavors of the East with a fresh, vibrant salad that sings of summer.

Why You’ll Love It

This recipe is both a feast for the senses and a breeze to prepare. You’ll love the way the creamy satay sauce clings to the juicy chicken thighs, each bite offering a perfect balance of savory and spicy. The accompanying tomato salad provides a crisp, refreshing contrast, making this dish a perfect harmony of flavors and textures. Whether you’re cooking for family, hosting a dinner party, or simply treating yourself, this recipe will undoubtedly become a favorite.

Ingredients

  • 4-6 chicken thighs
  • Salt and pepper to taste
  • Cayenne pepper to taste
  • 2 tablespoons light soy sauce
  • 1 tablespoon apple cider vinegar
  • 2 tablespoons peanut butter
  • 1 teaspoon sesame oil
  • 4 tablespoons satay sauce
  • 1/4 cup chopped walnuts
  • 1 tablespoon grated ginger
  • 2 cloves garlic, minced
  • 1/4 cup water
  • 1 tablespoon smooth peanut butter
  • 1 tablespoon honey
  • 2 cups diced tomatoes
  • 1/4 cup celery leaves, chopped
  • 1 tablespoon mirin
  • 2 tablespoons olive oil

Instructions

  1. In a large bowl, combine the soy sauce, apple cider vinegar, peanut butter, sesame oil, satay sauce, chopped walnuts, grated ginger, minced garlic, water, smooth peanut butter, and honey. Mix until smooth.
  2. Add the chicken thighs to the bowl, ensuring they are evenly coated with the marinade. Season with salt, pepper, and a pinch of cayenne pepper to taste.
  3. Cover the bowl and let the chicken marinate for at least 15 minutes. For best results, refrigerate and marinate overnight.
  4. Preheat your oven to 180°C (356°F).
  5. Lay the chicken thighs on a baking rack placed over a baking pan. Cover the pan with foil to keep the moisture in.
  6. Bake in the preheated oven for 45 minutes to one hour, or until the chicken is fully cooked and the juices run clear.
  7. While the chicken is baking, prepare the tomato salad by combining the diced tomatoes, celery leaves, mirin, and olive oil in a bowl. Toss gently to combine.
  8. Once the chicken is done, serve warm with the tomato salad on the side. Enjoy!

Tips

To enhance the flavors, consider toasting the walnuts lightly before adding them to the marinade. This will bring out their natural oils and add an extra depth to the sauce. Additionally, if you prefer a spicier kick, increase the amount of cayenne pepper or add a dash of chili flakes to the marinade.

Variations & Substitutions

If you prefer, you can substitute chicken thighs with chicken breasts, though they may require a slightly shorter cooking time to prevent drying out. For a nut-free version, replace peanut butter with sunflower seed butter and omit the walnuts. The tomato salad can also be varied by adding cucumbers or avocados for extra creaminess.

Storage

Leftover chicken thighs can be stored in an airtight container in the refrigerator for up to 3 days. Reheat in the oven at 160°C (320°F) until warmed through. The tomato salad is best consumed fresh but can be stored separately in the fridge for up to 1 day.

FAQ

Can I make this recipe in advance?

Absolutely! You can marinate the chicken up to a day in advance, which will only deepen the flavors. Prepare the tomato salad just before serving to ensure it remains fresh and crisp.

Is this recipe gluten-free?

To make this recipe gluten-free, ensure you use gluten-free soy sauce. All other ingredients are naturally gluten-free.

Can I use store-bought satay sauce?

Yes, store-bought satay sauce works perfectly in this recipe. However, if you have the time and ingredients, making your own can add a personal touch and allow you to adjust the flavors to your liking.

Nutrition

This dish provides a balanced meal with protein from the chicken and healthy fats from peanut butter and walnuts. The tomato salad offers a good dose of vitamins and antioxidants, making this not only a delicious but also a nutritious option for lunch or dinner.

Conclusion

Baked Chicken Thighs with Satay Sauce and Tomato Salad is more than just a meal; it’s a celebration of flavors that tells a story of tradition and innovation. It’s a dish that invites you to share in the joy of cooking and savor the warmth of home-cooked goodness. I hope this recipe brings as much joy to your table as it does to mine. Happy cooking!

Related update: Baked Chicken Thighs with Satay Sauce and Tomato Salad

Related update: Three-Cup Chicken

Chinese Chicken Salad With Chipotle Dressing | Made by Meaghan Moineau

Chinese Chicken Salad With Chipotle Dressing | Made by Meaghan Moineau

Title: Savory Nostalgia: Chinese Chicken Salad with Chipotle Dressing


Description:

Dive into the fusion of flavors with our Chinese Chicken Salad with Chipotle Dressing. This delightful dish combines the rich, nutty essence of pea-mond dressing with the smoky heat of chipotle, creating a salad that tantalizes the taste buds. Perfect as a main dish, this easy-to-make recipe is a nostalgic journey to cherished family gatherings.

---


A Taste of Memories: Chinese Chicken Salad with Chipotle Dressing


There’s something magical about a dish that evokes memories of family gatherings and cherished times. Growing up, Sundays were sacred in our household — a time for family, laughter, and a delicious meal that brought us all together. One of those meals was the Chinese Chicken Salad with Chipotle Dressing, a dish that became a family favorite for its unique blend of flavors and textures.


The Ingredients


- Pea-mond Dressing: A blend of smooth peanut and almond butters for a rich, creamy texture.
- Rice Wine Vinegar: Adds a tangy kick that complements the nutty flavors.
- Fresh Ginger: Provides a zesty warmth that refreshes the palate.
- Adobo Chipotle Pepper Juice & Puree: Infuses the dressing with smoky, spicy notes that elevate the dish.
- Soy Sauce & Honey: Balances the heat with a sweet, salty depth.
- Sesame & Canola Oils: Create a silky consistency with a hint of nuttiness.
- Shredded Napa Cabbage & Romaine Lettuce: Offer a crisp, fresh base.
- Shredded Carrots & Snow Peas: Add vibrant color and crunch.
- Fresh Cilantro & Mint Leaves: Bring a burst of freshness.
- Green Onion & Roasted Peanuts: Lend a savory, crunchy finish.
- Shredded Rotisserie Chicken: The protein-packed heart of the salad.
- Chili Oil & Lime: For those who crave an extra zing.

Instructions


1. Dressing Magic: In a medium bowl, whisk together the rice wine vinegar, smooth peanut and almond butters, fresh ginger, adobo chipotle pepper puree, soy sauce, honey, sesame oil, and canola oil. Season with salt and pepper to taste. This dressing, with its blend of nutty richness and smoky chipotle heat, is the star of the show.
2. Assemble the Salad: In a large bowl, combine the shredded napa cabbage, romaine lettuce, carrots, snow peas, cilantro, green onion, and rotisserie chicken. Toss gently to mix.
3. Finish with Flair: Drizzle the chipotle dressing over the salad, tossing to coat evenly. Sprinkle with roasted peanuts and fresh mint leaves for an added layer of flavor. For an extra kick, add a dash of chili oil and a squeeze of fresh lime.

A Dish with Heart


This Chinese Chicken Salad is more than just a meal; it’s a walk down memory lane. I remember the first time my grandmother made this dish. Her kitchen was filled with the aroma of fresh ginger and the smoky scent of chipotle, a combination that felt like a warm hug. Each bite was a burst of flavor — the spice of the chipotle, the crunch of the cabbage, and the unexpected sweetness of honey. It was a culinary adventure that brought us closer, sitting around the table, sharing stories and laughter.


Difficulty Rating: 4/10


As a main dish, this recipe is rated as an easy 4 out of 10. It's perfect for those who are looking to whip up something impressive without too much hassle. Whether you’re a seasoned chef or a kitchen newbie, this salad is accessible to all.


Conclusion


The Chinese Chicken Salad with Chipotle Dressing is a testament to how food can transcend mere sustenance, becoming a vessel of nostalgia and a catalyst for connection. So gather your ingredients, invite your loved ones, and create new memories with this delightful dish. Enjoy the journey from your kitchen to the heart of your home.

Read more about Appetizers

Read more about Main Dishes

Read more about Desserts