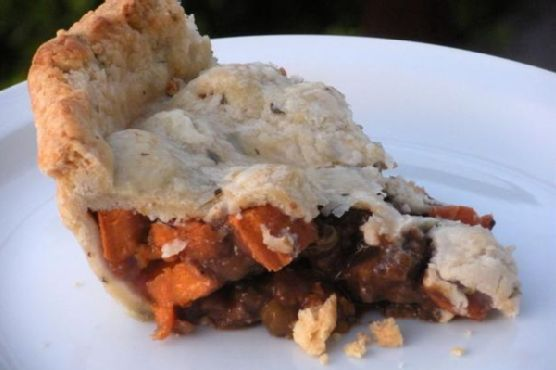
Lamb & Sweet Potato Pot Pie
Intro
There’s something magical about the aroma of a pot pie baking in the oven. It takes me back to my childhood, to the small, cozy kitchen in my grandmother’s house. She would make her famous pot pies on chilly autumn afternoons, and the scent of savory herbs and buttery crust would fill the air. Today, I’m excited to share with you a special recipe that’s dear to my heart: Lamb & Sweet Potato Pot Pie. This dish combines tender lamb, sweet potatoes, and a medley of delightful ingredients to create a comforting meal that’s perfect for any occasion.
Why You’ll Love It
This Lamb & Sweet Potato Pot Pie is a beautiful fusion of flavors and textures. The rich, savory lamb pairs perfectly with the sweetness of the potatoes, while the herbs add a fragrant touch to the dish. The pie crust is buttery and flaky, providing the perfect vessel for the delicious filling. Whether you’re preparing it for a special family dinner or simply craving a comforting meal, this pot pie is sure to become a favorite in your household.
Ingredients
- 2 lbs lamb, cubed
- 1 ½ tsp kosher salt
- ½ tsp black pepper
- 1 tsp caraway seeds
- 2 cloves garlic, minced
- 2 tbsp flour
- 2 tbsp olive oil
- 1 red onion, chopped
- 2 celery stalks, diced
- 1 cup red wine
- 1 cup demi glace
- 1 bay leaf
- 1 cup frozen peas
- 2 sweet potatoes, peeled and diced
- 1 tbsp cornstarch
- 1/4 cup water
- Zest of 1 lemon
- Zest of 1 orange
- 1 tbsp fresh rosemary, chopped
- 1 tbsp fresh thyme, chopped
- 2 ½ cups flour
- 1 tbsp sugar
- 1 tsp kosher salt
- 1 cup butter, chilled and cubed
- ½ cup shortening, chilled
- ½ cup ice water
- Milk for brushing
Instructions
- Start with the crust. Combine flour, sugar, rosemary, thyme, and salt in a large bowl. Add chilled butter and combine with a pastry blender.
- Add shortening and combine to cut into the flour and butter mixture until it resembles coarse cornmeal.
- Slowly add ice water by tablespoons, mixing well after each addition until the dough begins to stick together.
- Place dough on a flat surface and divide into two even pieces. Roll into balls, dust lightly with flour, and wrap in plastic. Refrigerate for at least an hour.
- Toss lamb with salt, pepper, caraway seeds, garlic, and flour, then set aside.
- As the dough chills, heat olive oil in a wide, deep pan. When sizzling, add lamb pieces and cook on medium heat until just browned. Remove and set aside.
- If necessary, add more olive oil to the same pan and scrape up all the drippings. Add onion and celery, cooking until soft and translucent.
- Pour in wine and demi glace, stirring well, then add lamb back to the pan along with peas and bay leaf. Cover, turn down to a simmer, and cook for about 15 minutes.
- Mix water and cornstarch, then pour into the lamb and veggies, mixing well. Add sweet potatoes and cook for another 5-7 minutes. Remove from heat and cool completely. Remove the bay leaf.
- Once the filling has cooled, roll one dough ball on a floured surface for the bottom crust layer. Place in a 9-inch pie dish and trim edges, then refrigerate.
- Roll the second piece of dough for the top crust. Remove the bottom crust from the fridge, pour in the filling, and top with the second layer. Trim and seal edges.
- Chill assembled pie briefly if the dough feels soft. Just before baking, brush milk over the top crust.
- Bake in a preheated oven at 375°F for 45-50 minutes or until golden brown.
- For early preparation, let the filling cool completely, assemble the pie, and chill until ready to bake.
Tips
For the best results, ensure all your crust ingredients are cold before you start mixing. This will help achieve that flaky texture we all love in a pie crust. If the dough becomes too warm while working with it, place it back in the fridge for a quick chill. Also, avoid skipping the step of letting the filling cool completely before assembling the pie; this prevents the crust from becoming soggy.
Variations & Substitutions
If lamb isn’t your preference, you can substitute it with beef or chicken. For a vegetarian version, skip the meat and add more vegetables like mushrooms or bell peppers. To add more depth of flavor, consider incorporating different herbs such as sage or adding a touch of smoked paprika for a smoky taste.
Storage
This pot pie can be stored in the refrigerator for up to 3 days. If you have leftovers, consider reheating them in the oven to preserve the crust’s texture. Alternatively, you can freeze the assembled, unbaked pie for up to a month. When ready to bake, allow it to thaw in the refrigerator overnight before baking as directed.
FAQ
Can I make the dough ahead of time?
Yes! The pie dough can be made up to two days in advance. Simply wrap it tightly in plastic wrap and store it in the refrigerator. You can also freeze the dough for up to a month. Just let it thaw in the fridge overnight before using.
What if I don’t have demi glace?
If you don’t have demi glace on hand, you can use beef broth as a substitute. Just be sure to reduce the amount of salt you add to the filling, as broth is saltier than demi glace.
How do I prevent the crust from getting soggy?
Ensuring the filling is completely cooled before assembling the pie is crucial. Additionally, baking the pie in the lower third of the oven can help the bottom crust cook more evenly and prevent sogginess.
Nutrition
While I haven’t provided specific nutritional information for this recipe, it is a hearty and filling dish that’s rich in protein and nutrients from the lamb and vegetables. If you’re watching your calorie intake, consider using less butter or replacing some of the pastry ingredients with whole wheat flour for a lighter alternative.
Conclusion
There you have it—a delightful Lamb & Sweet Potato Pot Pie that brings warmth and comfort to any table. Whether you’re reminiscing about childhood memories or creating new ones with loved ones, this recipe is sure to become a cherished favorite. I hope you enjoy making and sharing this dish as much as I do. And remember, the secret to the perfect pot pie lies in the love and care you put into each step. Happy cooking!
Related update: Lamb & Sweet Potato Pot Pie
Related update: Havarti and Asparagus Quiche