How to Make Easy Cheesy Garlic Bread | Made by Meaghan Moineau

How to Make Easy Cheesy Garlic Bread

Intro

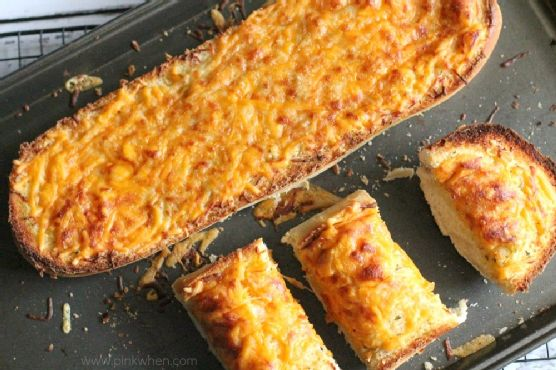
If there’s one dish that can transport me back to my childhood kitchen, it’s cheesy garlic bread. I vividly remember the aroma wafting through the house as my mom prepared this delicious treat for family dinners. We’d gather around the table, eagerly waiting for the hot, bubbly bread to make its way out of the oven. This easy cheesy garlic bread recipe has been a staple in our family, and I’m excited to share it with you. It’s simple, comforting, and perfect for any occasion.

Why You’ll Love It

This cheesy garlic bread is the perfect blend of crispy, cheesy, and garlicky goodness. Whether you’re serving it as an appetizer or a side dish, it’s bound to be a hit. Here’s why you’ll fall head over heels for this recipe:

  • Quick and Easy: With just a few ingredients and minimal prep time, you can have this savory treat ready in about 20 minutes.
  • Customizable: You can easily tweak the recipe to suit your taste preferences or dietary needs.
  • Family-Friendly: It’s a hit with kids and adults alike, making it a great option for family dinners or gatherings.
  • Flavorful: The combination of garlic, cheese, and fresh parsley creates an irresistible flavor profile.

Ingredients

  • 1 loaf of French white bread (Vienna)
  • 1/4 cup butter
  • 1/4 cup extra virgin olive oil
  • 3 cloves garlic, minced
  • 2 tablespoons fresh parsley, chopped
  • 1 cup mixed mozzarella and cheddar cheese, shredded
  • 1/4 cup Parmigiano Reggiano, grated

Instructions

  1. Preheat your oven to 350°F (175°C).
  2. Cut the loaf of bread into two halves lengthwise.
  3. In a small pan over medium heat, melt the butter and combine it with the olive oil, minced garlic, and chopped parsley. Stir frequently until the garlic is fragrant, about 2-3 minutes. Be careful not to burn the garlic.
  4. Brush the butter-garlic mixture over the cut sides of the bread halves, ensuring an even coating.
  5. In a bowl, mix together the mozzarella, cheddar, and Parmigiano Reggiano cheeses until well combined.
  6. Evenly distribute the cheese mixture over the garlic-buttered bread halves, covering them completely.
  7. Place the bread on a baking sheet and bake in the preheated oven for 10 minutes or until the cheese is bubbly and golden brown.
  8. Remove from the oven and allow to cool slightly before slicing and serving. Enjoy!

Tips

Here are some helpful tips to ensure your cheesy garlic bread turns out perfectly every time:

  • Use Fresh Ingredients: Fresh garlic and parsley will provide the best flavor. Avoid using pre-minced garlic if possible.
  • Watch the Garlic: Garlic can quickly go from fragrant to burnt, so keep a close eye on it while melting the butter.
  • Serve Warm: This bread is best enjoyed fresh out of the oven when the cheese is still gooey and the bread is crispy.

Variations & Substitutions

Feel free to get creative with this recipe! Here are a few variations and substitutions you might consider:

  • Herbs: Add a sprinkle of Italian seasoning or dried oregano for extra flavor.
  • Spicy Kick: For those who love a little heat, add a pinch of red pepper flakes to the butter mixture.
  • Vegan Option: Substitute the cheeses with your favorite vegan cheese blend and use vegan butter.
  • Different Bread: Try using ciabatta or sourdough for a different texture and flavor profile.

Storage

If you have leftovers (which might be unlikely!), you can store them in an airtight container in the refrigerator for up to 3 days. To reheat, place the bread in a preheated oven at 350°F (175°C) for 5-7 minutes, or until warmed through and the cheese is melty again.

FAQ

Can I make this bread ahead of time?

Yes, you can prepare the bread up to the point of baking and store it covered in the refrigerator for up to 24 hours. When you’re ready to serve, simply bake as directed, adding a couple of minutes to the baking time if needed.

Can I freeze cheesy garlic bread?

While it’s best enjoyed fresh, you can freeze the prepared bread before baking. Wrap it tightly in plastic wrap and aluminum foil, then freeze for up to 2 months. Bake from frozen, adding additional time as necessary until the cheese is bubbly and golden.

Nutrition

While I don’t have exact nutritional information for this recipe, it’s important to note that cheesy garlic bread is a treat best enjoyed in moderation. If you’re looking to reduce calories or fat, consider using less cheese or opting for a whole-grain bread option.

Conclusion

This easy cheesy garlic bread is a comforting and delicious addition to any meal. Whether you’re serving it as a side dish for pasta night or as a snack for game day, it’s sure to be a crowd-pleaser. I hope this recipe brings as much joy to your table as it has to mine. Enjoy the cheesy, garlicky goodness, and don’t be surprised if it becomes a regular request from family and friends!

Related update: How to Make Easy Cheesy Garlic Bread

Related update: Yorkshire Pudding

Fettuccine With Bacon Mushroom and Peas | Made by Meaghan Moineau

Fettuccine With Bacon, Mushroom, and Peas

Intro

There’s something magical about a steaming plate of pasta that transcends the ordinary. It has this incredible ability to transport us back in time, to moments filled with laughter, love, and the comforting aroma of a home-cooked meal. I remember the first time I tasted this delightful combination of fettuccine with bacon, mushroom, and peas. It was a chilly evening, and I was at my grandmother’s house. She had a knack for creating dishes that were simple yet bursting with flavor. This dish quickly became a family favorite, and every bite feels like a warm hug from her. Today, I’m thrilled to share this recipe with you, hoping it brings the same warmth and joy to your table.

Why You’ll Love It

This Fettuccine with Bacon, Mushroom, and Peas is a delightful blend of textures and flavors. It’s creamy, savory, and oh-so-satisfying! The smoky bacon, earthy mushrooms, and vibrant peas all come together in a luscious cream sauce that clings to every strand of fettuccine. Perfect for a weeknight dinner or a special occasion, this dish is quick to prepare and utterly comforting. Plus, it’s a versatile recipe that invites customization to suit your taste preferences.

Ingredients

  • Bacon
  • Cheese
  • Canned condensed cream of mushroom
  • Dried basil
  • Fettuccine
  • Black ground pepper
  • Canned mushroom
  • Dried oregano powder
  • Frozen green peas

Instructions

  1. Bring a large pot of water to boil over high heat and add a generous pinch of salt. Add the fettuccine and cook for about 9 minutes or until al dente.
  2. While the pasta is cooking, heat a pan over medium-high heat and brown the bacon. Once crispy, remove the bacon and drain it on paper towels. Set aside.
  3. Pour the excess oil out of the pan, leaving just a touch for flavor. Sauté the canned mushrooms for about a minute.
  4. Add the canned condensed cream of mushroom and a can of water to the pan. Stir well to combine.
  5. Season with ground black pepper, dried oregano, and/or basil, if desired. Bring the sauce to a gentle boil.
  6. Add the frozen green peas and a modest amount of grated cheese. Taste the sauce before adding more cheese, as the cream of mushroom can be quite salty.
  7. Once the pasta is cooked, drain it and add it to the sauce. Mix well to ensure each strand is coated.
  8. Crumble the cooked bacon and add it to the pasta. Give everything a good mix, then serve immediately. Enjoy!

Tips

For the best results, use high-quality bacon and freshly grated cheese. This enhances the flavor of the dish significantly. If you find the sauce too thick, add a splash of pasta water to reach your desired consistency. Be cautious with the salt as the bacon and cream of mushroom already contribute to the dish’s saltiness.

Variations & Substitutions

You can easily adapt this recipe to suit your dietary needs or preferences. For a vegetarian version, omit the bacon and add extra mushrooms or some sautéed spinach. If you’re not a fan of peas, substitute them with chopped asparagus or broccoli. You can also experiment with different types of cheese, such as Parmesan or Asiago, for a unique flavor profile.

Storage

This pasta dish is best enjoyed fresh, but leftovers can be stored in an airtight container in the refrigerator for up to 3 days. To reheat, gently warm it on the stovetop over low heat, adding a splash of milk or cream to bring back the creaminess. Avoid microwaving, as it may dry out the pasta.

FAQ

Can I use fresh mushrooms instead of canned?

Absolutely! Fresh mushrooms will add a wonderful texture and flavor. Simply slice them and sauté them in the pan before adding the cream of mushroom soup.

What type of cheese works best in this recipe?

A sharp cheddar or Parmesan cheese complements the flavors beautifully. However, feel free to use your favorite cheese or a blend to suit your taste.

Is it possible to make this dish gluten-free?

Yes, you can use gluten-free fettuccine to make this dish gluten-free. Ensure that any canned ingredients and seasonings are also certified gluten-free.

Nutrition

While it’s important to enjoy indulgent meals in moderation, this recipe offers a balance of protein from the bacon, fiber from the peas, and satisfying carbs from the pasta. Remember to consider portion control, especially if you’re watching your caloric intake.

Conclusion

Fettuccine with Bacon, Mushroom, and Peas is more than just a meal; it’s an experience. It’s a dish that brings people together, creates cherished memories, and satisfies the soul. Whether you’re cooking for loved ones or simply treating yourself, this recipe promises warmth and comfort in every bite. I hope this dish becomes a beloved part of your culinary repertoire, just as it has in my family. Happy cooking!

Related update: Fettuccine With Bacon Mushroom and Peas

Related update: Smoky Chicken Tacos