Roasted red peppers and tomatoes salad | Made by Meaghan Moineau

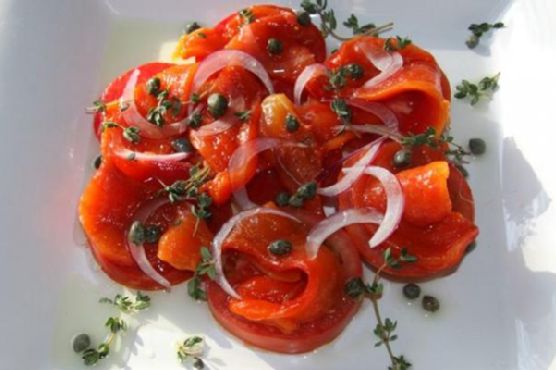
Roasted Red Peppers and Tomatoes Salad

Intro

There’s something magical about the aroma of roasted red peppers wafting through the kitchen. It instantly transports me back to summers spent at my grandmother’s house, where she would prepare the most delightful salads with freshly picked vegetables from her garden. The vibrant colors and rich flavors were a staple at family gatherings, and it’s a tradition I’ve lovingly carried on in my own home. This roasted red peppers and tomatoes salad is a true celebration of those cherished memories and a testament to the simple joys of wholesome cooking.

Why You’ll Love It

This salad is not just another side dish; it’s a symphony of flavors and textures that will captivate your senses. The sweetness of roasted red peppers pairs beautifully with the juicy tartness of ripe tomatoes. Add the mild sharpness of red onions and the briny pop of capers, and you’ve got a dish that’s as satisfying as it is refreshing. It’s a versatile recipe that works equally well as a light lunch, a side for grilled meats, or even a vibrant addition to a picnic spread. Not to mention, it’s incredibly easy to prepare, making it a perfect choice for both novice cooks and seasoned chefs.

Ingredients

  • 2 red bell peppers
  • 1 ripe tomato, thickly sliced
  • 1/2 red onion, thinly sliced
  • 2 tablespoons capers
  • 3 tablespoons olive oil
  • Coarse salt, to taste
  • Cracked black pepper, to taste
  • Fresh thyme, for garnish

Instructions

  1. Char the red bell peppers over a grill or gas flame, or on a cookie sheet under the broiler. Turn the peppers frequently as their skin blisters and chars on all sides.
  2. Transfer the charred peppers to a bowl and cover it to let them steam. This will make the skin easier to peel off.
  3. Once the peppers are cool to the touch, peel off the skin with your fingers, pull off the stems, then tear them open and remove and discard the seeds.
  4. Cut the peeled peppers into large pieces.
  5. Arrange the thickly sliced ripe tomato and large bell pepper pieces on a serving platter.
  6. Scatter the thinly sliced red onion and capers over the tomatoes and peppers.
  7. Drizzle the salad with olive oil and season to taste with coarse salt and cracked black pepper.
  8. Garnish with fresh thyme before serving.

Tips

To make peeling the peppers even easier, you can place them in a sealed plastic bag or a covered bowl after roasting. The trapped steam will help loosen the skin, making it more effortless to remove. Additionally, choosing ripe, firm tomatoes will ensure they hold their shape and add a burst of flavor to the salad.

Variations & Substitutions

Feel free to get creative with this salad. If you’re not a fan of capers, olives can be a great substitute, offering a similar briny kick. For a bit of creaminess, add slices of fresh mozzarella or sprinkle some crumbled feta over the top. Herbs like basil or parsley can replace thyme if you prefer a different aromatic note.

Storage

This salad is best enjoyed fresh, but if you have leftovers, store them in an airtight container in the refrigerator for up to two days. Keep in mind that the flavors will meld together over time, which can enhance the taste, but the texture of the tomatoes and peppers might become a bit softer.

FAQ

Can I use yellow or orange bell peppers instead?

Absolutely! Yellow or orange bell peppers can be used in place of red ones. They will add a slightly different sweetness and color to the salad, but the overall flavor will remain delicious.

Is this salad suitable for a vegan diet?

Yes, this salad is naturally vegan. It’s packed with plant-based goodness, and its vibrant ingredients make it a nutritious choice for anyone following a vegan lifestyle.

Nutrition

This salad is not only flavorful but also packed with nutrients. It’s rich in vitamins A and C from the bell peppers and tomatoes, while the olive oil provides healthy fats. It’s low in calories, making it a perfect choice for those looking to enjoy a healthy and satisfying meal.

Conclusion

This roasted red peppers and tomatoes salad is more than just a dish; it’s a nostalgic journey back to simpler times, where the focus was on fresh ingredients and bold flavors. Whether you’re hosting a family gathering or simply looking to enjoy a wholesome meal, this salad is sure to impress. It’s a tribute to the beauty of uncomplicated cooking and a reminder that the best recipes are often the ones passed down through generations. Enjoy this delightful salad and savor the moments it brings to your table.

Related update: Roasted red peppers and tomatoes salad

Related update: Green Beans with Garlic Chips

Related update: Easy Gluten Free Vegetarian Pasta Salad

Chicken Enchilada Salad Wraps | Made by Meaghan Moineau

Chicken Enchilada Salad Wraps

Intro

There’s something magical about recipes that bring back fond memories of family gatherings and cozy evenings. One of my favorite memories is of family picnics at the park, where my mom would pack a basket full of delicious and easy-to-eat meals. Among the assortment of sandwiches and snacks, her Chicken Enchilada Salad Wraps were always a hit. These wraps are the perfect blend of flavor and convenience, making them ideal for any occasion, whether it’s a quick lunch or a delightful picnic treat. Today, I’m excited to share this beloved recipe so you can enjoy these wraps as much as my family has over the years.

Why You’ll Love It

Chicken Enchilada Salad Wraps are the ultimate combination of flavor, ease, and versatility. Here’s why you’ll fall in love with this recipe:

  • Quick and Easy: With just a few simple ingredients, you can whip up these wraps in no time.
  • Flavorful: The creamy, spicy filling is balanced with fresh ingredients, making each bite a burst of deliciousness.
  • Versatile: Perfect for a quick meal, packed lunch, or a picnic snack.
  • Healthy: Made with light cream cheese and sour cream, these wraps are a lighter option that doesn’t compromise on taste.

Ingredients

  • 4 oz light cream cheese, softened
  • 1/2 cup sour light cream
  • 1 tsp chili powder
  • 1/2 tsp cumin
  • 1 clove garlic, minced
  • 1 can (12.5 oz) Swanson Premium Chicken, drained
  • 1 cup shredded cheddar cheese
  • 1 can (10 oz) diced tomatoes with green chilies, drained
  • 1/4 cup diced green onions
  • 2 tbsp fresh cilantro, chopped
  • 2 cups lettuce, chopped
  • 6 burrito-sized tortillas

Instructions

  1. In a medium bowl, blend together the light cream cheese, sour cream, chili powder, cumin, and minced garlic until smooth and well combined.
  2. Fold in the shredded cheddar cheese, Swanson Premium Chicken, drained tomatoes with green chilies, diced green onions, and chopped cilantro into the cream cheese mixture.
  3. Lay out the burrito-sized tortillas and divide the chicken mixture evenly among them.
  4. Top each tortilla with a portion of the chopped lettuce.
  5. Roll up each tortilla burrito-style, tucking in the sides as you go.
  6. Serve immediately or wrap in foil for later. Enjoy!

Tips

For the best Chicken Enchilada Salad Wraps, consider these helpful tips:

  • Ensure the cream cheese is softened for easier mixing.
  • To make rolling easier, slightly warm the tortillas before filling.
  • Cut wraps in half diagonally for easy handling, especially for packed lunches or picnics.

Variations & Substitutions

The beauty of this recipe is its flexibility. Here are some variations and substitutions you might consider:

  • Spice Level: Adjust the chili powder for more or less heat, or add a dash of hot sauce for an extra kick.
  • Protein: Swap the canned chicken for grilled chicken breast or rotisserie chicken for a different texture.
  • Cheese: Try using Monterey Jack or pepper jack cheese for a different flavor profile.
  • Tortillas: Use whole wheat or spinach tortillas for added nutrition.

Storage

These wraps are best enjoyed fresh, but they can also be stored for later:

  • Refrigerate: Wrap each enchilada salad wrap tightly in plastic wrap or foil and store in the refrigerator for up to 2 days.
  • Freeze: Although not recommended due to the fresh ingredients, you can freeze wraps without the lettuce for up to 1 month. Thaw in the refrigerator before adding fresh lettuce and serving.

FAQ

Can I make these wraps ahead of time?

Yes, you can prepare the filling a day in advance and store it in an airtight container in the refrigerator. Assemble the wraps just before serving to ensure they remain fresh and crisp.

What can I serve with Chicken Enchilada Salad Wraps?

These wraps are a meal on their own, but you can serve them with a side of tortilla chips, salsa, or a fresh fruit salad for a complete meal experience.

Can I make this recipe vegetarian?

Absolutely! Replace the chicken with canned black beans or grilled vegetables for a delicious vegetarian version.

Nutrition

While exact nutritional values can vary based on specific brands and quantities used, here’s an approximate breakdown per serving (1 wrap):

  • Calories: 320
  • Protein: 20g
  • Carbohydrates: 28g
  • Fat: 14g
  • Fiber: 3g

Conclusion

Chicken Enchilada Salad Wraps are a delightful blend of convenience and flavor, making them a fantastic choice for any meal or occasion. Whether you’re packing a lunch for work, planning a picnic, or simply looking for a quick and satisfying meal at home, these wraps are sure to please. Give this recipe a try, and I hope it becomes a staple in your household, just as it has in mine. Enjoy every bite!

Related update: Chicken Enchilada Salad Wraps

Square Deviled Eggs | Made by Meaghan Moineau

Square Deviled Eggs: A Fun Twist on a Classic Appetizer

Intro

There is something truly delightful about deviled eggs. They are a timeless appetizer, cherished at family gatherings, holiday dinners, and picnics alike. As a child, I remember standing on a stool in my grandmother’s kitchen, watching her expertly prepare deviled eggs. The aroma of boiled eggs mingled with the tangy scent of mustard filled the air, and I was entranced by the magic of this simple dish. Today, I’m excited to share a unique twist on this classic recipe: Square Deviled Eggs. Perfect for surprising your guests or adding a touch of whimsy to your dining table, these square-shaped delights are not only fun to make but also utterly delicious!

Why You’ll Love It

Square Deviled Eggs are not just a visual treat; they also offer a delightful culinary experience. Here’s why you’ll love them:

  • Fun and Unique: The square shape adds a playful twist to the traditional deviled egg, making it a conversation starter at any gathering.
  • Kid-Friendly: The creamy filling is soft and mild, making it a hit with children and adults alike.
  • Versatile: Perfect for parties, picnics, or as a unique addition to your holiday spread.

Ingredients

  • Medium-sized cooked eggs
  • Cream cheese
  • Ham

Instructions

  1. Begin by preparing your hard-boiled eggs. Place the eggs in a saucepan and cover them with cold water.
  2. Bring the water to a boil over medium heat. Once boiling, let the eggs cook for 5 minutes.
  3. Remove the saucepan from heat and let the eggs stand covered in hot water for 10 minutes.
  4. Once cooled, peel the eggs.
  5. To create the square shape, use an Egg cuber or Square Egg Press (see note below for purchase options). Slide each peeled egg into the press and screw the top down gently, pushing the egg into the corners.
  6. Allow the eggs to cool completely before removing them from the mold. For the best results, use medium-sized eggs.
  7. For the filling, mash the egg yolks with cream cheese and finely chopped ham until smooth and creamy.
  8. Carefully fill the square-shaped egg whites with the creamy yolk mixture. Serve chilled.

Tips

Here are some tips to ensure your Square Deviled Eggs turn out perfectly every time:

  • Plan Ahead: If you plan to serve these at a party, consider investing in multiple egg cubers to save time.
  • Egg Size: Medium-sized eggs work best to fit into the egg press molds.
  • Cooling Time: Make sure the eggs are completely cooled before removing them from the mold for a perfect square shape.

Variations & Substitutions

If you’re looking to mix things up, consider these variations and substitutions:

  • Spicy Twist: Add a dash of hot sauce or sprinkle of cayenne pepper to the filling for a spicy kick.
  • Vegetarian Option: Omit the ham and add finely chopped herbs like dill or chives for a refreshing flavor.
  • Cheese Lovers: Substitute cream cheese with a sharp cheddar for an extra cheesy flavor.

Storage

Store any leftover Square Deviled Eggs in an airtight container in the refrigerator for up to two days. For best quality, consume them as soon as possible. The texture and flavor are at their peak when fresh.

FAQ

Where can I purchase an Egg cuber or Square Egg Press?

Egg cubers or square egg presses are available online through major retailers such as Amazon or specialty kitchen stores. They are an affordable and fun addition to your kitchen tools.

Can I make Square Deviled Eggs in advance?

Yes, you can prepare the eggs and filling in advance. Simply store them separately in the refrigerator and assemble just before serving.

Nutrition

Square Deviled Eggs are a nutritious appetizer option. The eggs provide a good source of protein, while cream cheese and ham add a touch of richness. For a lighter version, consider using low-fat cream cheese.

Conclusion

Square Deviled Eggs are sure to bring joy and surprise to your dining table. Whether you’re hosting a party, enjoying a picnic, or simply looking for a fun way to enjoy a classic dish, these eggs are a delightful choice. With a touch of nostalgia and a modern twist, they are perfect for all occasions. So grab your Egg cuber, invite your loved ones, and enjoy this whimsical take on an old favorite!

Related update: Square Deviled Eggs

Related update: Guacamole

Related update: Easy Thanksgiving Entertaining