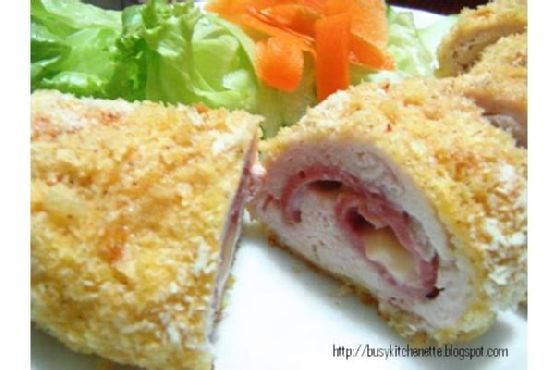
Easy Chicken Cordon Bleu
Intro
There’s something about the aroma of a good Chicken Cordon Bleu that always takes me back to my grandmother’s kitchen. I remember sitting on a stool, watching her skillfully roll each chicken breast, the aroma of melting cheese filling the air. Her version of this classic dish was something I looked forward to every Sunday dinner. Today, I’ve taken that cherished recipe and added a few personal touches, making it even easier for you to bring a piece of that nostalgia into your own home.
Why You’ll Love It
This Easy Chicken Cordon Bleu recipe is perfect for a cozy dinner at home or a special occasion. Its simplicity doesn’t compromise its flavor. You’ll love how the juicy chicken breast wraps around savory ham and oozy cheddar cheese, all encased in a crispy breadcrumb coating. It’s a dish that’s as delightful to make as it is to eat, and it doesn’t require any fancy cooking techniques. Plus, it’s customizable to your taste preferences, making it a versatile addition to your recipe arsenal.
Ingredients
- 4 skinless boneless chicken breasts
- 4 slices of ham
- 8 sticks of cheddar cheese (or more, if you’re a cheese lover!)
- Salt, to taste
- Ground peppercorn, to taste
- 1 cup bread crumbs
- 1/2 cup all-purpose flour
- 2 eggs, beaten
- Butter
Instructions
- Preheat your oven to 180°C (350°F).
- Gently pound the chicken breasts to about 1/4 inch thickness using a meat mallet. This ensures even cooking and makes it easier to roll.
- Season both sides of the chicken with salt and ground peppercorn.
- Place 1 slice of ham and 2 sticks of cheddar cheese on top of each breast. Feel free to add more cheese if desired!
- Roll up each breast tightly and secure with a toothpick to hold the shape.
- Dredge each rolled chicken breast in flour, ensuring it’s lightly coated.
- Brush each roll with beaten eggs, then roll in bread crumbs for a crispy coating.
- Brush a baking pan with olive oil and place the chicken rolls inside.
- Bake in the preheated oven for about 20 minutes.
- Layer each roll with butter cubes. Allow the butter to melt on top, infusing the rolls with its flavor and aroma.
- Bake for another 15 minutes, or until the chicken is cooked through and the coating is golden brown.
- Remove from the oven and let rest for a few minutes before serving with your favorite sauce.
Tips
For the best results, make sure to pound the chicken thinly and evenly. This not only helps with rolling but also ensures the chicken cooks evenly. If you’re a cheese enthusiast like me, don’t hesitate to add a bit more cheese for an extra gooey center. Lastly, using fresh breadcrumbs can elevate the texture of the crust, giving it a superior crunch.
Variations & Substitutions
Feel free to experiment with different types of cheese; Swiss cheese or Gruyère can be excellent substitutes for cheddar. For a healthier twist, you can use whole wheat breadcrumbs or almond flour instead of regular bread crumbs. If you prefer a different type of meat, turkey breast is a great alternative to chicken.
Storage
Leftover Chicken Cordon Bleu can be stored in an airtight container in the refrigerator for up to 3 days. To reheat, place the rolls in a preheated oven at 175°C (350°F) until warmed through. Avoid microwaving as it can make the breadcrumb coating soggy.
FAQ
Can I prepare Chicken Cordon Bleu ahead of time?
Yes, you can prepare the rolls ahead of time and store them in the refrigerator for up to 24 hours before baking. This makes it a great dish for entertaining, as you can do all the prep work in advance.
What sauce pairs well with Chicken Cordon Bleu?
A creamy Dijon mustard sauce or a simple white wine sauce pairs wonderfully with Chicken Cordon Bleu. The tanginess of the mustard complements the richness of the chicken and cheese perfectly.
Can I freeze Chicken Cordon Bleu?
Absolutely! Once the chicken rolls are assembled, wrap them tightly in plastic wrap and freeze for up to 2 months. When you’re ready to cook, thaw them in the refrigerator overnight before baking.
Nutrition
This recipe serves four and provides approximately 400 calories per serving, with 25g of protein, 20g of fat, and 30g of carbohydrates. Please note that these values can vary based on the specific brands and quantities used.
Conclusion
This Easy Chicken Cordon Bleu recipe is not just a nod to a timeless classic but also a celebration of flavors and memories. It’s perfect for a family dinner or an impressive dish for guests. With its crispy exterior and melty interior, it’s bound to become a beloved favorite in your household, just as it has in mine. Enjoy the process, and don’t forget to savor every bite!
Related update: Easy Chicken Cordon Bleu
Related update: Kielbasa With Brussels Sprouts In Mustard Cream Sauce