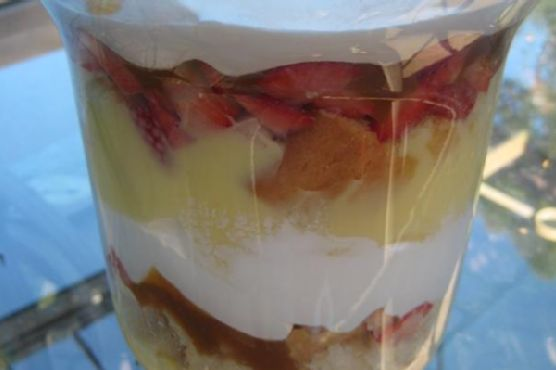
Caramel Almond Berry Trifle
Intro
There’s something truly special about desserts that combine layers of flavor and texture, and the Caramel Almond Berry Trifle is a perfect example of this magic. This dessert takes me back to warm summer afternoons at my grandmother’s house, where the aroma of fresh berries and sweet caramel wafted through the air. The kitchen was always bustling with activity, and the centerpiece was always a beautiful trifle that brought smiles to everyone’s faces. Today, I’m sharing this cherished recipe with you, hoping it brings as much joy to your table as it did to ours.
Why You’ll Love It
This Caramel Almond Berry Trifle is a showstopper for several reasons. First, it combines the richness of butterscotch caramel with the freshness of berries, creating a balance that will delight your taste buds. The almond extract adds a subtle but distinct flavor that elevates the entire dessert. It’s a perfect treat for gatherings, as it’s easy to make and assemble, yet impressive enough to wow your guests. Whether you’re hosting a summer party or just want to indulge in a sweet treat, this trifle is bound to become a favorite.
Ingredients
- 1 large box of vanilla pudding mix
- Milk (as directed on pudding package)
- 1 cap full of almond extract
- Fresh berries (such as strawberries, blueberries, and raspberries)
- Mrs. Richardson’s Butterscotch Caramel Sauce
- 1 container of Cool Whip
- Pound cake, cut into cubes
Instructions
- Prepare the vanilla pudding by mixing the pudding mix with milk according to the package instructions.
- Add one cap full of almond extract to the pudding and mix well. Allow the pudding to set by chilling it in the refrigerator.
- Once the pudding has set, begin layering the trifle. Start with a thick layer of pudding at the bottom of your trifle dish.
- Add a layer of pound cake cubes over the pudding.
- Spread a layer of fresh berries over the pound cake.
- Drizzle a generous amount of butterscotch caramel sauce over the berries.
- Add a layer of Cool Whip on top of the caramel sauce.
- Repeat the layers until you reach the top of your dish, ending with Cool Whip.
- Top with additional fresh berries and a final drizzle of caramel sauce for a beautiful finish.
Tips
For the best results, make sure your pudding is fully set before beginning the layering process. This will help each layer maintain its shape. You can also slightly toast the pound cake cubes for added texture and flavor. Ensure your berries are fresh and washed thoroughly, and consider using a mix of different berries for a more vibrant presentation.
Variations & Substitutions
If you want to switch things up, consider using different flavors of pudding, such as chocolate or butterscotch, instead of vanilla. You can also swap the pound cake for angel food cake or even brownies for a richer dessert. For a nut-free version, simply omit the almond extract. If fresh berries are not available, frozen berries can be used, but make sure to thaw and drain them properly to avoid excess moisture in your trifle.
Storage
The Caramel Almond Berry Trifle is best enjoyed fresh, but it can be stored in the refrigerator for up to two days. Cover the dish with plastic wrap to keep the layers intact and prevent the dessert from absorbing any fridge odors. Note that the longer it sits, the more the layers will blend together, which may affect the texture.
FAQ
Can I make this trifle ahead of time?
Yes, you can prepare the individual components of the trifle, such as the pudding and cake, a day in advance. Assemble the trifle on the day you plan to serve it to ensure the freshest layers and presentation.
What can I do if I don’t have a trifle dish?
If you don’t have a trifle dish, any large, clear bowl will work. You can also create individual servings using smaller glasses or jars, which makes for a beautiful presentation at parties.
Nutrition
While this trifle is a treat best enjoyed in moderation, it’s good to be aware of its nutritional content. Each serving provides a delightful combination of carbohydrates, fats, and sugars. For a lighter option, consider using sugar-free pudding mix, low-fat Cool Whip, and a reduced-sugar caramel sauce.
Conclusion
The Caramel Almond Berry Trifle is not just a feast for the taste buds but also a feast for the eyes. It combines the best of flavors and textures into a dessert that’s perfect for any occasion. Whether you’re reminiscing about family gatherings or creating new memories, this trifle is sure to become a beloved part of your dessert repertoire. Give it a try, and watch as it becomes a staple at your family gatherings, just as it has in mine.
Related update: Caramel Almond Berry Trifle
Related update: Yoghurt Honey Madeleines