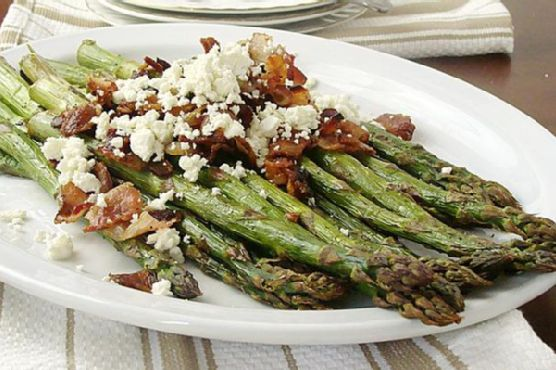
Roasted Asparagus With Bacon and Feta Cheese
Intro
Growing up, Sunday dinners were a cherished tradition in our household. My grandmother, with her gentle hands and warm heart, always knew how to bring the family together with her culinary creations. One of my fondest memories was the way she transformed simple ingredients into something extraordinary. This recipe for Roasted Asparagus with Bacon and Feta Cheese is inspired by those Sunday gatherings, where laughter was abundant, and plates were always full. The combination of tender asparagus, crispy bacon, and creamy feta evokes a sense of nostalgia and warmth, reminiscent of those cherished family meals.
Why You’ll Love It
This dish is a delightful blend of flavors and textures that will have you coming back for more. The savory crispness of bacon paired with the tangy, creamy feta creates a perfect harmony with the fresh, roasted asparagus. It’s an easy-to-make side dish that elevates any meal, providing a gourmet touch without the fuss. Whether you are hosting a dinner party or simply want to treat yourself to something special, this recipe is sure to impress.
Ingredients
- 1 bunch of asparagus, trimmed
- 4 slices of bacon, cooked and crumbled
- 1/4 cup of feta cheese, crumbled
- 2 tablespoons of olive oil
- Salt and pepper to taste
Instructions
- Preheat your oven to 450°F (230°C).
- Place the trimmed asparagus on a baking sheet lined with aluminum foil.
- Drizzle the asparagus with olive oil, ensuring each stalk is well-coated. Season with salt and pepper.
- Roast the asparagus in the preheated oven for about 8 to 10 minutes, or until they are tender and slightly caramelized.
- While the asparagus is roasting, cook the bacon in a skillet over medium heat until it is crisp. Transfer the bacon to a paper towel-lined plate to drain, then crumble it into small pieces.
- Once the asparagus is done, remove it from the oven and transfer it to a serving platter.
- Sprinkle the crumbled bacon over the asparagus, followed by the feta cheese.
- Serve immediately while warm.
Tips
For the best results, choose fresh, firm asparagus with vibrant green color and closed tips. If your asparagus is thick, consider peeling the lower half with a vegetable peeler to ensure even cooking. Be sure not to overcrowd the baking sheet to allow the asparagus to roast evenly.
Variations & Substitutions
If you’re looking to switch things up, try using goat cheese instead of feta for a creamier texture. For a vegetarian version, you can omit the bacon and add toasted pine nuts or sunflower seeds for a crunchy element. Feel free to experiment with different herbs like thyme or rosemary to add more depth of flavor.
Storage
Leftover roasted asparagus can be stored in an airtight container in the refrigerator for up to 3 days. To reheat, place it in a preheated oven at 350°F (175°C) for about 5 minutes, or until warmed through. Keep in mind that reheating might slightly alter the texture of the asparagus.
FAQ
Can I use frozen asparagus?
While fresh asparagus is recommended for the best texture and flavor, you can use frozen asparagus in a pinch. Be sure to thaw and pat it dry before roasting to avoid excess moisture affecting the roast.
What can I serve with this dish?
Roasted Asparagus with Bacon and Feta Cheese pairs beautifully with grilled meats such as chicken, steak, or fish. It also complements other side dishes like roasted potatoes or a fresh garden salad.
Is this dish keto-friendly?
Yes, this dish is low in carbohydrates and high in healthy fats, making it suitable for a keto diet. Just ensure that your bacon and feta are free from added sugars or fillers that might increase carb count.
Nutrition
This recipe is rich in fiber, vitamins, and minerals from the asparagus, as well as healthy fats and protein from the bacon and feta. It is a great low-carb, gluten-free option that fits well into a balanced diet.
Conclusion
Roasted Asparagus with Bacon and Feta Cheese is more than just a side dish; it’s a celebration of flavors that bring comfort and joy. Whether you’re reminiscing about family dinners or creating new memories, this dish is sure to become a favorite in your kitchen. Simple yet sophisticated, it’s a testament to the idea that sometimes the best meals are made with just a few quality ingredients. Enjoy this recipe as a reminder that love, like great food, is best shared around the table.
Related update: Roasted Asparagus With Bacon and Feta Cheese