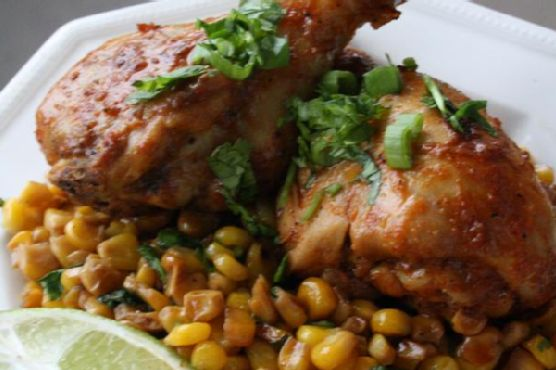
Cumin and Paprika Rubbed Chicken Drumsticks
Intro
There’s something absolutely delightful about the aroma of spices wafting through the kitchen, and this Cumin and Paprika Rubbed Chicken Drumsticks recipe brings back warm, nostalgic memories of family gatherings and weekend dinners. I remember my grandmother preparing a similar dish, where the spicy, earthy scent would fill the house, signaling the delicious feast that awaited us. This recipe is a tribute to those cherished times and is sure to become a favorite in your household too.
Why You’ll Love It
This dish is a perfect blend of simplicity and bold flavors. The cumin and paprika lend a warm, smoky depth to the chicken, while lime juice adds a refreshing tang. It’s a versatile recipe that can be served with a variety of sides, making it a staple in any meal plan. Moreover, the preparation is straightforward and requires minimal ingredients, making it a go-to for busy weeknights or relaxed weekend dinners.
Ingredients
- 6 skinless chicken drumsticks
- 2 teaspoons cumin powder
- 2 teaspoons paprika powder
- 3 garlic cloves, minced
- Juice of 1 lime
- Salt and pepper to taste
- 1 teaspoon olive oil
Instructions
- In a mixing bowl, combine the cumin powder, paprika powder, minced garlic, lime juice, and olive oil. Season with salt and pepper to taste.
- Add the chicken drumsticks to the bowl, ensuring they are well coated with the spice mixture. Let them marinate at room temperature for at least 30 minutes.
- Preheat your oven to 400°F (200°C). Grease an ovenproof pan with a little olive oil.
- Arrange the marinated drumsticks in a single layer in the prepared pan.
- Bake in the preheated oven for 15 minutes at 400°F, then reduce the temperature to 300°F (150°C) and continue cooking for another 15 minutes, or until the chicken is almost cooked through.
- Turn on the broiler. Place the pan under the broiler and continue to cook the chicken, turning them after about 5 minutes on each side, until they achieve a nice color on both sides.
- Serve hot, accompanied by sautéed corn with garlic, chili, and green onions, garnished with fresh cilantro and spring onion greens.
Tips
To enhance the flavor, consider marinating the chicken overnight in the refrigerator. This allows the spices to penetrate deeper into the meat. Also, be sure not to overcrowd the pan, as this ensures even cooking and a nice crispy exterior.
Variations & Substitutions
If you prefer a milder flavor, reduce the amount of paprika. For a spicier kick, add a pinch of cayenne pepper to the marinade. You can also substitute chicken thighs or wings for the drumsticks, adjusting the cooking time as necessary. If lime isn’t available, lemon juice can be used as a substitute.
Storage
Store any leftovers in an airtight container in the refrigerator for up to 3 days. Reheat in a preheated oven at 300°F (150°C) until warmed through. You can also freeze the cooked chicken for up to 2 months; thaw in the refrigerator before reheating.
FAQ
Can I use bone-in chicken breasts instead of drumsticks?
Yes, you can use bone-in chicken breasts, but you will need to adjust the cooking time. Bake at 400°F for about 20 minutes, then reduce the heat and continue as directed, ensuring the internal temperature reaches 165°F.
What sides go well with this dish?
Aside from the recommended sautéed corn, this chicken pairs beautifully with roasted vegetables, a fresh green salad, or a simple rice pilaf.
Nutrition
This dish offers a healthy balance of protein and spices, with each drumstick containing approximately 180 calories, 12g of fat, 2g of carbohydrates, and 16g of protein, making it a nutritious choice for a fulfilling meal.
Conclusion
Cumin and Paprika Rubbed Chicken Drumsticks are more than just a meal; they’re a gateway to cherished memories and a testament to the power of simple, fresh ingredients. Whether you’re cooking for family or friends, this dish is sure to impress and become a beloved staple in your recipe collection. Enjoy every bite!
Related update: Cumin and Paprika Rubbed Chicken Drumsticks
Related update: Cheesy Cowboy Quesadillas