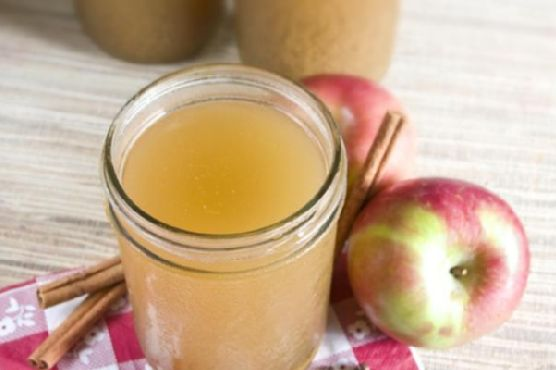
Spiced Apple Cider | Made by Meaghan Moineau

Spiced Apple Cider

Intro

As the leaves begin to turn and the air grows crisp, there’s nothing quite like the comforting warmth of a mug of spiced apple cider. I still remember the autumn afternoons spent at my grandmother’s house, where the scent of cinnamon and apples would fill the air. She would always have a pot simmering on the stove, ready to fill our mugs as we returned from playing in the fallen leaves. Those moments have stayed with me, and now, I find joy in recreating this cozy tradition for my family and friends. Let me share with you my take on this timeless beverage, perfect for any fall gathering or a quiet night in.

Why You’ll Love It

This spiced apple cider is a hug in a mug. It’s incredibly easy to make, filling your home with an inviting aroma that embodies the essence of fall. The combination of freshly pressed apple juice with warming spices like cinnamon, nutmeg, and allspice creates a rich and flavorful drink. Plus, it’s versatile—you can keep it family-friendly or add a splash of dark rum for a grown-up treat. Whether you’re serving it at a festive gathering or sipping it by the fire, this cider is sure to become a seasonal favorite.

Ingredients

  • 1 gallon freshly pressed apple juice
  • 1 tablespoon allspice
  • 4 cinnamon sticks
  • 2 inches fresh ginger, sliced
  • 1/4 cup maple syrup
  • 1/2 teaspoon ground nutmeg
  • 1 orange, sliced
  • 2 cups water

Instructions

  1. In a large non-reactive pot, combine all the ingredients: apple juice, allspice, cinnamon sticks, ginger, maple syrup, nutmeg, orange slices, and water. Stir to mix the spices thoroughly.
  2. Place the pot over medium-high heat and bring the mixture to a boil. Allow it to boil for about 5 minutes to help the flavors meld.
  3. Cover the pot with a lid, reduce the heat, and let it simmer for 30-40 minutes. This will allow the spices to infuse deeply into the cider.
  4. Line a colander with cheesecloth and carefully strain the cider to remove solids. This will leave you with a smooth, spiced liquid.
  5. Serve the cider warm. For an adult version, consider spiking it with a splash of dark rum.

Tips

To enhance the flavor of your cider, try to use freshly pressed apple juice if possible. This makes a significant difference in taste compared to store-bought versions. If you find the cider too sweet, adjust the maple syrup to your liking. Additionally, keep an eye on the simmering time; if you prefer a stronger spice flavor, allow it to simmer longer.

Variations & Substitutions

If you’re missing an ingredient or want to change things up, there are plenty of ways to adapt this recipe. You can substitute honey or brown sugar for the maple syrup if desired. For a citrusy twist, add a few lemon slices along with the orange. If you’re out of fresh ginger, ground ginger can work in a pinch, though fresh is always best for a more robust flavor. For a non-alcoholic zing, consider adding a splash of pomegranate juice before serving.

Storage

Store any leftover cider in an airtight container in the refrigerator for up to a week. To reheat, simply warm it on the stove over low heat, stirring occasionally. Avoid boiling it again to preserve the flavors.

FAQ

Can I make this cider in a slow cooker?

Absolutely! Combine all the ingredients in a slow cooker and cook on low for 4-6 hours. This method is great for keeping the cider warm for a party.

Can I use ground spices instead of whole?

Yes, you can substitute ground spices, but use them sparingly to avoid overpowering the cider. About 1 teaspoon of ground cinnamon and 1/4 teaspoon of ground allspice should suffice.

Is it possible to make this cider sugar-free?

Yes, you can omit the maple syrup if you prefer a sugar-free version. The natural sweetness of the apple juice should still provide plenty of flavor.

Nutrition

While the precise nutritional content can vary based on the specific ingredients used, a typical serving of spiced apple cider (without alcohol) contains approximately:

  • Calories: 120
  • Sugars: 24g
  • Vitamin C: 10% of Daily Value
  • Calcium: 2% of Daily Value

Conclusion

This spiced apple cider is more than just a drink; it’s an experience, a journey back to simpler times when the warmth of a kitchen and the love of family were all you needed to feel at home. Whether you’re serving it at a festive gathering or enjoying a quiet moment by yourself, this cider brings comfort and joy with every sip. I hope this recipe finds a cherished place in your fall traditions, just as it has in mine.

Related update: Spiced Apple Cider

Fresh Peach Margarita With Lime Sugar | Made by Meaghan Moineau

Fresh Peach Margarita With Lime Sugar

Intro

There’s something incredibly nostalgic about sipping on a refreshing cocktail that takes you back to warm summer evenings and gatherings with loved ones. The Fresh Peach Margarita with Lime Sugar does just that. It reminds me of the time I spent at my grandmother’s house in the heart of peach country, where the air always smelled of fresh fruit. We would sit on her porch and watch the sunset, savoring the sweetness of ripe peaches. This margarita is a delightful blend of those cherished memories and the vibrant flavors of peach and lime, offering a unique twist on the classic margarita.

Why You’ll Love It

This Fresh Peach Margarita is not just another cocktail; it’s an experience. The combination of juicy peaches and tangy lime sugar creates a harmony of flavors that’s both refreshing and invigorating. You’ll love the way the lime sugar adds a zesty kick to the sweet peach and smooth tequila, making each sip feel like a mini-vacation. Whether you’re hosting a summer party or simply enjoying a quiet evening at home, this margarita is sure to delight your taste buds and transport you to sunnier days.

Ingredients

  • Ice
  • 1 lime (juice)
  • Lime sugar (1/2 teaspoon of finely minced lime zest and 1/4 cup granulated sugar)
  • 1 ounce orange liquor
  • 1 ripe peach, peeled and sliced
  • 1 ounce peach schnapps
  • 1 tablespoon sugar
  • 2 ounces silver tequila

Instructions

  1. Add 1/2 teaspoon of finely minced lime zest to 1/4 cup granulated sugar and set aside for about 30 minutes, stirring occasionally.
  2. For a pretty presentation, coat the rims of the glasses you are using with lime sugar. Do this by rubbing the rim with a lime wedge and then placing the rim into a plate that has the sugar in it until the rim is coated.
  3. Place all ingredients into the blender and puree until smooth.
  4. If the mixture is too thick, add a little cold water to achieve the desired consistency.
  5. Either chill all ingredients before making or add some ice cubes after you have made the margarita and stir it until it is as cold as you like.
  6. Strain it into your glasses or serve on the rocks, as per your preference.

Tips

For the best flavor, use ripe peaches that are in season. They will be sweeter and more flavorful. If peaches aren’t available, frozen peaches can be used as a substitute. To enhance the lime flavor, consider adding a splash of lime juice directly into the margarita mixture. If you’re a fan of spicy drinks, try adding a dash of chili powder to the rim of your glass along with the lime sugar for an extra kick.

Variations & Substitutions

If you want to mix things up, consider using different fruits. Mango or pineapple can be excellent substitutes for peach, offering a tropical twist. You can also experiment with flavored tequilas or use a splash of coconut rum for a different flavor profile. For a non-alcoholic version, simply omit the tequila and schnapps and replace them with peach juice or nectar.

Storage

If you have any leftover margarita mix, store it in an airtight container in the refrigerator for up to two days. Before serving, give it a good stir or shake, as the ingredients may settle. It’s best enjoyed fresh, so try to consume it as soon as possible for the best taste.

FAQ

Can I make this margarita ahead of time?

Yes, you can prepare the lime sugar and slice the peaches ahead of time. However, for the freshest taste, it’s best to blend the margarita just before serving. If you must make it in advance, store it in the refrigerator and give it a good stir before serving.

What can I use if I don’t have a blender?

If a blender isn’t available, you can use a cocktail shaker. Muddle the peach slices in the shaker to release their juice, then add the rest of the ingredients with ice and shake well. Strain into your glass and enjoy.

Nutrition

While this cocktail is a treat, it’s worth noting that it contains sugar and alcohol, so enjoy it in moderation. The inclusion of fresh fruit does provide some nutritional benefits, such as vitamins and antioxidants from the peaches.

Conclusion

The Fresh Peach Margarita with Lime Sugar is a delightful way to celebrate the flavors of summer. Its vibrant taste and beautiful presentation make it the perfect addition to any gathering or a relaxing evening at home. I hope this recipe brings you as much joy as it has brought me, conjuring memories of sun-drenched days and cherished moments with loved ones. Cheers to creating new memories with every sip!

Related update: Fresh Peach Margarita With Lime Sugar

Related update: Spiced Apple Cider

Green Tea Fruit Medley Smoothie | Made by Meaghan Moineau

Green Tea Fruit Medley Smoothie

Intro

Welcome to your new favorite morning ritual: the Green Tea Fruit Medley Smoothie. There’s something magical about the quiet moments of dawn, where the world is still waking up and a gentle sun peeks through the curtains. It’s in these moments that I find myself reminiscing about the summers spent at my grandmother’s house. She had an expansive garden filled with vibrant berries and a cozy nook where she would brew fresh teas. The sweet aroma of berries mingling with the earthy scent of tea still lingers in my memory, and it’s this memory that inspired today’s recipe. This smoothie encapsulates those cherished mornings, blending the vibrant flavors of fresh berries and soothing green tea into a refreshing, nutrient-packed delight.

Why You’ll Love It

There are countless reasons to fall head over heels for this Green Tea Fruit Medley Smoothie:

  • Refreshing and Energizing: Start your day or recharge in the afternoon with a burst of natural energy from green tea and fruits.
  • Nutrient-Rich: Packed with antioxidants, vitamins, and fiber, this smoothie is as nutritious as it is delicious.
  • Quick and Easy: With just a few simple ingredients and a blender, you can whip up this delightful treat in minutes.
  • Customizable: Easily tweak the recipe to suit your taste or dietary needs.

Ingredients

  • 1 cup water
  • 3 Bigelow Green tea bags
  • 1 cup fresh berries (such as strawberries, blueberries, or raspberries)
  • 1 cup pineapple juice
  • 1/2 cup vanilla yogurt
  • 1 cup ice cubes

Instructions

  1. Bring 1 cup of water to a boil and pour over 3 Bigelow Green tea bags. Let steep for 5 minutes.
  2. Gently squeeze out the tea bags to extract all the flavor, then discard the bags.
  3. In a blender, combine the brewed green tea, fresh berries, pineapple juice, vanilla yogurt, and ice cubes.
  4. Blend all the ingredients until the mixture is smooth and creamy.
  5. Pour into a glass, serve immediately, and enjoy the refreshing taste of summer.

Tips

  • Choose ripe berries: For the best flavor, use ripe and sweet berries. You can also freeze them beforehand for a thicker smoothie.
  • Adjust sweetness: If you prefer a sweeter smoothie, add a teaspoon of honey or agave syrup.
  • Chill the tea: Prepare the green tea ahead of time and chill it for a colder, more refreshing drink.

Variations & Substitutions

This smoothie is quite versatile, and you can easily modify it to suit your preferences:

  • Different fruits: Swap out the berries for mangoes, peaches, or bananas for a different flavor profile.
  • Dairy-free option: Substitute vanilla yogurt with coconut yogurt or almond milk yogurt for a vegan version.
  • Herbal twist: Add a handful of fresh mint or basil leaves for a unique and refreshing herbal twist.

Storage

While this smoothie is best enjoyed fresh, you can store any leftovers in an airtight container in the refrigerator for up to 24 hours. Give it a good shake or stir before drinking. For longer storage, consider freezing the smoothie in ice cube trays and blending the cubes when you’re ready for another serving.

FAQ

Can I use black tea instead of green tea?

Yes, you can use black tea if you prefer its stronger flavor. Keep in mind that black tea has a higher caffeine content and a more robust taste, which will alter the flavor profile of the smoothie.

Is this smoothie suitable for kids?

Absolutely! This smoothie is a great way to sneak in some extra fruit and antioxidants into your child’s diet. If you’re concerned about caffeine, you can opt for a decaffeinated green tea.

Can I make this smoothie ahead of time?

While fresh is best, you can prepare the smoothie up to a day in advance. Store it in the refrigerator and give it a good shake before serving. For optimal freshness, consider freezing it into smoothie pops for a delightful treat.

Nutrition

This smoothie is a powerhouse of nutrition. Each serving is approximately 150 calories, with a good balance of carbohydrates, protein, and a small amount of fat. It provides a healthy dose of vitamin C, antioxidants from the berries and green tea, and probiotics from the yogurt, making it a well-rounded choice for a nutritious snack or breakfast.

Conclusion

The Green Tea Fruit Medley Smoothie is not just a drink; it’s a celebration of flavors and memories, a bridge connecting the tranquil mornings of the past with the vibrant mornings of today. Whether you’re enjoying it as a quick breakfast, a post-workout refreshment, or an afternoon pick-me-up, this smoothie promises to delight your senses and nourish your body. So, why wait? Gather your ingredients, blend up a glass, and let the refreshing taste remind you of sunlit gardens and peaceful mornings. Cheers to a deliciously healthy journey!

Related update: Green Tea Fruit Medley Smoothie

Related update: Fresh Peach Margarita With Lime Sugar

Three Ingredient Frozen Pina Colada | Made by Meaghan Moineau

Three Ingredient Frozen Pina Colada

Intro

There’s something magical about sipping a perfectly chilled Pina Colada on a warm sunny day. It transports me back to my childhood, when my family would go on summer vacations to the beach. My parents would enjoy their tropical drinks while my siblings and I played in the sand, and I’d always beg for a taste of their creamy, coconut-scented cocktails. Fast forward to today, and I’ve crafted an easy version that anyone can make at home with just three ingredients. Whether you’re lounging by the pool or hosting a summer party, this Three Ingredient Frozen Pina Colada will instantly bring the tropics to you. Let’s dive into what makes this drink the ultimate summer refresher!

Why You’ll Love It

This simple yet delightful version of the classic Pina Colada is perfect for those who crave that tropical flavor without the fuss. Here are a few reasons why you’ll fall in love with this recipe:

  • Simplicity: With only three main ingredients, it’s incredibly easy to whip up.
  • Refreshing: The combination of pineapple and coconut is the quintessential tropical duo that cools you down on hot days.
  • Customizable: You can easily adjust the sweetness and texture to your liking.
  • Perfect for Entertaining: It’s a crowd-pleaser that adds a touch of elegance to any gathering.

Ingredients

  • 2 cups ice
  • 1 cup pineapple juice
  • 1/2 cup coconut milk
  • 1/2 cup coconut rum (optional, adjust to taste)
  • Fresh pineapple wedges, for garnish
  • Maraschino cherries, for garnish

Instructions

  1. Add the ice, pineapple juice, coconut milk, and coconut rum to a blender.
  2. Blend on high until the mixture is smooth and creamy.
  3. Pour the Pina Colada into glasses.
  4. Garnish with fresh pineapple wedges and maraschino cherries before serving.

Tips

Creating the perfect Pina Colada can be an art. Here are some tips to ensure your drink is the best it can be:

  • Blending Time: Blend until completely smooth to avoid ice chunks.
  • Chill Your Glass: For an extra frosty experience, chill your glasses before serving.
  • Adjust Sweetness: If you prefer a sweeter drink, add a teaspoon of sugar or a splash of sweetened coconut milk.

Variations & Substitutions

The beauty of this recipe is its flexibility. Here are some variations and substitutions to try:

  • Non-Alcoholic Version: Skip the rum for a family-friendly mocktail.
  • Frozen Pineapple: Use frozen pineapple chunks instead of ice for a thicker texture.
  • Extra Coconut: Add a tablespoon of coconut cream for a richer coconut flavor.
  • Alternative Milks: Substitute coconut milk with almond or oat milk for a different twist.

Storage

While this Pina Colada is best enjoyed fresh, you can store any leftovers in the freezer. Pour the mixture into an airtight container and freeze for up to a month. When ready to serve, allow it to thaw slightly and blend again until smooth. Note that the texture might change slightly after freezing.

FAQ

Can I make this Pina Colada without a blender?

While a blender is ideal for achieving a smooth consistency, you can use a food processor if that’s what you have on hand. Alternatively, mix the ingredients well in a shaker with crushed ice for a less blended version.

What if I don’t have coconut rum?

No worries! You can use regular white rum and add a few drops of coconut extract to mimic the flavor. Adjust to taste for a delicious result.

Can I prepare this drink in advance?

Yes, you can make the mixture ahead of time and store it in the refrigerator for up to 24 hours. Give it a good stir or re-blend before serving to refresh its texture.

Nutrition

While indulging in this tropical delight, it’s good to know what’s in your drink. Each serving contains approximately:

  • Calories: 180
  • Fat: 6g
  • Carbohydrates: 20g
  • Protein: 1g
  • Sugar: 18g

Nutrition values may vary based on specific ingredients and quantities used.

Conclusion

The Three Ingredient Frozen Pina Colada is a testament to the fact that you don’t need a lengthy list of ingredients to create something truly special. Whether you’re reminiscing about sun-soaked vacations or simply seeking a moment of tropical bliss at home, this drink is your ticket to paradise. I hope this recipe brings a little sunshine into your day and perhaps even inspires you to create new memories with loved ones over a delicious glass of Pina Colada. Cheers to simple pleasures and the joy of sharing them!

Related update: Three Ingredient Frozen Pina Colada

Lavender Tea With Lemon French Macarons | Made by Meaghan Moineau

Lavender Tea With Lemon French Macarons

Intro

There’s something undeniably magical about French macarons. These delicate, airy confections have an exquisite texture that melts in your mouth. I remember the first time I tasted a macaron; it was a crisp autumn afternoon in Paris, and I was sitting in a quaint little café, watching the world go by. The macaron was lavender with a hint of lemon, and it was love at first bite. Ever since that day, I’ve been on a mission to recreate that perfect macaron, and I’m thrilled to share my Lavender Tea with Lemon French Macarons recipe with you.

Why You’ll Love It

This recipe captures the essence of a sunny afternoon spent in a fragrant, blooming garden. The floral notes of the lavender pair beautifully with the zesty lemon, creating a macaron that’s both refreshing and indulgent. Whether you’re hosting a tea party or simply treating yourself to a moment of bliss, these macarons are sure to impress.

Ingredients

  • 1 cup almond flour
  • 1/4 teaspoon cream of tartar
  • 3 large egg whites
  • 1 tablespoon dried lavender
  • 1 tablespoon lemon zest
  • 1 3/4 cup powdered sugar
  • 1/4 cup white sugar
  • Yellow food coloring

Instructions

  1. Pulse the almond flour and powdered sugar until blended, then sift twice to ensure all larger pieces of almond are separated out and the flour is blended well. Add the lemon zest and lavender to the flour mixture and set aside.
  2. Pulse the white sugar in a processor until very fine.
  3. In the large bowl of a standing mixer or by hand, start whipping the egg whites until foamy. Add a pinch of cream of tartar, and whip until soft peaks form.
  4. Reduce speed to low and add the fine white sugar one tablespoon at a time. When fully incorporated, increase speed to medium and then to high, and whip until stiff peaks form. Timing varies on this, and this is where practice makes perfect. Add your food coloring gel when almost completely done whipping.
  5. Sift 1/3 of the flour mixture into the egg whites and fold in completely. Repeat until all the flour is incorporated. You want to fold in until the batter is smooth, but still light.
  6. Spoon into a pastry bag fitted with a large tip. Pipe 1-inch rounds onto parchment-lined baking sheets, pulling the tip to the side to avoid leaving a peak mark.
  7. Tap the pan somewhat assertively on the counter to remove any trapped air and help the batter settle. Let sit for 30 minutes to 2 hours, until a shell forms on the top and a finger pressed lightly doesn’t leave a mark.
  8. Preheat your oven to around 300°F. Bake macarons in the fully preheated oven for 5 minutes, turn the pan, and bake for around 8 more minutes, or until the feet of the macaron are a bit sturdier than soft.
  9. Cool on sheets for two minutes, then remove to a rack to cool completely.
  10. Fill with prepared lemon curd and refrigerate to harden. Serve at room temperature with tea.

Tips

  • Ensure that all your mixing bowls and utensils are clean and dry before starting. Any grease or moisture can prevent the egg whites from whipping properly.
  • Practice makes perfect. Macarons can be finicky, so don’t be discouraged if your first batch isn’t perfect. Keep trying, and you’ll get the hang of it!
  • Use a silicone baking mat or parchment paper to prevent the macarons from sticking to the baking sheet.

Variations & Substitutions

If you’re looking to switch things up, consider these variations:

  • Flavor Variations: Swap the lemon zest and lavender for other flavors like orange zest and vanilla, or raspberry and rose.
  • Nut-Free Option: Substitute the almond flour with sunflower seed flour for a nut-free version.
  • Color Customization: Use different food coloring gels to create macarons in a rainbow of colors.

Storage

Macarons are best enjoyed fresh, but they can be stored in an airtight container in the refrigerator for up to 5 days. For longer storage, you can freeze them for up to a month. Just be sure to thaw them at room temperature before serving.

FAQ

Why are my macarons cracked?

Cracked macarons can be caused by under-mixing the batter or not allowing the shells to dry properly before baking. Make sure you fold the batter until it flows like lava, and let the shells rest until they form a skin on top.

How do I know when my egg whites are whipped enough?

The egg whites should be whipped until they form stiff peaks. When you lift the whisk, the peaks should stand straight up without drooping. Be careful not to over-whip, as this can cause the macarons to become dry.

Can I use liquid food coloring?

It’s best to use gel food coloring, as liquid food coloring can alter the consistency of the batter and affect the final texture of the macarons.

Nutrition

While these macarons are a delightful treat, it’s important to enjoy them in moderation. Each macaron is approximately 100 calories, with most of the calories coming from sugar and fat. They are naturally gluten-free, making them a great option for those with gluten sensitivities.

Conclusion

Baking macarons is both an art and a science, and it requires patience and practice. But once you master the technique, you’ll be able to create these delightful confections with ease. The combination of lavender and lemon in this recipe offers a unique twist on classic macarons, bringing a touch of elegance to any occasion. So, put on your apron, brew a pot of your favorite tea, and indulge in the simple pleasure of homemade macarons. Bon appétit!

Related update: Lavender Tea With Lemon French Macarons

Related update: Three Ingredient Frozen Pina Colada

Related update: Vegan Dirty Chai Pudding

Cranberry Margarita | Made by Meaghan Moineau

Cranberry Margarita: A Festive Twist on a Classic Cocktail

Intro

There’s something undeniably festive about the tart burst of cranberries, especially when paired with the smooth, citrusy notes of a classic margarita. I vividly remember the first time I tasted this delightful concoction. It was a chilly Thanksgiving evening at my grandmother’s house. The air was filled with the comforting aroma of roasted turkey and spiced pies, and my uncle, known for his cocktail prowess, decided to shake things up with a cranberry twist on his usual margarita. From the first sip, I was hooked, and that memory has since inspired me to recreate the magic every holiday season.

Why You’ll Love It

This Cranberry Margarita is the perfect blend of tart and sweet, offering a refreshing change from the traditional lime-based margarita. It’s easy to make, visually stunning, and perfect for impressing your guests at any gathering. Whether you’re celebrating the holidays or just in the mood for something special, this drink is sure to become a favorite.

Ingredients

  • Fresh cranberries
  • Grand Marnier
  • Orange juice
  • Light Karo syrup
  • Sugar
  • Tequila

Instructions

  1. In a saucepan over medium heat, melt the cup of sugar in the orange juice.
  2. Add the cranberries, reserving some for the skewers, and cook over low heat for 10 minutes. Set aside and let it cool.
  3. Blend the cooked cranberries in a blender, then strain to make the puree.
  4. In a shaker, add crushed ice, 1 1/2 ounces of tequila, 1/2 ounce of Grand Marnier, and 2 ounces of cranberry puree. Shake to mix.
  5. Skewer several cranberries onto 10 skewer sticks but leave enough skewer exposed on one end.
  6. Lightly brush each cranberry skewer with Karo syrup and then sprinkle extra sugar over the cranberry skewers.
  7. Place the cranberry swizzle sticks on wax paper and place in the freezer to set.
  8. Pour the drink into a sugar-rimmed martini glass.
  9. Add a cranberry swizzle stick for garnish.

Tips

For the best flavor, use fresh cranberries if they are in season. You can also adjust the sweetness by adding more or less sugar to the cranberry puree. If you prefer a smoother drink, make sure to strain the pureed cranberries thoroughly.

Variations & Substitutions

If you’re looking to tweak this recipe, here are a few ideas:

  • Alcohol-Free Version: Replace tequila and Grand Marnier with a mix of orange juice and sparkling water for a refreshing mocktail.
  • Spicy Twist: Add a slice of jalapeño to the shaker for a spicy kick.
  • Alternative Sweeteners: Use agave syrup instead of Karo syrup for a different flavor profile.

Storage

The cranberry puree can be stored in an airtight container in the refrigerator for up to three days. The cranberry swizzle sticks can be frozen and kept for up to a month, making them a handy garnish for impromptu cocktail nights.

FAQ

Can I make the cranberry puree in advance?

Absolutely! You can prepare the cranberry puree a day or two in advance. Just store it in the refrigerator until you’re ready to use it.

What can I use instead of Grand Marnier?

If you don’t have Grand Marnier on hand, you can substitute it with triple sec or Cointreau. Each will lend a slightly different citrus note to your margarita.

How do I rim the glass with sugar?

To rim the glass with sugar, simply rub a lime wedge around the edge of the glass, then dip the rim into a plate of sugar. This will give your drink a sweet finish with every sip.

Nutrition

Each serving of Cranberry Margarita contains approximately:

  • Calories: 180
  • Carbohydrates: 20g
  • Sugar: 17g
  • Alcohol: 15g

Note: Nutritional information does not include sugar on the rim.

Conclusion

The Cranberry Margarita is more than just a cocktail; it’s a celebration in a glass. Its vibrant color and tantalizing flavor make it a standout choice for any occasion. Whether you’re sipping it by a cozy fire or sharing it with friends at a festive party, this drink is sure to bring joy and warmth to your gatherings. I hope this recipe brings you as much delight as it has brought to my family and me. Cheers to crafting memorable moments, one sip at a time!

Related update: Cranberry Margarita

Coconut Cream Pie Vegan Milkshake | Made by Meaghan Moineau

Coconut Cream Pie Vegan Milkshake

Intro

There’s something magical about the creamy, tropical sweetness of coconut. It takes me back to sun-drenched summer days spent at my grandmother’s house, where she would whip up her famous coconut cream pie. As a child, I would eagerly watch her mix the ingredients, my mouth watering in anticipation of the first bite. Now, as a vegan, I wanted to capture that nostalgic flavor in a refreshing new form. Introducing: the Coconut Cream Pie Vegan Milkshake. This recipe is a delightful fusion of nostalgia and modern plant-based cooking, perfect for those hot afternoons when you crave something cool and satisfying.

Why You’ll Love It

This Coconut Cream Pie Vegan Milkshake is a decadent treat that is both dairy-free and delicious. It combines the rich, creamy texture of coconut with the natural sweetness of bananas, creating a smoothie that feels indulgent yet is made with wholesome ingredients. It’s incredibly simple to prepare, requiring just a blender and a few minutes of your time. Whether you’re vegan or simply looking for a lighter, plant-based dessert option, this milkshake is sure to delight your taste buds.

Ingredients

  • Fresh coconut meat
  • Lemon juice
  • Coconut oil
  • Light coconut milk
  • Frozen banana
  • Vanilla extract
  • Graham cracker crumbs
  • Coconut flakes
  • Ice cubes

Instructions

  1. In a blender, combine the fresh coconut meat, lemon juice, coconut oil, light coconut milk, frozen banana, and vanilla extract.
  2. Add the graham cracker crumbs to the blender.
  3. If you like your milkshake a little sweeter, you can add agave nectar to taste.
  4. Blend all the ingredients until smooth and creamy.
  5. Pour the milkshake into glasses and top with your choice of soy or dairy-based whipped cream.
  6. Sprinkle additional graham cracker crumbs on top.
  7. Garnish with toasted coconut flakes for an extra touch of coconut flavor.
  8. Serve immediately and enjoy! This recipe serves 2-3 people.

Tips

To ensure your milkshake is as creamy as possible, use fresh coconut meat and a high-speed blender. The frozen banana helps to thicken the shake, so make sure it’s well frozen before blending. For an extra frosty treat, chill your glasses in the freezer before serving.

Variations & Substitutions

If you want to play around with the flavors, there are plenty of options! Try adding a tablespoon of cocoa powder for a chocolatey twist, or a pinch of cinnamon for a warm spice note. You can substitute almond or oat milk for the coconut milk if you prefer, though it will slightly alter the flavor. If you’re gluten-free, ensure your graham crackers are gluten-free as well.

Storage

This milkshake is best enjoyed immediately to maintain its creamy texture. If you have leftovers, you can store them in the refrigerator for up to 24 hours, though the texture may become more liquid. Give it a good stir before drinking.

FAQ

Can I use canned coconut milk instead of light coconut milk?

Yes, you can use canned coconut milk, but it will result in a richer and creamier milkshake. If you prefer a lighter version, stick to the light coconut milk or dilute the canned coconut milk with water.

Is there a substitute for the banana?

If you’re not a fan of bananas, you can use a scoop of vegan vanilla ice cream to achieve a similar creamy texture. Keep in mind, this will alter the flavor profile slightly.

Nutrition

This milkshake is a great source of healthy fats from the coconut and provides natural sweetness from the banana. It’s a delightful treat that satisfies your sweet tooth without the need for refined sugars, especially if you omit the agave nectar. If you’re monitoring your intake, be mindful of the graham crackers and whipped cream toppings, as these add extra calories.

Conclusion

The Coconut Cream Pie Vegan Milkshake is not just a drink; it’s an experience that transports you to a tropical paradise with every sip. It’s a wonderful homage to traditional coconut cream pie, yet adapted for a modern, vegan lifestyle. Whether you’re serving it as a dessert at a summer gathering or enjoying it as a midday treat, this milkshake is sure to become a favorite. Enjoy the creamy, dreamy taste of coconut in a whole new way, and relish the joy that comes with every delicious sip.

Related update: Coconut Cream Pie Vegan Milkshake

Related update: Impossible” Coconut Pie

Related update: Cranberry Margarita

Spiced Apple Cider | Made by Meaghan Moineau

Spiced Apple Cider: A Cozy Autumn Indulgence

Intro

There’s something truly magical about the crisp air of autumn. It takes me back to my childhood days spent at my grandparents’ orchard, where the scent of freshly picked apples mingled with the earthy aroma of fallen leaves. Each visit concluded with a warm mug of spiced apple cider, lovingly prepared by my grandmother. This delightful drink was more than just a beverage; it was a hug in a mug, a symbol of comfort and warmth. Today, I’m sharing a recipe for Spiced Apple Cider that captures that nostalgic essence, perfect for cozy evenings by the fireplace or festive gatherings with loved ones.

Why You’ll Love It

Our Spiced Apple Cider is the epitome of fall in a cup. It’s a tantalizing blend of sweet and spicy flavors that will warm you from the inside out. Here’s why you’ll love it:

  • Easy to Make: With just a handful of ingredients and a few simple steps, you can enjoy a homemade cider that tastes like it simmered all day.
  • Versatile: Perfect for both intimate evenings and large gatherings, this cider can be easily scaled up or down.
  • Customizable: Personalize your cider with a splash of dark rum for an adult twist or keep it non-alcoholic for the whole family to enjoy.

Ingredients

  • 4 cups freshly apple juice
  • 2 cups water
  • 3 cinnamon sticks
  • 1 teaspoon allspice
  • 1 tablespoon freshly grated ginger
  • 1/4 cup maple syrup
  • 1/4 teaspoon ground nutmeg
  • 1 orange, sliced

Instructions

  1. In a large non-reactive pot, combine all the ingredients: apple juice, water, cinnamon sticks, allspice, ginger, maple syrup, nutmeg, and orange slices.
  2. Bring the mixture to a boil over medium-high heat.
  3. Once boiling, let it boil for about 5 minutes.
  4. Cover the pot, reduce the heat, and let it simmer for 30 to 40 minutes, allowing the flavors to meld together.
  5. Line a colander with cheesecloth and strain the cider to remove the solids.
  6. Serve warm. For an adult version, spike with dark rum if desired.

Tips

Here are some tips to ensure your Spiced Apple Cider is perfect every time:

  • Use Fresh Ingredients: Freshly grated ginger and freshly squeezed apple juice can make a significant difference in flavor.
  • Non-Reactive Pot: Using a non-reactive pot such as stainless steel or enamel-coated will prevent any metallic taste from leaching into the cider.
  • Simmer Time: The longer you let it simmer, the more intense the flavors will become. Just be sure not to boil it for too long, or you’ll lose some of the fresh apple flavors.

Variations & Substitutions

The beauty of this Spiced Apple Cider is its versatility:

  • Sugar Substitute: Replace maple syrup with honey or brown sugar for a different sweetness profile.
  • Spice Mix: Add cloves or cardamom for an extra layer of spice.
  • Fruit Infusion: Add cranberries or sliced pears to the simmering cider for additional fruitiness.

Storage

Leftover Spiced Apple Cider can be stored in an airtight container in the refrigerator for up to 5 days. Reheat gently on the stove or in the microwave before serving. For longer storage, consider freezing the cider in a freezable container, leaving room at the top for expansion.

FAQ

Can I make this cider ahead of time?

Absolutely! This cider can be made a day or two in advance and stored in the refrigerator. The flavors will continue to meld, making it even more delicious. Simply reheat before serving.

Is it possible to make this cider in a slow cooker?

Yes, you can easily adapt this recipe for a slow cooker. Combine all the ingredients in the cooker and cook on low for 4-6 hours. Strain and serve as directed.

What can I use as a non-alcoholic substitute for rum?

If you prefer a non-alcoholic version, consider adding a splash of vanilla extract for a warm, aromatic note that complements the spices beautifully.

Nutrition

While the exact nutritional content can vary based on the specific ingredients used, a typical serving of Spiced Apple Cider (without rum) contains approximately:

  • Calories: 120
  • Sugars: 28g
  • Vitamin C: 10% of the Daily Value

Conclusion

Whether you’re reminiscing about fond childhood memories or creating new traditions with your family, this Spiced Apple Cider is sure to become a cherished favorite. With its warm, inviting aroma and rich, comforting taste, it embodies the spirit of autumn. So, wrap yourself in a cozy blanket, pour a steaming mug of cider, and savor the simple pleasures of the season. Enjoy!

Related update: Spiced Apple Cider

Summer Fruit Sangria | Made by Meaghan Moineau

Summer Fruit Sangria: A Refreshing Delight for Warm Days

Intro

There’s something magical about the long, sun-drenched days of summer that calls for a refreshing, fruity drink in hand. For me, nothing captures the essence of summer more than a chilled glass of homemade sangria. I vividly remember the first time I tasted this delightful concoction. It was a balmy afternoon at my grandmother’s house, where the garden was in full bloom, and the air smelled of sweet blossoms. She poured me a glass of her special summer fruit sangria, brimming with vibrant colors and flavors. That moment, with its playful mix of citrus and berries, became a cherished memory, a taste of joy and sunshine. Today, I’m excited to share with you this beloved recipe, hoping it brings as much happiness to your table as it has to mine.

Why You’ll Love It

Summer Fruit Sangria is the quintessential drink for any warm-weather gathering. Here’s why you’ll fall head over heels for this delightful beverage:

  • Easy to Make: With just a handful of ingredients and simple steps, it’s a breeze to prepare.
  • Vibrant and Refreshing: The combination of juicy fruits and rich red wine creates an irresistible, refreshing blend.
  • Perfect for Entertaining: Whether you’re hosting a backyard BBQ or a casual get-together, sangria is always a crowd-pleaser.
  • Customizable: You can tailor it to your taste with different fruits and spirits.
  • Make-Ahead: Prepare it the day before, letting the flavors meld beautifully overnight.

Ingredients

  • 1 bottle of dry red table wine
  • 1/4 cup brandy
  • 1/4 cup triple sec
  • 1/2 cup orange juice
  • 1/4 cup simple syrup
  • 2 ripe peaches, sliced
  • 1 orange, sliced
  • 1 cup raspberries
  • 1 cup blueberries
  • Ice, for serving

Instructions

  1. In a large jug or beverage container, combine the bottle of dry red table wine, brandy, and triple sec.
  2. Add the orange juice and simple syrup, stirring gently to blend.
  3. Introduce the sliced peaches, orange, raspberries, and blueberries into the mixture. Stir well to ensure the fruit is evenly distributed.
  4. Cover the jug and refrigerate for at least 24 hours. This resting time allows the flavors to meld and develop beautifully.
  5. When ready to serve, give the sangria a gentle stir and pour it over ice in individual glasses.

Tips

For the best sangria experience, keep these tips in mind:

  • Choose a wine you enjoy drinking on its own; its flavor will be prominent in the sangria.
  • For a less sweet version, reduce the amount of simple syrup or omit it entirely.
  • Use ripe, in-season fruits for the best flavor and juiciness.
  • Chill your wine and fruit beforehand to speed up the refrigeration process.

Variations & Substitutions

One of the joys of making sangria is its versatility. Here are some variations and substitutions to consider:

  • Fruits: Try adding strawberries, cherries, or pineapple for a tropical twist.
  • Wine: Swap the red wine for a white wine or rosé for a lighter version.
  • Spirits: Replace brandy with rum or vodka for a different kick.
  • Sparkling Sangria: Just before serving, top each glass with a splash of club soda or sparkling water for some fizz.

Storage

Sangria is best enjoyed within a couple of days. Store any leftovers in the refrigerator, covered. Be sure to remove any ice before storing to prevent dilution. The flavors will continue to develop, but the freshness of the fruit is best within the first couple of days.

FAQ

Can I use frozen fruit in sangria?

Yes, frozen fruit can be a convenient and budget-friendly option. It can also help chill the sangria, eliminating the need for extra ice. Just be aware that frozen fruit may release more juice, slightly altering the flavor balance.

What type of wine is best for sangria?

Opt for a dry red wine like a Cabernet Sauvignon, Merlot, or Tempranillo. These wines offer a rich flavor that complements the sweetness of the fruit and other ingredients. However, feel free to experiment with your favorite variety.

Can sangria be made non-alcoholic?

Absolutely! Substitute the wine with a combination of grape juice and cranberry juice, and leave out the spirits. You can still enjoy the fruity, refreshing essence of sangria without the alcohol.

Nutrition

While sangria is a delightful treat, it’s essential to enjoy it in moderation. The nutritional content will vary based on the specific ingredients and quantities used. Typically, a serving of sangria contains around 150-200 calories, depending on the sweetness and type of wine. Remember, the addition of fruits contributes vitamins and antioxidants, making it a slightly healthier indulgence.

Conclusion

Summer Fruit Sangria is more than just a beverage; it’s a celebration of summer’s bounty, a nod to carefree days, and the joy of sharing moments with loved ones. Whether you’re sipping it by the pool or serving it at a festive gathering, this sangria will surely bring smiles and sunshine to your day. So, gather your ingredients, embrace the simplicity of the process, and let the flavors transport you to a summer paradise. Cheers to good times and great company!

Related update: Summer Fruit Sangria

Related update: Lemon Drop Jello Shots

Related update: Spiced Apple Cider

Watermelon, Kiwi, Apple and Frozen Banana Smoothie | Made by Meaghan Moineau

Watermelon, Kiwi, Apple, and Frozen Banana Smoothie

Intro

There’s something undeniably refreshing about a homemade smoothie, especially when it combines the vibrant flavors of summer fruits. I remember spending long summer days at my grandmother’s house, where she would often surprise me with her delightful fruit concoctions. One of my fondest memories is sitting on her porch swing, sipping a cool glass of her watermelon, kiwi, apple, and frozen banana smoothie. The taste was not just a treat for my taste buds but also a journey back to those carefree childhood afternoons. Today, I’m excited to share this nostalgic recipe with you, bringing a piece of my past into your present.

Why You’ll Love It

This smoothie is a celebration of fresh, fruity flavors that will invigorate your senses and brighten your day. It’s perfect for breakfast, a midday snack, or a post-workout refreshment. Not only is it delicious, but it’s also packed with vitamins and nutrients, giving you an energy boost without the guilt. With the natural sweetness of watermelon and the tangy twist of kiwi, this smoothie is a delightful way to enjoy the bounty of summer fruits all year round. Plus, it’s incredibly easy to make, requiring minimal prep time and just a handful of ingredients.

Ingredients

  • 1 cup apple juice
  • 1 frozen banana
  • 1 cup ice cubes
  • 2 kiwi fruits, peeled and chopped
  • 2 cups seeded or seedless watermelon, chopped

Instructions

  1. Place all the ingredients in a blender.
  2. Blend on high speed until the mixture is smooth and creamy.
  3. Pour the smoothie into a glass.
  4. Enjoy your refreshing and healthy drink!

Tips

For the best smoothie experience, make sure to use a ripe banana for a naturally sweet flavor. If you prefer a thicker texture, you can add more frozen banana or reduce the amount of apple juice. Adjust the sweetness by adding honey or agave syrup if needed. To enhance the flavors, consider adding a pinch of salt or a splash of lime juice.

Variations & Substitutions

Feel free to customize this smoothie to suit your taste and dietary needs. You can substitute apple juice with coconut water for a tropical twist or almond milk for a creamier texture. If kiwi isn’t your favorite, swap it for strawberries or blueberries. For added nutrition, consider sneaking in a handful of spinach or kale. You can also sprinkle some chia seeds or flaxseeds for extra fiber and omega-3 fatty acids.

Storage

This smoothie is best enjoyed fresh, but if you have leftovers, store them in an airtight container in the refrigerator for up to 24 hours. Give it a good shake or stir before drinking, as the ingredients may separate over time. For longer storage, you can freeze the smoothie in a freezer-safe container or ice cube tray. Thaw it in the fridge or blend it again before serving.

FAQ

Can I use fresh banana instead of frozen?

Yes, you can use a fresh banana, but keep in mind that the smoothie will be less thick and creamy. To compensate, you might want to add more ice cubes or reduce the amount of apple juice.

Is this smoothie vegan?

Yes, this smoothie is naturally vegan as all the ingredients are plant-based. As long as you don’t add any dairy products, it will remain vegan-friendly.

Can I make this smoothie ahead of time?

While it’s best to enjoy this smoothie fresh, you can prepare it ahead of time. Store it in the refrigerator for up to 24 hours or freeze it for later use. Just remember to give it a good shake or re-blend before drinking.

Nutrition

This smoothie is a powerhouse of nutrients. It’s rich in vitamins A, C, and K, thanks to the watermelon and kiwi. The frozen banana provides potassium and fiber, while apple juice adds additional vitamins and a touch of sweetness. This drink is also hydrating and low in calories, making it an excellent choice for a healthy lifestyle.

Conclusion

This watermelon, kiwi, apple, and frozen banana smoothie is not just a delightful beverage but also a nod to cherished memories and the simple joys of life. Whether you’re looking for a quick breakfast option or a refreshing treat on a hot day, this smoothie is sure to satisfy. Gather your ingredients, blend them to perfection, and indulge in a burst of fruity flavors that will transport you to sunlit afternoons and carefree moments. Enjoy each sip, knowing you’re nourishing your body and soul.

Related update: Watermelon, Kiwi, Apple and Frozen Banana Smoothie

Related update: Gluten Free Dairy Free Buttermilk Biscuits

Related update: Summer Fruit Sangria

Banana Smoothie Boost | Made by Meaghan Moineau

Banana Smoothie Boost

Intro

There’s something undeniably comforting about a banana smoothie. It takes me back to those golden summer mornings spent at my grandmother’s kitchen table. She would always have a fresh batch of smoothies ready for us kids, blending the perfect mix of delicious fruits and wholesome ingredients. Among these, my favorite was the banana smoothie. Today, I want to share with you a modern twist on this nostalgic beverage – the Banana Smoothie Boost. This delightful recipe combines the natural sweetness of bananas with the rich flavors of chocolate and coffee, creating a refreshing and invigorating drink that’s perfect for any time of the day. Whether you’re looking to kick-start your morning or re-energize in the afternoon, this smoothie is sure to hit the spot.

Why You’ll Love It

This Banana Smoothie Boost is the ultimate blend of taste and nutrition. The creamy texture of almond milk pairs perfectly with the frozen banana, creating a lusciously smooth base. The addition of coffee gives you that much-needed caffeine kick, while chocolate adds an indulgent touch. A hint of honey ties everything together with its natural sweetness. Whether you’re a busy bee needing a quick breakfast or a fitness enthusiast seeking a post-workout snack, this smoothie will fit seamlessly into your lifestyle. Plus, it’s incredibly easy to make and can be customized to suit your taste preferences.

Ingredients

  • 1 cup almond milk
  • 1 frozen banana
  • 1 tablespoon chocolate (shaved for topping)
  • 1/2 cup brewed coffee (cooled)
  • 1 tablespoon honey

Instructions

  1. Gather all your ingredients. Ensure the coffee is brewed and cooled before use.
  2. In a blender, combine the almond milk, frozen banana, brewed coffee, and honey.
  3. Blend on high speed until the mixture is smooth and creamy.
  4. Pour the smoothie into a glass.
  5. Sprinkle the shaved chocolate on top for a delightful garnish.
  6. Serve immediately and enjoy your revitalizing Banana Smoothie Boost!

Tips

For an even creamier texture, consider using a high-power blender. If you prefer a thicker smoothie, you can add a few ice cubes or an extra half banana. For those who like a sweeter taste, a touch more honey can do the trick. To make the process quicker, prep your ingredients the night before, so all you have to do is blend them in the morning.

Variations & Substitutions

If you’re vegan or avoiding honey, agave syrup or maple syrup is a great alternative. For a nut-free version, substitute almond milk with oat milk or coconut milk. If you’re not a fan of coffee, omit it or replace it with a caffeine-free coffee substitute or a teaspoon of cocoa powder for a chocolatey flavor without the caffeine. You can also add a scoop of your favorite protein powder to turn this smoothie into a powerful post-workout drink.

Storage

While this Banana Smoothie Boost is best enjoyed fresh, you can store it in the refrigerator for up to 24 hours. Keep it in a tightly sealed jar or cup to maintain its freshness. Before drinking, give it a good shake or stir, as separation may occur. For those who like to plan ahead, consider freezing individual smoothie portions in airtight containers. Simply let them thaw in the fridge overnight before consuming.

FAQ

Can I use fresh bananas instead of frozen?

Yes, you can use fresh bananas, but keep in mind that frozen bananas contribute to the smoothie’s thick and cold texture. If using fresh bananas, you might want to add a few ice cubes to achieve a similar consistency.

Is it necessary to use cooled coffee?

Using cooled coffee is recommended to prevent the smoothie from becoming too warm. Hot coffee can also impact the texture of the smoothie. If you’re in a hurry, you can use cold brew coffee as a convenient alternative.

Can I prepare this smoothie the night before?

Yes, you can prepare the smoothie the night before, but for the best flavor and texture, it’s ideal to blend it fresh. If you do make it in advance, store it in the fridge and give it a good shake before drinking.

Nutrition

This smoothie is not only delicious but also packed with nutrients. The banana provides potassium and dietary fiber, while almond milk is a great source of calcium and vitamin E. Coffee offers antioxidants, and a touch of honey adds natural energy. Just be mindful of the chocolate topping if you’re watching your sugar intake.

Conclusion

The Banana Smoothie Boost is a delightful fusion of flavors that’s sure to become a staple in your drink repertoire. It combines the nostalgia of a classic banana smoothie with modern flavors, making it perfect for today’s busy lifestyle. Whether you’re reminiscing about childhood summers or simply in need of a tasty pick-me-up, this smoothie is here to brighten your day. Give it a try and let it transport you to a place of comfort and joy with every sip. Happy blending!

Related Recipes

Also try: Banana Smoothie Boost

Related update: Watermelon, Kiwi, Apple and Frozen Banana Smoothie

Classic Mint Julep | Made by Meaghan Moineau

Classic Mint Julep | Made by Meaghan Moineau

Title: Sipping on Nostalgia: The Timeless Charm of a Classic Mint Julep
Description: Dive into the refreshing world of the Classic Mint Julep, a cocktail that perfectly marries the boldness of bourbon with the invigorating essence of fresh mint. This blog post not only walks you through crafting this iconic drink but also weaves in a heartwarming tale from a family summer tradition. Perfect for a relaxing afternoon on the porch, this recipe is rated at a difficulty level of 3/10 and is classified under “Appetizer” as a delightful prelude to any gathering.

The Timeless Charm of a Classic Mint Julep

There’s something undeniably enchanting about sipping on a Mint Julep. The clinking of ice against the julep cup, the aromatic burst of fresh mint, and the smooth warmth of bourbon create an experience that’s more than just a drink—it’s a moment. Today, I want to take you on a journey through my cherished family memories and guide you in crafting this timeless cocktail.

Ingredients:

– Fresh mint

– Simple syrup

– Ice

– Bourbon

Instructions:

1. Minty Fresh Start: Begin by adding fresh mint leaves and simple syrup to a tall glass. With the handle of a spoon, gently crush and mash the mint leaves to release their essential oils and aromas, creating the foundation of this classic cocktail.
2. Creating the Chill: Fill the glass with crushed ice, then pour in the bourbon. Using a teaspoon, jiggle the contents to ensure a thorough mix while chilling the concoction.
3. The Grand Finish: Strain the mixture into a julep cup brimming with crushed ice. Garnish with a sprig of fresh mint for that perfect aromatic touch.

A Nostalgic Family Memory

Growing up, summers were synonymous with family gatherings on my grandparents’ porch. As kids, we were always fascinated by the ritualistic preparation of the Mint Julep, a tradition my grandfather upheld with pride. The adults would gather around, their laughter mingling with the evening breeze, as my grandfather meticulously mashed mint leaves with his cherished wooden spoon—an heirloom passed down through generations.

The clinking of ice and the rich aroma of bourbon signaled the start of stories and conversations that would weave our family closer. My grandmother would tell tales of our ancestors, each story as refreshing and invigorating as the drinks in their hands. The Mint Julep wasn’t just a cocktail; it was a vessel of connection, a way to keep our family history alive with each sip.

Difficulty Level: 3/10

Creating a Classic Mint Julep is simple yet satisfying, making it a perfect choice for both novice and seasoned cocktail enthusiasts. With a few ingredients and steps, you can craft a drink that resonates with tradition and taste.

Classification: Appetizer

This drink sets the stage for any social gathering, offering a refreshing start to an evening of camaraderie and delight.

Indulge in the nostalgia and serenity of a Classic Mint Julep, where every sip is a tribute to the past and a toast to the memories yet to be made. Whether you’re entertaining guests or enjoying a quiet moment alone, this cocktail is an invitation to savor the simple joys of life.

Read more about Appetizers

Read more about Main Dishes

Read more about Desserts

Also try: Banana Smoothie Boost

Powerhouse Almond Matcha Superfood Smoothie | Made by Meaghan Moineau

Powerhouse Almond Matcha Superfood Smoothie | Made by Meaghan Moineau

Title: Unleash Your Energy with the Powerhouse Almond Matcha Superfood Smoothie
Description: Dive into the world of wellness with our Powerhouse Almond Matcha Superfood Smoothie. This vibrant, nutrient-packed blend is a delicious way to kickstart your day. Perfect for breakfast or a midday boost, this smoothie combines the creamy richness of almond butter with the refreshing zing of matcha and tropical fruits. Join us as we explore this delightful recipe and the cherished family memory that inspired it.

In the hustle and bustle of modern life, finding the perfect balance of health and taste can often feel like an elusive quest. But what if I told you that the secret lies in a simple, yet extraordinary, blend of ingredients? Enter the Powerhouse Almond Matcha Superfood Smoothie—a concoction that not only fuels your body but also brings a sense of nostalgia with every sip.

Growing up, Sunday mornings were a special time in our house. My grandmother, a spirited woman with a penchant for healthy living, would whip up what she called her “magic potions.” These weren’t your ordinary breakfast smoothies; they were vibrant elixirs, brimming with color and flavor, designed to invigorate our bodies and minds for the week ahead.

One particular Sunday, I remember vividly. The kitchen was filled with the comforting aroma of vanilla, mingling with the earthy scent of matcha. My grandmother stood by the blender, her eyes twinkling with mischief as she added a spoonful of almond butter—her secret ingredient. “This,” she said with a wink, “is what gives it the power.”

As a child, I didn’t quite understand the concept of superfoods. But I did understand that this smoothie was something special. It was creamy yet refreshing, with a perfect balance of sweetness and a subtle hint of green tea. It felt like a treat, yet it was packed with wholesome goodness.

Now, as an adult, I’ve recreated this memory in my own kitchen. The Powerhouse Almond Matcha Superfood Smoothie has become a staple in my household, not just for its health benefits but for the warm reminder of those cherished Sunday mornings.

Ingredients:

– 2 tablespoons unsalted natural almond butter

– 1 cup unsweetened almond milk

– 1 frozen banana

– 1 tablespoon chia seeds

– 1 cup baby kale

– 1/2 cup frozen mango pieces

– 1 teaspoon green matcha tea powder

– 1/2 cup frozen pineapple

– 1/2 teaspoon vanilla extract

Instructions:

1. Combine all of the ingredients in a blender.

2. Blend on high until smooth.

3. Serve immediately and enjoy the burst of flavor and energy!

Difficulty Rating: 3/10
Classification: Appetizer

This smoothie is not just a drink; it’s a celebration of vibrant, wholesome ingredients that work harmoniously to energize your day. Whether you’re a seasoned health enthusiast or just starting your journey, the Powerhouse Almond Matcha Superfood Smoothie is a perfect way to embrace wellness with a touch of nostalgia. So go ahead, take a sip, and let the memories flow.

Read more about Appetizers

Read more about Main Dishes

Read more about Desserts

Also try: Banana Smoothie Boost

Refreshing Strawberry Limeade | Made by Meaghan Moineau

Refreshing Strawberry Limeade | Made by Meaghan Moineau

Title: Revive Summer Memories with Refreshing Strawberry Limeade
Description: Dive into nostalgia with our Refreshing Strawberry Limeade recipe, a delightful blend of sweet strawberries and tangy lime that is sure to awaken your senses. Perfect for summer gatherings or a quiet afternoon on the porch, this beverage is a trip down memory lane with every sip. Learn how to craft this easy yet elegant drink that’s sure to become a family favorite.

---


A Sip of Summer: Refreshing Strawberry Limeade Recipe

There's something magic about the simple joy of sipping a chilled, fruity drink on a hot summer day. For me, this Refreshing Strawberry Limeade is more than just a thirst-quencher; it's a cherished family tradition.


A Walk Down Memory Lane

Growing up, summer vacations meant long afternoons spent at my grandmother's house. Her backyard was a haven of vibrant flowers, towering oak trees, and laughter that echoed through the warm air. My cousins and I would run around until we were breathless before collapsing under the shade with cups of her famous strawberry limeade in hand. The sweet, tangy taste was the perfect antidote to the summer heat, and each sip seemed to cool the sun’s fiery rays.


My grandmother would prepare the drink early in the morning, allowing the flavors to meld together. Watching her work in the kitchen, I learned the art of balancing sweetness with tartness—a skill I've come to master over the years.


Ingredients:

- Fresh strawberries


- Sugar


- Lemon lime soda


- Seltzer


- Turbinado sugar


- Lime (juice)


- Thinly sliced limes


- Ice


Instructions:
1. Macerate the Berries: Begin by adding fresh strawberries and sugar to a bowl. Allow them to macerate for about 30 minutes. This process enhances the natural sweetness of the berries, creating a luscious base for your limeade.
2. Blend to Perfection: Once the strawberries have released their juices, transfer them to a food processor or blender. Pulse until smooth, creating a vibrant strawberry puree.
3. Mix the Magic: In a large pitcher, add ice until it's about one-third full. Pour in 2 parts seltzer to 1 part lemon lime soda. This combination provides the perfect fizzy foundation for your drink.
4. Combine Flavors: Stir in a few scoops of the strawberry puree and add the juice from 1 lime. Mix well, then taste. Adjust by adding more strawberry puree or lime juice as desired to suit your taste.
5. Garnish and Serve: For a touch of elegance, add thinly sliced limes to the pitcher. Rim each glass with turbinado sugar for added sweetness and garnish with a lime wedge.
Difficulty Rating: 3/10
Classification: Appetizer

This Refreshing Strawberry Limeade is more than just a drink; it's a celebration of family bonds and summer afternoons. Whether you're looking to relive old memories or create new ones, this delightful beverage is sure to enchant your taste buds and warm your heart. So, gather your loved ones, find a cozy spot in the shade, and enjoy a glass of nostalgia. Cheers to summer's sweetest flavors!

Read more about Appetizers

Read more about Main Dishes

Read more about Desserts

Green Tea Fruit Medley Smoothie | Made by Meaghan Moineau

Green Tea Fruit Medley Smoothie | Made by Meaghan Moineau

Title: Sipping on Memories: The Green Tea Fruit Medley Smoothie
Description: Dive into the vibrant, refreshing world of the Green Tea Fruit Medley Smoothie, a delightful blend that not only tantalizes your taste buds but also warms your heart with nostalgia. Discover how this smoothie, steeped in family tradition, can become a staple in your kitchen. Easy to make and bursting with flavor, this smoothie is perfect for breakfast, as a midday pick-me-up, or a light dessert.

---


In the hustle and bustle of our daily lives, it's often the simplest of pleasures that bring us the greatest joy. For me, the Green Tea Fruit Medley Smoothie is much more than just a refreshing drink; it’s a cherished family tradition that has been lovingly passed down through the generations.


A Trip Down Memory Lane

Growing up, summers at my grandmother's house were a kaleidoscope of colorful memories. Her backyard, a sprawling canvas of greenery and fresh blooms, was our playground. But what I remember most vividly is the scent of freshly brewed green tea wafting through the open kitchen window, mingling with the sweet, tangy aroma of ripe berries.


Every afternoon, my grandmother would prepare what she affectionately called her "secret elixir" — a concoction she swore was the secret to her youthful energy and radiant smile. It was the Green Tea Fruit Medley Smoothie, a harmonious blend of robust green tea, succulent fresh berries, and the tropical sweetness of pineapple juice, all swirled together with creamy vanilla yogurt.


As children, my siblings and I would gather around the kitchen counter, eagerly watching as she steeped the green tea bags in a pot of boiling water. The anticipation was palpable as she squeezed out the tea bags, releasing every last drop of flavor before discarding them. With a twinkle in her eye, she would pour the fragrant tea into the blender, adding generous handfuls of vibrant berries and a splash of pineapple juice. The final touch was a dollop of vanilla yogurt and a few ice cubes to create a perfectly chilled treat.


With the press of a button, the blender would roar to life, transforming the disparate ingredients into a smooth, frothy masterpiece. We would clink our glasses together, savoring each sip as we laughed and shared stories under the summer sun.


Crafting Your Own Smoothie Magic
Creating this delightful smoothie is as easy as it is rewarding, making it a perfect addition to any meal. Here’s how you can bring a taste of my family’s tradition into your home:
Ingredients:

- 1 cup boiling water


- 3 Bigelow Green Tea bags


- 1 cup fresh berries (your choice of strawberries, blueberries, or raspberries)


- 1/2 cup pineapple juice


- 1/2 cup vanilla yogurt


- 1 cup ice cubes


Instructions:

1. Begin by preparing the tea. Steep 3 Bigelow Green Tea bags in 1 cup of boiling water for 5 minutes.


2. Carefully squeeze out the tea bags to extract all the flavor, then discard them.


3. In a blender, combine the freshly brewed tea, fresh berries, pineapple juice, vanilla yogurt, and ice cubes.


4. Blend until smooth, ensuring all ingredients are well incorporated.


5. Pour the smoothie into glasses and enjoy!


Simplicity at Its Best

With a difficulty rating of 3 out of 10, this smoothie is accessible to everyone, from novice cooks to kitchen aficionados. Whether you enjoy it as a vibrant appetizer, a refreshing main dish, or a light dessert, the Green Tea Fruit Medley Smoothie is sure to become a beloved part of your culinary repertoire.


So, next time you find yourself longing for a taste of something special, remember the Green Tea Fruit Medley Smoothie — a drink that’s as much about celebrating life’s simple pleasures as it is about savoring the delightful flavors of nature’s bounty.

Read more about Appetizers

Read more about Main Dishes

Read more about Desserts

Bahamian Goombay Smash Cocktail | Made by Meaghan Moineau

Bahamian Goombay Smash Cocktail | Made by Meaghan Moineau

Title: Sip the Tropics: Crafting the Perfect Bahamian Goombay Smash Cocktail
Description: Dive into the vibrant flavors of the Bahamian Goombay Smash Cocktail, a tropical delight that captures the essence of island life. With a blend of coconut rum, apricot brandy, and fresh juices, this cocktail promises to transport your senses to sun-soaked beaches. Join me as I share a nostalgic family memory tied to this refreshing drink, and learn how to create this masterpiece right at home. Difficulty: 3/10. Category: Appetizer.

---


When the sun dips low and paints the sky in hues of orange and pink, there's one drink that brings the spirit of the Bahamas to life: the Goombay Smash Cocktail. This tropical concoction, bursting with the rich flavors of coconut rum, apricot brandy, and fresh juices, is more than just a drink—it's an experience, a memory, a taste of paradise in a glass.


Ingredients


- Coconut Rum: Infuses the cocktail with a delightful tropical sweetness.
- Apricot Brandy: Adds a rich, fruity depth that balances the rum.
- Dark Rum: Provides a robust, molasses-like flavor.
- Pineapple Juice: Offers a vibrant, tangy sweetness.
- Orange Juice: Complements with a fresh, citrusy zing.
- Fresh Orange and Pineapple: For the perfect garnish.

Instructions


1. Begin by filling a small pitcher with ice, setting the stage for a chilled, refreshing drink.


2. Add both the coconut rum and dark rum, followed by the apricot brandy, creating a strong yet sweet foundation.


3. Pour in the pineapple juice, allowing its tang to dance with the rums.


4. Top off with orange juice, balancing the flavors with a citrusy brightness.


5. Stir gently, ensuring all ingredients meld together.


6. Garnish with slices of fresh orange and pineapple, enhancing both the visual and aromatic appeal.


A Nostalgic Family Memory


Every sip of the Goombay Smash takes me back to summers spent at my grandmother's quaint beach house on Eleuthera Island. It was a tradition for our family to gather every evening on the porch, the warm breeze carrying the scent of salt and hibiscus. My grandmother, with her infectious laughter and sun-kissed skin, would expertly mix a pitcher of Goombay Smash as we shared stories of our day.


This cocktail was more than just a drink; it was a symbol of togetherness and joy. As the sun set, painting the sky with a palette of tropical colors, we would raise our glasses, toasting to another unforgettable day in paradise. The Goombay Smash was our family's liquid sunshine, a reminder of the beautiful moments shared.


Difficulty and Classification


Creating the Bahamian Goombay Smash Cocktail is delightfully simple, with a difficulty rating of 3/10. Its ease of preparation makes it a perfect appetizer cocktail, setting a vibrant, tropical tone for any gathering.


---


In crafting the Goombay Smash, you're not just making a cocktail; you're capturing the essence of the Bahamas, inviting the spirit of the islands into your home. Whether you're reminiscing about family gatherings or creating new memories, this delightful drink is sure to become a cherished favorite, just as it has been for my family. So, shake off the day, embrace the island vibes, and enjoy your very own Bahamian escape, one sip at a time.

Read more about Appetizers

Read more about Main Dishes

Read more about Desserts

Cherry Lime Mojito | Made by Meaghan Moineau

Cherry Lime Mojito | Made by Meaghan Moineau

Title: Sipping Memories: The Refreshing Allure of the Cherry Lime Mojito
Description: Dive into the nostalgic flavors of the Cherry Lime Mojito, a refreshing cocktail that effortlessly blends cherries, mint, and lime. Discover how this delightful drink can transport you to cherished family gatherings.

---


When the sun sets on a warm summer evening, there's nothing quite like the refreshing taste of a Cherry Lime Mojito to cool you down. This vibrant cocktail, with its perfect blend of tangy lime, sweet cherries, and invigorating mint, is more than just a drink—it's a journey back to cherished family memories that linger like a gentle breeze on a hot day.


Recipe Overview
Ingredients:

- Fresh cherries


- Mint leaves


- Lime


- Demerara sugar


- White rum


- Carbonated water


Instructions:

1. In a tall glass, place a handful of fresh cherries, a sprig of mint leaves, a squeeze of lime, and a teaspoon of demerara sugar.


2. Muddle these ingredients together at the bottom of the glass, releasing the rich flavors and aromas that make this drink so unique.


3. Add a few ice cubes to the glass, creating a cool base for the cocktail.


4. Pour in a generous serving of white rum, allowing it to mingle with the muddled fruits and herbs.


5. Top off the glass with carbonated water, giving it that signature mojito fizz.


6. Serve immediately, garnished with a cherry or a sprig of mint for an extra touch of elegance.


Difficulty Level: 3/10
Classification: Dessert
A Nostalgic Sip of Family Gatherings

Growing up, summers at my grandparents’ house were punctuated by the lively clinking of colorful glasses filled with my grandmother’s signature Cherry Lime Mojitos. It wasn’t just the drink that was special, but the way it brought our family together, weaving a tapestry of laughter and love.


I remember one particular Fourth of July when the air was thick with the smell of barbecue and the sound of children’s laughter. We gathered on the porch, the adults sipping on mojitos while we kids played tag under the setting sun. Grandma would always say that the secret to her mojito was the freshly picked cherries from her backyard, a ritual she never missed. The combination of cherries and mint, she claimed, was like capturing the essence of summer in a glass.


Even now, every time I make a Cherry Lime Mojito, I am transported back to those evenings. The taste of the cocktail is a reminder of the warmth of family, the simplicity of those days, and the love that was always in abundance. It’s not just a drink; it’s a vessel of memories that continue to bring joy and connection.


The Cherry Lime Mojito is not just a cocktail; it’s an experience—a way to savor the flavors of summer while reminiscing about the beautiful moments that make life sweet. Whether you're sipping it on your porch or serving it at a gathering, this drink has a way of bringing people together, just like it did for my family all those years ago.


---


Enjoy the refreshing taste and nostalgic journey of the Cherry Lime Mojito, a delightful drink that combines the best of summer fruits with a touch of family tradition. Cheers to making new memories while cherishing the old!

Read more about Appetizers

Read more about Main Dishes

Read more about Desserts

Dark Chocolate Cinnamon Easter Eggnog | Made by Meaghan Moineau

Dark Chocolate Cinnamon Easter Eggnog | Made by Meaghan Moineau

Title: Indulgence in a Cup: Dark Chocolate Cinnamon Easter Eggnog
Description: Dive into the rich, velvety embrace of our Dark Chocolate Cinnamon Easter Eggnog, a delightful fusion of classic holiday flavors with a luxurious twist. This decadent dessert drink will not only tantalize your taste buds but also evoke cherished family memories, perfect for sharing around the Easter table.

---


A Chocolate Lover’s Dream: Dark Chocolate Cinnamon Easter Eggnog Recipe


As the bright hues of spring unfurl with the promise of Easter, our family tradition always circles back to the kitchen, where the aroma of cinnamon and chocolate heralds the festive season. This year, bring a touch of nostalgia and indulgence to your Easter gathering with our Dark Chocolate Cinnamon Easter Eggnog. This luscious dessert drink is rated a 5 out of 10 in difficulty, making it an approachable yet impressive treat for any home cook.


Ingredients:


- 4 egg yolks
- 2 cups milk
- ½ cup granulated sugar
- 4 oz dark chocolate, chopped
- 2 tablespoons unsweetened dark cocoa powder
- 1 teaspoon ground cinnamon
- 1 cup heavy whipping cream
- ¼ cup chocolate liqueur
- 1 teaspoon vanilla extract

Instructions:


1. Combine Ingredients: In a medium saucepan over medium heat, whisk together the egg yolks, milk, sugar, dark chocolate, cocoa powder, and cinnamon. The key here is to whisk continuously, ensuring the ingredients meld into a smooth, chocolatey mixture.
2. Heat and Stir: As the mixture heats and just starts to boil and bubble, remove it from the heat promptly to prevent curdling. The fragrance of cinnamon and chocolate will fill your kitchen, a sensory cue that the mixture is ready.
3. Cool Down: Pour the mixture into a bowl set over an ice bath. Whisk for several minutes until the concoction is cool to the touch.
4. Final Touches: Once cooled, whisk in the heavy cream, chocolate liqueur, and vanilla extract. At this point, your eggnog is ready to serve. For an extra touch, top with whipped cream and a sprinkle of cinnamon.
5. Serve or Store: Serve immediately for the freshest taste, or store in the refrigerator for up to two days, allowing the flavors to deepen.

Snappy Tips and Substitutions:


- Egg Yolks: Ensure thorough whisking to avoid curdling.
- Chocolate Variations: Use original unsweetened cocoa powder if dark chocolate isn't to your liking, and feel free to swap in your favorite chopped chocolate.
- Liqueur Options: Substitute with another liqueur of your choice if chocolate liqueur isn't available.

A Family Memory:


Easter Sundays at my grandma’s house were nothing short of magical. As children, we were drawn to the kitchen by the enchanting scents of warm spices and melting chocolate. Grandma would always make her signature eggnog, a recipe passed down through generations, with her own special twist of adding cinnamon and chocolate. We’d gather around her small kitchen table, our eyes wide with anticipation, as she ladled the creamy concoction into our mugs. Even as adults, that first sip transports us back to those carefree days of childhood wonder and family togetherness.


Dessert Delight:


Our Dark Chocolate Cinnamon Easter Eggnog is the perfect dessert drink to cap off your Easter feast. Its rich flavors and creamy texture offer a comforting, indulgent experience, making it a delightful addition to your holiday traditions. Whether enjoyed as a nostalgic nod to the past or a new family favorite, this eggnog recipe is sure to warm hearts and create lasting memories.


Celebrate the season with this decadent treat, and let it become a cherished part of your Easter celebrations.

Read more about Appetizers

Read more about Main Dishes

Read more about Desserts

Cherry Lime Mojito | Made by Meaghan Moineau

Cherry Lime Mojito | Made by Meaghan Moineau

A Sip of Summer: The Cherry Lime Mojito


Description:

Escape to a tropical paradise with every sip of the Cherry Lime Mojito. This refreshing cocktail combines the tartness of lime, the sweetness of cherries, and the cooling freshness of mint to create a symphony of flavors that dance on your palate. Perfect for summer gatherings or a quiet evening on the porch, this mojito is a delightful escape in a glass. Rated at a 4 out of 10 for difficulty, this cocktail is as accessible as it is delicious. Pour yourself a glass and dive into a nostalgic tale of family memories tied to this drink.

---


Ingredients:

- Fresh cherries

- Mint leaves


- Lime


- Demerara sugar


- White rum


- Carbonated water


Instructions:

1. Muddle the Magic: In a tall glass, combine cherries, mint leaves, demerara sugar, and slices of lime. Gently muddle the ingredients to release their flavors.
2. Ice, Ice Baby: Add a few ice cubes to the glass, providing a chilled base for your drink.
3. Rum Away: Pour in a generous splash of white rum, letting it mingle with the muddled mixture.
4. Bubbly Finish: Top off the glass with carbonated water, giving your mojito a refreshing fizz. Stir gently and serve immediately.

Nostalgic Family Memory:


The Cherry Lime Mojito holds a special place in my heart, not just for its refreshing taste, but for the cherished family memories it evokes. Growing up, summer afternoons at my grandparents' house were a cherished tradition. Their sprawling backyard was a haven of lush greenery and vibrant flowers, a testament to my grandfather's green thumb.


Every summer, our family would gather for a weekend barbecue, a celebration of togetherness filled with laughter, games, and delicious food. As the adults chatted and the children played, my grandmother would prepare her signature Cherry Lime Mojitos. She believed that a good mojito was the secret ingredient to a perfect summer day.


I can still picture her in the kitchen, her hands deftly muddling cherries and mint, her face adorned with a warm smile. She'd let me help, guiding my eager hands as I pressed the ingredients together, releasing their aromatic symphony. Her garden provided the freshest mint, which she picked just moments before crafting each drink.


The first sip of that mojito was like stepping into a world where time slowed down, where the sun shone a little brighter, and laughter echoed a little longer. It was a drink that brought us together, a shared experience that transcended generations.


Even now, as I prepare my own Cherry Lime Mojito, I can't help but feel a wave of nostalgia wash over me. With each sip, I'm transported back to those sun-drenched afternoons, surrounded by family, love, and the simple joy of being together.


Difficulty: 4/10

Classification: Beverage

Whether you're crafting this mojito for a family gathering or a solo indulgence, it's a drink that promises to refresh and delight. Cheers to the memories it creates and the ones it brings back to life.

Read more about Appetizers

Read more about Main Dishes

Read more about Desserts

Sex in a glass | Made by Meaghan Moineau

Sex in a glass | Made by Meaghan Moineau

Title: Indulge in Nostalgia with "Sex in a Glass": A Decadent Dessert Delight
Description:

Dive into a world of creamy indulgence with "Sex in a Glass," a dessert that's not just rich in flavor but rich in memories. This delightful concoction brings together the smoothness of dulce de leche ice cream, the boldness of espresso, and the sweetness of caramel for a sensory experience that is as unforgettable as the family moments it evokes. Discover how to craft this simple yet sophisticated sweet and relive the warmth of cherished family gatherings.


---


A Nostalgic Sip: Reliving Family Memories with "Sex in a Glass"

The clinking of glasses, the gentle hum of conversation, and the scent of espresso wafting through the air—all these elements bring me back to those cherished Sunday afternoons at my grandmother's house. It was a time when family gathered around the long dining table, a mosaic of mismatched chairs pulled together from different rooms, creating a circle of love and laughter.


After a hearty meal, my grandmother would disappear into the kitchen, only to return with her signature dessert: "Sex in a Glass." It was a tradition, a sweet ending to every family gathering, and for us, it was more than just a dessert. It was a celebration in a glass, a ritual that marked the culmination of a day spent with loved ones.


As she meticulously poured caramel dessert topping into each glass, the anticipation grew. Next came the cream, swirling in a gentle dance with the caramel, creating a canvas for the star ingredient—dulce de leche ice cream. The rich, creamy texture was the perfect counterpoint to the bold espresso, which she would brew fresh, allowing it to cool just enough before adding it to the mix. The final touch was a sprinkle of sugar, a nod to the sweetness of life itself.


This dessert, "Sex in a Glass," was more than just a treat. It was a bridge to the past, a reminder of simpler times when the world seemed to pause, if only for a moment, to savor the richness of family and flavor.


The Recipe: A Simple Yet Sophisticated Dessert
Ingredients:

- Caramel dessert topping


- Cream


- Dulce de leche ice cream


- Espresso


- Sugar


- Water


Instructions:

1. Begin by making a strong espresso. Bring water to a boil and pour it over the espresso grounds. Allow it to steep and set aside to cool.


2. Once the espresso has cooled, add the melted dulce de leche ice cream, blending the flavors into a harmonious mix.


3. In a glass, drizzle caramel dessert topping.


4. Pour in the cream, followed by the espresso and ice cream mixture.


5. Stir gently and top with a sprinkle of sugar.


6. Serve immediately and enjoy the luxurious blend of flavors.


Difficulty Level: 3/10
Classification: Dessert

Whether you're looking to recreate a beloved family tradition or simply searching for a new dessert to savor, "Sex in a Glass" is a delightful choice. Its simplicity belies the depth of flavor it offers, making it the perfect dessert to share with those you hold dear. So, gather your loved ones, raise your glasses, and toast to the sweet moments that linger long after the last sip.

Read more about Appetizers

Read more about Main Dishes

Read more about Desserts