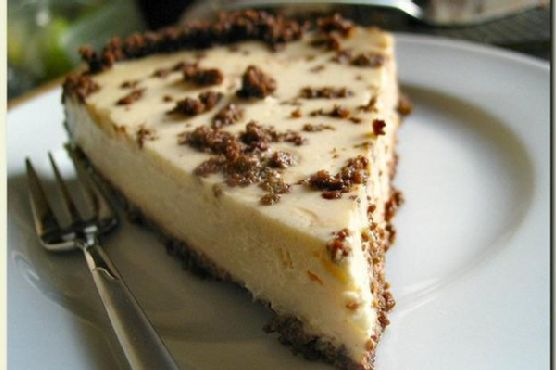
Dulce De Leche Cheesecake
Intro
There’s something magical about the moment when you take your first bite of a perfectly crafted cheesecake. For me, it brings back memories of sitting in my grandmother’s cozy kitchen, watching her create the most delightful desserts with her loving touch. Her signature Dulce De Leche Cheesecake was always a family favorite, and I’m thrilled to share this cherished recipe with you. It’s a creamy, indulgent treat that will transport you to a place of warmth and sweetness.
Why You’ll Love It
This Dulce De Leche Cheesecake is the epitome of comfort and indulgence. The rich, creamy texture paired with the sweet, caramel-like flavor of dulce de leche creates an irresistible dessert experience. Whether you’re serving it at a dinner party or enjoying a slice with your afternoon coffee, this cheesecake is sure to impress.
- The combination of almond cookie crust and luscious filling is a match made in heaven.
- It’s a make-ahead dessert, perfect for entertaining or a special occasion.
- The recipe is straightforward, making it accessible even for novice bakers.
- Each bite offers a perfect balance of sweetness and tanginess, thanks to a hint of lemon.
Ingredients
- 200g almond cookies, crushed
- 2 tablespoons cornstarch
- 400g Philadelphia balance cream cheese
- 1 cup dulce de leche
- 3 large eggs
- 1 tablespoon lemon juice
- 1 teaspoon lemon zest
- 1/4 teaspoon salt
- 1/2 cup sugar
- 100g unsalted butter, melted
- 1/2 cup plain yogurt
Instructions
- Preheat your oven to 165°C (330°F) and grease a 24cm springform pan.
- In a mixing bowl, toss the crushed almond cookies with the melted butter until well combined. Reserve 1 tablespoon of the mixture for the topping.
- Press the remaining mixture into the bottom and 3cm up the sides of the prepared springform pan. Chill in the refrigerator until ready to use.
- In a large mixing bowl, beat the cream cheese and sugar with an electric mixer on medium speed until smooth and creamy.
- Add the yogurt and eggs, one at a time, beating until just blended after each addition.
- Stir in the cornstarch, dulce de leche, lemon juice, and zest until everything is well combined.
- Pour the cream cheese mixture into the prepared crust, smoothing the top with a spatula.
- Sprinkle the reserved cookie crumbs over the top of the cheesecake.
- Place the cheesecake in a larger baking pan and fill the outer pan with hot water, about halfway up the side of the springform pan, to create a water bath.
- Bake for 65 minutes or until the edges are set but the center still jiggles slightly.
- Turn the oven off and leave the cheesecake in the oven with the door ajar for 1 hour to cool gradually.
- Remove the cheesecake from the oven and let it cool completely on a wire rack.
- Chill the cheesecake in the refrigerator for at least 4 hours or overnight until firm.
Tips
- Ensure all ingredients are at room temperature for a smoother batter.
- To prevent cracks, avoid overmixing the batter and ensure a gradual cooling process.
- Use a water bath to maintain even baking and prevent the cheesecake from drying out.
Variations & Substitutions
- Crust: Substitute almond cookies with graham crackers or digestive biscuits for a different flavor.
- Dulce De Leche: Swap with caramel sauce if preferred, but note that the flavor profile will change slightly.
- Yogurt: Greek yogurt or sour cream can be used as substitutes for a creamier texture.
Storage
Store any leftover cheesecake in the refrigerator, covered, for up to 5 days. For longer storage, wrap individual slices tightly in plastic wrap and place them in an airtight container in the freezer for up to 2 months. Thaw in the refrigerator before serving.
FAQ
Can I make this cheesecake ahead of time?
Absolutely! This cheesecake is perfect for making ahead. Prepare and chill it the day before serving to allow the flavors to meld beautifully.
What is the best way to slice the cheesecake?
To achieve clean slices, use a sharp knife dipped in hot water and wiped dry between cuts. This prevents the filling from sticking to the knife.
How can I tell when the cheesecake is done baking?
The cheesecake is done when the edges are set, and the center jiggles slightly when gently shaken. It will continue to firm up as it cools.
Nutrition
Each serving of Dulce De Leche Cheesecake offers a delightful combination of flavors with approximately 420 calories, 25g fat, 40g carbohydrates, and 8g protein. Enjoy this treat in moderation as part of a balanced diet.
Conclusion
This Dulce De Leche Cheesecake is more than just a dessert; it’s a piece of nostalgia and a testament to the joy of sharing sweet moments with loved ones. Whether you’re a seasoned baker or trying your hand at cheesecake for the first time, this recipe promises to deliver a delightful experience with every bite. Serve it with love, and watch as it becomes a cherished favorite in your home, just as it has in mine. Enjoy!
Related update: Dulce De Leche Cheesecake
Related update: Creamsicle Cookies