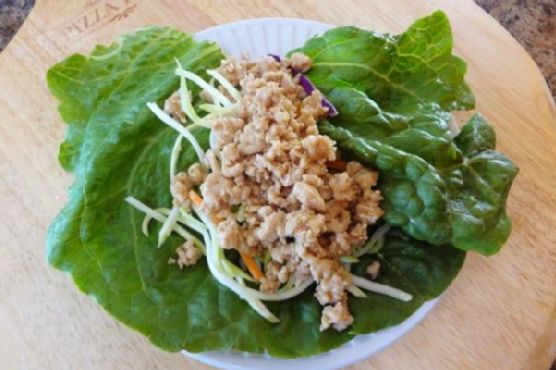
Asian Lettuce Wraps | Made by Meaghan Moineau

Asian Lettuce Wraps

Intro

There’s something magical about gathering around the table with family and friends, sharing a meal that’s not only delicious but also fun to eat. Growing up, I remember my grandmother’s kitchen filled with the tantalizing aroma of her homemade dishes. She had a knack for transforming simple ingredients into extraordinary meals. One of my fondest memories is of her lettuce wraps, which she prepared with love and care. Inspired by her culinary magic, I’ve created my own version of Asian Lettuce Wraps, a dish that brings back warm memories and is sure to create new ones for your family.

Why You’ll Love It

These Asian Lettuce Wraps are not just a meal; they’re an experience. Here’s why you’ll fall in love with them:

  • Healthy and Nutritious: Packed with lean protein and fresh veggies, it’s a guilt-free indulgence.
  • Quick and Easy: Perfect for busy weeknights, this recipe comes together in less than 30 minutes.
  • Customizable: Easily adapt the ingredients to your taste or dietary needs.
  • Perfect for Sharing: Ideal for family dinners, parties, or any gathering where good food and company are desired.

Ingredients

  • 1 pound extra-lean ground turkey
  • 2 cloves garlic, minced
  • 1/4 cup chicken stock
  • 2 tablespoons coconut aminos
  • 1 tablespoon thai fish sauce
  • 2 tablespoons orange marmalade
  • 1 tablespoon fresh lime juice
  • 1 teaspoon sesame oil
  • 1/2 teaspoon ground ginger
  • 1 tablespoon tapioca starch
  • 1 cup broccoli slaw
  • Large green lettuce leaves

Instructions

  1. Place the ground turkey and minced garlic in a skillet over medium heat and begin to brown, breaking up the meat as you cook. Use a hand-held potato masher to help break up the meat more evenly.
  2. While the turkey is cooking, prepare the sauce. In a bowl or using a magic bullet, combine the chicken stock, coconut aminos, fish sauce, orange marmalade, lime juice, sesame oil, ground ginger, and tapioca starch. Whisk or process until well blended.
  3. Add the sauce to the ground turkey and continue cooking until the turkey is fully cooked and the sauce has thickened, about 5-7 minutes.
  4. Serve the turkey mixture with broccoli slaw, wrapped in large green lettuce leaves. Enjoy!

Tips

To ensure your lettuce wraps are the best they can be, consider these helpful tips:

  • Use Fresh Ingredients: Fresh garlic and lime juice make a noticeable difference in flavor.
  • Choose the Right Lettuce: Opt for large, sturdy lettuce leaves like Romaine or Butter lettuce for easy wrapping.
  • Balance the Flavors: Taste the sauce before adding it to the meat and adjust the ingredients to your liking.

Variations & Substitutions

Feel free to get creative with your lettuce wraps! Here are some ideas to make them your own:

  • Protein Swap: Substitute ground turkey with ground chicken or even tofu for a vegetarian version.
  • Spice It Up: Add some sriracha or red pepper flakes for a spicy kick.
  • Different Veggies: Add diced bell peppers or shredded carrots for extra crunch and color.

Storage

To store any leftovers, keep the turkey filling and lettuce leaves separate. Store the turkey mixture in an airtight container in the refrigerator for up to 3 days. When ready to eat, simply reheat the filling on the stove or in the microwave, and then wrap it in fresh lettuce leaves.

FAQ

Can I make these wraps ahead of time?

Yes, you can prepare the turkey filling in advance and store it in the refrigerator until you’re ready to serve. Just reheat the filling and wrap it in fresh lettuce leaves when you’re ready to eat.

What can I use instead of tapioca starch?

If you don’t have tapioca starch on hand, you can substitute it with cornstarch or arrowroot powder. Both will work well to thicken the sauce.

Is there a vegetarian version of this recipe?

Absolutely! You can make a vegetarian version by substituting the ground turkey with crumbled tofu or tempeh. Just adjust the cooking time as needed.

Nutrition

These Asian Lettuce Wraps are not only delicious but also nutritious. With lean protein and fresh vegetables, they offer a balanced meal that’s low in calories and high in flavor. Each serving provides essential vitamins and minerals, making it a healthy choice for any meal.

Conclusion

Whether you’re looking for a quick weeknight dinner, a healthy lunch option, or a dish to impress your guests, these Asian Lettuce Wraps are a perfect choice. They’re easy to make, customizable, and packed with flavor. Plus, they bring the joy of shared meals and the nostalgia of cherished family recipes to your table. Enjoy the process of creating and savoring these wraps, and make them a part of your family traditions. Happy cooking!

Related update: Asian Lettuce Wraps

Related update: Barbecued Baby Back Pork Ribs and Bush's Grillin' Beans

Caribbean black bean and sweet potato soup | Made by Meaghan Moineau

Caribbean Black Bean and Sweet Potato Soup

Intro

There’s something magical about a bowl of soup that can transport you to another place. For me, this Caribbean Black Bean and Sweet Potato Soup does just that. I remember my first encounter with this delightful dish during a family trip to a little coastal village in Jamaica. The aroma of spices wafted through the air as we sat by the beach, the sun setting in the horizon, painting the sky with hues of orange and pink. The rich, comforting flavor of the soup was a perfect complement to the cool ocean breeze. Every time I prepare this soup, I’m reminded of that cherished memory, and I hope it brings a touch of the Caribbean warmth to your home as well.

Why You’ll Love It

This Caribbean Black Bean and Sweet Potato Soup is more than just a delightful culinary experience; it’s a bowl of comfort and warmth. Here are a few reasons why you’ll fall in love with it:

  • Rich in Flavor: The combination of spices like ginger and allspice gives this soup a unique and robust flavor profile that’s both comforting and exotic.
  • Nutritious: Packed with protein-rich black beans and nutrient-dense sweet potatoes, this soup is as healthy as it is delicious.
  • Versatile: It’s perfect for any occasion, whether you’re looking for a hearty lunch or a warming dinner.
  • Easy to Make: With simple steps and readily available ingredients, you can bring a taste of the Caribbean to your kitchen with ease.

Ingredients

  • 1 cup dry black turtle beans
  • 2 tablespoons coconut oil
  • 1 large yellow sweet onion, diced
  • 2 jalapenos, seeded and minced
  • 1 teaspoon ground ginger
  • 1 teaspoon ground allspice
  • 1 teaspoon dried thyme
  • 1 tablespoon coarse sea salt, plus more to taste
  • 6 cups vegetable broth
  • 2 large sweet potatoes, peeled and cubed
  • 1 tablespoon brown sugar
  • 1/4 cup chopped green onions
  • 1/4 cup fresh cilantro, chopped

Instructions

  1. Rinse the black beans thoroughly and place them in a large bowl. Cover the beans with about 4 inches of water and allow them to soak overnight or for at least 8 hours.
  2. Once soaked, strain and rinse the black beans again.
  3. In a large soup pot, heat the coconut oil over medium heat. Add the diced onion and minced jalapenos, sautéing for about 10 minutes until soft and fragrant.
  4. Add the soaked black beans and pour in the vegetable broth. Stir in ground ginger, allspice, thyme, and sea salt.
  5. Bring the mixture to a boil, then reduce the heat and let it simmer for approximately 1 hour and 30 minutes.
  6. Add the cubed sweet potatoes and brown sugar to the pot. Continue to simmer for an additional 30 minutes, or until the beans and sweet potatoes are tender.
  7. Remove 1 cup of the soup and puree it in a blender, then return it to the pot to add creaminess to the soup.
  8. Stir in the chopped cilantro and green onions, and season with additional salt and pepper to taste. Serve warm, and enjoy!

Tips

  • Bean Soaking: If you’re short on time, use the quick soak method by boiling the beans for 2 minutes, then letting them sit for 1 hour before proceeding with the recipe.
  • Spice Level: Adjust the number of jalapenos to your taste preference. For a milder soup, use only one jalapeno or remove the seeds.
  • Texture: For a thicker soup, puree more than a cup of the mixture, or use an immersion blender directly in the pot for desired consistency.

Variations & Substitutions

  • Protein Boost: Add cooked chicken or shrimp for an extra protein punch.
  • Vegan Option: Ensure that the vegetable broth is vegan-friendly and consider adding a squeeze of lime for zest.
  • Spice Swap: If you don’t have allspice, a blend of cinnamon, nutmeg, and cloves can be used as a substitute.

Storage

This soup keeps well, making it perfect for meal prep or enjoying throughout the week. Store any leftovers in an airtight container in the refrigerator for up to 5 days. The flavors will continue to meld and deepen, making it even more delicious the next day. For longer storage, freeze the soup in individual portions for up to 3 months. Thaw overnight in the refrigerator before reheating.

FAQ

Can I use canned black beans instead of dried?

Yes, you can use canned black beans as a convenient alternative. If you choose to use canned beans, drain and rinse them well. You can skip the soaking step and proceed directly to sautéing the onions and jalapenos. Since canned beans are already cooked, adjust the simmering time accordingly and add the beans during the last 30 minutes of cooking.

What can I serve with this soup?

This Caribbean Black Bean and Sweet Potato Soup is quite filling on its own, but it pairs wonderfully with a side of crusty bread or warm tortillas. A fresh green salad with citrus dressing can also complement the soup beautifully, adding a refreshing contrast to the rich flavors.

Is this soup suitable for freezing?

Absolutely! This soup freezes exceptionally well. Allow it to cool completely before transferring it to freezer-safe containers. It can be frozen for up to 3 months. To reheat, thaw overnight in the refrigerator and warm on the stove over medium heat. You may need to add a splash of broth or water to loosen the consistency as it heats.

Nutrition

This soup is not only delicious but also nutritious. Each serving is rich in fiber, vitamins, and minerals, making it a hearty and healthy choice. Black beans provide an excellent source of plant-based protein, while sweet potatoes are loaded with vitamin A and potassium. The use of coconut oil adds healthy fats, and the array of spices brings antioxidant properties to the table. Enjoy this wholesome meal knowing it’s both good for your taste buds and your body.

Conclusion

Incorporating the tropical flair of the Caribbean, this Black Bean and Sweet Potato Soup is a delightful and nourishing dish that can be enjoyed year-round. Whether you’re reminiscing about past travels or simply craving a comforting meal, this soup is sure to warm your heart and satisfy your palate. I hope you enjoy making this recipe as much as I do, and that it brings a little bit of the Caribbean sunshine into your home. Bon appétit!

Related update: Caribbean black bean and sweet potato soup

Related update: Lamb & Sweet Potato Pot Pie

Related update: Kale and Chickpea Soup with Lemon

Tempered Spicy Potatoes | Made by Meaghan Moineau

Tempered Spicy Potatoes

Intro

As a child, the aroma of tempered spices wafting through our home was a sure sign of a special meal in the making. My grandmother had a magical way of transforming simple ingredients into something extraordinary, and her Tempered Spicy Potatoes were no exception. This dish, with its crispy exterior and tender, spicy interior, was a family favorite that never failed to bring everyone to the table. Today, I’m excited to share this nostalgic recipe with you, hoping it brings warmth and flavor to your home just as it did mine.

Why You’ll Love It

This recipe is a delightful blend of flavors and textures that will tantalize your taste buds. Whether you’re looking to spice up your weeknight meals or impress guests with something unique, these Tempered Spicy Potatoes are a perfect choice. They’re easy to make, require minimal ingredients, and are incredibly versatile. Plus, they pair beautifully with rice, roti, or even a slice of crusty bread.

Ingredients

  • Cinnamon stick
  • Curry leaves
  • Mustard seeds
  • Oil
  • Onions
  • Cooked par potatoes
  • Red dried chilli flakes
  • Salt
  • Turmeric

Instructions

  1. Cut the par-boiled potatoes into wedges.
  2. Heat oil in a pan for deep frying and fry the potatoes until they are slightly golden brown. Keep the fried potatoes aside.
  3. Place a frying pan on medium heat and add 1 1/2 tbsp of oil. (I used a non-stick pan.)
  4. Add the mustard seeds, cinnamon stick, and curry leaves. Let the mustard seeds pop.
  5. Next, add the sliced onions and cook for 1 minute.
  6. Add the potatoes, turmeric, and salt. Stir fry the potatoes for 5 minutes on low heat until the onions are slightly golden brown.
  7. Lastly, add the red chilli flakes and cook for a minute.
  8. Serve warm with rice, roti, or bread.

Tips

For the best results, ensure the potatoes are thoroughly dried after par-boiling; this will help them achieve a crispier texture when fried. If you prefer a milder spice level, adjust the amount of red dried chili flakes to suit your taste. Remember to keep the heat low when adding the spices to prevent them from burning, which can result in a bitter taste.

Variations & Substitutions

If you’re looking to experiment, consider these variations:

  • Herbs: Add fresh cilantro or mint leaves for an added burst of flavor.
  • Vegetables: Throw in some bell peppers or peas for a more colorful dish.
  • Spices: Swap the mustard seeds for cumin seeds for a different flavor profile.
  • Oil: Use ghee instead of oil for a richer taste.

Storage

These spicy potatoes are best enjoyed fresh, but if you have leftovers, store them in an airtight container in the refrigerator for up to 3 days. To reheat, simply warm them in a pan over low heat until heated through. Avoid microwaving, as it can make the potatoes soggy.

FAQ

Can I make this recipe vegan?

Absolutely! This recipe is naturally vegan as it uses plant-based ingredients. Just ensure any bread or sides you serve with it are vegan as well.

How can I make this dish less spicy?

If you prefer a milder version, reduce the amount of red dried chili flakes or substitute them with paprika for a less intense heat.

Can I use sweet potatoes instead of regular potatoes?

Yes, sweet potatoes can be a delicious alternative. They will add a subtle sweetness to the dish that pairs beautifully with the spices.

Nutrition

This dish is a great source of carbohydrates and is rich in flavor without being overly heavy. The use of spices brings added health benefits, including anti-inflammatory properties. Keep in mind that the nutritional content may vary based on portion sizes and specific brands of ingredients used.

Conclusion

Tempered Spicy Potatoes are more than just a side dish; they’re a celebration of flavors and family traditions. I hope you enjoy making this recipe and that it becomes a cherished part of your culinary repertoire. Whether you’re sharing it with loved ones or enjoying it as a comforting solo meal, may it bring warmth and happiness to your table.

Related update: Tempered Spicy Potatoes

5-Minute Blueberry Chia Jam | Made by Meaghan Moineau

5-Minute Blueberry Chia Jam

Intro

There’s something magical about homemade jams that can instantly transport you back to the cozy kitchens of your childhood. I remember spending summer afternoons in my grandmother’s kitchen, surrounded by baskets of fresh berries picked from her garden. The sweet aroma of simmering fruits would fill the air as she stirred her pot of homemade jam, teaching me the art of patience and the joy of creating something truly delicious from scratch. Those cherished memories inspired me to create a quick and easy version of jam that fits perfectly into our busy lives today. Introducing: the 5-Minute Blueberry Chia Jam! This delightful recipe combines the natural sweetness of blueberries with the nutritional power of chia seeds, offering you a healthy and delicious spread in no time.

Why You’ll Love It

This 5-Minute Blueberry Chia Jam is not only quick and easy to make, but it is also packed with nutrients and flavor. Here are just a few reasons you’ll fall head over heels for this recipe:

  • Time-Saving: It takes just five minutes to whip up this jam, making it perfect for busy mornings or last-minute brunches.
  • Healthful Ingredients: Packed with antioxidants from blueberries and fiber from chia seeds, this jam is a nutritious addition to any meal.
  • Versatile: Use it on toast, pancakes, yogurt, or even as a topping for desserts.
  • Customizable Sweetness: You can adjust the sweetness to your liking with honey or maple syrup.
  • No Cooking Required: That’s right, no need to slave over a hot stove!

Ingredients

  • 1 cup fresh blueberries
  • 2 tablespoons chia seeds
  • 1-2 tablespoons honey or maple syrup (to taste)
  • Water (as needed for blending)

Instructions

  1. Add all of the ingredients to your blender with just enough water to allow it to blend smoothly.
  2. Blend until the mixture reaches your desired consistency. You can make it smooth or leave some texture, as you prefer.
  3. Pour the jam into a glass jar or similar container.
  4. Seal the jar and store it in the fridge. The jam should last for around 4-5 days.

Tips

For the best results, use fresh, ripe blueberries. If fresh blueberries aren’t available, frozen ones can be a good substitute—just make sure to thaw them first. Adjust the sweetness based on the natural sweetness of your berries and your personal preference. You can add a dash of lemon juice for a slight tangy twist, which also helps preserve the vibrant color of the jam.

Variations & Substitutions

Feel free to get creative with this recipe! You can substitute blueberries with other berries like strawberries, raspberries, or blackberries. If you’re vegan or prefer a different sweetener, agave syrup or coconut sugar works well too. For a thicker jam, simply add more chia seeds, as they will absorb the liquid and thicken the mixture.

Storage

Store your 5-Minute Blueberry Chia Jam in a sealed glass jar in the refrigerator. It’s best consumed within 4-5 days for optimal freshness and flavor. If you want to make a larger batch, consider freezing smaller portions in ice cube trays. Once frozen, transfer the cubes to a zip-top bag. Simply thaw as needed and enjoy!

FAQ

Can I use a food processor instead of a blender?

Yes, you can use a food processor if you don’t have a blender. Just ensure that the blueberries break down enough to mix well with the chia seeds and sweetener. You might need to scrape down the sides a few times to achieve an even consistency.

What if my jam is too runny?

If your jam is too runny, add an additional tablespoon of chia seeds and let the mixture sit for a few minutes to thicken. Chia seeds absorb liquid and will help achieve a firmer texture.

Nutrition

Blueberries are a powerhouse of antioxidants, while chia seeds provide a healthy dose of omega-3 fatty acids, fiber, and protein. Using honey or maple syrup allows you to control the sweetness naturally. This jam is a nutrient-rich choice compared to traditional sugar-laden jams and is suitable for a variety of dietary preferences.

Conclusion

With its simplicity, health benefits, and delightful taste, this 5-Minute Blueberry Chia Jam is sure to become a staple in your kitchen. Whether you’re spreading it on your morning toast or offering it as a topping on your favorite dessert, this jam promises to bring a bit of sunshine to your day. So, why not take a few minutes to make a batch today and enjoy a taste of homemade goodness that’s both nostalgic and nourishing?

Related update: 5-Minute Blueberry Chia Jam

Related update: Homemade Muesli Breakfast Cereal

Minted Pea & Spinach Soup | Made by Meaghan Moineau

Minted Pea & Spinach Soup

Intro

As the days grow shorter and the air turns crisp, there’s nothing quite like a warm bowl of soup to bring comfort and warmth to your soul. Growing up, I fondly remember my grandmother’s kitchen, where the scent of fresh herbs and simmering vegetables filled the air. Her minted pea soup was a family favorite, and every spoonful felt like a warm hug. Today, I’m excited to share my own version of this nostalgic dish, with a delightful twist of spinach for added nutrition and flavor. It’s a simple, yet satisfying recipe that I’m sure will become a staple in your kitchen as well.

Why You’ll Love It

This Minted Pea & Spinach Soup is a delightful fusion of flavors that is both refreshing and comforting. Here are a few reasons why you’ll fall in love with this recipe:

  • Quick and Easy: With just a few simple steps, you’ll have a delicious soup ready in no time.
  • Nutritious: Packed with vitamins and minerals from peas and spinach, this soup is as healthy as it is tasty.
  • Versatile: Perfect as a starter or a light meal, and easy to customize to your taste.
  • Comfort in a Bowl: The creamy texture and soothing flavors make this soup the ultimate comfort food.

Ingredients

  • 2 cups chicken stock
  • 1/2 cup cream
  • 1 teaspoon canned dried mint
  • 1 cup milk
  • 2 cups frozen peas
  • 2 diced potatoes
  • Salt & pepper to taste
  • 2 cups fresh spinach
  • 1 teaspoon sugar
  • 1 cup water
  • 1/2 cup yoghurt

Instructions

  1. Place the diced potatoes in a medium-sized pot with a little bit of water and some salt & pepper. Place the lid on and cook for 20 minutes until almost soft.
  2. Add the frozen peas and cook for a further 5 minutes until the potatoes are soft and cooked through.
  3. Add the fresh spinach and cook for an additional 3-5 minutes, until wilted.
  4. Remove the pot from heat and let it cool for a few minutes. Then, blend to a puree with an immersion blender.
  5. Return the pot to the stovetop, adding the cream, milk, water, and chicken stock. Re-heat for a few minutes until piping-hot.
  6. Add the yoghurt, dried mint, sugar, salt, and pepper to taste and stir through.
  7. Serve immediately, scattered with some crispy croutons or bacon bits. For a unique twist, fry up some cheesegrillers in thin slices with a bit of sweet chili sauce and use as a topper.

Tips

  • For a smoother texture, strain the soup through a fine mesh sieve after blending.
  • Adjust the seasoning to your preference, adding more mint or sugar for a balanced flavor.
  • Garnish with fresh mint leaves for a pop of color and added freshness.

Variations & Substitutions

This soup recipe is highly adaptable. Here are some variations and substitutions you can try:

  • Vegetarian Version: Substitute the chicken stock with vegetable stock for a vegetarian-friendly option.
  • Dairy-Free: Use coconut milk or almond milk instead of cream and milk for a dairy-free alternative.
  • Add Protein: Stir in some cooked chicken or tofu for added protein and texture.

Storage

This soup stores beautifully, making it perfect for meal prep:

  • Refrigerator: Store in an airtight container in the refrigerator for up to 3 days.
  • Freezer: Freeze in individual portions for up to 3 months. Thaw overnight in the refrigerator before reheating.

FAQ

Can I use fresh peas instead of frozen?

Yes, you can use fresh peas if they are in season. Simply adjust the cooking time to ensure they are tender before blending.

Is it necessary to use an immersion blender?

An immersion blender is convenient for making a smooth puree directly in the pot. However, if you don’t have one, you can carefully transfer the soup to a countertop blender and blend in batches.

Can I make this soup ahead of time?

Absolutely! This soup can be made a day in advance and stored in the refrigerator. Reheat gently on the stovetop before serving.

Nutrition

This soup is not only delicious but also packed with nutrients:

  • Calories: Approximately 180 per serving
  • Protein: 5g
  • Fat: 8g
  • Carbohydrates: 22g
  • Fiber: 4g

Conclusion

Minted Pea & Spinach Soup is a delightful blend of flavors that brings warmth and nourishment to any table. Whether you’re reminiscing about childhood memories or creating new ones, this soup is sure to become a cherished favorite. Enjoy it on a chilly day, share it with loved ones, or savor it in solitude with a good book. No matter how you choose to enjoy it, this soup is a reminder that comfort can be found in the simplest of ingredients. Happy cooking!

Related update: Minted Pea & Spinach Soup

Related update: Spicy Lemongrass Soup

Carrot Cake Snack Bites | Made by Meaghan Moineau

Carrot Cake Snack Bites

Intro

There’s something magical about the aroma of freshly baked carrot cake wafting through the kitchen. It takes me back to my grandmother’s cozy kitchen, where the warmth of her oven matched the warmth of her smile. She would let me lick the spoon, a sweet reward for helping her mix the batter. Those cherished memories inspired me to create these Carrot Cake Snack Bites, a healthy, no-bake version of a classic favorite that encapsulates nostalgia in every bite.

Why You’ll Love It

These Carrot Cake Snack Bites are a delightful fusion of wholesome ingredients and timeless flavors. They’re the perfect treat for anyone who craves the essence of carrot cake without the commitment of baking. Whether you’re looking for a quick snack, a guilt-free dessert, or a lunchbox addition, these bites have got you covered. They’re vegan, gluten-free, and packed with nutrients, making them a delicious and nourishing choice for everyone.

Ingredients

  • 1 cup shredded carrots
  • 1 teaspoon cinnamon
  • 1/2 cup shredded coconut
  • 1/2 teaspoon ground ginger
  • 1 cup pitted medjool dates
  • 1/2 cup sunflower seeds
  • 1/2 cup walnuts

Instructions

  1. In a food processor, blend all the snack bite ingredients together until the mixture is well combined and sticky.
  2. Scoop out tablespoons full of the batter and roll it into a ball using your hands.
  3. For additional crunch and flavor, roll the balls in sesame seeds, coconut, or chopped almonds, if desired.
  4. Store the snack bites in an airtight container in the refrigerator to keep them fresh.

Tips

For best results, ensure your dates are soft and moist. If they seem dry, soak them in warm water for 10 minutes before using. When rolling the bites, dampen your hands slightly to prevent the mixture from sticking. Experiment with different coatings for a variety of textures and flavors.

Variations & Substitutions

Feel free to customize these snack bites to suit your taste. Swap walnuts for pecans or almonds for a different nutty flavor, or replace sunflower seeds with pumpkin seeds for an autumn twist. Don’t have medjool dates? Try using dried apricots or figs as an alternative. Add a pinch of nutmeg or cardamom to enhance the spice profile.

Storage

Store your Carrot Cake Snack Bites in an airtight container in the refrigerator. They will stay fresh for up to a week. For longer storage, freeze them for up to three months. Simply thaw at room temperature for a few minutes before enjoying.

FAQ

Can I make these snack bites without a food processor?

Yes, you can make them without a food processor, although it will require a bit more effort. Finely chop the dates, nuts, and seeds, then mix everything together in a bowl until a sticky dough forms.

Are these snack bites suitable for a nut-free diet?

To make these bites nut-free, simply omit the walnuts and use additional sunflower seeds or pumpkin seeds instead. You can also explore using seeds like chia or flax for added nutrition.

Can I add protein powder to these snack bites?

Absolutely! Adding a scoop of your favorite protein powder can boost the nutritional value of these bites. Simply adjust the consistency by adding a bit of water or almond milk if needed.

Nutrition

Each Carrot Cake Snack Bite is packed with vitamins and minerals from the carrots, healthy fats from the nuts and seeds, and natural sweetness from the dates. They’re a great source of fiber, vitamin A, and plant-based protein, making them a balanced and wholesome snack option.

Conclusion

These Carrot Cake Snack Bites are more than just a treat—they’re a nostalgic nod to the comforting flavors of a beloved dessert, reimagined in a health-conscious form. Perfect for any time of the day, they’re sure to become a staple in your snack rotation. Whether you’re savoring them on a busy afternoon or sharing them with loved ones, these bites are a delicious reminder of the simple joys in life. Enjoy the taste of nostalgia with every bite!

Related update: Carrot Cake Snack Bites

Banana Blueberry Pancakes | Made by Meaghan Moineau

Banana Blueberry Pancakes

Intro

There’s something truly magical about starting your day with a stack of warm, fluffy pancakes. For me, banana blueberry pancakes bring back memories of cozy weekend mornings spent in my grandmother’s kitchen. The sweet scent of bananas mingling with the sharp tartness of blueberries filled the air as we eagerly awaited the first batch. Now, I’m thrilled to share this recipe with you so you can create your own cherished breakfast traditions.

Why You’ll Love It

These banana blueberry pancakes are not just a treat for the taste buds but also a wholesome start to your day. They combine the natural sweetness of ripe bananas with the burst of flavor from blueberries. The use of coconut flour makes them a nutritious alternative to regular pancakes, offering a delightful texture that’s both light and satisfying. Plus, they’re easy to make and perfect for a quick weekday breakfast or a leisurely weekend brunch.

Ingredients

  • 4 whole eggs
  • 1 cup water
  • 2 tablespoons liquid coconut oil
  • ½ cup coconut flour
  • 1 teaspoon cream of tartar
  • 1 teaspoon ground cinnamon
  • 2 ripe bananas, mashed
  • 1 cup frozen blueberries

Instructions

  1. Beat the eggs for 1 minute until they are light and frothy.
  2. Add the water, liquid coconut oil, and coconut flour. Whisk the mixture until combined.
  3. Allow the batter to sit for 5 minutes to let the coconut flour absorb and expand.
  4. Add the cream of tartar, cinnamon, and mashed bananas to the batter and whisk until smooth.
  5. Gently fold in the frozen blueberries using a spatula.
  6. Heat oil, butter, or a combination of both in a skillet over medium to low heat.
  7. Ladle ½ cup of the batter onto the skillet for each pancake.
  8. Cook for about 5 minutes on one side, then carefully flip the pancake to cook the other side until golden brown.
  9. Repeat the steps until you have made 8 pancakes.
  10. Serve hot, drizzled with maple syrup.

Tips

For the best results, make sure your bananas are overripe, as they will add extra sweetness and moisture to the pancakes. If your batter seems too thick, feel free to add a little more water to reach your desired consistency. It’s also important to cook the pancakes over medium to low heat to ensure they cook evenly and don’t burn.

Variations & Substitutions

If you don’t have coconut flour on hand, almond flour can be a great alternative, though the texture will be slightly different. You can also substitute fresh blueberries for frozen ones if they’re in season. For a nutty twist, add a handful of chopped walnuts or pecans to the batter.

Storage

These pancakes can be stored in an airtight container in the refrigerator for up to 3 days. For longer storage, freeze them by placing parchment paper between each pancake and sealing them in a freezer bag. Reheat in the microwave or toaster for a quick breakfast option.

FAQ

Can I make the batter ahead of time?

It’s best to prepare the batter just before cooking to maintain the freshness and texture of the pancakes. However, you can mix the dry ingredients and store them separately, then combine with the wet ingredients when you’re ready to cook.

Are these pancakes suitable for a gluten-free diet?

Yes, these banana blueberry pancakes are gluten-free as they use coconut flour, which is a great alternative to traditional wheat flour.

Nutrition

Each serving of these pancakes provides a good source of protein from the eggs and a boost of vitamins and antioxidants from the blueberries and bananas. Coconut flour adds healthy fats and fiber, making these pancakes a nutritious breakfast choice.

Conclusion

Banana blueberry pancakes are a wonderful way to start your day with something delicious and nutritious. Whether you’re making these for a special occasion or just a regular morning, they’re sure to bring a smile to your face. So gather your ingredients, put on your apron, and enjoy the delightful process of making these pancakes. You might just find they become a beloved staple in your morning routine!

Related update: Banana Blueberry Pancakes

Related update: Peach Carrot Coconut Vegan Pancake

Related update: Raspberry Thumbprint Wholewheat Scones With Macadamia Nuts

Thai Savory Brown Fried Rice | Made by Meaghan Moineau

Thai Savory Brown Fried Rice

Intro

There’s something incredibly comforting about the aroma of fried rice sizzling on the stove, filling the kitchen with its enticing fragrance. This Thai Savory Brown Fried Rice recipe takes me back to my childhood summers spent in my grandmother’s bustling kitchen. She would whip up the most delicious meals seemingly without effort, and her fried rice was always the highlight of our family gatherings. Today, I am thrilled to share my version of this beloved dish, which brings together the warmth of those cherished memories and the vibrant flavors of Thailand in one delightful bowl.

Why You’ll Love It

This Thai Savory Brown Fried Rice is a deliciously wholesome and satisfying dish that you’ll fall in love with for several reasons:

  • Flavorful: The combination of garlic, red chili peppers, and fresh lime juice creates a symphony of tastes that dance on your palate.
  • Nutritious: Packed with wholesome ingredients like brown rice, fresh vegetables, and cashews, this dish is as nourishing as it is tasty.
  • Quick and Easy: Once the rice is ready, the rest of the meal comes together in a flash, making it perfect for busy weeknights.
  • Customizable: Easily adapt this recipe to suit your dietary preferences or whatever ingredients you have on hand.

Ingredients

  • 2 tablespoons extra virgin olive oil, divided
  • 3 cloves garlic, minced
  • 2 red fresh chili peppers, sliced
  • 1/2 cup raw cashew nuts
  • 1/4 cup dry unsweetened shredded coconut, toasted
  • 1 teaspoon stevia powder
  • 2 tablespoons Bragg Liquid Aminos
  • 1 tablespoon apple cider vinegar
  • 1 flax egg (1 tablespoon ground flaxseed mixed with 3 tablespoons water)
  • 1 cup fresh green beans, trimmed and cut into 1-inch pieces
  • 2 cups shredded regular bok choy
  • 3 cups cooked brown rice
  • Lime wedges, for serving

Instructions

  1. Prepare the Perfect Brown Rice: In a medium saucepan, heat 1 teaspoon of olive oil over medium heat. Add 1 cup of uncooked brown rice and stir until lightly browned. Place 2 basil leaves on top of the rice and add 2 cups of filtered water all at once. Cover with a lid and bring to a boil. Reduce heat to a simmer and cook until all the water has evaporated, about 40 minutes. Remove from heat and let it sit covered for 5 minutes, then fluff with a fork.
  2. While the rice is cooking, heat the remaining olive oil in a wok or large frying pan over medium heat. Add the minced garlic and cook until lightly golden, being careful not to burn it.
  3. Add the sliced red chili peppers, cashew nuts, and toasted coconut to the pan, stirring to combine.
  4. In a small bowl, mix together the stevia powder, Bragg Liquid Aminos, and apple cider vinegar. Pour this mixture into the pan and cook for 1 minute over medium heat.
  5. Push the stir-fry to one side of the pan and add the flax egg on the opposite end. Cook and stir the flax egg for about a minute, then incorporate it into the stir-fry mixture.
  6. Add the green beans, bok choy, and cooked brown rice to the stir-fry. Cook and stir on medium for another minute, until the bok choy is wilted but the green beans remain slightly crunchy.
  7. Spoon the fried rice into a serving dish and serve with lime wedges on the side for squeezing over the rice before eating.

Tips

  • Toast the Coconut: Toasting the coconut enhances its flavor and adds a delightful crunch to the dish. Simply spread it in a dry pan and heat over medium heat, stirring frequently until golden brown.
  • Prep Ahead: Cook the brown rice ahead of time and store it in the refrigerator. Cold rice works best for fried rice recipes as it doesn’t clump together.
  • Adjust Spice Level: If you prefer a milder dish, reduce the amount of chili peppers or remove the seeds before slicing.

Variations & Substitutions

This recipe is incredibly versatile, and you can easily adapt it to suit your taste or dietary needs:

  • Protein Options: Add tofu, shrimp, or chicken for additional protein.
  • Vegetable Swaps: Substitute or add other vegetables such as bell peppers, carrots, or snap peas.
  • Soy Sauce Alternative: If you don’t have Bragg Liquid Aminos, tamari or soy sauce will work just as well.

Storage

Leftover Thai Savory Brown Fried Rice can be stored in an airtight container in the refrigerator for up to 3 days. Reheat gently in a pan over medium heat, adding a splash of water or broth to help rehydrate the rice. Avoid microwaving as it can make the rice rubbery.

FAQ

Can I use white rice instead of brown rice?

Yes, you can substitute white rice for brown rice in this recipe. Keep in mind that white rice cooks faster, so adjust the cooking time accordingly.

Is there a substitute for flax egg?

If you’re not vegan, you can use a regular egg instead of a flax egg. Simply scramble it in the pan before adding it to the stir-fry.

Can I make this dish ahead of time?

Yes, you can prepare the rice and chop the vegetables ahead of time to streamline the cooking process. However, for the best texture and flavor, it’s recommended to stir-fry the ingredients just before serving.

Nutrition

This Thai Savory Brown Fried Rice is a wholesome and balanced meal. It’s rich in fiber from the brown rice and vegetables, healthy fats from the olive oil and cashews, and offers a moderate amount of protein. However, nutritional values can vary based on serving size and any variations you make to the recipe.

Conclusion

Thai Savory Brown Fried Rice is more than just a meal; it’s a culinary journey that brings together vibrant flavors and cherished memories. Whether you’re cooking for family, friends, or just treating yourself, this dish is sure to impress with its delightful taste and nourishing ingredients. I hope this recipe becomes a beloved staple in your home, just as it has in mine. Enjoy!

Related update: Thai Savory Brown Fried Rice

Related update: Madras Beef Curry

Gluten Free Profiteroles | Made by Meaghan Moineau

Gluten Free Profiteroles

Intro

There’s something truly magical about the delicate crunch and soft, airy center of a well-made profiterole. Growing up, my grandmother used to make these delightful little puffs for special occasions, filling them with sweetened cream and drizzling them with chocolate. The kitchen would fill with the rich aroma of baking pastry, a scent that still transports me back to those cozy family gatherings. Now, with this gluten free version, I’m excited to share a recipe that brings the same joy and nostalgia, but without the gluten.

Why You’ll Love It

This gluten free profiterole recipe is a game-changer for anyone with gluten sensitivities. Not only does it deliver the classic texture and taste you love, but it’s also surprisingly simple to make. You’ll appreciate that the ingredients are likely already in your pantry and the method doesn’t require any fancy equipment. Whether you’re a seasoned baker or new to the kitchen, this recipe is designed to be approachable and rewarding.

Ingredients

  • Butter
  • Egg
  • Gluten free flour
  • Xanthan gum
  • Milk
  • Salt
  • Sugar
  • Water

Instructions

  1. Preheat oven to 375°F.
  2. Sift the flour, xanthan gum, salt, and sugar together 3-4 times. Set aside in a handy location close to the stove.
  3. Break the egg into a measuring cup and whisk to combine. Set aside.
  4. Prepare your hand mixer so that it is ready when needed.
  5. Measure milk and water into a deep heavy-bottomed pan. Cut butter into small chunks and add to the milk mixture. Heat gently until all the butter has melted.
  6. Increase heat on the butter-milk mixture until it comes to a rolling boil. Remove from heat and pour the flour mixture into the milk mixture all at once. Beat vigorously with a wooden spoon.
  7. Return to a low heat and continue beating with the wooden spoon until the flour forms a smooth paste and has come cleanly off all the sides and bottom (should be shiny and smooth). Avoid overcooking this paste as the buns will become heavy.
  8. Remove from heat and slowly pour the egg into the mixture, beating well with the hand mixer. Be careful not to make the paste too runny. The amount of egg required depends on the humidity, so add in small quantities. Continue to beat until shiny and stiff.
  9. The paste should be firm but elastic and should be able to stand on its own when dropped by spoonfuls. This paste may be kept for a couple of hours covered with a damp cloth. It can also be frozen and used successfully.
  10. Prepare a cookie sheet by running it under cold water, shaking excess water off, but leaving it damp. Use two baking sheets to protect the bottom of each puff from burning.
  11. Place tablespoons of the mixture about 10 cm apart (the choux will double to triple in size).
  12. Bake for 20-25 minutes, until the exterior is golden. Do not open the oven for the first 15 minutes. Choux needs to be golden; otherwise, they will collapse as they cool.
  13. When done, remove from the sheet to a baking rack, piercing with a toothpick to allow steam to escape. Choux pastry may be reheated for about 10 minutes to crisp them up again.

Tips

For the best results, make sure all your ingredients are at room temperature before you begin. This helps everything combine more smoothly. Also, keep an eye on the humidity levels in your kitchen; this can affect how much egg you need to add to your dough.

Variations & Substitutions

Feel free to get creative with your fillings! Traditional cream or custard are always hits, but consider experimenting with flavored creams like coffee or chocolate. For a dairy-free version, substitute the milk and butter with plant-based alternatives.

Storage

Store any leftover profiteroles in an airtight container at room temperature for up to two days. They can also be frozen for longer storage—just thaw and reheat them in the oven to regain their crispness.

FAQ

Can I make these profiteroles ahead of time?

Yes, you can make the choux pastry ahead of time and store it covered with a damp cloth for a few hours, or freeze them for later use. Just reheat in the oven before serving to ensure they are crisp.

What if I don’t have xanthan gum?

If you don’t have xanthan gum, you can try using guar gum or psyllium husk as an alternative. These help provide the necessary elasticity in gluten free baking.

Nutrition

Profiteroles are a treat and should be enjoyed in moderation. The exact nutritional content will vary based on the size of your profiteroles and the type of filling used. However, they are relatively low in sugar and can fit into a balanced diet when enjoyed as an occasional indulgence.

Conclusion

This gluten free profiterole recipe is a beautiful way to bring a touch of elegance to your dessert table. With the perfect balance of crispness and airiness, these treats are sure to impress your family and friends, gluten free or not. Enjoy the process of making them and savor every bite of nostalgia they bring. Happy baking!

Related update: Gluten Free Profiteroles

Related update: Creamy Potato Salad with Cashew Dressing and Fresh Basil