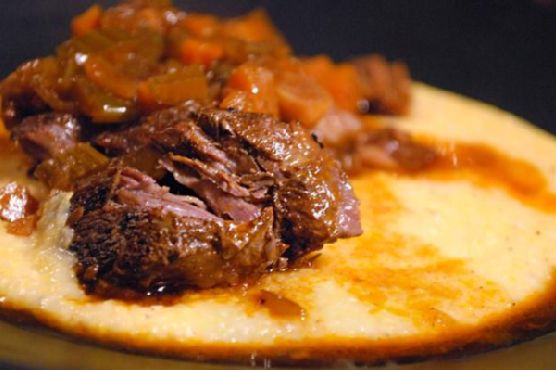
Beef Braised In Red Wine
Intro
There’s something magical about the aroma of a hearty stew simmering gently in the oven. It always takes me back to my grandmother’s kitchen, where the scent of herbs and red wine would fill the room, promising a meal that warmed the soul as much as it did the body. This Beef Braised in Red Wine recipe is my homage to those cherished days. The tender beef, the rich sauce, and the earthy vegetables create a symphony of flavors that feels both nostalgic and comforting. Join me as we explore this classic dish that is perfect for cozy family dinners or special occasions.
Why You’ll Love It
This dish is a celebration of deep, robust flavors that develop beautifully over a few hours of slow cooking. The beef becomes exceptionally tender, practically melting in your mouth, while the red wine sauce is rich and velvety, with hints of rosemary and thyme. Whether you’re a seasoned chef or a home cook looking to impress, this recipe is straightforward yet delivers restaurant-quality results. Plus, the delicious aroma while it cooks will make your home feel warm and welcoming.
Ingredients
- Bacon
- Boneless beef chuck roast
- Carrot
- Celery
- Dry red full-bodied wine
- Garlic cloves
- Olive oil
- Onion
- Pepper
- Rosemary
- Salt
- Thyme
- Tomato paste
- Water
Instructions
- Put the oven rack in the middle and preheat the oven to 325°F (163°C).
- Heat oil in a large Dutch oven until hot but not smoking.
- Meanwhile, pat the beef dry and season with salt and pepper.
- Brown the beef on both sides, about 10 minutes total. If the bottom of your pan starts to scorch, turn down the heat slightly.
- Remove the beef from the pan and let it rest on a plate.
- Add bacon to the pan and sauté until browned.
- Add the carrot, celery, and onion, cooking until they are softened and golden brown.
- Add garlic, thyme, and rosemary, sautéing for 1 minute.
- Add tomato paste, stirring in and cooking for 1 minute.
- Add wine, and boil until the liquid is reduced by half.
- Add water to the pan and bring to a simmer.
- Return the beef and any juices to the pan.
- Cover the pot with the lid and transfer to the oven.
- Cook for 2 1/2 to 3 hours, or until the beef is very tender.
- Remove beef from the pan and slice across the grain.
- Serve beef on top of potatoes or grits, topped with sauce from the pan.
Tips
For best results, choose a full-bodied red wine, like Cabernet Sauvignon or Merlot, which will enhance the flavor of the dish. Make sure to brown the beef properly to develop a deep flavor base. If you find the sauce too thin after cooking, you can reduce it further on the stovetop.
Variations & Substitutions
If you prefer, you can substitute the beef chuck roast with beef short ribs for a different texture. For a non-alcoholic version, replace the wine with a mixture of beef broth and a splash of balsamic vinegar. To add a touch of sweetness, consider adding a handful of dried fruit, like prunes or raisins, during the braising process.
Storage
This dish stores beautifully and tastes even better the next day. Keep leftovers in an airtight container in the refrigerator for up to 3 days. To reheat, gently warm on the stovetop or in the oven until heated through. You can also freeze the beef and sauce for up to 3 months; just ensure it’s fully cooled before transferring to freezer-safe containers.
FAQ
Can I make this dish in advance?
Absolutely! In fact, the flavors deepen and improve if made a day ahead. Simply prepare the dish, allow it to cool to room temperature, and store it in the refrigerator. Reheat gently before serving.
What side dishes pair well with beef braised in red wine?
This dish pairs wonderfully with creamy mashed potatoes, polenta, or crusty bread to soak up the rich sauce. Steamed green beans or a simple salad also make for a refreshing contrast.
Is it possible to use a slow cooker instead of an oven?
Yes, after browning the beef and sautéing the vegetables, transfer everything to a slow cooker. Cook on low for 6-8 hours or until the beef is tender. Adjust the sauce consistency as needed before serving.
Nutrition
This dish is rich and hearty, so a little goes a long way. While specific nutrition can vary based on portion sizes and specific ingredients used, beef braised in red wine is a good source of protein and iron. For those watching their intake, consider serving smaller portions with plenty of vegetables on the side.
Conclusion
Beef Braised in Red Wine is more than a meal; it’s an experience. The deep, complex flavors and tender beef create a dish that feels like a warm embrace on a chilly evening. Whether for a special occasion or simply to indulge in a comforting classic, this recipe is a keeper. I hope it brings as much joy to your table as it has to mine over the years. Enjoy every savory, satisfying bite!
Related update: Beef Braised In Red Wine