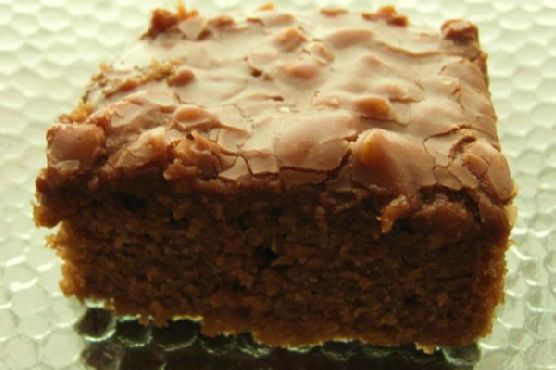
Gooey Chocolate Buttermilk Sheet Cake
Intro
There’s something magical about a chocolate cake that instantly brings back a flood of childhood memories. I recall spending countless afternoons in my grandmother’s kitchen, eagerly awaiting the moment when I could lick the spoon clean of any remaining batter. The aroma of chocolate wafting through the house was a promise of the indulgent treat to come. This Gooey Chocolate Buttermilk Sheet Cake is a tribute to those cherished days, combining rich cocoa flavors with a tender crumb that only buttermilk can provide. Whether it’s for a birthday, a family gathering, or just a midweek pick-me-up, this cake promises to delight and satisfy.
Why You’ll Love It
This cake isn’t just about chocolate; it’s about creating moments. Its melt-in-your-mouth texture and rich, gooey frosting make it an instant hit at any gathering. You’ll love how easy it is to make, with simple ingredients that come together to create something extraordinary. The buttermilk adds a subtle tanginess that perfectly complements the sweetness of the chocolate, while the frosting is a luscious dream that you’ll want to eat straight from the pan.
Ingredients
- 2 cups all-purpose flour
- 2 cups sugar
- 1 teaspoon baking soda
- 1/2 teaspoon salt
- 1 cup butter (or margarine)
- 1/4 cup cocoa powder
- 1 cup water
- 1/2 cup vegetable oil
- 1/2 cup buttermilk
- 2 large eggs, beaten
- 1 teaspoon vanilla extract
- 1/2 cup milk
- 4 cups icing sugar
- Optional: chopped nuts for topping
Instructions
- Preheat your oven to 350°F (180°C).
- In a large saucepan, bring to a boil the water, cocoa powder, oil, and butter or margarine.
- In a separate large mixing bowl, combine the flour, sugar, salt, and baking soda.
- Whisk the hot cocoa mixture into the dry ingredients and mix well.
- Add the buttermilk, vanilla extract, and beaten eggs to the batter; continue mixing until smooth.
- Pour the batter into a greased and floured 9″x13″ oblong baking pan.
- Bake in the preheated oven for approximately 20 minutes, or until a toothpick comes out clean when inserted in the middle.
- Remove the cake from the oven and prepare the frosting while the cake is still warm.
- For the frosting, set a large pan over medium heat and melt the butter with the cocoa powder and milk.
- Stir in the icing sugar and vanilla extract; whisk until smooth.
- Add the chopped nuts if desired, then stir well and spread the frosting on the warm cake.
- Let the cake cool before serving.
Tips
To ensure your cake remains moist, avoid overbaking. Keep a close eye on it towards the end of the baking time. If you want a deeper chocolate flavor, consider using Dutch-processed cocoa powder. For a nut-free option, simply omit the nuts from the frosting.
Variations & Substitutions
If you’re out of buttermilk, you can make a quick substitute by adding a tablespoon of lemon juice or white vinegar to a cup of milk and letting it sit for 5 minutes. For a more decadent version, fold in chocolate chips or swirl in some peanut butter before baking. If you prefer a lighter frosting, you can reduce the icing sugar by a cup.
Storage
This cake can be stored at room temperature, covered, for up to 3 days. If you live in a particularly warm climate, consider refrigerating it to preserve the frosting. For longer storage, wrap individual slices in plastic wrap and freeze them for up to two months. Thaw at room temperature before enjoying.
FAQ
Can I make this cake ahead of time?
Absolutely! This cake can be made a day in advance. Just ensure it’s stored properly to maintain its moist texture. You can frost it on the day you plan to serve for optimal freshness.
Can I use margarine instead of butter?
Yes, margarine can be used in place of butter in both the cake and the frosting. However, butter will provide a richer flavor and texture.
Can I add coffee to enhance the chocolate flavor?
Definitely! Adding a tablespoon of instant coffee granules to the boiling cocoa mixture will deepen the chocolate flavor without making the cake taste like coffee.
Nutrition
This cake is a treat and should be enjoyed as such. Each serving contains approximately 350 calories, with 15g of fat, 50g of carbohydrates, and 4g of protein. Keep in mind that these values may vary based on portion size and specific ingredients used.
Conclusion
This Gooey Chocolate Buttermilk Sheet Cake is more than just a dessert; it’s a delightful experience that brings joy with every bite. Whether you’re rekindling fond memories or creating new ones, this cake is sure to become a beloved staple in your recipe collection. So preheat that oven, gather your ingredients, and enjoy the sweet satisfaction of homemade goodness.
Related update: Gooey Chocolate Buttermilk Sheet Cake
Related update: Classy Poached Pear In Spicy Mango Nectar With Mango Ice Cream