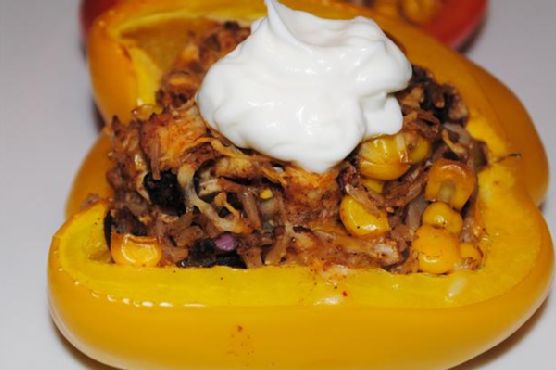
Blast Of Color Mexican Stuffed Bell Peppers
Intro
There’s something magical about the vibrant colors of fresh vegetables, especially when they’re stuffed with a delicious mix of spices and wholesome ingredients. Our Blast Of Color Mexican Stuffed Bell Peppers bring a rainbow of flavors to your table, reminiscent of the lively street markets of Mexico. As a child, I remember accompanying my grandmother to those bustling markets. The air was filled with the aroma of spices and roasted vegetables, and my eyes were captivated by the vivid displays of fresh produce. These stuffed peppers are a tribute to those cherished days, a perfect blend of tradition and modern convenience.
Why You’ll Love It
This recipe is not only visually stunning but also incredibly satisfying. Here’s why you’ll fall head over heels for these Mexican Stuffed Bell Peppers:
- Nutritious and Balanced: Packed with protein from chicken and black beans, fiber from brown rice, and vitamins from fresh vegetables.
- Easy to Prepare: With a few simple steps, you can create a dish that feels gourmet yet is perfect for a weeknight dinner.
- Customizable: Easily adapt the recipe to fit your dietary needs or personal preferences.
- Great for Meal Prep: These peppers can be made ahead and stored for quick lunches or dinners throughout the week.
Ingredients
- 6 large bell peppers (any color)
- 1 cup black beans, drained and rinsed
- 1 cup shredded rotisserie chicken breast
- 1 can (4 oz) fire roasted green diced chiles
- 1 tablespoon chili seasoning
- 1 cup cooked brown rice
- 1 cup frozen corn kernels, thawed
- 2 cloves garlic, minced
- 1 cup low-fat shredded cheddar cheese, divided
- 1/2 cup red onion, diced
- 1 roma tomato, diced
- 1/3 cup sour light cream
Instructions
- Preheat your oven to 400 degrees Fahrenheit (200 degrees Celsius).
- In a large bowl, combine the cooked brown rice, shredded chicken, thawed corn, diced tomato, diced onion, black beans, 1/2 cup of the shredded cheddar cheese, minced garlic, fire roasted green chiles, and chili seasoning. Mix well.
- Prepare a baking dish by lining it with foil and spraying it with cooking spray.
- Slice the tops off the bell peppers and remove the seeds and membranes. Stuff each bell pepper with the chicken mixture, pressing firmly to fill the cavity and mounding the mixture on top.
- Place the stuffed peppers in the prepared baking dish. Top each pepper with an additional 1/2 tablespoon of cheese.
- Bake in the preheated oven for 30 to 40 minutes, or until the peppers are just tender.
- Remove from the oven and top each pepper with 1/2 tablespoon of sour cream before serving.
Tips
- If the tops of the peppers brown too quickly in the oven, cover them loosely with foil.
- For an extra kick, consider adding a dash of hot sauce or a sprinkle of cayenne pepper to the filling mixture.
- Ensure your rice is cool before mixing it with other ingredients to prevent the cheese from melting prematurely.
Variations & Substitutions
- Vegetarian Option: Omit the chicken and add extra black beans or some cooked quinoa for added protein.
- Cheese Substitute: Use a dairy-free cheese to make this recipe lactose-intolerant friendly.
- Different Grains: Swap out brown rice for quinoa or farro for a different texture and flavor.
Storage
These stuffed peppers can be stored in an airtight container in the refrigerator for up to 3 days. To reheat, simply place them in a microwave-safe dish and heat for 2-3 minutes, or until warmed through. You can also freeze them for up to 2 months; thaw in the refrigerator overnight before reheating.
FAQ
Can I use fresh chiles instead of canned?
Absolutely! If you prefer using fresh chiles, simply roast them until charred, peel off the skin, and dice them before adding to the mixture.
Can I make these peppers spicier?
Yes, you can adjust the spice level to your liking by adding more chili seasoning or incorporating chopped jalapeños into the stuffing mix.
Is there a way to reduce the sodium content?
To reduce sodium, use low-sodium black beans and chicken, and opt for a no-salt-added chili seasoning. You can also rinse the canned beans to remove some of the sodium.
Nutrition
Each serving of these Mexican Stuffed Bell Peppers is approximately 250 calories, with 30g of protein, 10g of fat, and 20g of carbohydrates. They are a rich source of fiber, vitamins A and C, and calcium, making them a nutritious option for any meal.
Conclusion
Our Blast Of Color Mexican Stuffed Bell Peppers are a delightful way to bring vibrant flavors and colors to your dinner table. Whether you’re reminiscing about family traditions or simply looking for a delicious meal to share with loved ones, these peppers will not disappoint. We hope you enjoy making and savoring this recipe as much as we do. Happy cooking!
Related Recipes
Also try: Blast Of Color Mexican Stuffed Bell Peppers
Also try: Beans With Smoked Pork Hock