Caramel ice cream | Made by Meaghan Moineau

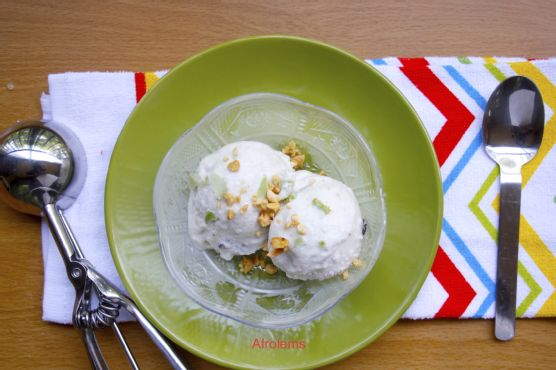
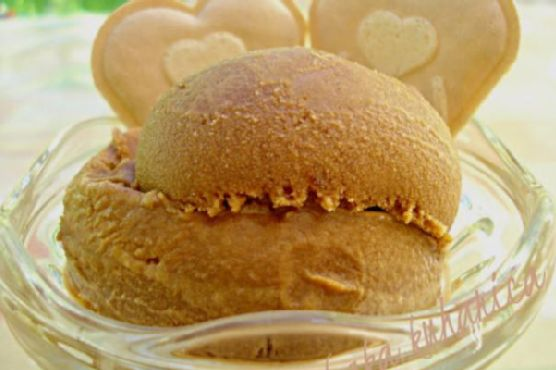
Decadent Homemade Caramel Ice Cream

Intro

There’s something truly magical about homemade ice cream, especially when it’s infused with the rich, buttery flavor of caramel. This recipe for caramel ice cream takes me back to summers spent in my grandmother’s kitchen, where the aroma of simmering sugar and cream would fill the air. We’d gather around the table eagerly waiting for the first scoop of freshly churned ice cream, savoring every bite as if it were a treasure. Today, I’m thrilled to share this delightful recipe that promises to evoke the same warm memories and smiles in your home.

Why You’ll Love It

This caramel ice cream is a creamy, indulgent treat that’s surprisingly simple to make. Its rich flavor profile will satisfy any sweet tooth, and the smooth texture is perfect for hot summer days or as a dessert for a cozy night in. Whether you’re an ice cream aficionado or a caramel lover, this recipe is sure to become a family favorite.

Ingredients

  • 2 cups sugar
  • 1 cup water, divided
  • 4 large eggs
  • 1 cup powdered sugar
  • 2 cups heavy cream
  • 1/2 teaspoon salt
  • 1 teaspoon vanilla extract

Instructions

  1. In a large skillet, combine the sugar and 1/2 cup of water over medium-high heat. Stir occasionally, allowing the sugar to dissolve and the mixture to come to a boil.
  2. Continue boiling the sugar mixture for about 5 minutes until it reaches a dark brown color. Be careful not to burn it.
  3. Remove the skillet from the heat and gradually stir in the remaining 1/2 cup of water. Allow the caramel to cool to room temperature and set aside.
  4. In a medium bowl, beat the eggs for 3 minutes until they are thick and light yellow in color.
  5. Gradually beat in the powdered sugar until well combined.
  6. Stir in the heavy cream, salt, and vanilla extract.
  7. Gently stir in the caramel mixture until smooth.
  8. Cover the mixture and chill in the refrigerator for at least 4 hours or overnight.
  9. Pour the chilled mixture into an ice cream machine and churn according to the manufacturer’s instructions until frozen.
  10. Transfer the ice cream to a plastic container and place it in the freezer for at least an hour before serving.
  11. Before serving, let the ice cream sit at room temperature for 5-10 minutes to reach the perfect scooping consistency.

Tips

For best results, serve your caramel ice cream in chilled glass or porcelain bowls. Use a hot, dry ice cream scoop for the perfect scoop every time—simply dip the scoop in boiling water and wipe it dry before using.

Variations & Substitutions

If you’re looking to switch things up, consider adding a pinch of sea salt to the caramel for a salted caramel twist. Alternatively, you could swirl in some chocolate chips or nuts during the churning process for added texture and flavor. For those who prefer a lighter version, substitute half of the heavy cream with milk.

Storage

Store your caramel ice cream in an airtight container in the freezer. It will keep for up to two weeks, although we doubt it will last that long! Just be sure to allow it to soften at room temperature before scooping.

FAQ

Can I make this recipe without an ice cream machine?

Yes! If you don’t have an ice cream machine, simply pour the mixture into a shallow dish and place it in the freezer. Stir every 30 minutes for the first few hours to break up ice crystals, then freeze until firm.

How can I prevent ice crystals from forming?

To prevent ice crystals, ensure that your mixture is thoroughly chilled before churning. Using an ice cream machine also helps achieve a smoother texture by churning air into the mixture as it freezes.

Nutrition

This recipe yields approximately 8 servings. Each serving contains about:

  • Calories: 350
  • Fat: 22g
  • Carbohydrates: 38g
  • Protein: 4g

Conclusion

Making caramel ice cream from scratch is a rewarding experience that brings joy to both the cook and those lucky enough to enjoy the results. With its rich flavor and creamy texture, this recipe is sure to become a staple in your culinary repertoire. Whether you’re serving it at a family gathering or enjoying a quiet night in, this homemade treat is sure to impress. So, gather your ingredients, channel your inner chef, and let the magic of caramel ice cream unfold in your kitchen!

Related update: Caramel ice cream

Caramel Macchiato Cake | Made by Meaghan Moineau

Caramel Macchiato Cake

Intro

There’s something magical about the aroma of coffee and caramel mingling in the air. It takes me back to lazy Sunday afternoons at my grandmother’s house, where the fragrant scent of freshly brewed coffee and the sweet promise of caramel treats filled the kitchen. Inspired by those cherished memories, this Caramel Macchiato Cake captures the essence of those moments in a delectable dessert that combines the rich flavors of coffee, chocolate, and caramel. Whether you’re a coffee lover or a dessert enthusiast, this cake is designed to bring warmth and joy to your table.

Why You’ll Love It

This Caramel Macchiato Cake is more than just a cake; it’s an experience. Here are a few reasons why you’ll fall head over heels for this delightful dessert:

  • Rich and Flavorful: The combination of chocolate, coffee, and caramel creates a symphony of flavors that dance on your taste buds.
  • Perfect for All Occasions: Whether it’s a birthday, a family gathering, or just a treat for yourself, this cake is sure to impress.
  • Easy to Make: With a few simple ingredients and steps, you’ll have a show-stopping dessert without spending hours in the kitchen.

Ingredients

  • Butter
  • Condensed milk
  • White corn syrup
  • Unflavored gelatin powder
  • Chocolate cake mix
  • Granulated sugar
  • Heavy whipping cream
  • Coffee
  • Powdered sugar
  • Water

Instructions

  1. Make the Cake Layers: Follow the chocolate cake box instructions to make three layers. Add an extra box of mix if needed to ensure you have enough batter for three layers. Add the instant coffee directly to the batter, stir, and let it sit for a few minutes to allow the coffee to dissolve.
  2. Divide the batter evenly into three 8-inch cake pans. Bake according to the box instructions.
  3. Once the cakes are cool, place a large plate on top of each pan and invert so that the plate is on the bottom. Tap the top of the pan a few times and gently wiggle to remove the pan from the cake. Repeat for the other two layers. Wrap the cake layers in plastic wrap and refrigerate for at least 2 hours or overnight.
  4. Make the Caramel: In a small saucepan over medium-low heat, combine the butter, condensed milk, white corn syrup, and granulated sugar. Stir and cook until the mixture reaches a dark golden brown color, stirring frequently to prevent burning.
  5. Once the caramel is ready, let it cool slightly before using it to layer and top the cake.
  6. Layer the cake with caramel and frosting of your choice, and drizzle more caramel on top for a beautiful finish.

Tips

To ensure your Caramel Macchiato Cake turns out perfectly, consider these helpful tips:

  • Chill the Cake Layers: Chilling the cake layers makes them easier to handle and frost.
  • Keep an Eye on the Caramel: Caramel can go from perfect to burnt quickly, so stir continuously and watch for the color change.
  • Use Quality Coffee: The coffee flavor is essential in this cake, so use a good quality coffee for the best results.

Variations & Substitutions

Feel free to make this cake your own by trying out some of these variations and substitutions:

  • Chocolate Variation: Add chocolate chips to the batter for extra chocolatey goodness.
  • Nutty Twist: Sprinkle chopped nuts between the layers for added texture and flavor.
  • Alternative Frosting: Try a cream cheese frosting for a tangy contrast to the sweet caramel.
  • Dairy-Free: Use dairy-free substitutes for butter and cream to make the cake suitable for those with dairy allergies.

Storage

To store your Caramel Macchiato Cake, wrap it tightly in plastic wrap or place it in an airtight container. It can be stored at room temperature for up to 3 days or in the refrigerator for up to a week. For longer storage, wrap the cake in plastic wrap and aluminum foil, then freeze for up to 3 months. Thaw in the refrigerator before serving.

FAQ

Can I use instant coffee instead of brewed coffee?

Yes, you can use instant coffee. Simply dissolve it in a bit of hot water before adding it to the batter for a stronger coffee flavor.

How do I prevent my caramel from burning?

Keep the heat on medium-low and stir the caramel constantly. Watch for the color change to a dark golden brown and remove it from heat immediately once it reaches that point.

Nutrition

This Caramel Macchiato Cake is a decadent treat, perfect for special occasions. While it’s not the lowest in calories, it is certainly rich in flavor and satisfaction. Enjoy a slice in moderation as part of a balanced diet.

Conclusion

The Caramel Macchiato Cake is a celebration of flavors and a delightful nod to the cherished memories of cozy afternoons filled with the aroma of coffee and caramel. Whether you’re making it for a special occasion or simply to enjoy a slice of comfort, this cake is sure to become a favorite. So gather your ingredients, embrace the warmth of your kitchen, and create a dessert that will surely bring smiles and sweet memories to those who share it with you.

Related update: Caramel Macchiato Cake

Gluten Free Profiteroles | Made by Meaghan Moineau

Gluten Free Profiteroles

Intro

There’s something truly magical about the delicate crunch and soft, airy center of a well-made profiterole. Growing up, my grandmother used to make these delightful little puffs for special occasions, filling them with sweetened cream and drizzling them with chocolate. The kitchen would fill with the rich aroma of baking pastry, a scent that still transports me back to those cozy family gatherings. Now, with this gluten free version, I’m excited to share a recipe that brings the same joy and nostalgia, but without the gluten.

Why You’ll Love It

This gluten free profiterole recipe is a game-changer for anyone with gluten sensitivities. Not only does it deliver the classic texture and taste you love, but it’s also surprisingly simple to make. You’ll appreciate that the ingredients are likely already in your pantry and the method doesn’t require any fancy equipment. Whether you’re a seasoned baker or new to the kitchen, this recipe is designed to be approachable and rewarding.

Ingredients

  • Butter
  • Egg
  • Gluten free flour
  • Xanthan gum
  • Milk
  • Salt
  • Sugar
  • Water

Instructions

  1. Preheat oven to 375°F.
  2. Sift the flour, xanthan gum, salt, and sugar together 3-4 times. Set aside in a handy location close to the stove.
  3. Break the egg into a measuring cup and whisk to combine. Set aside.
  4. Prepare your hand mixer so that it is ready when needed.
  5. Measure milk and water into a deep heavy-bottomed pan. Cut butter into small chunks and add to the milk mixture. Heat gently until all the butter has melted.
  6. Increase heat on the butter-milk mixture until it comes to a rolling boil. Remove from heat and pour the flour mixture into the milk mixture all at once. Beat vigorously with a wooden spoon.
  7. Return to a low heat and continue beating with the wooden spoon until the flour forms a smooth paste and has come cleanly off all the sides and bottom (should be shiny and smooth). Avoid overcooking this paste as the buns will become heavy.
  8. Remove from heat and slowly pour the egg into the mixture, beating well with the hand mixer. Be careful not to make the paste too runny. The amount of egg required depends on the humidity, so add in small quantities. Continue to beat until shiny and stiff.
  9. The paste should be firm but elastic and should be able to stand on its own when dropped by spoonfuls. This paste may be kept for a couple of hours covered with a damp cloth. It can also be frozen and used successfully.
  10. Prepare a cookie sheet by running it under cold water, shaking excess water off, but leaving it damp. Use two baking sheets to protect the bottom of each puff from burning.
  11. Place tablespoons of the mixture about 10 cm apart (the choux will double to triple in size).
  12. Bake for 20-25 minutes, until the exterior is golden. Do not open the oven for the first 15 minutes. Choux needs to be golden; otherwise, they will collapse as they cool.
  13. When done, remove from the sheet to a baking rack, piercing with a toothpick to allow steam to escape. Choux pastry may be reheated for about 10 minutes to crisp them up again.

Tips

For the best results, make sure all your ingredients are at room temperature before you begin. This helps everything combine more smoothly. Also, keep an eye on the humidity levels in your kitchen; this can affect how much egg you need to add to your dough.

Variations & Substitutions

Feel free to get creative with your fillings! Traditional cream or custard are always hits, but consider experimenting with flavored creams like coffee or chocolate. For a dairy-free version, substitute the milk and butter with plant-based alternatives.

Storage

Store any leftover profiteroles in an airtight container at room temperature for up to two days. They can also be frozen for longer storage—just thaw and reheat them in the oven to regain their crispness.

FAQ

Can I make these profiteroles ahead of time?

Yes, you can make the choux pastry ahead of time and store it covered with a damp cloth for a few hours, or freeze them for later use. Just reheat in the oven before serving to ensure they are crisp.

What if I don’t have xanthan gum?

If you don’t have xanthan gum, you can try using guar gum or psyllium husk as an alternative. These help provide the necessary elasticity in gluten free baking.

Nutrition

Profiteroles are a treat and should be enjoyed in moderation. The exact nutritional content will vary based on the size of your profiteroles and the type of filling used. However, they are relatively low in sugar and can fit into a balanced diet when enjoyed as an occasional indulgence.

Conclusion

This gluten free profiterole recipe is a beautiful way to bring a touch of elegance to your dessert table. With the perfect balance of crispness and airiness, these treats are sure to impress your family and friends, gluten free or not. Enjoy the process of making them and savor every bite of nostalgia they bring. Happy baking!

Related update: Gluten Free Profiteroles

Related update: Creamy Potato Salad with Cashew Dressing and Fresh Basil

Baked Caramel Custard | Made by Meaghan Moineau

Baked Caramel Custard: A Sweet Journey Back in Time

Intro

There’s something magical about the aroma of caramel wafting through the kitchen. It transports me back to my grandmother’s cozy home, where weekends were filled with warmth and the promise of something sweet baking in the oven. Her Baked Caramel Custard was a family favorite, a simple yet elegant dessert that graced our table on special occasions and ordinary days alike. Each spoonful was a creamy, dreamy reminder of home, love, and the art of simple cooking. Today, I invite you to join me on this nostalgic journey and create your own sweet memories with this timeless recipe.

Why You’ll Love It

This Baked Caramel Custard is a delightful dessert that blends the rich, buttery flavor of caramel with the smoothness of custard. It’s not only a treat for the palate but also a feast for the eyes with its glossy, amber top. This recipe is perfect for those who appreciate simple ingredients coming together to create something extraordinary. Whether you’re new to custard-making or a seasoned pro, this recipe is easy to follow and promises a dessert that’s as satisfying to make as it is to eat.

Ingredients

  • Egg substitute
  • 1 egg yolk
  • Evaporated skim milk
  • Port wine
  • Skim milk
  • Sugar plus
  • Sugar
  • Vanilla

Instructions

  1. Preheat the oven to 350°F (175°C).
  2. Scald the evaporated skim milk and skim milk together in a heavy saucepan. Remove from heat and set aside.
  3. In a skillet over medium heat, caramelize the sugar until it melts and turns a golden brown.
  4. Slowly add the milk mixture to the caramelized sugar, stirring constantly until the sugar dissolves completely.
  5. In a medium bowl, beat the egg substitute and egg yolk together until lemon-colored.
  6. Add the milk mixture, port wine, and vanilla to the eggs, stirring well to combine.
  7. Pour the custard mixture into 6 custard cups and place them in a baking dish.
  8. Add boiling water to the baking dish, ensuring the water reaches halfway up the sides of the cups.
  9. Bake in the preheated oven for 35 to 40 minutes, or until the custards are set.
  10. Remove the custard cups from the oven and chill completely in the refrigerator.
  11. Once chilled, place a dessert plate on top of each custard cup and invert to serve.

Tips

For the perfect caramel, keep a close eye on the sugar as it melts. It can go from golden to burnt very quickly, so be ready to remove it from the heat as soon as it reaches the desired color. Additionally, when adding the milk to the caramel, pour slowly to avoid splattering and ensure a smooth mixture.

Variations & Substitutions

If you’re looking to adapt this recipe, consider using almond milk in place of skim milk for a nutty flavor. For a boozy twist, swap out the port wine for a favorite liqueur. You can also add a pinch of sea salt to the caramel for a salted caramel version that balances sweet with savory.

Storage

Store any leftover custard in the refrigerator, covered, for up to three days. This dessert is best enjoyed chilled, so feel free to prepare it a day in advance for a fuss-free treat.

FAQ

Can I make this custard without the egg substitute?

Yes, you can replace the egg substitute with an additional egg yolk if you prefer a richer custard.

How do I know when the custard is set?

The custard is set when it jiggles slightly in the center but is firm around the edges. A knife inserted into the center should come out clean.

Nutrition

This recipe yields six servings, with each serving being approximately 1/2 cup. While specific nutritional values will vary depending on ingredient brands and substitutions, this custard is generally lower in fat due to the use of skim milk and egg substitutes. It’s a delightful indulgence that can fit into a balanced diet.

Conclusion

Baked Caramel Custard is more than just a dessert; it’s a comforting reminder of simpler times and the joy of creating something special from everyday ingredients. Whether you’re making it for a family gathering or a quiet night in, this recipe is sure to delight and impress. So grab your apron, preheat the oven, and let the sweet journey begin!

Related update: Baked Caramel Custard

Related update: Gluten Free Profiteroles

Related update: Wild Blueberry Lemon Muffins

Vegan Strawberry Shortcake served with Vegan Whipped Cream | Made by Meaghan Moineau

Vegan Strawberry Shortcake Served with Vegan Whipped Cream

Introduction

There’s something magical about the first bite of a strawberry shortcake that transports me back to my grandmother’s kitchen. I remember those warm summer evenings when we would gather around the wooden table, eagerly awaiting her famous dessert. Her recipe was a family treasure, but as I’ve embraced a plant-based lifestyle, I’ve recreated this classic with a vegan twist. Today, I’m thrilled to share this Vegan Strawberry Shortcake recipe served with a luscious vegan whipped cream. It’s a dessert that captures the essence of summer and love in every bite.

Why You’ll Love It

This Vegan Strawberry Shortcake is not only a delightful treat for the taste buds but also a heartwarming nod to traditional desserts with a modern, plant-based spin. Here’s why you’ll love it:

  • Simple Ingredients: Made with pantry staples, this recipe is both accessible and economical.
  • Quick and Easy: With minimal prep and bake time, you can whip up this dessert in under an hour.
  • Perfectly Balanced: The sweetness of the strawberries and the lightness of the shortcake are perfectly complemented by the creamy, dreamy vegan whipped topping.
  • Family-Friendly: This is a dessert that everyone, regardless of dietary preferences, can enjoy together.

Ingredients

  • 1 cup flour
  • 1/2 cup almond meal
  • 1/4 cup turbinado sugar
  • 1 teaspoon baking soda
  • 1/4 teaspoon salt
  • 3/4 cup almond milk
  • 1 teaspoon apple cider vinegar
  • 1/4 cup vegetable oil
  • Tiny drop of almond extract
  • 1 pint fresh strawberries, sliced
  • Vegan whipped cream (store-bought or homemade)

Instructions

  1. Preheat your oven to 400 degrees F (200 degrees C).
  2. Add the sliced strawberries to a glass bowl and refrigerate until ready to use.
  3. In a medium-sized bowl, combine the flour, almond meal, baking soda, and salt. Mix well.
  4. In a small bowl, combine 1 teaspoon of water with the turbinado sugar, stirring slightly to help dissolve the sugar.
  5. In a large bowl, whisk together the almond milk, apple cider vinegar, vegetable oil, sugar mixture, and almond extract.
  6. Make a well in the center of the dry ingredients and gradually add the wet ingredients. Mix until just combined.
  7. Line two baking sheets with parchment paper.
  8. Drop the batter by generous tablespoons onto the sheets, spacing them a few inches apart. You should aim for 5 per baking sheet.
  9. Bake for 10-12 minutes, or until the shortcakes are just slightly golden.
  10. Allow the shortcakes to cool completely before slicing them in half with a serrated knife.
  11. Add a generous dollop of vegan whipped topping to the bottom half of each shortcake, followed by a spoonful of strawberries.
  12. Top with the remaining shortcake half, adding a bit more whipped topping and a few strawberries on top.
  13. Serve on individual dessert plates and enjoy!

Tips

  • Chill Your Tools: For an extra fluffy whipped topping, chill your mixing bowl and beaters in the freezer for about 10 minutes before whipping.
  • Use Fresh Strawberries: Fresh, ripe strawberries will yield the best flavor. Avoid using frozen strawberries as they can become mushy.
  • Don’t Overmix: When combining wet and dry ingredients, mix just until combined to ensure light and fluffy shortcakes.

Variations & Substitutions

This recipe is versatile and can be easily adapted to suit your preferences or dietary needs:

  • Replace almond milk with any other non-dairy milk, such as soy or oat milk.
  • Substitute almond meal with oat flour for a nut-free version.
  • For a citrus twist, add a teaspoon of lemon zest to the batter.
  • Experiment with different fruits such as blueberries or raspberries for a new flavor profile.

Storage

These shortcakes are best enjoyed fresh, but if you have leftovers, store them in an airtight container at room temperature for up to 2 days. Assemble with the whipped topping and strawberries just before serving to maintain their texture and freshness. The vegan whipped cream can be stored in the refrigerator for up to 3 days.

FAQ

Can I make the shortcakes gluten-free?

Yes, you can substitute the all-purpose flour with a gluten-free flour blend. Ensure the blend contains xanthan gum to help mimic the texture of traditional flour.

What can I use instead of turbinado sugar?

If turbinado sugar is not available, you can use coconut sugar or light brown sugar as a substitute. Both will provide a similar flavor and texture.

How can I make homemade vegan whipped cream?

To make homemade vegan whipped cream, chill a can of full-fat coconut milk overnight. Scoop out the solid cream and whip it with a little powdered sugar and vanilla extract until fluffy.

Nutrition

Each serving of Vegan Strawberry Shortcake contains approximately:

  • Calories: 250
  • Fat: 12g
  • Carbohydrates: 32g
  • Protein: 4g
  • Fiber: 3g
  • Sugar: 14g

Conclusion

Whether you’re a seasoned vegan or simply looking to explore plant-based desserts, this Vegan Strawberry Shortcake is sure to delight. With its light and airy texture, juicy strawberries, and creamy topping, it’s a recipe that embodies the joy of summer. Gather your loved ones, share a slice, and create new sweet memories that will last a lifetime. Enjoy!

Related update: Vegan Strawberry Shortcake served with Vegan Whipped Cream

Related update: Baked Caramel Custard

Valentine Hearts | Made by Meaghan Moineau

Valentine Hearts: A Sweet Treat for Your Loved Ones

Intro

Every Valentine’s Day, my grandmother would bake a special treat that filled the house with the aroma of love and sweetness. As a child, I would watch her gracefully craft heart-shaped pastries, her hands moving with a rhythm that spoke of years of experience and love. Inspired by her legacy, I’ve created my own version of this beloved dessert: Valentine Hearts. These delightful puff pastries, filled with crème fraiche and fresh strawberries, are perfect for sharing with your loved ones. Join me as we bring a touch of nostalgia and romance to your kitchen with this simple yet elegant recipe.

Why You’ll Love It

Valentine Hearts are a beautiful and delicious way to show someone you care. Not only are they visually stunning, but they also combine the flaky, buttery goodness of puff pastry with the creamy richness of crème fraiche and the natural sweetness of strawberries. This dessert is perfect for any occasion where you want to impress with minimal effort. Plus, the aroma of these pastries baking in your oven will fill your home with warmth and love.

Ingredients

  • Puff pastry
  • 1 egg, beaten for glaze
  • Castor sugar
  • Canned crème fraiche
  • Fresh strawberries
  • Plain chocolate

Instructions

  1. Preheat your oven to 220 degrees C (425 F).
  2. Thaw the puff pastry sheet according to the instructions on the box.
  3. Unroll the pastry sheet and cut out around 8 hearts using a heart-shaped cookie cutter.
  4. Prick each heart with a fork, brush with beaten egg, and sprinkle lightly with some castor sugar.
  5. Place these hearts on a greased baking sheet and bake for about 10 minutes until they are risen and golden brown.
  6. Let the pastry hearts cool completely.
  7. Slice the strawberries and split the cooled hearts horizontally using a sharp knife.
  8. Sandwich the heart halves together with crème fraiche and sliced strawberries.
  9. Drizzle melted plain chocolate over the tops and dust with a bit more castor sugar.

Tips

For the best results, ensure the puff pastry is well-chilled before cutting and baking. This helps them puff up beautifully. When slicing the hearts, use a very sharp knife to prevent crumbling. If you’re preparing these ahead of time, keep the components separate and assemble just before serving to maintain the pastry’s crispness.

Variations & Substitutions

If crème fraiche isn’t available, you can substitute it with whipped cream or mascarpone cheese for a similar texture and taste. For a fruity twist, consider adding raspberries or blueberries to the strawberry filling. If you prefer a different kind of chocolate, white chocolate can be a delightful alternative for drizzling.

Storage

Valentine Hearts are best enjoyed fresh on the day they are made. However, if you have leftovers, store them in an airtight container in the refrigerator for up to two days. Keep the pastry and filling separate if possible, and assemble just before serving to preserve the texture.

FAQ

Can I make the pastry hearts in advance?

Yes, you can bake the pastry hearts a day in advance. Store them in an airtight container at room temperature and assemble them with the filling just before serving.

What if I don’t have a heart-shaped cookie cutter?

No worries! You can easily create a heart shape by cutting the pastry into squares and trimming the top corners to form a heart. Alternatively, you can use any other shape cutter you have on hand.

Can I use frozen strawberries instead of fresh ones?

While fresh strawberries are recommended for their texture and flavor, you can use thawed frozen strawberries in a pinch. Just be sure to drain any excess liquid to avoid soggy pastries.

Nutrition

This dessert is meant to be a treat, so indulge in moderation. The combination of puff pastry, crème fraiche, and chocolate provides a rich and satisfying flavor profile, while the strawberries add a fresh and nutritious element. Remember, the joy of sharing these with loved ones is as wholesome as the ingredients themselves.

Conclusion

Valentine Hearts are more than just a dessert; they are a symbol of love and thoughtfulness. Whether you’re sharing them with a romantic partner, family, or friends, these sweet treats are sure to make any occasion special. The simplicity of the recipe allows you to focus on the joy of baking and sharing, creating memories that will last long after the last crumb is gone. So preheat your oven, gather your ingredients, and let the love-filled aroma of Valentine Hearts fill your home. Happy Valentine’s Day!

Related update: Valentine Hearts

Related update: Vegan Strawberry Shortcake served with Vegan Whipped Cream

OREO Cookie Balls – Snowman | Made by Meaghan Moineau

OREO Cookie Balls – Snowman

Intro

As the first snowflakes start to fall, there’s a certain magic that fills the air. Growing up, my siblings and I would rush outside, our noses turning rosy as we built snowmen in the front yard. Those chilly afternoons always ended with us huddled around the kitchen table, indulging in sweet treats that our mom had prepared. One of our favorite snowy day indulgences was her OREO Cookie Balls—transformed into adorable snowmen. These delightful bites encapsulate the joy of winter and the warmth of family gatherings.

Why You’ll Love It

These OREO Cookie Balls are the perfect combination of rich, chocolatey goodness and creamy decadence, all encased in a fun, wintry theme. They’re incredibly easy to make, requiring minimal ingredients, and are an absolute hit at any holiday gathering. Whether you’re hosting a festive party or simply enjoying a cozy night in, these snowman-themed treats will bring smiles to all.

Ingredients

  • 1 package of OREO Cookies
  • 8 oz cream cheese, softened
  • 16 oz Baker’s chocolate, melted
  • Rolo chocolate candy
  • Black gel icing
  • Orange gel icing
  • Additional supplies to decorate snowmen (e.g., mini chocolate chips, pretzel sticks)

Instructions

  1. Take the entire package of OREO Cookies, including the filling, and crush them in a large gallon ziplock bag until you have fine crumbs.
  2. Empty the cookie crumbs into a large mixing bowl.
  3. Add the softened cream cheese to the bowl.
  4. Mix well on medium speed until fully combined and smooth.
  5. Use a 1-inch cookie scoop to portion out the mixture, then roll into balls using the palms of your hands.
  6. Place the cookie balls on a cookie sheet and freeze for about 10 minutes to firm up.
  7. Melt the Baker’s chocolate according to the package instructions.
  8. Dip each cookie ball into the melted chocolate, ensuring it is fully coated, and then place on a wax paper-covered cookie sheet.
  9. Decorate with Rolo candies for hats, and use black and orange gel icing to create eyes and noses. Additional supplies can be used for further decoration, such as mini chocolate chips for buttons or pretzel sticks for arms.
  10. Place the decorated cookie balls in the refrigerator for an hour to harden completely.

Tips

For the best results, ensure your cream cheese is thoroughly softened before mixing. This will help achieve a smooth, homogeneous mixture. When dipping the cookie balls in chocolate, use a fork to lift them out, allowing excess chocolate to drip off for a cleaner finish.

Variations & Substitutions

Feel free to get creative with the decorations! You can use colored sprinkles or edible glitter for added festive flair. If you’re not a fan of Baker’s chocolate, white chocolate can also be used for a different flavor profile. Vegan cream cheese and chocolate alternatives can turn this recipe into a plant-based delight.

Storage

Store these OREO Cookie Balls in an airtight container in the refrigerator for up to a week. If you’d like to make them ahead of time, they can also be frozen for up to a month. Just be sure to thaw them in the refrigerator before serving.

FAQ

Can I use a different type of cookie instead of OREOs?

While OREOs provide the classic taste and texture, you can experiment with other sandwich cookies for different flavors. Just ensure they’re similar in composition for best results.

Is it necessary to freeze the cookie balls before dipping them in chocolate?

Freezing helps the balls hold their shape and makes them easier to dip in chocolate. This step is important for achieving a smooth coating.

How can I make these treats gluten-free?

Simply substitute the OREO Cookies with a gluten-free sandwich cookie option. Ensure all other ingredients, like the chocolate and cream cheese, are also certified gluten-free.

Nutrition

While these treats are indulgent, it’s good to savor them in moderation. Each snowman OREO Cookie Ball is approximately 120 calories, with the majority coming from healthy fats and carbohydrates. Enjoy as a festive treat alongside a balanced diet.

Conclusion

OREO Cookie Balls – Snowman are a whimsical and delicious addition to any winter celebration. They capture the joy of the season and are perfect for sharing with loved ones. Whether you’re reminiscing about childhood snow days or creating new memories with your own family, these treats will warm your heart and delight your taste buds. Gather your ingredients, invite the kids to help with the decorating, and enjoy the magic of creating these sweet little snowmen together!

Related update: OREO Cookie Balls – Snowman

Related update: Valentine Hearts

Cinnamon Sugar Fried Apples | Made by Meaghan Moineau

Cinnamon Sugar Fried Apples

Intro

There’s something about the aroma of cinnamon and apples wafting through the kitchen that just feels like home. Growing up, my grandmother would often make a batch of her famous cinnamon sugar fried apples on chilly autumn afternoons. She’d tell me stories of how her mother taught her the recipe, and we’d share laughter and warmth over this simple yet delightful treat. Today, I’m excited to share this beloved recipe with you, allowing you to create your own sweet memories.

Why You’ll Love It

These cinnamon sugar fried apples are a delightful treat that combines the tartness of fresh apples with the warm, sweet flavors of cinnamon and sugar. The crispy batter encasing the tender apple slices provides a perfect texture contrast, making each bite a delicious experience. Whether you serve them as a dessert, a snack, or a unique side dish, these fried apples are sure to become a family favorite.

Ingredients

  • 1 cup all-purpose flour
  • 3-4 fresh apples, cored and sliced 1 cm thick
  • 1/2 cup brown sugar
  • 1 tablespoon ground cinnamon
  • 2 large eggs, lightly beaten
  • 1/4 cup granulated sugar
  • Zest of 1 lemon
  • 1 cup milk
  • Vegetable oil, for frying
  • 1/4 teaspoon salt
  • 2 tablespoons unsalted butter, melted

Instructions

  1. In a mixing bowl, combine all-purpose flour, salt, and granulated sugar. Slowly whisk in the milk, followed by the lightly beaten eggs, lemon zest, and melted unsalted butter. Mix until the batter is smooth and lump-free.
  2. Cover the bowl with plastic wrap and let the batter rest at room temperature for 30 minutes. This step allows the flour to fully hydrate and results in a better texture.
  3. Meanwhile, prepare your apples by coring and slicing them into 1 cm thick rings. Set them aside.
  4. Heat the vegetable oil in a deep skillet or frying pan over medium heat until it reaches 350°F (175°C).
  5. Once the batter has rested, dip each apple slice into the batter, ensuring it is fully coated.
  6. Carefully place the battered apple slices into the hot oil. Fry them in batches, making sure not to overcrowd the pan.
  7. Fry each side until golden brown, about 2-3 minutes per side. Use a slotted spoon to remove the apples from the oil and drain them well on a plate lined with double paper towels.
  8. In a small bowl, mix together the brown sugar and ground cinnamon. Sprinkle this mixture over the hot fried apple slices.
  9. Serve the cinnamon sugar fried apples immediately for the best taste and texture.

Tips

To ensure the best results, make sure your oil is at the right temperature before frying. If the oil is too hot, the batter will burn before the apple is cooked through. If it’s too cool, the apples will absorb too much oil and become soggy. Use a thermometer for accuracy. Additionally, using a tart apple variety like Granny Smith will provide a nice balance with the sweetness of the cinnamon sugar coating.

Variations & Substitutions

If you’d like to change things up, consider adding a pinch of nutmeg or ginger to the cinnamon sugar mixture for a spicier kick. For a different flavor profile, try using apple cider in place of milk in the batter. If you’re looking for a gluten-free option, substitute the all-purpose flour with a gluten-free flour blend.

Storage

While these fried apples are best enjoyed fresh, you can store any leftovers in an airtight container in the refrigerator for up to two days. To reheat, place them on a baking sheet and warm them in a preheated oven at 350°F (175°C) for about 5-7 minutes. This will help them regain some of their original crispiness.

FAQ

Can I use other fruits instead of apples?

Yes, you can experiment with other fruits like pears or peaches. Make sure the fruit is firm enough to hold its shape during frying.

What is the best type of apple for this recipe?

Granny Smith apples are a great choice because of their tart flavor and firm texture, which holds up well during frying. However, feel free to use your favorite apple variety.

Can I make the batter in advance?

Yes, you can prepare the batter a day in advance. Store it covered in the refrigerator and give it a good stir before using.

Nutrition

While I don’t have exact nutritional information, it’s important to note that these fried apples are a treat and should be enjoyed in moderation. They are rich in sugars and fats, but also offer the benefits of fiber and vitamins from the apples. Pair them with a balanced diet for a delightful indulgence.

Conclusion

Cinnamon sugar fried apples are more than just a dessert; they’re a connection to fond memories and a way to create new ones with family and friends. Whether you’re serving them at a gathering or enjoying them on a cozy night in, these apples are sure to bring warmth and joy. I hope this recipe finds a special place in your heart and kitchen, just as it has in mine.

Related update: Cinnamon Sugar Fried Apples

No-Bake Green Tea Tofu Cheesecake | Made by Meaghan Moineau

No-Bake Green Tea Tofu Cheesecake

Intro

There’s something truly magical about the delicate balance of flavors in a well-made cheesecake. I remember the first time I tasted a green tea cheesecake at a quaint little café in Tokyo. It was a rainy afternoon, and the cozy atmosphere was filled with the aroma of freshly brewed matcha. The cheesecake was unlike anything I had ever tasted—light, creamy, and infused with the subtle bitterness of green tea. Years later, inspired by that unforgettable experience, I decided to recreate it in my own kitchen. This No-Bake Green Tea Tofu Cheesecake is a tribute to that memory, and it has since become a favorite in my household.

Why You’ll Love It

This No-Bake Green Tea Tofu Cheesecake is a delightful fusion of traditional Japanese flavors and classic cheesecake. It’s perfect for those who appreciate the earthy taste of matcha combined with the creamy texture of cheesecake. The addition of tofu not only makes it a healthier alternative but also gives the cheesecake a uniquely smooth texture. Plus, it’s a no-bake recipe, which means no need to heat up your kitchen—perfect for warm days or when you’re short on time.

Ingredients

  • 8″ springform cake pan, lined and greased
  • Marie biscuits
  • Butter
  • 200g tofu, wrapped in cheesecloth
  • 2 tsp gelatine powder
  • 5 tbsp water
  • 2 tbsp green tea powder (matcha)
  • 250g cream cheese
  • 100g natural yogurt or sour cream
  • 100ml soya milk or fresh milk
  • 100g icing sugar
  • 1 tsp vanilla extract

Instructions

  1. Line and grease an 8″ springform cake pan.
  2. Crush the marie biscuits into fine crumbs and mix with melted butter. Press the mixture onto the base of the cake pan to form the crust.
  3. Wrap the tofu in cheesecloth and press out the water by placing a heavy object on top for about 15 minutes.
  4. Soak the gelatine powder in water and set aside for about 5 minutes.
  5. Mix the green tea powder with 5 tablespoons of hot water and set aside.
  6. In a food processor, blend the cream cheese, pressed tofu, yogurt, soya milk, icing sugar, and vanilla extract until very smooth.
  7. Heat the gelatine mixture in a double boiler until melted, then add it to the cream cheese mixture and blend well.
  8. Pour three-quarters of the cream cheese mixture into one bowl and one-quarter into another.
  9. Add the green tea mixture to the one-quarter portion of the cream cheese mixture and mix well.
  10. Spoon the plain and green tea cream cheese fillings alternately into the prepared pan until all the mixtures are used up. Gently shake the pan to level the surface.
  11. To create swirls, gently run a chopstick in a circular motion through the mixture.
  12. Chill the cake in the refrigerator for at least 4 hours or overnight.
  13. For perfect slices, cut the cheesecake with a hot knife.

Tips

To ensure the cheesecake sets properly, make sure to chill it for at least 4 hours. A hot knife will help you achieve clean slices. Simply dip the knife in hot water, wipe it dry, and slice.

Variations & Substitutions

If you’re not a fan of matcha, you can substitute it with cocoa powder for a chocolate twist. Additionally, you can use graham crackers instead of marie biscuits for the crust. For a dairy-free version, opt for dairy-free cream cheese and yogurt.

Storage

This cheesecake can be stored in the refrigerator, covered, for up to 5 days. For longer storage, it can be frozen. Wrap it tightly in plastic wrap and then in aluminum foil before freezing. Thaw in the refrigerator before serving.

FAQ

Can I use agar-agar instead of gelatine?

Yes, you can substitute agar-agar for gelatine, but the texture may slightly differ. Use the same amount and follow the package instructions for best results.

Is it necessary to press the tofu?

Yes, pressing the tofu is essential to remove excess water, which helps achieve the desired creamy texture in the cheesecake.

What type of green tea powder should I use?

It’s best to use high-quality matcha powder, as it will provide a vibrant color and authentic flavor to the cheesecake.

Nutrition

This cheesecake is a lighter alternative to traditional cheesecakes due to the use of tofu and reduced sugar. However, nutritional values will vary based on the ingredients used.

Conclusion

This No-Bake Green Tea Tofu Cheesecake is a delicious and unique dessert that brings a touch of elegance and a hint of nostalgia to any occasion. Whether you’re a long-time fan of matcha or new to this delightful flavor, you’ll appreciate the balance of creamy textures and subtle sweetness. It’s a perfect treat to impress guests or to enjoy as a special indulgence for yourself. I hope this recipe brings you as much joy and fond memories as it does for me. Enjoy!

Related update: No-Bake Green Tea Tofu Cheesecake

Related update: Cinnamon Sugar Fried Apples

Related update: Caramel Macchiato Cake

Chocolate Caramel Cupcakes | Made by Meaghan Moineau

Chocolate Caramel Cupcakes

Intro

Chocolate and caramel have always been a match made in heaven, and these Chocolate Caramel Cupcakes are a testament to that divine pairing. I remember the first time I baked these cupcakes was for a family gathering. The sweet aroma of chocolate and caramel wafting through the house brought everyone to the kitchen, eager for a taste. Watching my family enjoy these cupcakes was a moment of pure joy, and I’m thrilled to share this recipe with you, hoping it brings the same happiness to your table.

Why You’ll Love It

These Chocolate Caramel Cupcakes are the perfect combination of rich, moist chocolate cake and a creamy, dreamy caramel frosting. Whether you’re a seasoned baker or a novice, you’ll appreciate how straightforward this recipe is. The result is an impressive dessert that looks as stunning as it tastes. Every bite offers a beautiful balance of flavors and textures, with a touch of saltiness if you choose to add a sprinkle of sea salt. This recipe is sure to become a favorite in your baking repertoire!

Ingredients

  • 1 3/4 cups all-purpose flour
  • 3/4 cup unsweetened cocoa powder
  • 1 1/2 teaspoons baking soda
  • 1/2 teaspoon salt
  • 3/4 cup unsalted butter, softened
  • 1 3/4 cups sugar
  • 1 teaspoon vanilla extract
  • 2 large eggs
  • 4 ounces semi-sweet chocolate, melted and cooled
  • 1 cup milk
  • 1/2 cup unsalted butter (for frosting)
  • 1 cup brown sugar
  • 1/2 cup milk (for frosting)
  • 3 cups powdered confectioners’ sugar

Instructions

  1. Preheat your oven to 350 degrees Fahrenheit. Prepare the cupcake pans by greasing them or placing paper liners in each well.
  2. In a small bowl, whisk together the flour, cocoa powder, baking soda, and salt; set aside.
  3. In a large bowl, use an electric hand mixer on medium speed to beat the butter until creamy, about 2 minutes.
  4. Gradually add the sugar to the butter, beating until the mixture is light and fluffy, about 3 minutes. Be sure to scrape down the sides of the bowl occasionally.
  5. Beat in the vanilla extract, followed by the eggs, one at a time, ensuring each is fully incorporated before adding the next.
  6. Mix in the cooled, melted chocolate until well combined.
  7. Alternately add the flour mixture to the batter in four additions, beginning and ending with the flour mixture, and alternating with the milk. Beat briefly on low-medium speed until the batter is smooth.
  8. Fill each cupcake well 3/4 of the way full with batter.
  9. Bake for about 22 minutes or until a toothpick inserted into the center of a cupcake comes out with a few moist crumbs attached.
  10. Cool the cupcakes in the pan on a wire rack for 10 minutes, then remove them from the pan and let cool completely on the rack.
  11. To make the frosting, melt the butter in a 2-quart saucepan over medium heat. Stir in the brown sugar and bring to a boil, stirring constantly.
  12. Reduce the heat to low and continue to boil and stir for 2 minutes.
  13. Stir in 1/2 cup of milk and bring back to a boil, then remove from heat and allow to cool to lukewarm, about 30 minutes.
  14. Gradually stir the caramel mixture into a large mixing bowl with powdered sugar and milk. Beat with an electric hand mixer on low speed for about 6 minutes, or until the frosting is light and fluffy.
  15. If the frosting is too stiff, add milk a teaspoon at a time to reach the desired consistency. If too runny, add additional powdered sugar, beating on low until it thickens.
  16. Store the frosting in the refrigerator for 15 minutes before using it to frost the cupcakes to help it firm up.
  17. For a salted caramel twist, sprinkle sea salt on top of the frosting or mix in 1/2 teaspoon of sea salt towards the end of the frosting preparation.

Tips

Here are some helpful tips to ensure your Chocolate Caramel Cupcakes turn out perfectly every time:

  • Ensure all your ingredients are at room temperature before starting. This helps the batter mix more evenly.
  • If you don’t have semi-sweet chocolate on hand, you can use dark chocolate for a richer taste.
  • When melting the chocolate, do so gently in a microwave or double boiler to prevent it from burning.
  • Always allow the cupcakes to cool completely before frosting to prevent the frosting from melting.

Variations & Substitutions

Feel free to get creative with this recipe:

  • Flavor Variations: Add a teaspoon of espresso powder to the batter for a mocha twist.
  • Substitutions: For a dairy-free option, use coconut milk in place of regular milk and dairy-free butter substitutes.
  • Extra Add-ins: Consider folding in mini chocolate chips or chopped nuts into the batter before baking for added texture.

Storage

Store any leftover cupcakes in an airtight container at room temperature for up to 2 days. If you’d like to keep them longer, refrigerate them for up to a week. For longer storage, freeze the cupcakes (without frosting) for up to 3 months. Thaw them in the refrigerator overnight before frosting and serving.

FAQ

Can I make these cupcakes ahead of time?

Yes, you can! You can bake the cupcakes a day in advance and store them in an airtight container. Make the frosting on the day you plan to serve them for the best texture.

What if my frosting is too runny?

If your frosting is too runny, gradually add more powdered sugar, a few tablespoons at a time, while beating on low speed until it reaches your desired consistency.

Can I use store-bought caramel sauce for the frosting?

While homemade caramel provides the best flavor, you can use store-bought caramel sauce in a pinch. Just make sure to adjust the consistency with powdered sugar and milk as needed.

Nutrition

While desserts are meant to be a treat, it’s helpful to know what you’re enjoying. Each cupcake is approximately 320 calories, with the primary nutritional components being carbohydrates and fats. Remember, moderation is key!

Conclusion

These Chocolate Caramel Cupcakes are more than just a dessert; they’re a piece of happiness wrapped in a paper liner. Perfect for any celebration or simply to indulge your sweet tooth, this recipe is sure to become a cherished favorite. Whether you’re sharing them with family or savoring one with a cup of coffee, these cupcakes are a delightful treat that never fails to impress. Enjoy every bite and happy baking!

Related update: Chocolate Caramel Cupcakes

Related update: No-Bake Green Tea Tofu Cheesecake

Red Velvet Cupcake | Made by Meaghan Moineau

Red Velvet Cupcakes

Intro

There’s something magical about red velvet cupcakes. The vibrant red hue, the rich cocoa flavor, and the creamy frosting come together to create a cupcake that’s as delightful to look at as it is to eat. I remember the first time I baked red velvet cupcakes with my grandmother. We spent the afternoon in her cozy kitchen, the air filled with warmth and the sweet aroma of baking. She taught me the importance of patience and precision when measuring ingredients, and how a simple cupcake can bring joy to those who share it. Today, I’m excited to share with you my beloved recipe for red velvet cupcakes, a treat that not only delights the taste buds but also brings back fond memories of time spent in the kitchen with loved ones.

Why You’ll Love It

These red velvet cupcakes are a perfect blend of color, taste, and texture. The deep red color makes them a show-stopper at any gathering, while the soft, moist cake paired with the creamy frosting ensures that each bite is a taste of heaven. They’re easy to make and even easier to enjoy, whether you’re a seasoned baker or a beginner. The slight tang from the buttermilk and vinegar perfectly complements the sweetness, making these cupcakes not too sweet, but just right.

Ingredients

  • 1 teaspoon baking soda
  • ¾ cup unsalted butter, softened
  • 1 cup buttermilk
  • 2 ½ cups cake flour, sifted
  • 1 teaspoon cider vinegar
  • 8 ounces cream cheese, softened
  • 3 large eggs
  • 4 cups powdered sugar
  • 2 tablespoons red food coloring
  • ½ teaspoon salt
  • 1 ½ cups sugar
  • ½ cup unsalted butter, softened (for frosting)
  • 2 tablespoons unsweetened cocoa
  • 1 teaspoon vanilla extract

Instructions

  1. Preheat your oven to 350°F (175°C). Grease and lightly flour two cupcake pans to make 24 cupcakes.
  2. In a small bowl, sift the cake flour and set aside.
  3. In a large bowl, use an electric mixer on medium speed to cream together the butter and sugar until very light and fluffy, about 5 minutes.
  4. Add the eggs one at a time, beating well after each addition.
  5. In a small bowl, whisk together the red food coloring, cocoa, and vanilla. Add this mixture to the batter and beat well.
  6. In a measuring cup, stir the salt into the buttermilk. Add to the batter in three parts, alternating with the flour. With each addition, beat until the ingredients are incorporated, but do not overbeat.
  7. In a small bowl, stir together the cider vinegar and baking soda. Add this to the batter and mix well.
  8. Using a rubber spatula, scrape down the batter in the bowl, ensuring the ingredients are well blended and the batter is smooth.
  9. Divide the batter evenly among the prepared pans.
  10. Arrange the oven racks in the upper and lower thirds of the oven and bake the cupcakes, switching positions of the pans halfway through, until a tester comes out clean, about 20 minutes.
  11. Cool the cupcakes in the pan for 10 minutes, then remove from the pan and cool completely on a rack before icing.
  12. To make the frosting, combine butter, salt, and cream cheese in a mixer and beat on medium speed for 2-3 minutes.
  13. Add powdered sugar gradually until just incorporated. Be careful not to overmix; the frosting should be thick but not fluffy.
  14. Add vanilla extract. If the frosting is too thick, add a splash of milk to achieve the desired consistency.
  15. To ice the cupcakes, mound about a cup of frosting on top of each cupcake and use an icing spatula to create a swirl on top. Decorate with colored sprinkles if desired.

Tips

For the best results, ensure all ingredients are at room temperature before you start. This helps them mix more evenly. When measuring flour, be sure to sift it to avoid lumps and ensure a light texture. Lastly, resist the temptation to open the oven door while baking, as this can cause the cupcakes to deflate.

Variations & Substitutions

If you’re looking to switch things up, consider using natural food coloring for a more subtle hue. For a different flavor profile, try adding a teaspoon of almond extract to the batter. You can also substitute the cream cheese frosting with a simple buttercream or a whipped cream topping for a lighter option.

Storage

Store the cupcakes in an airtight container at room temperature for up to 2 days. For longer storage, keep them in the refrigerator for up to a week. To freeze, wrap each cupcake individually in plastic wrap and place in a freezer-safe bag for up to 3 months. Thaw at room temperature before serving.

FAQ

Can I make these cupcakes ahead of time?

Yes, you can bake the cupcakes a day in advance and store them in an airtight container. Frost them on the day you plan to serve them for the best texture and flavor.

What can I do if I don’t have buttermilk?

If you don’t have buttermilk, you can make a substitute by adding 1 tablespoon of lemon juice or vinegar to 1 cup of milk. Let it sit for 5 minutes before using it in the recipe.

Can I use regular flour instead of cake flour?

Yes, you can substitute all-purpose flour for cake flour by using 2 ¼ cups of all-purpose flour plus ¼ cup of cornstarch. Sift them together before using in the recipe.

Nutrition

Each red velvet cupcake with frosting contains approximately 280 calories, 12g of fat, 37g of carbohydrates, and 3g of protein. Please note these values are estimates and can vary based on specific ingredients used.

Conclusion

These red velvet cupcakes are a true delight, offering a perfect balance of flavors and a stunning appearance that will impress your family and friends. Whether you’re baking for a special occasion or just because, they’re sure to bring smiles and fond memories. Happy baking!

Related update: Red Velvet Cupcake

Related update: Chocolate Caramel Cupcakes

Related update: Cherry Coke Float Cupcakes With Chocolate Shell

Gluten-Free Tres Leches Cake | Made by Meaghan Moineau

Gluten-Free Tres Leches Cake

Intro

Tres Leches Cake has always been a staple at our family gatherings, a tradition passed down through generations. I remember as a child, watching my grandmother skillfully blend the ingredients with a touch of love and a sprinkle of nostalgia. When the cake was served, the room would fill with a chorus of ‘oohs’ and ‘aahs’ as we indulged in its rich, creamy delight. This gluten-free version of the classic Tres Leches Cake offers the same indulgent experience, ensuring that everyone, including those with gluten sensitivities, can partake in this delectable tradition.

Why You’ll Love It

This Gluten-Free Tres Leches Cake is a delightful twist on the traditional recipe, maintaining the rich, creamy texture and flavor while being accessible to those with gluten sensitivities. The combination of sweetened condensed milk, evaporated milk, and half-and-half creates a luscious, melt-in-your-mouth experience. Topped with freshly whipped cream, strawberries, and mint leaves, this cake is perfect for any celebration or as a special treat.

Ingredients

  • 1 teaspoon baking powder
  • 1/2 cup butter, softened
  • 1 teaspoon cinnamon
  • 1/4 teaspoon cream of tartar
  • 6 large eggs, separated
  • 1 can evaporated milk
  • 1 cup half-and-half
  • 1/2 cup masa harina
  • 1/4 cup milk
  • 1 cup strawberries, sliced
  • Mint leaves, for garnish
  • 1 teaspoon orange zest
  • 1/4 teaspoon salt
  • 1/2 cup sorghum flour
  • 1 cup sugar, divided
  • 1 can sweetened condensed milk
  • 1 tablespoon vanilla extract
  • 1 teaspoon vanilla
  • 1 cup whipping cream
  • 1/2 teaspoon xanthan gum

Instructions

  1. Preheat oven to 350 degrees Fahrenheit. Generously butter a 13×9 inch baking dish.
  2. In a large bowl, beat 1/2 cup sugar, egg yolks, and butter until light and fluffy, about 5 minutes.
  3. Fold in the vanilla extract, orange zest, cinnamon, sorghum flour, masa harina, baking powder, xanthan gum, and milk.
  4. In another large bowl, beat egg whites to soft peaks, adding cream of tartar after about 20 seconds.
  5. Gradually add the remaining 1/2 cup sugar and continue beating until egg whites are glossy and firm, but not dry.
  6. Gently fold the egg whites into the cake mixture.
  7. Pour this batter into the prepared baking dish, spreading out evenly.
  8. Bake until the cake is golden and a toothpick inserted in the center comes out clean, about 25 minutes.
  9. Pierce cake all over with a toothpick.
  10. Whisk together the evaporated milk, sweetened condensed milk, and half-and-half, and pour evenly over the cake.
  11. Allow to cool for a bit, then cover and place in refrigerator for 4 hours, up to overnight.
  12. Before serving, place the whipping cream, 2 tablespoons sugar, and 1 teaspoon vanilla in a mixer bowl and whisk to stiff peaks, until nice and thick.
  13. Spread the whipped cream over the cake and top with strawberries and mint leaves.
  14. Allow to chill in the refrigerator until ready to serve.

Tips

For the best results, ensure all your ingredients are at room temperature before you begin. This helps in achieving a smooth batter and evenly whipped egg whites. When folding the egg whites into the batter, be gentle to maintain the airy texture. Make sure to pierce the cake thoroughly with a toothpick to allow the milk mixture to seep in evenly, ensuring every bite is moist and flavorful.

Variations & Substitutions

If you want to add a citrusy twist, try adding a bit more orange zest or even some lemon zest to the cake batter. For a dairy-free version, substitute coconut milk for the half-and-half and use a dairy-free whipping cream alternative. You can also try topping the cake with other fruits like mangoes or peaches for a tropical flair.

Storage

This cake is best enjoyed fresh, but it can be stored in the refrigerator for up to three days. Cover it tightly with plastic wrap or store it in an airtight container to maintain its moisture. The flavors tend to deepen with time, making it even more delicious the next day!

FAQ

Can I make this cake in advance?

Absolutely! This Gluten-Free Tres Leches Cake can be made a day ahead. In fact, allowing it to sit overnight in the refrigerator helps the flavors meld together beautifully. Just be sure to add the whipped cream and toppings just before serving for maximum freshness.

How do I ensure the cake doesn’t get soggy?

The key to avoiding a soggy cake is to ensure it’s properly baked before adding the milk mixture. A toothpick inserted should come out clean, indicating it’s done. When pouring the milk mixture, do so gradually and evenly, allowing the cake to absorb it without becoming too saturated.

Nutrition

While this cake is a treat and not necessarily a health food, it’s made with wholesome ingredients. Each serving provides a good source of calcium from the milk and cream, and the gluten-free flours offer a unique texture and flavor. Remember to enjoy it in moderation as part of a balanced diet.

Conclusion

This Gluten-Free Tres Leches Cake is a labor of love, bringing together rich flavors and textures that delight the senses. Whether you’re enjoying it as part of a special celebration or simply as a treat for yourself, it promises to be a memorable experience. I hope this recipe brings as much joy to your table as it has to mine, creating cherished memories with each indulgent bite.

Related update: Gluten-Free Tres Leches Cake

Related update: Tropical Ice Pops

Crispy Pineapple Fritters | Made by Meaghan Moineau

Crispy Pineapple Fritters: A Delightful Treat for Any Occasion

Intro

There’s something magical about the smell of freshly fried fritters wafting through the kitchen, bringing back memories of sunlit afternoons at my grandmother’s house. She would whip up a batch of her famous pineapple fritters, and we’d gather around the kitchen table, eagerly awaiting the first bite. The crispy exterior, the sweet and juicy pineapple inside, and a dusting of powdered sugar on top made for an unforgettable treat. Today, I’m thrilled to share this beloved recipe with you, updated for a new generation while preserving that nostalgic charm.

Why You’ll Love It

These Crispy Pineapple Fritters are a perfect blend of sweet and savory, with a satisfying crunch that makes them irresistibly good. Whether you’re serving them as a snack, dessert, or even a breakfast treat, these fritters are sure to delight everyone at the table. They’re easy to make, require simple ingredients, and are wonderfully versatile, allowing you to add your favorite toppings or enjoy them just as they are.

Ingredients

  • Canned pineapple rings
  • Flour
  • Cornstarch
  • Egg
  • Baking powder
  • Salt
  • Milk
  • Panko breadcrumbs
  • Canola oil

Instructions

  1. Prepare the batter by combining the flour, cornstarch, baking powder, salt, egg, and milk in a shallow dish. Whisk with a fork to create a smooth, pancake-like batter.
  2. In another shallow dish, place the panko breadcrumbs.
  3. Pour about an inch of canola oil into a large skillet and preheat the oil over medium-high heat.
  4. Pat the pineapple rings as dry as possible between sheets of paper towels to ensure they fry up crispy.
  5. Dip each pineapple ring into the batter, tapping off any excess, then coat well in the panko crumbs.
  6. Immediately fry the coated rings in the hot oil until they’re golden brown on both sides, about 2-3 minutes per side.
  7. Remove the fritters from the oil and drain them on paper towels.
  8. Serve the fritters hot, warm, or at room temperature. Optional garnishes include powdered sugar, cinnamon sugar, ice cream, or whipped cream.

Tips

For the best results, ensure your oil is at the right temperature. You can test this by dropping a small piece of batter into the oil; if it sizzles and browns quickly, you’re ready to fry. Also, be sure not to overcrowd the skillet, as this can lower the oil temperature and result in soggy fritters.

Variations & Substitutions

If you’re looking to switch things up, try using fresh pineapple instead of canned for a slightly tangier flavor. You can also experiment with different coatings, such as crushed cereal or coconut flakes, for added texture. For a dairy-free version, substitute the milk with almond or coconut milk, and for a gluten-free option, use gluten-free flour and breadcrumbs.

Storage

To store any leftover fritters, let them cool completely, then place them in an airtight container. They can be kept in the refrigerator for up to three days. To reheat, simply pop them in the oven at 350°F (175°C) for about 10 minutes or until heated through. Avoid microwaving, as it can make them soggy.

FAQ

Can I make these fritters ahead of time?

Yes, you can prepare the batter and coat the pineapple rings in advance. Store them in the refrigerator until you’re ready to fry. However, for the crispiest texture, it’s best to fry them just before serving.

What can I serve with pineapple fritters?

Pineapple fritters pair wonderfully with a scoop of vanilla ice cream or a dollop of whipped cream. For a more decadent treat, try drizzling them with caramel or chocolate sauce.

Nutrition

While the exact nutritional content will depend on the specific ingredients and portion sizes used, a typical serving of crispy pineapple fritters provides a delightful combination of carbohydrates, a moderate amount of fat from the frying process, and the natural sugars found in pineapple. Enjoy them as an occasional treat as part of a balanced diet.

Conclusion

Crispy Pineapple Fritters are a delightful way to bring a touch of tropical sweetness to any occasion. With their crunchy coating and juicy center, they’re sure to become a favorite in your household as they have in mine. I hope this recipe brings you as much joy and as many cherished memories as it has brought to my family. Happy cooking!

Related update: Crispy Pineapple Fritters

Related update: Fluffy frittata with spinach

Coconut Guava Ice cream | Made by Meaghan Moineau

Coconut Guava Ice Cream: A Tropical Delight

Intro

There’s something magical about the fusion of tropical flavors that instantly transports you to a serene beach with every bite. Coconut Guava Ice Cream embodies this essence perfectly. As a child, I remember visiting my grandmother’s house every summer. She had a beautiful guava tree in her backyard, and we would spend lazy afternoons picking ripe guavas and concocting different treats. This ice cream recipe takes me back to those sun-dappled days, filled with laughter, tropical fruits, and the warmth of family gatherings.

Why You’ll Love It

This Coconut Guava Ice Cream is a luscious blend of creamy coconut milk, sweet guavas, and the delightful crunch of peanuts. It’s vegan-friendly, simple to make, and doesn’t require an ice cream maker. The refreshing taste of guava combined with the rich coconut base creates an indulgent yet refreshing dessert. It’s the perfect treat to beat the heat and impress your guests at any gathering.

Ingredients

  • 1 can of coconut milk
  • 1/2 cup condensed milk
  • 2 ripe guavas, chopped and de-seeded
  • 1/2 cup blueberries
  • 1/4 cup crushed peanuts

Instructions

  1. Place the can of coconut milk in the freezer and allow it to solidify. This could take 4-6 hours depending on the temperature of your freezer.
  2. Take out the can of coconut milk and open it completely. The milk and coconut water will have separated, and the coconut water part will be clearer than the milk.
  3. With a very sharp knife, cut through the frozen coconut milk to separate the milk from the coconut water.
  4. Place the frozen coconut milk part in the blender.
  5. Pour in your condensed milk and chopped de-seeded guavas. Blend for about 3-5 minutes at intervals until smooth.
  6. Pour the mixture into a bowl, add your blueberries, stir in, and pop it in the freezer.
  7. Allow your coconut ice cream to freeze for about 3-6 hours.
  8. Serve garnished with the crushed peanuts.

Tips

To ensure the best texture, make sure the coconut milk is fully solidified before opening. Use ripe guavas for maximum flavor. If you prefer a smoother texture, blend the blueberries with the coconut milk and guavas instead of stirring them in.

Variations & Substitutions

If you want to add a citrusy note, consider adding a tablespoon of lime juice before blending. For a nut-free version, skip the peanuts and garnish with toasted coconut flakes instead. If guavas are not in season, substitute with mangoes or papayas for a different tropical twist.

Storage

Store the Coconut Guava Ice Cream in an airtight container in the freezer for up to two weeks. Allow it to soften at room temperature for a few minutes before serving for the best texture.

FAQ

Can I use fresh coconut milk instead of canned?

While fresh coconut milk can be used, canned coconut milk is preferred for its creaminess and consistency, which enhances the texture of the ice cream.

Is this recipe suitable for vegans?

Yes, this recipe is vegan-friendly as long as you use vegan condensed milk or a homemade version made from coconut milk and sugar.

Can I make this recipe without a blender?

A blender is recommended for achieving a smooth texture. However, you can mash the guavas and mix them with the other ingredients using a fork if a blender is unavailable.

Nutrition

This Coconut Guava Ice Cream is a delightful indulgence. While exact nutritional values may vary based on specific ingredients used, it is generally a good source of healthy fats from the coconut milk and provides vitamins from the fruits. It’s a sweet treat best enjoyed in moderation.

Conclusion

Coconut Guava Ice Cream is a celebration of tropical flavors, nostalgia, and simplicity. With just a few ingredients and steps, you can create a delicious and refreshing dessert that will transport you to a sunny paradise with every bite. Whether you’re entertaining guests or treating yourself, this ice cream is sure to impress. So, why not give it a try and create your own tropical memories?

Related update: Coconut Guava Ice cream

Related update: Macaroni and Cheese Gratin

Peppermint Hot Chocolate Cupcakes | Made by Meaghan Moineau

Peppermint Hot Chocolate Cupcakes

Intro

There’s something utterly magical about the combination of chocolate and peppermint, especially when the weather turns chilly, and the air is filled with the scent of pine and fireplaces. These Peppermint Hot Chocolate Cupcakes are a delightful treat that transports me back to cozy winter evenings spent in my grandmother’s kitchen. I remember sitting at her wooden table, the room filled with the warm, sweet aroma of melting chocolate and peppermint candies. She would let me help stir the batter, my small hands barely able to grip the whisk. Those moments were filled with laughter, stories, and the kind of love that only a grandmother can give. Now, I carry on that tradition with these cupcakes, hoping to bring some of that warmth and nostalgia to your home.

Why You’ll Love It

These cupcakes are a perfect blend of rich, chocolatey goodness and refreshing peppermint. The luscious ganache filling adds a decadent surprise, while the marshmallow buttercream frosting with a hint of peppermint creates a festive touch. They’re not only delicious but also visually stunning, making them perfect for holiday gatherings or any winter celebration. Whether you’re serving them to family and friends or enjoying one with a cup of hot cocoa by the fire, these cupcakes are sure to be a hit.

Ingredients

  • 1 cup semisweet chocolate chips
  • 1 cup hot-brewed coffee
  • 2 cups sugar
  • 1 3/4 cups all-purpose flour
  • 3/4 cup unsweetened cocoa powder
  • 1 1/2 teaspoons baking soda
  • 1 1/2 teaspoons baking powder
  • 1 teaspoon salt
  • 2 large eggs
  • 1 cup buttermilk
  • 1/2 cup vegetable oil
  • 2 teaspoons vanilla extract
  • 1/2 cup heavy cream
  • 1/4 cup unsalted butter
  • 8 ounces semisweet chocolate, chopped
  • 1/2 cup unsalted butter, softened
  • 2 cups marshmallow creme
  • 1/2 teaspoon peppermint extract
  • 3-4 cups powdered sugar
  • 2 tablespoons milk
  • Crushed peppermint candies, for garnish

Instructions

  1. Preheat the oven to 350 degrees F. Line a cupcake or muffin pan with 24 regular-size cupcake liners.
  2. Combine the chocolate chips and hot coffee together, stirring occasionally until the chocolate is melted and the mixture is smooth.
  3. In a large bowl, sift together the sugar, flour, cocoa powder, baking soda, baking powder, and salt.
  4. In another bowl, beat the eggs with an electric mixer until thickened slightly. Slowly add the buttermilk, oil, and vanilla.
  5. Add the melted chocolate mixture to the eggs, and combine completely.
  6. Add the sugar mixture and beat on medium speed until well combined.
  7. Fill the prepared cupcake liners three-quarters full with the cupcake batter.
  8. Bake until a toothpick inserted in center comes out clean, 18 to 21 minutes. Cool the cupcakes completely.
  9. While the cupcakes are baking, prepare the Chocolate Ganache and the Peppermint Marshmallow Buttercream Frosting (directions below).
  10. To make the Chocolate Ganache, bring the heavy cream and butter to a simmer in a small saucepan. Turn off the heat and add in the chocolate. Stir the mixture until smooth. Set aside to cool.
  11. To make the Peppermint Marshmallow Buttercream Frosting, whip together the butter and marshmallow creme using an electric mixer fitted with a whisk attachment.
  12. Add the peppermint extract. Slowly add 2 cups of the powdered sugar and continue to mix on a slow speed.
  13. Add the milk and additional powdered sugar, up to 2 cups, until desired consistency is reached.
  14. To assemble cupcakes: Using an apple corer, remove the center of each cupcake. Fill each cupcake with a spoonful of the Chocolate Ganache.
  15. Using the frosting-filled pastry bag, frost the cupcakes and sprinkle with crushed peppermint candies.

Tips

For the best results, ensure all your ingredients are at room temperature before you begin. This helps everything blend together more smoothly. Also, when making the ganache, make sure not to let the cream and butter boil; just simmer them gently to avoid a grainy texture.

Variations & Substitutions

If you’re not a fan of peppermint, you can substitute the peppermint extract with almond or vanilla extract for a different twist. You can also use dark chocolate instead of semisweet for a richer flavor. For a dairy-free version, use coconut milk and a vegan butter substitute.

Storage

These cupcakes can be stored in an airtight container in the refrigerator for up to 5 days. Before serving, let them come to room temperature for the best taste and texture. You can also freeze them without frosting for up to 2 months. Just thaw them overnight in the refrigerator before frosting and serving.

FAQ

Can I make these cupcakes gluten-free?

Yes, you can substitute the all-purpose flour with a gluten-free flour blend. Just make sure it’s a 1:1 substitute for best results.

Do I have to use coffee in the recipe?

If you’re not a fan of coffee, you can substitute it with hot water or hot chocolate. The coffee enhances the chocolate flavor, but it’s not essential.

Nutrition

While these cupcakes are a treat and should be enjoyed in moderation, they do contain some nutritional benefits. The cocoa powder provides antioxidants, and using dark chocolate can add a boost of iron and magnesium. However, they are still high in sugar and fat, so enjoy them as an occasional indulgence.

Conclusion

These Peppermint Hot Chocolate Cupcakes are more than just a dessert; they’re a celebration of flavors and memories. Whether you’re making them for a holiday party or simply to indulge in a bit of winter nostalgia, they’re sure to bring joy and warmth to those who taste them. I hope this recipe becomes a cherished part of your holiday traditions, just as it has in my family. Enjoy every sweet, minty bite!

Related update: Peppermint Hot Chocolate Cupcakes

Related update: Grandma Inez's Pineapple Pie

Coconut Almond Cheesecake | Made by Meaghan Moineau

Coconut Almond Cheesecake

Intro

Every family has that one dessert that makes its way to the table at every special gathering. For my family, it’s the Coconut Almond Cheesecake. I remember my grandmother pulling out her worn, handwritten recipe card every time we had a celebration. The rich, creamy cheesecake with a hint of coconut and the crunch of almonds was always the highlight of the meal. Eventually, she passed the recipe down to me, and now, I’m thrilled to share it with you. This cheesecake is more than just a dessert; it’s a cherished family tradition.

Why You’ll Love It

This Coconut Almond Cheesecake is a delightful twist on the classic cheesecake. Here’s why you’ll adore it:

  • Rich and Creamy: The filling is smooth and decadent, with cream cheese and a hint of coconut extract blending perfectly.
  • Nutty Crunch: The addition of almonds in both the crust and filling provides a satisfying crunch that complements the creamy texture.
  • Perfect for Any Occasion: Whether it’s a holiday, birthday, or just because, this cheesecake is guaranteed to impress.
  • Make-Ahead Friendly: It can be prepared in advance, making it a stress-free dessert option.

Ingredients

  • Crust:
    • 1 1/2 cups graham cracker crumbs
    • 1/2 cup sweetened coconut
    • 1/2 cup almonds
    • 1/4 cup sugar
    • 1/4 cup (1/2 stick) unsalted butter, melted
  • Filling:
    • 4 (8-ounce) packages cream cheese, softened
    • 1 1/4 cups sugar
    • 4 large eggs
    • 1/2 cup sweetened coconut
    • 1 teaspoon coconut extract
    • 1/2 cup almonds, chopped
  • Glaze:
    • 1 cup semisweet chocolate chips
    • 1/2 cup whipping cream
    • 1 teaspoon vanilla extract

Instructions

  1. Prepare the Crust: Preheat your oven to 350°F (175°C). Wrap the outside of a 9-inch-diameter springform pan with 2 3/4-inch-high sides with foil.
  2. In a food processor, finely grind the graham cracker crumbs, sweetened coconut, almonds, and sugar. Add the melted butter and process until moist crumbs form.
  3. Press the crust mixture onto the bottom and 1 inch up the sides of the prepared pan. Bake until the crust is set and beginning to brown, about 12 minutes. Let it cool completely.
  4. Reduce the oven temperature to 325°F (160°C).
  5. Make the Filling: In a large bowl, use an electric mixer to beat the cream cheese and sugar until smooth.
  6. Add the eggs one at a time, beating just until blended after each addition.
  7. Mix in the sweetened coconut and coconut extract. Fold in the chopped almonds.
  8. Transfer the filling to the prepared crust. Bake until the cake is puffed and no longer moves when the pan is shaken, about 1 hour and 15 minutes. Cool completely on a rack.
  9. Prepare the Glaze: In a small saucepan, combine the semisweet chocolate chips and whipping cream. Stir over low heat until the chocolate is melted and the mixture is smooth. Remove from heat and stir in the vanilla extract.
  10. Once the cheesecake is completely cooled, pour the chocolate glaze over the top, spreading it evenly.
  11. Refrigerate the cheesecake for at least 4 hours, or overnight, before serving.

Tips

  • Room Temperature Ingredients: Ensure your cream cheese and eggs are at room temperature for a smoother filling.
  • Cooling is Key: Allow the cheesecake to cool gradually to prevent cracking. Let it cool in the oven with the door slightly ajar for about 1 hour before moving it to a wire rack.
  • Springform Pan Tip: Wrapping the pan with foil helps prevent water from the water bath from seeping into the cheesecake.

Variations & Substitutions

Feel free to make this cheesecake your own:

  • Nuts: Swap almonds for pecans or walnuts for a different nutty flavor.
  • Flavor Extracts: Experiment with almond extract or vanilla extract instead of coconut extract for a subtle flavor change.
  • Chocolate Glaze: Try using white chocolate for a different twist on the glaze.

Storage

To store leftovers, cover the cheesecake with plastic wrap or place it in an airtight container and refrigerate for up to 5 days. For longer storage, freeze individual slices by wrapping them tightly in plastic wrap and placing them in a resealable freezer bag. They can be frozen for up to 1 month.

FAQ

Can I make this cheesecake ahead of time?

Absolutely! This cheesecake is perfect for making ahead. Simply prepare it up to 2 days in advance and store it in the refrigerator. Add the chocolate glaze on the day you plan to serve it for the best presentation.

What if I don’t have a food processor?

No problem! You can crush the graham crackers, coconut, and almonds in a resealable bag using a rolling pin until they are finely ground. Then, mix them with the sugar and melted butter in a bowl.

Nutrition

While I don’t have the exact nutritional breakdown for this cheesecake, it’s important to note that it is a rich dessert and should be enjoyed in moderation. For those watching their calorie intake, consider serving smaller slices or saving it for special occasions.

Conclusion

The Coconut Almond Cheesecake is a delightful and indulgent dessert that’s sure to become a favorite in your household, just as it has been in mine. Its creamy texture, nutty flavor, and irresistible chocolate glaze make it a standout treat. Whether you’re making it for a family gathering or simply to satisfy your sweet tooth, this cheesecake is bound to impress. Enjoy every rich and delicious bite, and perhaps, start a new tradition of your own!

Related update: Coconut Almond Cheesecake

Related update: Peppermint Hot Chocolate Cupcakes

Candy Cane Chocolate Marshmallows | Made by Meaghan Moineau

Candy Cane Chocolate Marshmallows

Intro

As the holiday season approaches, there’s a unique joy in the air, one that brings with it the aroma of nostalgia and sweet treats. I remember my childhood days when my grandmother would hand us candy canes every Christmas, and we’d spend hours trying to perfect our hot chocolate game. Those candy canes weren’t just sweet delights; they were the essence of our festive spirit. Today, I want to share a recipe that combines those cherished memories with a modern twist: Candy Cane Chocolate Marshmallows. This delicious treat is perfect for sharing with family and friends or simply enjoying alone with a good book by the fireplace.

Why You’ll Love It

This recipe is a delightful fusion of flavors and textures that will take your taste buds on a festive journey. The cool and minty candy canes complement the rich, velvety chocolate, while the fluffy marshmallow center adds a delightful contrast. It’s a simple yet decadent treat that is perfect for gifting or enjoying as a cozy dessert on a chilly evening. Plus, it’s an easy recipe that you can whip up in no time, making it ideal for last-minute holiday preparations.

Ingredients

  • Candy canes
  • Dark chocolate
  • Marshmallows
  • Milk chocolate

Instructions

  1. Crush candy canes using the bottom of a glass, a mallet, or any tool that works for you. Aim for a mix of fine and chunky pieces for a textured coating.
  2. Set up a double boiler to melt the chocolate. If you don’t have one, you can place a heatproof bowl over a pot of simmering water, ensuring the bowl doesn’t touch the water.
  3. Break the dark chocolate and milk chocolate into small pieces and melt them together in the double boiler, stirring occasionally until smooth.
  4. Using a skewer or a fork, dip each marshmallow into the melted chocolate, ensuring it’s evenly coated.
  5. Roll the chocolate-covered marshmallow in the crushed candy cane pieces, pressing slightly to ensure the candy adheres well.
  6. Place the coated marshmallows on a sheet of wax paper to set.
  7. Chill the marshmallows in the refrigerator for at least an hour or until the chocolate has fully hardened.
  8. Store the marshmallows in an airtight container to maintain freshness.
  9. Enjoy these marshmallows on their own or dunk them into a steaming mug of hot chocolate for an extra indulgent treat.

Tips

To make the process even smoother, here are a few tips:

  • Choose high-quality chocolate for the best flavor. A mix of dark and milk chocolate provides a rich and balanced taste.
  • If you’re short on time, you can crush the candy canes in advance and store them in a sealed bag to maintain freshness.
  • To add an extra layer of flavor, consider adding a drop of peppermint extract to the melted chocolate.

Variations & Substitutions

Feel free to get creative with this recipe. Here are some variations and substitutions you might enjoy:

  • Chocolate Variations: Use white chocolate for a sweeter, creamier coating, or try a flavored chocolate bar for a unique twist.
  • Marshmallow Options: Consider using flavored marshmallows, such as peppermint or vanilla, to add an extra dimension of taste.
  • Nutty Crunch: Add chopped nuts, like almonds or pistachios, to the crushed candy canes for a nutty crunch.

Storage

Store your Candy Cane Chocolate Marshmallows in an airtight container in a cool, dry place. They should last for up to two weeks, although they are often too delicious to resist for that long! If you live in a warmer climate, consider storing them in the refrigerator to prevent the chocolate from melting.

FAQ

Can I use regular chocolate chips instead of chocolate bars?

Yes, you can use chocolate chips if you prefer. They melt just as well and are often more convenient. However, be sure to choose high-quality chips for the best flavor.

How can I prevent the chocolate from seizing while melting?

Ensure that no water or steam comes into contact with the chocolate as it melts. Use a dry bowl and utensils, and melt the chocolate slowly over low heat. Stir continuously to promote even melting.

Can I use this recipe for other holidays?

Absolutely! Simply swap the candy cane pieces for other festive toppings. For example, you could use colored sprinkles for Easter or crushed gingerbread cookies for a cozy winter treat.

Nutrition

These Candy Cane Chocolate Marshmallows are a delightful indulgence. While they are a treat best enjoyed in moderation, they offer a moment of festive joy. Remember, the holidays are about balance and enjoyment!

Conclusion

Candy Cane Chocolate Marshmallows are a festive delight that brings together the best of holiday flavors in one delightful treat. Whether you’re sharing them at a holiday gathering, gifting them to friends, or enjoying them on a quiet evening at home, they are sure to bring smiles and warm memories. I hope this recipe adds a touch of sweetness to your holiday season, just as it has to mine. Happy cooking, and enjoy every delicious bite!

Related update: Candy Cane Chocolate Marshmallows

Related update: Coconut Almond Cheesecake

Related update: Cheesy Potato Corn Scones

Chocolate Nutella Walnut Cake | Made by Meaghan Moineau

Chocolate Nutella Walnut Cake

Intro

There’s nothing quite like the smell of a homemade cake wafting through the house. For me, it brings back fond memories of my childhood, sneaking into the kitchen to catch a whiff of whatever my grandmother was baking. One of my all-time favorites was her Chocolate Nutella Walnut Cake, a deliciously rich and nutty treat that always had the family gathered around, forks ready. This cake combines the deep, rich flavors of dark chocolate with the creamy, nutty goodness of Nutella and a satisfying crunch from walnuts. It’s a recipe passed down through generations, and I’m thrilled to share it with you today.

Why You’ll Love It

This Chocolate Nutella Walnut Cake is a dessert lover’s dream. Here are a few reasons why you’ll fall in love with it:

  • Rich and Decadent: The combination of dark chocolate and Nutella creates a luscious, melt-in-your-mouth experience.
  • Textural Delight: The walnuts add a crunchy texture that perfectly complements the soft, moist cake.
  • Simple to Make: With straightforward instructions and common ingredients, this cake is as easy to whip up as it is delicious.
  • Perfect for Any Occasion: Whether it’s a family gathering, a holiday, or a simple weekday treat, this cake is sure to please.

Ingredients

  • 3 large eggs
  • 1 cup sugar
  • 1 cup chopped walnuts
  • 1 cup Nutella
  • 100g dark chocolate, chopped
  • 1/2 cup butter
  • 1 cup all-purpose flour
  • 1 teaspoon baking powder
  • 1/4 teaspoon salt

Instructions

  1. Preheat your oven to 350°F (185°C).
  2. In a large mixing bowl, beat the eggs and sugar together until the mixture is light and fluffy.
  3. In a saucepan over low heat, melt the butter, dark chocolate, and Nutella, stirring constantly until smooth.
  4. Gradually add the melted chocolate mixture to the egg and sugar mixture, stirring continuously to combine.
  5. In a separate bowl, mix together the flour, baking powder, and salt. Gradually fold these dry ingredients into the wet mixture until well combined.
  6. Add the chopped walnuts to the batter and gently fold them in.
  7. Prepare a springform pan by greasing it with butter and lightly dusting it with flour.
  8. Pour the batter into the prepared pan, smoothing the top with a spatula.
  9. Bake in the preheated oven for 40 minutes, or until a toothpick inserted into the center of the cake comes out clean.
  10. Allow the cake to cool in the pan for 10 minutes before transferring it to a wire rack to cool completely.

Tips

To ensure your Chocolate Nutella Walnut Cake turns out perfectly every time, consider these helpful tips:

  • Room Temperature Ingredients: Make sure your eggs and butter are at room temperature before you begin. This helps achieve a smoother batter.
  • Don’t Overmix: When combining the dry ingredients with the wet, be careful not to overmix. This can lead to a dense cake.
  • Chop Walnuts Finely: For a more even distribution of walnuts throughout the cake, chop them finely.

Variations & Substitutions

Feel free to get creative with this recipe! Here are a few variations and substitutions you might like:

  • Nut-Free Option: If you’re not a fan of walnuts or have a nut allergy, you can omit them or substitute with chocolate chips for extra indulgence.
  • Different Nutella Flavors: Try using Nutella’s hazelnut spread with cocoa for a different flavor profile.
  • Gluten-Free Alternative: Substitute the all-purpose flour with a gluten-free flour blend for a celiac-friendly treat.

Storage

Store any leftover cake in an airtight container at room temperature for up to 3 days, or in the refrigerator for up to a week. For longer storage, wrap the cake tightly in plastic wrap and aluminum foil, then freeze for up to three months. Thaw it in the refrigerator overnight before serving.

FAQ

Can I use milk chocolate instead of dark chocolate?

Yes, you can substitute milk chocolate for dark chocolate if you prefer a sweeter taste. However, keep in mind that this will change the overall flavor profile of the cake.

What can I use instead of Nutella?

If you don’t have Nutella on hand, you can use any chocolate hazelnut spread or even a homemade version. Alternatively, peanut butter or almond butter can be used for a different twist.

How do I know when the cake is done?

The best way to check if the cake is done is to insert a toothpick into the center. If it comes out clean or with just a few crumbs, the cake is ready. Be careful not to overbake, as this can dry out the cake.

Nutrition

This cake is a decadent treat, so it’s best enjoyed in moderation. Each slice contains approximately:

  • Calories: 350
  • Fat: 20g
  • Saturated Fat: 9g
  • Cholesterol: 70mg
  • Sodium: 150mg
  • Carbohydrates: 38g
  • Sugar: 25g
  • Protein: 5g

Conclusion

Whether you’re a chocolate lover, a Nutella enthusiast, or simply someone who enjoys baking, this Chocolate Nutella Walnut Cake is sure to become a favorite in your dessert repertoire. It’s a perfect balance of rich flavors and delightful textures that will have you reaching for seconds. Bring a bit of nostalgia and warmth into your kitchen and share this delectable treat with your loved ones. Happy baking!

Related update: Chocolate Nutella Walnut Cake

Related update: Candy Cane Chocolate Marshmallows

Related update: Gluten-Free Tres Leches Cake

Red Velvet Cupcake | Made by Meaghan Moineau

Red Velvet Cupcake Recipe

Intro

There’s something magical about a batch of red velvet cupcakes, with their rich, velvety texture and striking color. Growing up, my grandmother would often bake these delightful treats for special occasions, and the aroma of vanilla and cocoa would fill her cozy kitchen. It was a time when the whole family would gather around, eagerly waiting to taste the first cupcake, topped with a generous swirl of cream cheese frosting. Today, I’m excited to share this cherished recipe with you, so you can create your own sweet memories.

Why You’ll Love It

These red velvet cupcakes are not just beautiful to look at, but they also offer a perfect balance of flavors. The subtle hint of cocoa, combined with the tanginess of the buttermilk and cream cheese frosting, creates a taste that is both unique and irresistible. They’re perfect for any celebration or just a cozy afternoon tea. Plus, the recipe is simple enough for even novice bakers to master.

Ingredients

  • Baking soda
  • ¾ cup unsalted butter
  • Buttermilk
  • Cake flour
  • Cider vinegar
  • Cream cheese
  • Eggs
  • Powdered sugar
  • Red food coloring
  • Salt
  • Sugar
  • Unsalted butter
  • Unsweetened cocoa
  • Vanilla
  • Vanilla extract

Instructions

  1. Preheat your oven to 350°F (175°C). Grease and lightly flour two cupcake pans to make 24 cupcakes.
  2. In a small bowl, sift the cake flour and set it aside.
  3. In a large bowl, use the medium speed of an electric mixer to cream the butter and sugar until very light and fluffy, about 5 minutes.
  4. Add the eggs, one at a time, beating well after each addition.
  5. In a small bowl, whisk together the red food coloring, cocoa, and vanilla. Add this mixture to the batter and beat well.
  6. In a measuring cup, stir the salt into the buttermilk. Add this to the batter in three parts, alternating with the flour. With each addition, beat until the ingredients are incorporated, but do not overbeat.
  7. In a small bowl, stir together the cider vinegar and baking soda. Add this to the batter and mix well.
  8. Using a rubber spatula, scrape down the batter in the bowl, ensuring the ingredients are well blended and the batter is smooth.
  9. Divide the batter among the prepared pans.
  10. Arrange the oven racks in the upper and lower thirds of the oven. Bake the cupcakes, switching positions of the pans halfway through baking, until a tester comes out clean, about 20 minutes.
  11. Cool the cupcakes in the pan for 10 minutes, then remove them from the pan and cool completely on a rack before icing.
  12. To make the frosting, combine butter, salt, and cream cheese in a mixer and beat on medium speed for 2-3 minutes. Add sugar until just incorporated. Do not over mix. It should be thick but not fluffy. Add vanilla. If necessary, add milk to thin.
  13. To ice, mound about a cup of frosting on top of each cupcake and use an icing spatula to make a swirl on top. If desired, decorate with colored sprinkles.

Tips

For the best results, ensure all your ingredients are at room temperature before starting. This helps them blend more smoothly. Also, be gentle when mixing the batter to keep the cupcakes light and fluffy. Finally, don’t skip the step of switching the pans halfway through baking; it ensures even cooking.

Variations & Substitutions

If you’re looking to make these cupcakes a tad healthier, consider using whole wheat pastry flour in place of cake flour. For a fun twist, you can add a teaspoon of orange zest to the batter for a citrusy kick. If you prefer a less sweet frosting, reduce the powdered sugar by half and add a splash of lemon juice for a tangy flavor.

Storage

These cupcakes are best enjoyed fresh, but they can be stored in an airtight container at room temperature for up to two days. If you need to keep them longer, store them in the fridge for up to a week. Just bring them to room temperature before serving for the best texture and flavor. You can also freeze them without frosting for up to three months.

FAQ

Can I use all-purpose flour instead of cake flour?

While cake flour gives these cupcakes their tender crumb, you can substitute all-purpose flour if needed. Just be sure to measure carefully and sift it to ensure a light texture.

What can I use instead of buttermilk?

If you don’t have buttermilk on hand, you can make a quick substitute by adding one tablespoon of lemon juice or vinegar to one cup of milk. Let it sit for about 5 minutes before using it in the recipe.

How do I know when the cupcakes are done?

The cupcakes are done when a toothpick inserted into the center comes out clean or with just a few moist crumbs. If the toothpick is wet with batter, give them a few more minutes.

Nutrition

Each red velvet cupcake is approximately 250 calories, with 12g of fat, 33g of carbohydrates, and 3g of protein. These values can vary slightly based on specific ingredients used and portion sizes.

Conclusion

Red velvet cupcakes are a classic treat that never fails to impress. Whether you’re baking them for a special occasion or just because, they’re sure to bring smiles to everyone who tastes them. I hope this recipe brings as much joy to your kitchen as it has to mine. Happy baking!

Related update: Red Velvet Cupcake

Related update: Red Velvet Cupcake

Lemon and Strawberry Loaf | Made by Meaghan Moineau

Lemon and Strawberry Loaf

Intro

There’s something truly magical about the aroma of freshly baked goods wafting through the house. It takes me back to my childhood, spending weekends at my grandmother’s house. I would watch her bake, my tiny hands eagerly helping sprinkle flour on the countertop. One of my favorite recipes from those days is this delightful Lemon and Strawberry Loaf. Not only is it a beautiful marriage of tangy and sweet, but it also brings back warm memories of those precious moments spent baking alongside my grandmother.

Why You’ll Love It

This Lemon and Strawberry Loaf is a delightful treat for any occasion. The tartness of the lemon perfectly complements the sweetness of the strawberries, creating a balanced flavor profile that is both refreshing and comforting. The addition of dessicated coconut adds a subtle nuttiness and texture that elevates the loaf to a new level. Whether you’re enjoying a slice with your morning coffee or serving it as a dessert at a dinner party, this loaf is sure to impress.

Ingredients

  • 125g butter, softened
  • 200g sugar
  • 2 eggs
  • 250g self-raising flour
  • 50g dessicated coconut
  • 150ml natural yoghurt
  • 1 lemon, juice and rind
  • 150g fresh strawberries, chopped

Instructions

  1. Preheat the oven to 180°C (350°F).
  2. Line a 23cm x 12cm loaf tin with baking paper.
  3. In a mixing bowl, beat the butter and sugar until pale and creamy.
  4. Add the eggs, one at a time, beating well after each addition.
  5. Mix in the lemon rind and juice.
  6. Using a rubber spatula, stir in the flour, dessicated coconut, yoghurt, and strawberries until just combined.
  7. Pour the mixture into the prepared loaf tin and smooth the top with the spatula.
  8. Bake for 50-60 minutes or until a skewer inserted in the center comes out clean.
  9. Allow the loaf to cool in the tin for 10 minutes, then turn out onto a wire rack to cool completely.

Tips

To ensure your loaf is moist and fluffy, make sure all your ingredients are at room temperature before you begin. This helps them blend together more smoothly. Additionally, be careful not to overmix the batter, as this can result in a dense loaf. When folding in the strawberries, do so gently to avoid crushing them and turning the batter pink.

Variations & Substitutions

If you’re feeling adventurous, there are several ways you can tweak this recipe to suit your taste. You could substitute the strawberries with raspberries or blueberries for a different berry flavor. For a dairy-free version, replace the butter with a dairy-free spread and the yoghurt with a coconut-based alternative. You can also add a handful of chopped nuts, like almonds or walnuts, for some extra crunch.

Storage

This Lemon and Strawberry Loaf is best enjoyed fresh, but it can be stored for later enjoyment as well. Keep the loaf in an airtight container at room temperature for up to three days. If you’d like to store it for longer, wrap it tightly in plastic wrap and store it in the refrigerator for up to a week. For even longer storage, you can freeze the loaf for up to three months. Simply slice it before freezing so you can defrost individual pieces as needed.

FAQ

Can I use frozen strawberries instead of fresh?

Yes, you can use frozen strawberries if fresh ones are not available. Just be sure to thaw them completely and drain any excess liquid before adding them to the batter to prevent it from becoming too runny.

What can I use if I don’t have self-raising flour?

If you don’t have self-raising flour, you can make your own by combining 2 cups of all-purpose flour with 3 teaspoons of baking powder and 1/2 teaspoon of salt. This will give you the same effect as self-raising flour.

Can I make this loaf gluten-free?

Absolutely! You can substitute the self-raising flour with a gluten-free flour blend. Just make sure it includes a binding agent like xanthan gum to help maintain the structure of the loaf.

Nutrition

This loaf is not only delicious but also contains some nutritional benefits. The strawberries provide a good source of vitamin C and antioxidants, while the lemon juice offers an additional boost of vitamin C. The inclusion of natural yoghurt adds a dose of protein and calcium.

Conclusion

Baking this Lemon and Strawberry Loaf brings a piece of nostalgia into the modern kitchen. It’s a simple recipe that delivers a burst of flavor and warmth with every bite. Whether you’re baking it for a special occasion, as a sweet treat for your family, or simply to enjoy a moment of peace with a slice of homemade goodness, this loaf is sure to become a beloved addition to your recipe collection. Happy baking!

Related update: Lemon and Strawberry Loaf