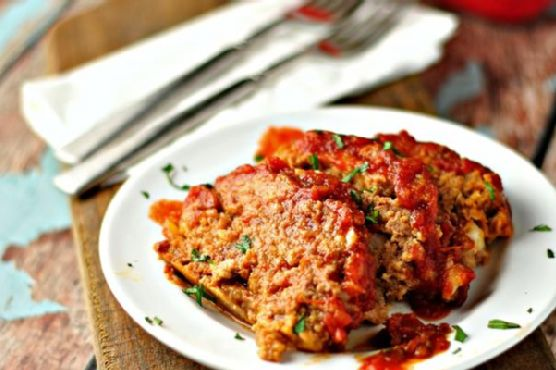
Tasty Easy Meatloaf | Made by Meaghan Moineau

Tasty Easy Meatloaf

Intro

There’s something incredibly comforting about a well-made meatloaf. I remember the first time I helped my grandmother make her signature meatloaf. The kitchen was filled with the savory aroma of spices and the tangy sweetness of tomato sauce. It was a chilly autumn evening, and as we sat around the dining table, the warmth of the meatloaf seemed to embrace us all. This recipe is inspired by those cherished moments, offering a modern twist on a classic dish that’s perfect for family dinners or cozy gatherings.

Why You’ll Love It

This Tasty Easy Meatloaf is a delightful blend of flavors and textures that will make your taste buds sing. It’s incredibly easy to make, requiring just a few simple steps and ingredients you probably already have in your pantry. The combination of ground beef and sausage creates a juicy, flavorful base, while the sweet and tangy sauce adds an irresistible layer of goodness. Whether you’re a seasoned cook or a kitchen novice, this recipe is designed to bring smiles to your dinner table.

Ingredients

  • 1 cup breadcrumbs
  • 2 tablespoons brown sugar
  • 1/2 pound bulk sausage
  • 1 can (15 ounces) tomato sauce, divided
  • 1 tablespoon cider vinegar
  • 1 teaspoon cumin
  • 1 large egg
  • 1 teaspoon garlic powder
  • 1 pound ground beef
  • 1 small onion, diced
  • 1 teaspoon pepper
  • 1 teaspoon salt
  • 1/4 cup water
  • 1 tablespoon whole grain mustard
  • 2 teaspoons Worcestershire sauce

Instructions

  1. Preheat your oven to 350°F (175°C).
  2. In a large bowl, combine the ground beef, sausage, breadcrumbs, diced onion, egg, salt, pepper, cumin, garlic powder, and 1/2 cup of tomato sauce.
  3. Gently mix the ingredients using your hands until just combined. Be careful not to overmix to avoid a chewy texture.
  4. Shape the mixture into a loaf and place it in a shallow ovenproof pan.
  5. In a separate bowl, stir together the remaining tomato sauce, cider vinegar, brown sugar, whole grain mustard, water, and Worcestershire sauce.
  6. Pour the sauce over the meatloaf, ensuring it’s evenly coated.
  7. Bake in the preheated oven for 1 hour, or until the meatloaf is cooked through.
  8. While cooking, spoon the sauce over the top of the meatloaf every 20 minutes to keep it moist and flavorful.
  9. Remove the meatloaf from the oven and let it rest for 10 minutes before slicing and serving.

Tips

  • For best results, use fresh breadcrumbs instead of store-bought, as they help retain moisture.
  • To ensure even cooking, shape your meatloaf with uniform thickness throughout.
  • Letting the meatloaf rest before slicing helps it retain its juices and makes serving easier.

Variations & Substitutions

If you’re looking to switch things up, here are a few variations and substitutions you might consider:

  • Meat: Swap the ground beef for ground turkey or chicken for a lighter version.
  • Gluten-Free: Use gluten-free breadcrumbs to accommodate dietary restrictions.
  • Spice It Up: Add a pinch of cayenne pepper or a splash of hot sauce for a spicier kick.

Storage

Leftover meatloaf can be stored in an airtight container in the refrigerator for up to 3 days. Alternatively, you can freeze slices of meatloaf wrapped tightly in plastic wrap and aluminum foil for up to 3 months. To reheat, thaw in the refrigerator overnight and warm in an oven preheated to 350°F (175°C) until heated through.

FAQ

Can I prepare the meatloaf mixture in advance?

Yes, you can prepare the meatloaf mixture up to a day in advance. Simply mix the ingredients, shape into a loaf, and store covered in the refrigerator. Allow the mixture to come to room temperature before baking.

What sides go well with meatloaf?

Meatloaf pairs wonderfully with classic sides such as mashed potatoes, steamed vegetables, or a fresh garden salad. For a comforting meal, consider serving it with buttery dinner rolls or roasted potatoes.

How do I know when the meatloaf is done?

The meatloaf is done when it reaches an internal temperature of 160°F (71°C). Use a meat thermometer to check the temperature in the center of the loaf for accuracy.

Nutrition

Each serving of Tasty Easy Meatloaf provides approximately:

  • Calories: 320
  • Protein: 20g
  • Carbohydrates: 15g
  • Fat: 20g

Conclusion

This Tasty Easy Meatloaf is a timeless classic that’s sure to become a favorite in your household. With its simple preparation and delectable flavor, it’s an ideal dish for any occasion. Whether you’re recreating cherished family memories or starting new traditions, this meatloaf is a wonderful way to bring warmth and joy to your table. Enjoy every bite!

Related update: Tasty Easy Meatloaf

Related update: San Francisco Cioppino

Crock-Pot: Asian-Style Country Ribs with Black Bean Garlic Sauce | Made by Meaghan Moineau

Crock-Pot: Asian-Style Country Ribs with Black Bean Garlic Sauce

Intro

Growing up, Sundays were always my favorite day of the week. It wasn’t just because it marked a day of rest, but because it was the day my family gathered around a cozy meal, shared stories, and laughed until our bellies ached. One of the dishes that always graced our Sunday table was my grandmother’s Asian-Style Country Ribs, simmered slowly to perfection. The aroma of garlic and ginger would fill the house, inviting everyone to the kitchen even before it was ready. I remember the anticipation and the comforting warmth that this dish brought to our home. Today, I’m sharing this beloved recipe with you, hoping it will bring the same warmth and joy to your family gatherings.

Why You’ll Love It

This recipe is not only delicious but also incredibly easy to prepare. With just 10 minutes of prep time, you can have a hearty and flavorful meal ready in the slow cooker. The combination of savory black bean garlic sauce and tender pork ribs creates an irresistible dish that’s perfect for any occasion. It’s budget-friendly and yields multiple servings, making it ideal for family dinners or gatherings with friends. Plus, the crock-pot does all the work, allowing you more time to relax with your loved ones.

Ingredients

  • 2 lbs boneless pork country ribs
  • 1/4 cup black bean garlic sauce (from a jar)
  • 1/2 cup chicken stock
  • 1 tablespoon cornstarch
  • 1 tablespoon dark sesame oil
  • 3 cloves fresh garlic, minced
  • 1 tablespoon ginger root, minced
  • 2 tablespoons honey
  • 1 teaspoon coarsely cracked black pepper
  • 3 tablespoons low sodium soy sauce
  • 2 scallions, chopped (green and white parts)

Instructions

  1. Begin by trimming any excess fat from the boneless pork ribs. This will help the dish avoid becoming too greasy.
  2. In a large bowl, mix together the black bean garlic sauce, chicken stock, cornstarch, sesame oil, garlic, ginger, honey, black pepper, and soy sauce. Stir until the cornstarch is fully dissolved.
  3. Place the pork ribs in the crock-pot and pour the sauce mixture over them, ensuring each rib is well-coated.
  4. Cover and cook on low heat for 5 to 6 hours. Avoid cooking any longer to prevent the ribs from becoming mushy.
  5. Once cooked, gently remove the ribs from the crock-pot and place them on a serving platter.
  6. Garnish with freshly chopped scallions before serving.
  7. Enjoy alongside steamed rice and snow peas for a complete meal.

Tips

For the best results, ensure that the ribs are submerged in the sauce as much as possible. This will ensure even cooking and flavor absorption. If your crock-pot has a hot spot, you may want to rotate the ribs halfway through the cooking process.

Variations & Substitutions

If you prefer a spicier kick, consider adding a teaspoon of chili garlic sauce or a few dashes of hot sauce to the mix. You can also substitute the pork ribs with chicken thighs or beef short ribs if desired. For a sweeter glaze, increase the amount of honey or add a tablespoon of brown sugar.

Storage

Store any leftovers in an airtight container in the refrigerator for up to 3 days. This dish can also be frozen for up to 2 months. To reheat, thaw in the fridge overnight and warm up in a saucepan over low heat until heated through.

FAQ

Can I use fresh black beans instead of jarred black bean garlic sauce?

While fresh black beans are nutritious, the jarred black bean garlic sauce provides a unique fermented flavor that is essential to this dish. For best results, I recommend using the jarred version.

How can I tell if the ribs are done?

The ribs should be tender and easily pull apart with a fork. If they’re still tough, they need more cooking time. However, be careful not to exceed the 6-hour mark to avoid mushiness.

Nutrition

This dish is a good source of protein and rich in flavors thanks to the garlic and ginger. It’s important to note that using low sodium soy sauce helps keep the sodium levels in check, making it a healthier option compared to traditional soy sauce.

Conclusion

There’s nothing quite like the comfort of a home-cooked meal that requires minimal effort yet delivers maximum flavor. This Crock-Pot Asian-Style Country Ribs with Black Bean Garlic Sauce is a testament to that. Not only is it a tribute to cherished family traditions, but it’s also a wonderful recipe to start new ones. I hope this dish brings as much joy and satisfaction to your table as it has to mine. Happy cooking!

Related update: Crock-Pot: Asian-Style Country Ribs with Black Bean Garlic Sauce

Related update: Tasty Easy Meatloaf

Ginger Molasses Rounds | Made by Meaghan Moineau

Ginger Molasses Rounds: A Classic Cookie Recipe

Intro

There’s something magical about the smell of ginger and molasses wafting through the house during the holiday season. It instantly transports me back to my grandmother’s cozy kitchen, where the warmth of the oven and the sound of gentle laughter provided a comforting backdrop to our baking adventures. These Ginger Molasses Rounds were always the star of the show, their spicy aroma and chewy texture making them irresistible to both young and old. This recipe has been passed down through generations, and I’m thrilled to share this family treasure with you.

Why You’ll Love It

These Ginger Molasses Rounds capture the essence of holiday cheer in every bite. You’ll love them because they’re:

  • Quick and Easy: With simple ingredients and straightforward instructions, these cookies come together in no time.
  • Perfectly Spiced: The combination of ginger and cinnamon creates a warm, inviting flavor that you’ll crave all year round.
  • Chewy and Soft: Baked to perfection, these cookies maintain a soft, chewy texture that will melt in your mouth.
  • Family-Friendly: A fun baking project for kids and adults alike, creating memories that will be cherished forever.

Ingredients

  • 1 teaspoon baking soda
  • 1/2 cup butter, softened
  • 1 teaspoon cinnamon
  • 1 large egg
  • 2 cups all-purpose flour
  • 1/4 cup additional granulated sugar (for rolling)
  • 1 tablespoon ground ginger
  • 1/4 cup molasses
  • 1/2 teaspoon salt
  • 3/4 cup granulated sugar

Instructions

  1. Preheat your oven to 350°F (175°C) and line a baking sheet with parchment paper.
  2. In a large bowl, cream together the butter and 3/4 cup of sugar until the mixture is light and fluffy.
  3. Beat in the egg and molasses until fully incorporated and smooth.
  4. In a separate bowl, whisk together the flour, baking soda, salt, cinnamon, and ground ginger.
  5. Gradually blend the dry ingredients into the creamed mixture, stirring until just combined.
  6. Shape the dough into small balls, about 1 inch in diameter.
  7. Roll each ball in the additional granulated sugar to coat completely.
  8. Place the sugar-coated balls on the prepared baking sheet, spacing them 2 inches apart.
  9. Bake in the preheated oven for 8-9 minutes, or until the cookies are just set with slightly cracked tops.
  10. Remove from the oven and allow them to cool on the baking sheet for a few minutes before transferring to a wire rack to cool completely.

Tips

For the best results, make sure your butter is softened to room temperature before beginning. This will ensure a smooth and creamy dough. Additionally, avoid overbaking; removing the cookies when they are just set will deliver the perfect chewy texture.

Variations & Substitutions

Feel free to experiment with this recipe to suit your taste. You can:

  • Swap out half the flour for whole wheat flour for a nuttier flavor and added fiber.
  • Incorporate 1/4 cup of finely chopped crystallized ginger for an extra burst of ginger flavor.
  • Add a pinch of ground cloves or nutmeg for a subtle spice complexity.
  • Use dark brown sugar in place of granulated sugar for a richer, deeper molasses flavor.

Storage

Store your Ginger Molasses Rounds in an airtight container at room temperature for up to a week. They can also be frozen for up to three months; just be sure to let them thaw at room temperature before enjoying.

FAQ

Can I use margarine instead of butter?

Yes, you can substitute margarine for butter in this recipe, though the flavor and texture may vary slightly. Make sure to choose a high-quality margarine for the best outcome.

What can I use instead of molasses?

If you don’t have molasses on hand, you can use an equal amount of honey or maple syrup as a substitute. Keep in mind that this will alter the flavor profile slightly, but the cookies will still be delicious.

Why are my cookies spreading too much?

If your cookies are spreading too much during baking, it might be due to the dough being too warm. Try chilling the dough for 30 minutes before shaping and baking to help them maintain their shape.

Nutrition

Each cookie contains approximately:

  • Calories: 90
  • Fat: 3.5g
  • Carbohydrates: 14g
  • Protein: 1g
  • Sugar: 8g
  • Fiber: 0.5g

Conclusion

These Ginger Molasses Rounds are more than just cookies; they’re a delicious tradition that brings warmth and joy to any gathering. Whether you’re making them for a holiday feast or just a cozy night in, these cookies promise to be a hit with everyone who tries them. So gather your ingredients, invite some loved ones, and embark on a delightful baking adventure. Happy baking!

Related update: Ginger Molasses Rounds

Related update: Baked Cinnamon Apple Wedges

Related update: Lemon Poppy Seed Muffins

Asian Lettuce Wraps | Made by Meaghan Moineau

Asian Lettuce Wraps

Intro

There’s something magical about gathering around the table with family and friends, sharing a meal that’s not only delicious but also fun to eat. Growing up, I remember my grandmother’s kitchen filled with the tantalizing aroma of her homemade dishes. She had a knack for transforming simple ingredients into extraordinary meals. One of my fondest memories is of her lettuce wraps, which she prepared with love and care. Inspired by her culinary magic, I’ve created my own version of Asian Lettuce Wraps, a dish that brings back warm memories and is sure to create new ones for your family.

Why You’ll Love It

These Asian Lettuce Wraps are not just a meal; they’re an experience. Here’s why you’ll fall in love with them:

  • Healthy and Nutritious: Packed with lean protein and fresh veggies, it’s a guilt-free indulgence.
  • Quick and Easy: Perfect for busy weeknights, this recipe comes together in less than 30 minutes.
  • Customizable: Easily adapt the ingredients to your taste or dietary needs.
  • Perfect for Sharing: Ideal for family dinners, parties, or any gathering where good food and company are desired.

Ingredients

  • 1 pound extra-lean ground turkey
  • 2 cloves garlic, minced
  • 1/4 cup chicken stock
  • 2 tablespoons coconut aminos
  • 1 tablespoon thai fish sauce
  • 2 tablespoons orange marmalade
  • 1 tablespoon fresh lime juice
  • 1 teaspoon sesame oil
  • 1/2 teaspoon ground ginger
  • 1 tablespoon tapioca starch
  • 1 cup broccoli slaw
  • Large green lettuce leaves

Instructions

  1. Place the ground turkey and minced garlic in a skillet over medium heat and begin to brown, breaking up the meat as you cook. Use a hand-held potato masher to help break up the meat more evenly.
  2. While the turkey is cooking, prepare the sauce. In a bowl or using a magic bullet, combine the chicken stock, coconut aminos, fish sauce, orange marmalade, lime juice, sesame oil, ground ginger, and tapioca starch. Whisk or process until well blended.
  3. Add the sauce to the ground turkey and continue cooking until the turkey is fully cooked and the sauce has thickened, about 5-7 minutes.
  4. Serve the turkey mixture with broccoli slaw, wrapped in large green lettuce leaves. Enjoy!

Tips

To ensure your lettuce wraps are the best they can be, consider these helpful tips:

  • Use Fresh Ingredients: Fresh garlic and lime juice make a noticeable difference in flavor.
  • Choose the Right Lettuce: Opt for large, sturdy lettuce leaves like Romaine or Butter lettuce for easy wrapping.
  • Balance the Flavors: Taste the sauce before adding it to the meat and adjust the ingredients to your liking.

Variations & Substitutions

Feel free to get creative with your lettuce wraps! Here are some ideas to make them your own:

  • Protein Swap: Substitute ground turkey with ground chicken or even tofu for a vegetarian version.
  • Spice It Up: Add some sriracha or red pepper flakes for a spicy kick.
  • Different Veggies: Add diced bell peppers or shredded carrots for extra crunch and color.

Storage

To store any leftovers, keep the turkey filling and lettuce leaves separate. Store the turkey mixture in an airtight container in the refrigerator for up to 3 days. When ready to eat, simply reheat the filling on the stove or in the microwave, and then wrap it in fresh lettuce leaves.

FAQ

Can I make these wraps ahead of time?

Yes, you can prepare the turkey filling in advance and store it in the refrigerator until you’re ready to serve. Just reheat the filling and wrap it in fresh lettuce leaves when you’re ready to eat.

What can I use instead of tapioca starch?

If you don’t have tapioca starch on hand, you can substitute it with cornstarch or arrowroot powder. Both will work well to thicken the sauce.

Is there a vegetarian version of this recipe?

Absolutely! You can make a vegetarian version by substituting the ground turkey with crumbled tofu or tempeh. Just adjust the cooking time as needed.

Nutrition

These Asian Lettuce Wraps are not only delicious but also nutritious. With lean protein and fresh vegetables, they offer a balanced meal that’s low in calories and high in flavor. Each serving provides essential vitamins and minerals, making it a healthy choice for any meal.

Conclusion

Whether you’re looking for a quick weeknight dinner, a healthy lunch option, or a dish to impress your guests, these Asian Lettuce Wraps are a perfect choice. They’re easy to make, customizable, and packed with flavor. Plus, they bring the joy of shared meals and the nostalgia of cherished family recipes to your table. Enjoy the process of creating and savoring these wraps, and make them a part of your family traditions. Happy cooking!

Related update: Asian Lettuce Wraps

Related update: Barbecued Baby Back Pork Ribs and Bush's Grillin' Beans

Kale and Roasted Sweet Potato Soup with Chicken Sausage | Made by Meaghan Moineau

Kale and Roasted Sweet Potato Soup with Chicken Sausage

Intro

There’s something incredibly comforting about a warm bowl of soup on a chilly day. It reminds me of the afternoons spent in my grandmother’s kitchen, where the aroma of simmering vegetables and spices would fill the air, wrapping us in a cozy embrace. One of her favorites to make was a hearty soup with whatever vegetables were in season. Drawing inspiration from those cherished memories, I’ve crafted this Kale and Roasted Sweet Potato Soup with Chicken Sausage. It’s a dish that speaks to the soul and nourishes the body, perfect for family gatherings or a quiet evening at home.

Why You’ll Love It

This soup is a delightful blend of savory and sweet flavors, thanks to the roasted sweet potatoes and seasoned chicken sausage. It’s packed with nutritious kale and mushrooms, giving you a boost of vitamins and minerals. The spices add a subtle warmth, making each spoonful a delightful experience. Whether you’re looking for a quick weeknight meal or something special to share with guests, this soup is a versatile choice that’s both satisfying and comforting.

Ingredients

  • 2 large sweet potatoes, peeled and cubed
  • 1 yellow onion, diced
  • 1 bunch of kale, washed and chopped
  • 8 ounces mushrooms, sliced
  • 12 ounces chicken sausage, sliced
  • 4 cups chicken stock
  • 3 cloves garlic, minced
  • 1 teaspoon dried thyme
  • 1 teaspoon ground coriander
  • 1/2 teaspoon chili flakes (optional)
  • Sea salt, to taste
  • Black pepper, to taste
  • Olive oil

Instructions

  1. Preheat your oven to 400°F (200°C). Place the cubed sweet potatoes in a baking pan or dish. Season with sea salt and black pepper, then coat with olive oil. Bake for 20 to 25 minutes, until soft. Remove from oven and set aside.
  2. In a dutch oven over medium heat, warm some olive oil. Add the chicken sausage and cook until just browned.
  3. Add in the diced onion and sliced mushrooms. Cook for about 3 to 5 minutes, until softened.
  4. Stir in the minced garlic, dried thyme, ground coriander, a pinch of sea salt, and black pepper. Cook for about 1 minute, allowing the spices to become fragrant.
  5. Pour in the chicken stock and bring the mixture to a boil. Reduce the heat and let it simmer for about 5 to 10 minutes.
  6. Add in the roasted sweet potatoes and chopped kale. Push the kale down into the soup so it is submerged. Cook for about 3 to 5 minutes, until the kale is bright green and tender.
  7. Taste and adjust seasoning with more salt and pepper if needed. Serve hot and enjoy!

Tips

For the best flavor, choose high-quality chicken sausage and fresh kale. Be sure to season the sweet potatoes well before roasting to enhance their natural sweetness. If you prefer a thicker soup, you can mash some of the roasted sweet potatoes before adding them to the pot. Also, feel free to adjust the spice level by adding more or less chili flakes according to your preference.

Variations & Substitutions

If you’re looking to switch things up, try using turkey sausage or a plant-based sausage for a different protein option. You can also substitute spinach for kale if you prefer a milder green. For a more substantial meal, consider adding cooked quinoa or orzo to the soup. If you’re aiming for a vegetarian version, simply omit the sausage and use vegetable stock instead of chicken stock.

Storage

This soup stores beautifully and can be kept in an airtight container in the refrigerator for up to 3 days. For longer storage, freeze portions in airtight containers for up to 3 months. To reheat, simply thaw in the refrigerator overnight and warm on the stove over low heat.

FAQ

Can I make this soup ahead of time?

Absolutely! This soup is even more flavorful the next day as the ingredients have more time to meld together. Simply prepare it as per the instructions and store it in the refrigerator. Reheat gently on the stove before serving.

What can I serve with this soup?

This soup pairs wonderfully with crusty bread or a fresh green salad. For a heartier meal, consider serving it alongside a grilled cheese sandwich or a roasted vegetable platter.

Is this soup spicy?

The soup has a mild kick from the chili flakes, but it’s not overly spicy. You can adjust the spice level by varying the amount of chili flakes according to your taste preference.

Nutrition

This soup is a nutrient powerhouse packed with vitamins A and C from the sweet potatoes and kale. It’s also a good source of protein from the chicken sausage and provides fiber and antioxidants from the mushrooms. With its balanced blend of macronutrients and micronutrients, this soup is both nourishing and satisfying.

Conclusion

Warm, nourishing, and packed with flavor, this Kale and Roasted Sweet Potato Soup with Chicken Sausage is a bowl of comfort that’s perfect for any occasion. Whether you’re sharing it with loved ones or savoring a quiet moment alone, this soup is sure to bring a sense of warmth and satisfaction. Don’t forget to experiment with the variations and make it your own. Happy cooking!

Related update: Kale and Roasted Sweet Potato Soup with Chicken Sausage

Related update: Greek-Style Baked Fish: Fresh, Simple, and Delicious

Related update: Julia Child's Vichyssoise

Creamy Vegan Butternut Squash Mac and Cheese | Made by Meaghan Moineau

Creamy Vegan Butternut Squash Mac and Cheese

Intro

There’s something incredibly comforting about a warm bowl of mac and cheese. It takes me back to chilly autumn afternoons at my grandmother’s house, where the aroma of cheese and spices filled the air, making everything feel just right. As a child, I remember peeking into the oven, eagerly waiting for that bubbly, golden crust to form. Now, with a modern twist, I bring you a creamy vegan butternut squash mac and cheese that pays homage to those nostalgic days while embracing a more plant-based lifestyle. It’s a dish that wraps you in warmth and nostalgia, perfect for sharing with loved ones or enjoying as a cozy meal for one.

Why You’ll Love It

This creamy vegan butternut squash mac and cheese is a delightful twist on a classic comfort food that will satisfy your cravings without any dairy. Here’s why you’ll love it:

  • Rich and Creamy: The butternut squash puree adds a velvety texture that perfectly mimics traditional cheese sauce.
  • Healthy Ingredients: With nutritional yeast and butternut squash, this dish is packed with vitamins and minerals.
  • Family-Friendly: It’s a hit with kids and adults alike, making it a perfect family dinner option.
  • Easy to Make: With simple steps and readily available ingredients, you can whip up this dish any day of the week.
  • Great for Entertaining: Impress your guests with a dish that’s both comforting and health-conscious.

Ingredients

  • 1 cup breadcrumbs
  • 1 cup pureed butternut squash
  • 2 cups elbow macaroni
  • 1/4 cup nutritional yeast
  • 1/2 teaspoon black pepper
  • 1 teaspoon salt
  • 1 cup light soy milk
  • 2 tablespoons vegan buttery spread
  • 1 cup vegan cheddar shreds
  • 1 cup water

Instructions

  1. Preheat your oven to 350°F (175°C).
  2. Bring a large pot of salted water to a boil over medium heat. Add in the elbow macaroni and cook until pasta is al dente, about 8-10 minutes.
  3. While waiting for the pasta to cook, begin preparing your sauce. In a medium-sized saucepan, melt the vegan buttery spread over medium heat.
  4. Add in the nutritional yeast and mix together to form a paste.
  5. Slowly add the soy milk, whisking continuously to ensure a lump-free sauce. Allow the mixture to simmer for about 5 minutes, or until the sauce begins to thicken.
  6. Stir in the pureed butternut squash, mixing thoroughly to ensure everything is well blended. The butternut squash will also help to thicken the sauce.
  7. Add the vegan cheddar shreds and let sit for 1 to 2 minutes, or until the sauce has a creamy, velvety smooth consistency.
  8. Remove the sauce from heat and let it sit for a moment.
  9. Drain the pasta and add it to the cheese sauce. Stir together until the pasta is well coated.
  10. Pour the mixture into a greased 9 x 9-inch baking pan.
  11. Sprinkle breadcrumbs over the macaroni and cheese.
  12. Bake for 15 minutes, or until the cheese begins to bubble and the breadcrumbs are golden brown.
  13. Serve warm and enjoy this creamy vegan home-style comfort food!

Tips

  • For extra creaminess, add a splash more soy milk if the sauce is too thick.
  • If you prefer a spicier kick, add a pinch of cayenne pepper to the sauce.
  • To make your own breadcrumbs, simply toast some stale bread and pulse it in a food processor until fine.

Variations & Substitutions

This dish is versatile and adaptable to suit your preferences:

  • Gluten-Free: Use gluten-free pasta and breadcrumbs to make this dish gluten-free.
  • Nut-Free: Ensure that your vegan cheddar shreds and buttery spread are nut-free if allergies are a concern.
  • Vegetable Add-ins: Stir in some cooked broccoli or peas for added nutrition and texture.

Storage

Store any leftovers in an airtight container in the refrigerator for up to 3 days. Reheat in the oven or microwave until warmed through. For longer storage, this dish can be frozen for up to a month. Thaw overnight in the refrigerator before reheating.

FAQ

Can I use a different type of plant-based milk?

Yes, you can substitute light soy milk with almond milk, oat milk, or any other plant-based milk of your choice. Just ensure it’s unsweetened to avoid altering the flavor of the dish.

What can I use instead of butternut squash?

If you don’t have butternut squash on hand, pureed pumpkin or sweet potato are great alternatives that will still provide that rich, creamy texture and a touch of sweetness.

Nutrition

This creamy vegan butternut squash mac and cheese is a nutritious meal option. The butternut squash provides a good source of vitamins A and C, while the nutritional yeast adds a boost of B vitamins. Plus, it’s lower in fat compared to traditional mac and cheese, making it a heart-healthy choice.

Conclusion

This creamy vegan butternut squash mac and cheese is more than just a meal; it’s a warm hug in a bowl, reminiscent of cherished memories yet perfectly suited for today’s culinary trends. Whether you’re gathering with family or enjoying a quiet night in, this dish promises to deliver comfort and satisfaction. I hope you enjoy making and eating it as much as I do!

Related update: Creamy Vegan Butternut Squash Mac and Cheese

Pasta With Salmon Cream Sauce | Made by Meaghan Moineau

Pasta With Salmon Cream Sauce

Intro

There’s something truly comforting about a warm, creamy pasta dish, especially when it brings back fond memories of family gatherings. I remember my grandmother preparing her famous Pasta with Salmon Cream Sauce every Sunday. The aroma would fill her cozy kitchen, and we would eagerly wait at the dining table, ready to dive into a meal that felt like a warm hug on a plate. This dish combines the rich flavors of salmon with a velvety cream sauce, creating a meal that’s both satisfying and elegant. Whether you’re cooking for a family dinner or a romantic evening, this recipe is sure to impress.

Why You’ll Love It

This Pasta with Salmon Cream Sauce is a delightful blend of creamy, savory, and fresh flavors. Here’s why you’ll love making and eating it:

  • Quick and Easy: This recipe is perfect for busy nights, taking under 30 minutes from start to finish.
  • Rich and Flavorful: The creamy sauce is perfectly balanced with the saltiness of the salmon and the freshness of the herbs.
  • Family-Friendly: It’s a hit with both kids and adults, making it a great choice for family meals.
  • Customizable: You can easily tweak the ingredients to suit your dietary preferences or what you have on hand.

Ingredients

  • 2 tablespoons butter
  • 2 tablespoons flour
  • 2 cups milk
  • 1 onion, finely chopped
  • 1/2 cup grated parmesan cheese
  • 2 tablespoons chopped fresh parsley
  • 1 cup peas
  • 12 ounces penne pasta
  • 1/4 teaspoon pepper
  • 1 can (about 7.5 ounces) red salmon, drained and broken into chunks

Instructions

  1. In a large pot of boiling water, cook the penne pasta until al dente, about 10-12 minutes. Drain and return to the pot.
  2. In a saucepan, melt butter over medium heat. Add the chopped onion and cook until tender.
  3. Stir in the flour and cook for a few seconds to form a roux.
  4. Gradually whisk in the milk and bring to a simmer, stirring constantly until the sauce thickens.
  5. Add the peas, broken salmon chunks with juices, parsley, parmesan cheese, and pepper. Stir to combine.
  6. Pour the salmon cream sauce over the cooked pasta and stir gently until well mixed.
  7. Serve immediately and enjoy!

Tips

  • Don’t Overcook the Pasta: Make sure to cook the pasta just until al dente. It will continue to cook slightly when mixed with the sauce.
  • Use Fresh Ingredients: Fresh parsley and good-quality parmesan cheese make a big difference in flavor.
  • Adjust Consistency: If the sauce is too thick, add a splash of milk to reach your desired consistency.

Variations & Substitutions

  • Vegetarian Option: Substitute the salmon with sautéed mushrooms for a vegetarian twist.
  • Gluten-Free: Use gluten-free pasta and flour to make this dish suitable for a gluten-free diet.
  • Add More Veggies: Feel free to add spinach or broccoli for extra nutrients and color.

Storage

If you have leftovers, store them in an airtight container in the refrigerator for up to 3 days. Reheat gently on the stove or in the microwave, adding a little milk to loosen the sauce if necessary.

FAQ

Can I use fresh salmon instead of canned?

Absolutely! Fresh salmon will add a luxurious touch to this dish. Simply cook the salmon separately, flake it, and add it to the sauce in place of the canned salmon.

Can I make the sauce ahead of time?

Yes, you can prepare the sauce in advance and store it in the refrigerator for up to 2 days. Reheat it gently on the stove, stirring constantly, before mixing with the pasta.

Nutrition

This dish is approximately 300 calories per serving, making it a satisfying meal that won’t weigh you down. Pair it with a side salad for a balanced dinner.

Conclusion

Pasta with Salmon Cream Sauce is more than just a meal; it’s a culinary experience that brings warmth and joy to the table. Whether you’re recreating treasured family memories or creating new ones, this recipe is sure to become a favorite in your home. Enjoy the creamy textures, the vibrant flavors, and the satisfaction of a dish made with love. Happy cooking!

Related update: Pasta With Salmon Cream Sauce

Related update: Glazed pork chops

Turkey Enchilada Bake | Made by Meaghan Moineau

Turkey Enchilada Bake: A Delicious Twist on a Classic Comfort Dish

Intro

There’s something truly magical about the aroma of enchiladas wafting through the house. It takes me back to warm, cozy evenings in my grandmother’s kitchen, where laughter was abundant, and the food was always made with love. She would spend hours crafting the perfect enchilada sauce, her apron dusted with flour and spices. I’ve taken those cherished memories and added my own twist to create a dish that’s both comforting and modern: the Turkey Enchilada Bake.

Why You’ll Love It

This Turkey Enchilada Bake combines the rich, savory flavors you adore in traditional enchiladas with the convenience of a one-dish meal. It’s perfect for busy weeknights or family gatherings, offering hearty, satisfying layers that will leave everyone asking for seconds. Plus, it’s packed with lean protein and vibrant vegetables, making it a nutritious option you can feel good about serving.

Ingredients

  • 2 ripe avocados
  • 1 can black beans, drained and rinsed
  • 1 tbsp chili powder
  • 2 chipotles in adobo, chopped
  • 1 bunch fresh cilantro, chopped
  • 12 corn tortillas
  • 1 can fire roasted canned tomatoes
  • 3 cloves garlic
  • 1 can green chilies
  • 1 tsp ground coriander
  • 1 tsp ground cumin
  • Juice of 1 lime
  • 1 lb lean ground turkey
  • 1 red onion, diced
  • 1 tsp paprika
  • 1 can salsa
  • 2 cups shredded Mexican cheese blend
  • 1 cup light sour cream
  • 5 tomatillos
  • 1 yellow onion

Instructions

  1. Make the turkey mixture: In a large skillet over medium heat, cook the ground turkey until browned. Add the diced red onion, chili powder, ground cumin, ground coriander, and paprika. Stir until the spices are well combined. Add the black beans and half of the chopped cilantro. Cook for an additional 5 minutes, then set aside.
  2. Roast the vegetables: Preheat your oven to 400 degrees. Cut the tomatillos in half and slice the yellow onion into thin slices. Remove the garlic from its covering. Arrange the tomatillos, onion slices, and garlic on a baking sheet. Roast in the oven for 15-20 minutes until the vegetables are tender and slightly charred.
  3. Prepare the sauce: In a blender, combine the roasted vegetables, fire roasted tomatoes, chipotles in adobo, green chilies, and lime juice. Blend until smooth and adjust seasoning with salt and pepper to taste.
  4. Assemble the bake: Reduce the oven temperature to 375 degrees. In a large baking dish, spread a thin layer of the sauce at the bottom. Layer 6 corn tortillas over the sauce, followed by half of the turkey mixture, a third of the remaining sauce, and a sprinkle of cheese. Repeat the layers with the remaining tortillas, turkey mixture, sauce, and cheese.
  5. Bake: Cover the dish with foil and bake for 20 minutes. Remove the foil and bake for an additional 10 minutes, until the cheese is bubbly and golden.
  6. Serve: Let the dish cool for a few minutes. Garnish with sliced avocados, the remaining cilantro, and dollops of light sour cream. Serve with additional lime wedges if desired.

Tips

For the best flavor, allow the turkey mixture to simmer with the spices for a few extra minutes. This will ensure that the spices fully develop and infuse the meat with deliciousness. When roasting the vegetables, keep an eye on them to avoid over-charring, which can lead to bitterness in the sauce.

Variations & Substitutions

Feel free to customize your Turkey Enchilada Bake with your favorite ingredients. Swap the ground turkey for shredded chicken or beef to suit your taste. For a vegetarian version, skip the meat entirely and add more beans or roasted vegetables like zucchini or bell peppers. If you prefer a spicier dish, include additional chipotles in adobo or a sprinkle of cayenne pepper.

Storage

Leftovers can be stored in an airtight container in the refrigerator for up to 3 days. To reheat, simply cover and bake in a 350-degree oven until warmed through. This dish also freezes well; wrap portions individually for easy defrosting and reheating on busy days.

FAQ

Can I make this dish ahead of time?

Absolutely! You can prepare the Turkey Enchilada Bake a day in advance and store it in the refrigerator. When ready to serve, simply bake as directed, adding a few extra minutes if needed.

What can I serve with Turkey Enchilada Bake?

This dish pairs beautifully with a simple side salad or a serving of Mexican rice. You can also offer additional toppings such as diced tomatoes, jalapeños, or olives for added flavor.

Can I use flour tortillas instead of corn tortillas?

Yes, you can substitute flour tortillas if you prefer. Keep in mind that they may absorb more sauce, so consider adding a bit extra if needed to keep the dish moist.

Nutrition

This Turkey Enchilada Bake is a nutritious choice, offering lean protein from the turkey and plenty of vitamins from the roasted vegetables. Each serving is approximately 350 calories, with 15g of fat, 30g of carbohydrates, and 25g of protein. It’s a well-balanced meal that fits into a variety of dietary plans.

Conclusion

Whether you’re looking for a comforting meal reminiscent of family gatherings or a new recipe to add to your weeknight rotation, this Turkey Enchilada Bake is sure to become a favorite. It captures the essence of traditional enchiladas while offering a lighter, modern twist. I hope you enjoy making and sharing this dish as much as I do, keeping the spirit of family and love alive in every bite.

Related update: Turkey Enchilada Bake

Related update: Easy Chicken Cordon Bleu

Chive and dill muffins | Made by Meaghan Moineau

Chive and Dill Muffins Recipe

Intro

There’s something magical about the aroma of freshly baked muffins wafting through the kitchen. It transports me back to my grandmother’s cozy kitchen, where every Sunday morning was dedicated to baking something delicious. One of my fondest memories is of sitting at the wooden table, swinging my feet as I eagerly awaited her latest creation. Today, I’m excited to share a recipe that brings back that cherished nostalgia: Chive and Dill Muffins. These savory muffins are a delightful twist on the classic, with a hint of spice and the fresh flavors of chives and dill. Perfect for breakfast, brunch, or a savory snack, these muffins are sure to become a family favorite.

Why You’ll Love It

These Chive and Dill Muffins are more than just your average muffin. Here’s why you’ll fall in love with them:

  • Flavor Packed: The combination of chives and dill brings a fresh and herby taste that pairs perfectly with the subtle sweetness of the muffin base.
  • Quick and Easy: With simple ingredients and straightforward instructions, you can have these muffins ready in no time.
  • Versatile: Whether you’re looking for a savory breakfast option or a flavorful side for your soup or salad, these muffins fit the bill.
  • Family-Friendly: Even the pickiest eaters will enjoy the mild spice and rich flavors packed into each muffin.

Ingredients

  • 1 cup all-purpose flour
  • 1 cup yellow cornmeal
  • 1 tablespoon sugar
  • 1 tablespoon baking powder
  • 1/2 teaspoon salt
  • 1/4 teaspoon baking soda
  • 1/4 teaspoon cayenne pepper
  • 2 tablespoons fresh chives, chopped
  • 2 tablespoons fresh dill, chopped
  • 1 cup plain yogurt
  • 2 large eggs
  • 6 tablespoons unsalted butter, melted

Instructions

  1. Preheat your oven to 220°C (425°F). Grease a standard muffin tin or line with silicone muffin cups.
  2. In a medium bowl, whisk together the all-purpose flour, yellow cornmeal, sugar, baking powder, salt, baking soda, and cayenne pepper.
  3. Stir in the chopped chives and dill, ensuring they are evenly distributed throughout the dry ingredients.
  4. In another medium bowl, whisk together the plain yogurt, eggs, and melted butter until well combined.
  5. Add the yogurt mixture to the dry ingredients and stir just until everything is blended. Be careful not to overmix, as this can make the muffins dense.
  6. Divide the batter evenly among the prepared muffin cups, using about 1/3 cup of batter for each.
  7. Bake in the preheated oven for 20 minutes, or until the muffins are puffed and golden brown. To check for doneness, insert a toothpick into the center of a muffin; if it comes out clean, they are ready.
  8. Allow the muffins to cool in the muffin tin for a few minutes before removing them. Serve warm and enjoy!

Tips

Here are a few tips to ensure your Chive and Dill Muffins turn out perfectly:

  • Use Fresh Herbs: Fresh chives and dill provide the best flavor. If you must use dried herbs, reduce the quantity by half.
  • Don’t Overmix: When combining wet and dry ingredients, stir just until moistened for light and fluffy muffins.
  • Check Oven Temperature: Ensure your oven is at the correct temperature before baking. An oven thermometer can help with accuracy.

Variations & Substitutions

This muffin recipe is versatile, and you can easily customize it to suit your taste:

  • Cheesy Addition: Add 1/2 cup of shredded cheddar cheese to the batter for a cheesy twist.
  • Spice It Up: Increase the cayenne pepper to 1/2 teaspoon for a spicier kick.
  • Whole Wheat Option: Replace half of the all-purpose flour with whole wheat flour for added fiber.
  • Dairy-Free: Substitute the yogurt with a plant-based yogurt and use a non-dairy butter alternative.

Storage

Store any leftover muffins in an airtight container at room temperature for up to two days. For longer storage, keep them in the refrigerator for up to a week. These muffins also freeze well; simply wrap them individually in plastic wrap and place them in a freezer-safe bag for up to three months. To reheat, thaw at room temperature and warm in the oven for a few minutes before serving.

FAQ

Can I use dried herbs instead of fresh?

Yes, you can use dried herbs, but the flavor won’t be as vibrant. If using dried herbs, reduce the quantity by half, as they are more concentrated than fresh herbs.

Are these muffins suitable for vegetarians?

Absolutely! These Chive and Dill Muffins are vegetarian-friendly, as they do not contain any meat products. Ensure your yogurt and butter are vegetarian if this is a concern for you.

Can I make these muffins gluten-free?

To make these muffins gluten-free, substitute the all-purpose flour with a 1-to-1 gluten-free baking flour. Ensure the cornmeal and other ingredients are certified gluten-free as well.

Nutrition

Each muffin is approximately 150 calories, with 7 grams of fat, 15 grams of carbohydrates, and 4 grams of protein. These values are estimates and can vary based on ingredient brands and modifications.

Conclusion

These Chive and Dill Muffins are a delightful addition to any meal. Their savory flavor, accented by the freshness of herbs, makes them a versatile and beloved choice. Whether you’re savoring them as a quick breakfast, a side dish, or a snack, they promise to bring a touch of the homemade warmth and nostalgia that only freshly baked goods can offer. So, gather your ingredients and enjoy baking these delicious muffins with your loved ones. Here’s to creating new memories and enjoying every bite!

Related update: Chive and dill muffins

Related update: Mashed Sweet Potatoes

Related update: Watching What I Eat: Peanut Butter Banana Oat Breakfast Cookies with Carob / Chocolate Chips

Easy and Delicious Taco Soup | Made by Meaghan Moineau

Easy and Delicious Taco Soup

Intro

Growing up, family gatherings were never complete without a large pot of my grandmother’s famous taco soup simmering on the stove. The aroma would fill the house, drawing everyone into the kitchen for a taste even before it was ready. This recipe, inspired by her classic version, is not only easy to make but also incredibly delicious. Whether you’re looking to please a crowd or just want a comforting bowl for yourself, this taco soup is the answer.

Why You’ll Love It

This taco soup is a perfect blend of savory, spicy, and hearty flavors that will warm you from the inside out. It’s a one-pot wonder, meaning less cleanup and more time to enjoy with your loved ones. Its simple ingredients make it accessible, yet it’s packed with flavor that feels like a labor of love. Plus, it’s adaptable for various dietary needs, making it a versatile dish for any occasion.

Ingredients

  • 1 lb cooked ground turkey
  • 1 onion, diced
  • 1 can pinto beans, drained and rinsed
  • 1 can kidney beans, drained and rinsed
  • 1 can regular corn, drained
  • 1 can tomato sauce
  • 1 can diced tomatoes
  • 1 can green chiles
  • 1 can olives, sliced
  • 1 packet gluten free taco seasoning
  • 1/4 teaspoon cayenne pepper (optional)
  • Fresh cilantro, for topping
  • Cheese, for topping
  • Tortilla chips, for serving
  • Sour cream, for serving

Instructions

  1. In a large pot, combine the cooked ground turkey, onion, pinto beans, kidney beans, corn, tomato sauce, diced tomatoes, green chiles, olives, taco seasoning, and cayenne pepper.
  2. Stir the ingredients together, and heat the mixture to a full boil.
  3. Once boiling, reduce the heat and let it simmer for 30 minutes, stirring occasionally.
  4. To serve, ladle the soup into bowls and top with fresh cilantro, cheese, tortilla chips, and a dollop of sour cream.

Tips

For the best flavor, allow the soup to simmer a bit longer if you have the time. This will let the spices meld beautifully. If you prefer a thicker soup, consider adding a bit more beans or reducing the amount of liquid by draining the diced tomatoes.

Variations & Substitutions

Feel free to experiment with this recipe. You can substitute ground turkey with ground beef or chicken if you prefer. If you like it spicier, add chopped jalapeños or a dash of hot sauce. For a vegetarian version, simply omit the meat and add more beans or tofu. You can also swap out the cheese and sour cream with dairy-free alternatives for a vegan option.

Storage

Leftover taco soup can be stored in an airtight container in the refrigerator for up to 3 days. It also freezes well for up to 3 months. To reheat, simply thaw overnight in the fridge if frozen, and warm on the stove over medium heat.

FAQ

Can I make this soup in a slow cooker?

Yes, you can prepare this taco soup in a slow cooker. Simply add all ingredients to the slow cooker, except for the toppings. Cook on low for 6-8 hours or high for 3-4 hours. Serve with your favorite toppings.

Is taco soup spicy?

This recipe has a mild spice level, which can be adjusted to your preference. If you prefer a milder soup, omit the cayenne pepper. For more heat, increase the amount of cayenne or add other spicy ingredients like jalapeños.

Nutrition

While the exact nutritional content can vary based on the specific brands and quantities used, taco soup generally offers a balanced mix of protein from the ground turkey, fiber from the beans, and essential vitamins and minerals from the vegetables. It’s a hearty and satisfying meal that can fit into a variety of dietary plans.

Conclusion

There you have it—an easy and delicious taco soup that brings warmth and joy to the table, just like my grandmother’s did. This recipe is not only a nod to tradition but also a versatile dish that you can make your own. Whether you’re serving it at a family gathering or savoring a quiet night in, it’s sure to become a favorite in your household. Enjoy!

Related update: Easy and Delicious Taco Soup

Related update: Moosewood Lentil Soup

Pizza bites with pumpkin | Made by Meaghan Moineau

Pizza Bites with Pumpkin: A Delicious Twist on a Classic Favorite

Intro

Growing up, pizza nights were a cherished tradition in our family. The excitement of choosing toppings and watching the dough rise in the oven created an atmosphere of warmth and joy. As the weather turns cooler and pumpkins begin to adorn doorsteps, I am reminded of those cozy evenings shared with loved ones. Today, I’m thrilled to bring you a unique twist on a classic favorite—Pizza Bites with Pumpkin. This recipe combines the rich, earthy flavors of pumpkin with the savory goodness of cheese, creating a delightful treat that transports me right back to those beloved family gatherings.

Why You’ll Love It

These pizza bites are a perfect blend of nostalgia and innovation. They’re bite-sized, making them ideal for parties, snacks, or even a fun family meal. The addition of pumpkin adds a subtle sweetness that pairs beautifully with the savory cheeses and herbs. You’ll love how quick and easy this recipe is, and your guests will adore the surprise ingredient that makes these bites stand out. They’re also a great way to sneak in some extra veggies, making them a hit with both kids and adults alike.

Ingredients

  • Pumpkin
  • Olive oil
  • Feta cheese
  • Mozzarella cheese
  • Eggs
  • Dried oregano
  • Parsley
  • Garlic

Instructions

  1. Using a food processor, chop the pumpkin until it resembles rice-like granules.
  2. In a hot pan, sauté the pumpkin with olive oil for about 3 minutes, then set aside to cool.
  3. In a mixing bowl, combine feta and mozzarella cheeses. Add the eggs one at a time, mixing to combine.
  4. Add the cooled pumpkin and spices to the cheese mixture. Mix well until everything is well blended.
  5. Evenly spoon the mixture into the greased muffin tin molds.
  6. Press pizza dough down evenly and firmly in each mold. This step is crucial to ensure the bites stick together.
  7. Place in the oven and bake for 30 minutes at 200°C (392°F).
  8. Remove the pizza bites from the oven and let them set in the pan for 5-10 minutes before removing to cool completely. This step is important to prevent them from breaking apart.

Tips

To make your pizza bites even more flavorful, try using fresh herbs instead of dried ones. Fresh parsley and oregano can elevate the taste significantly. You can also add a pinch of chili flakes if you fancy a bit of heat. Remember, pressing the dough down firmly is essential to help the bites maintain their shape. Be patient and let them cool properly before removing from the molds.

Variations & Substitutions

If you’re looking to mix things up, try substituting the pumpkin with sweet potato for a different flavor profile. For a dairy-free version, you can use a vegan cheese substitute. Additionally, feel free to experiment with other herbs and spices that you love. Basil or thyme can be great alternatives to oregano and parsley.

Storage

These pizza bites can be stored in an airtight container in the refrigerator for up to 3 days. They can also be frozen for up to a month. If freezing, place them in a single layer on a baking sheet first, then transfer to a freezer-safe container once frozen. To reheat, simply pop them in the oven until warmed through.

FAQ

Can I make these pizza bites ahead of time?

Absolutely! You can prepare the mixture a day in advance and store it in the refrigerator. When ready to bake, simply spoon the mixture into the muffin tin molds and follow the baking instructions.

What can I serve with pizza bites?

These pizza bites pair wonderfully with a fresh green salad or a bowl of tomato soup. They’re also delicious on their own as a snack or appetizer.

Can I use canned pumpkin?

While fresh pumpkin is recommended for the best texture and flavor, canned pumpkin can be used in a pinch. Just make sure it’s not the pumpkin pie filling, as that contains added sugars and spices.

Nutrition

While the exact nutritional content will vary based on specific ingredient brands and quantities used, a typical serving of these pumpkin pizza bites is packed with protein from the cheese and eggs, and essential vitamins from the pumpkin. They provide a balanced snack option with a moderate amount of carbohydrates and fats.

Conclusion

Pizza Bites with Pumpkin are a delightful twist on a classic dish, bringing warmth and comfort to any occasion. They capture the essence of fall with their unique flavor combination and are sure to become a favorite in your household. I hope this recipe brings you as much joy and nostalgia as it has brought me. Happy cooking!

Related update: Pizza bites with pumpkin

Related update: Chavrie Caramelized Red Onion Tarts

Mashed Potatoes with Garlic, Sage & Goat Cheese | Made by Meaghan Moineau

Mashed Potatoes with Garlic, Sage & Goat Cheese

Intro

There’s something about the aroma of garlic and sage that instantly transports me back to my grandmother’s kitchen. I remember the chilly autumn afternoons when I would watch her skillfully mash potatoes with her old hand masher, her movements rhythmic and comforting. She always had a knack for creating the most divine mashed potatoes, and her secret ingredient? A touch of creamy goat cheese that added a delightful tanginess. This recipe for Mashed Potatoes with Garlic, Sage & Goat Cheese is inspired by those cherished memories. It’s a dish that not only fills the belly but also warms the soul, making it perfect for family gatherings or a cozy night in.

Why You’ll Love It

This recipe is a modern twist on a classic comfort food. The creamy texture of the mashed potatoes is beautifully complemented by the rich, earthy flavors of garlic and sage. The addition of goat cheese introduces a subtle tanginess that elevates the dish to a gourmet level. Whether you’re serving these mashed potatoes as a side dish for a holiday feast or as a comforting weeknight dinner, they are sure to be a hit with everyone at the table.

Ingredients

  • 4 large baking potatoes, peeled and quartered
  • 2 cloves of garlic, minced
  • 1 pyramid (about 5.3 oz) Chavrie Goat Cheese
  • 2 tablespoons olive oil
  • 2 teaspoons fresh sage, finely chopped
  • Salt and black pepper to taste

Instructions

  1. In a medium saucepan, cook the potatoes in salted water until tender, about 15 minutes.
  2. Drain the potatoes and return them to the saucepan.
  3. While still warm, add the olive oil, garlic, and Chavrie Goat Cheese.
  4. Whip the potatoes with handheld mixers until the ingredients are blended and the desired consistency is obtained.
  5. Season with salt and black pepper to taste.
  6. Garnish with fresh sage before serving.

Tips

For the creamiest mashed potatoes, make sure to use high-starch potatoes like russets or Yukon Golds. Don’t overmix the potatoes, as this can make them gluey. If you’re mashing by hand, a potato masher or ricer works best. You can also add a splash of milk or cream for extra creaminess.

Variations & Substitutions

If you’re looking to switch things up, try using roasted garlic for a deeper flavor. Substitute the goat cheese with cream cheese or sour cream if you’re not a fan of goat cheese. For a dairy-free version, use a plant-based cheese alternative and coconut cream. You can also add a touch of nutmeg or a handful of chopped chives for additional flavor.

Storage

Leftover mashed potatoes can be stored in an airtight container in the refrigerator for up to 3 days. To reheat, simply microwave or warm them in a saucepan over low heat, adding a splash of milk or broth to bring back the creamy texture. These mashed potatoes can also be frozen for up to a month, making them a convenient make-ahead dish.

FAQ

Can I make these mashed potatoes ahead of time?

Yes, you can prepare these mashed potatoes up to two days in advance. Store them in the refrigerator and reheat gently on the stove or in the microwave before serving. Add a little milk or broth to revive the creamy texture.

How can I make this recipe vegan?

To make these mashed potatoes vegan, substitute the goat cheese with your favorite plant-based cheese and use a dairy-free milk alternative like almond or oat milk. Ensure that the olive oil is your primary fat source.

What can I serve with these mashed potatoes?

These mashed potatoes pair beautifully with a variety of main dishes. Try them alongside roasted chicken, grilled steak, or a hearty mushroom stew. They’re also a fantastic complement to holiday meals like Thanksgiving turkey or Christmas roast.

Nutrition

While nutritional values can vary based on specific ingredients and portion sizes, a serving of these mashed potatoes is roughly 250 calories. They are a good source of potassium and vitamin C from the potatoes, with additional healthy fats from the olive oil. The goat cheese adds a dose of protein and calcium, making this dish both delicious and nutritious.

Conclusion

Mashed Potatoes with Garlic, Sage & Goat Cheese is a dish that brings together the best of comfort and gourmet cooking. It’s a recipe that honors tradition while offering room for creativity and adaptation. Whether you’re cooking for a crowd or enjoying a solo dinner, these mashed potatoes are sure to become a staple in your culinary repertoire. I hope you find as much joy in making and eating them as I do, and that they bring a sense of warmth and nostalgia to your table, just as they do to mine.

Related update: Mashed Potatoes with Garlic, Sage & Goat Cheese

Tomato and Bacon Pizza With Rice Crust | Made by Meaghan Moineau

Tomato and Bacon Pizza With Rice Crust

Intro

There’s something undeniably comforting about the aroma of fresh pizza wafting through the kitchen. It takes me back to my childhood, when my grandmother would let me help her prepare her signature pizzas every Sunday. As I stood on tiptoes to reach the counter, she would gently guide my hands as I sprinkled cheese and laid out the toppings. Her secret ingredient was always love, and it’s a lesson I’ve carried with me into my own kitchen. Today, I’m excited to share a unique twist on a classic favorite: Tomato and Bacon Pizza with Rice Crust. This recipe combines savory flavors with a satisfying crunch, offering a delightful spin on the traditional pizza experience.

Why You’ll Love It

This Tomato and Bacon Pizza with Rice Crust brings together the flavors of crispy turkey bacon, juicy tomatoes, and melty mozzarella cheese on a distinctive rice crust. The rice crust is not only a fun alternative to traditional pizza dough, but it’s also naturally gluten-free, making it a great option for those with dietary restrictions. The addition of Italian seasoning adds an aromatic touch that complements the savory toppings perfectly. Whether you’re looking for a new family favorite or a crowd-pleaser for your next gathering, this pizza is sure to impress.

Ingredients

  • 1 bell pepper, sliced
  • 2 cups cooked rice
  • 1 large egg
  • 1 teaspoon Italian seasoning
  • 1 cup shredded mozzarella cheese
  • 2 medium tomatoes, sliced
  • 6 slices of turkey bacon, cooked and crumbled

Instructions

  1. Preheat your oven to 400°F (200°C).
  2. In a large bowl, combine the cooked rice, egg, and Italian seasoning. Mix well until the ingredients are fully incorporated.
  3. Grease a 10-inch pizza pan lightly with oil or non-stick spray. Press the rice mixture onto the pan evenly to form the crust.
  4. Spread the crumbled turkey bacon over the rice crust, followed by the sliced tomatoes and bell pepper.
  5. Sprinkle the shredded mozzarella cheese evenly over the toppings.
  6. Bake in the preheated oven for about 20 minutes, or until the cheese is melted and bubbly.
  7. Once baked, remove from the oven, allow to cool slightly, slice, and serve warm.

Tips

For the best results, make sure your rice is well-cooked and slightly sticky, which helps the crust hold together better. If you find the rice mixture too loose, you can add a tablespoon of flour or gluten-free flour blend to help bind it. Additionally, consider using a pizza stone if you have one, as it can help achieve a crispier crust.

Variations & Substitutions

If you’re looking to switch things up, there are plenty of variations you can try with this recipe. For a vegetarian option, skip the turkey bacon and add more vegetables like mushrooms or spinach. You can also substitute the mozzarella cheese for dairy-free cheese if you’re catering to a dairy-free diet. Experiment with different herbs and spices in the crust for a unique flavor twist, such as adding a pinch of garlic powder or dried basil.

Storage

Leftover pizza can be stored in an airtight container in the refrigerator for up to 3 days. To reheat, place slices in a preheated oven at 350°F (175°C) for about 10 minutes or until warmed through. For a quick option, you can also use the microwave, though the crust will be less crispy.

FAQ

Can I use brown rice instead of white rice for the crust?

Absolutely! Brown rice is a great alternative and will add a nuttier flavor and extra nutrients to your pizza crust. Just ensure it’s cooked thoroughly before mixing it into the crust.

How can I make this recipe vegetarian or vegan?

To make a vegetarian version, simply omit the turkey bacon and consider adding extra veggies. For a vegan option, use a flax egg (1 tablespoon ground flaxseed mixed with 2.5 tablespoons water) in place of the egg and substitute a plant-based cheese for the mozzarella.

Nutrition

This recipe is packed with flavor yet mindful of nutritional needs. While specific values can vary based on the exact ingredients used, a slice of this pizza offers a good balance of protein from the turkey bacon and egg, healthy fats from the cheese, and fiber from the rice and vegetables. It’s a delicious way to enjoy a meal that’s both satisfying and nourishing.

Conclusion

This Tomato and Bacon Pizza with Rice Crust is a wonderful fusion of flavors and textures that pays homage to the comforting tradition of homemade pizza while offering a fresh, modern twist. Whether you’re enjoying it with family on a cozy night in or sharing it with friends at a lively gathering, this pizza is sure to become a beloved staple in your recipe collection. Remember, the best ingredient in any dish is love—so sprinkle it generously as you create this delightful meal. Enjoy!

Related update: Tomato and Bacon Pizza With Rice Crust

Related update: Mango Fried Rice

All American Sloppy Joes | Made by Meaghan Moineau

All American Sloppy Joes

Intro

Growing up, there was nothing quite like the excitement of Sloppy Joe night in our household. The rich, tangy aroma of the slow-simmering sauce would fill the kitchen, drawing us in like a magnetic force. My mom would always serve them with a side of her famous homemade coleslaw and a cold glass of lemonade. It was a meal that brought the family together at the table, where laughter and stories were shared between messy bites. There’s something wonderfully nostalgic about Sloppy Joes; they remind us of simpler times, when the most pressing matter was how to keep the filling from spilling out of the bun.

Why You’ll Love It

If you’re in search of a meal that’s both heartwarming and ridiculously simple to prepare, look no further. These All American Sloppy Joes are the epitome of comfort food. With minimal ingredients and a quick preparation time, they’re perfect for busy weeknights or casual gatherings. The combination of savory and tangy flavors, with just a hint of spice, makes this dish appealing to both kids and adults alike. Plus, they’re an excellent way to feed a crowd without breaking the bank.

Ingredients

  • 2 tablespoons olive oil
  • 2 garlic cloves, minced
  • 2 shallots, finely chopped
  • 1 green bell pepper, diced
  • Salt and black pepper, to taste
  • 1 1/2 pounds ground beef
  • 1 cup tomato sauce
  • 1/2 cup American barbecue sauce
  • 2 tablespoons Worcestershire sauce
  • 1 teaspoon hot sauce (optional for extra heat)
  • 6 split burger buns

Instructions

  1. Heat the olive oil in a large skillet over medium heat.
  2. Add the minced garlic, shallots, and diced green bell pepper. Stir until fragrant and tender, about 3 minutes.
  3. Season the vegetables with salt and black pepper.
  4. Add the ground beef to the skillet. Stir and cook for about 5 minutes, until the meat is no longer pink and fully cooked.
  5. Add the tomato sauce, barbecue sauce, Worcestershire sauce, and hot sauce into the skillet. Stir to combine thoroughly.
  6. Reduce heat and simmer the mixture until it thickens, about 10 minutes.
  7. To serve, spoon the sloppy meat onto the toasted, buttered bun bottoms and cover with the bun tops. Enjoy with your favorite side dish or pickles.

Tips

For the best Sloppy Joes, use fresh, high-quality ground beef with a good balance of fat to keep the mixture juicy. Don’t rush the simmering process; giving the sauce time to thicken will enhance the flavors. Toasting the buns adds a delightful crunch that complements the softness of the filling.

Variations & Substitutions

If you prefer a healthier version, you can substitute ground turkey or chicken for the beef. For a vegetarian option, use lentils or a plant-based ground meat substitute. Add a dash of smoked paprika or cumin for an extra layer of flavor. You can also incorporate additional vegetables like mushrooms or carrots to bulk up the filling.

Storage

Leftover Sloppy Joe mixture can be stored in an airtight container in the refrigerator for up to 3 days. Reheat in a skillet over medium heat, adding a splash of water if the mixture becomes too thick. You can also freeze the mixture for up to 3 months; just thaw it overnight in the fridge before reheating.

FAQ

Can I make Sloppy Joes ahead of time?

Yes, Sloppy Joes are a great make-ahead meal. You can prepare the meat mixture a day in advance and store it in the refrigerator. Reheat it on the stove before serving for a quick and easy meal.

What are some good side dishes to serve with Sloppy Joes?

Sloppy Joes pair wonderfully with classic sides like coleslaw, potato salad, or corn on the cob. For something a little different, try serving them with sweet potato fries or a fresh green salad.

How can I make the Sloppy Joes spicier?

If you like a bit more heat, feel free to increase the hot sauce or add some chopped jalapeños to the mixture. A sprinkle of red pepper flakes can also kick up the spice level to your liking.

Nutrition

While the exact nutritional content will vary based on specific ingredients and portion sizes, on average, a serving of Sloppy Joes can provide approximately 400-500 calories, with a good balance of protein, carbohydrates, and fats. To make it a more balanced meal, consider adding a side of vegetables or a fresh salad.

Conclusion

All American Sloppy Joes are a timeless classic that brings warmth and joy to any meal. Whether you’re feeding a hungry family or hosting a casual get-together, this dish is sure to please. With its rich flavors and easy preparation, it’s a recipe that you’ll return to time and time again. Enjoy the taste of nostalgia and savor the moments shared over these deliciously messy sandwiches!

Related update: All American Sloppy Joes

Related update: How to make the World’s Greatest Lasagna Roll Ups

Blast Of Color Mexican Stuffed Bell Peppers | Made by Meaghan Moineau

Blast Of Color Mexican Stuffed Bell Peppers

Intro

Welcome to a vibrant culinary journey where every bite is a delightful explosion of flavors! Our Blast Of Color Mexican Stuffed Bell Peppers are not just a feast for the palate but also a joy for the eyes. These stuffed peppers are a wonderful medley of hearty ingredients and bold spices, reminiscent of family gatherings where food was the centerpiece of laughter and love.

I remember the first time I had stuffed bell peppers at my grandmother’s house. The kitchen was filled with the warm, inviting smell of roasted peppers mingling with spices, and the table was surrounded by family eagerly awaiting the meal. Today, I bring you a modern twist to that classic memory with a Mexican flair, perfect for any occasion.

Why You’ll Love It

This recipe is not only delicious but also packed with nutrients, making it a perfect meal for both busy weeknights and leisurely weekends. Here’s why you’ll fall in love with these stuffed peppers:

  • Colorful and Nutritious: Each bell pepper is a rainbow of ingredients, offering a punch of vitamins and minerals.
  • Flavorful and Satisfying: The combination of rotisserie chicken, black beans, and fire-roasted green chiles creates a satisfying and savory filling.
  • Easy to Prepare: With just a few simple steps, you can create a meal that looks gourmet but comes together quickly.
  • Customizable: Easily tweak the ingredients to suit your taste or dietary needs.

Ingredients

  • 4 large bell peppers
  • 1 cup black beans, drained and rinsed
  • 2 cups rotisserie chicken breast, shredded
  • 1/2 cup fire roasted green diced chiles
  • 1 tablespoon chili seasoning
  • 1 cup cooked brown rice
  • 1 cup frozen corn kernels, thawed
  • 3 cloves garlic, minced
  • 1 cup low-fat shredded cheddar cheese, divided
  • 1/2 cup red onion, diced
  • 1 roma tomato, diced
  • 2 tablespoons sour light cream

Instructions

  1. Preheat your oven to 400 degrees Fahrenheit.
  2. In a large bowl, combine the cooked brown rice, shredded chicken, thawed corn, diced roma tomato, diced red onion, black beans, 1/2 cup of cheddar cheese, minced garlic, fire roasted green chiles, and chili seasoning.
  3. Line a baking dish with foil and spray it lightly with cooking spray to prevent sticking.
  4. Prepare the bell peppers by cutting off the tops and removing the seeds and membranes inside.
  5. Stuff each bell pepper with the chicken mixture, pressing it firmly into the pepper and mounding it slightly over the top.
  6. Top each stuffed pepper with 1/2 tablespoon of the remaining cheddar cheese.
  7. Place the stuffed peppers in the prepared baking dish and bake in the preheated oven for 30 to 40 minutes, or until the peppers are just tender.
  8. Once out of the oven, top each pepper with 1/2 tablespoon of sour cream before serving.

Tips

  • For uniform cooking, try to select bell peppers that are similar in size and shape.
  • If you prefer softer peppers, you can pre-cook them in the microwave for a couple of minutes before stuffing.
  • To add a bit more spice, consider adding a dash of cayenne pepper to the filling mixture.

Variations & Substitutions

One of the best things about this recipe is its versatility. Here are some variations and substitutions you might consider:

  • Vegetarian Option: Omit the chicken and increase the amount of black beans or add cooked quinoa for a plant-based version.
  • Cheese Choices: Swap the cheddar cheese for pepper jack or Monterey Jack for a different flavor profile.
  • Low Carb: Substitute cauliflower rice for the brown rice to reduce the carbohydrate content.

Storage

These stuffed peppers can be stored in an airtight container in the refrigerator for up to 3 days. To reheat, place them in a preheated oven at 350 degrees for about 10-15 minutes or until warmed through. Alternatively, you can use a microwave for a quicker option.

FAQ

Can I freeze stuffed bell peppers?

Yes, you can freeze these peppers! Once baked, allow them to cool completely, then wrap each pepper individually in plastic wrap and place them in a freezer-safe bag. They can be frozen for up to 3 months. To reheat, thaw them overnight in the refrigerator and bake as directed in the storage section.

What can I serve with stuffed bell peppers?

These stuffed peppers are a meal on their own, but you can serve them with a side salad, guacamole, or tortilla chips for added texture and flavor. A refreshing glass of iced tea or a citrusy margarita would also complement the meal nicely.

Nutrition

Each serving of these colorful stuffed peppers is not only packed with flavor but also with nutrition. Here’s a quick overview:

  • Calories: Approximately 280 per stuffed pepper
  • Protein: 25g
  • Carbohydrates: 35g
  • Fat: 7g
  • Fiber: 8g

Conclusion

Our Blast Of Color Mexican Stuffed Bell Peppers are more than just a meal; they are a celebration of flavors and memories. Whether you’re looking to impress at a dinner party or simply want a comforting meal for your family, these peppers are sure to be a hit. We hope this recipe brings as much joy to your table as it has to ours. Happy cooking!

Related update: Blast Of Color Mexican Stuffed Bell Peppers

Related update: Perfect fish cakes

Turkey Pot Pie With Cornbread Crust | Made by Meaghan Moineau

Turkey Pot Pie With Cornbread Crust

Intro

There’s something about the aroma of a homemade pot pie wafting through the house that instantly transports me back to my childhood. I remember those chilly autumn evenings when my grandmother would pull a bubbling pot pie out of the oven, the golden crust perfectly crisp. We’d gather around the table, the warmth of the meal and the love in the room keeping the cold at bay. This Turkey Pot Pie with Cornbread Crust is my twist on that nostalgic dish, combining tender turkey and hearty vegetables with a sweet and savory cornbread topping. It’s a comforting classic with a delightful twist that I’m excited to share with you.

Why You’ll Love It

This Turkey Pot Pie with Cornbread Crust is not just any pot pie. Here are a few reasons why you’ll absolutely love it:

  • Comfort Food at Its Best: The combination of flavors from the savory turkey filling and the sweet cornbread crust is the ultimate comfort food experience.
  • Perfect for Leftovers: This recipe is a wonderful way to use up leftover turkey, especially after the holidays.
  • Family-Friendly: It’s a dish that both kids and adults will enjoy, making it perfect for family dinners.
  • Simple Ingredients: Made with pantry staples, you won’t have to make a special trip to the store.

Ingredients

  • 2 tablespoons olive oil
  • 1 onion, chopped
  • 2 carrots, diced
  • 2 stalks celery, sliced
  • 1 cup trimmed green beans, cut into 1-inch pieces
  • 2 cloves garlic, minced
  • 2 tablespoons flour
  • 2 cups chicken stock
  • 2 cups cooked turkey, shredded or diced
  • 1 teaspoon ground sage
  • 1 teaspoon ground thyme
  • Salt and cracked pepper to taste
  • 1 cup yellow white cornmeal
  • 1 cup flour
  • 1 tablespoon baking powder
  • 1 tablespoon sugar
  • 1/2 teaspoon salt
  • 1 cup milk
  • 1 large egg
  • 1/4 cup canola oil

Instructions

  1. Preheat the Oven: Preheat your oven to 400°F (200°C). Generously coat a pie plate or baking dish with nonstick cooking spray.
  2. Prepare the Filling: Heat olive oil in a large pan over medium heat. Add the onion, carrots, celery, and green beans, and sauté for about 10 minutes until the vegetables are tender.
  3. Add minced garlic to the pan and stir constantly for 30 seconds until fragrant.
  4. Sprinkle flour over the vegetables and stir until it coats them evenly, about 30 seconds.
  5. Slowly stir in the chicken stock, letting it thicken slightly with the flour.
  6. Add cooked turkey, sage, thyme, salt, and pepper to the mixture. Stir well to combine and let it cook for another 5 minutes. Pour the filling into the prepared baking dish.
  7. Make the Cornbread Crust: In a large bowl, whisk together the cornmeal, flour, baking powder, sugar, and salt.
  8. In a separate bowl, mix the milk, egg, and canola oil until well combined.
  9. Stir the wet ingredients into the dry ingredients until just combined. Do not overmix.
  10. Spoon the cornbread batter evenly over the turkey filling in the baking dish.
  11. Bake in the preheated oven until the cornbread is golden brown, about 22 to 25 minutes.
  12. Let the pot pie cool for at least 15 minutes before serving to allow the flavors to meld together.

Tips

  • Ensure the vegetables are tender before adding the flour to avoid a raw flour taste in your filling.
  • If the filling seems too thick, add a splash more chicken stock to loosen it up.
  • For a richer flavor, substitute half of the milk in the cornbread crust with buttermilk.

Variations & Substitutions

  • Protein Variations: Swap out turkey for chicken, beef, or even a vegetarian protein like chickpeas or tofu.
  • Vegetable Additions: Feel free to add other vegetables like mushrooms, peas, or corn for extra flavor and nutrition.
  • Gluten-Free Option: Use a gluten-free flour blend for both the filling and cornbread crust.

Storage

Store any leftovers in an airtight container in the refrigerator for up to three days. To reheat, place in a preheated oven at 350°F (175°C) until warmed through. You can also freeze the pot pie before baking. Thaw in the refrigerator overnight and bake as directed.

FAQ

Can I make this pot pie ahead of time?

Yes, you can prepare the filling and cornbread batter separately, then assemble and bake when you’re ready to serve. This makes it a great option for a make-ahead meal.

What can I serve with turkey pot pie?

This pot pie is quite filling on its own, but you can complement it with a simple green salad or roasted vegetables for a complete meal.

Can I use canned vegetables instead of fresh?

While fresh vegetables are recommended for the best flavor and texture, you can use canned vegetables in a pinch. Just be sure to drain them well and reduce the cooking time during the sautéing step.

Nutrition

This Turkey Pot Pie with Cornbread Crust provides a balanced meal with protein, carbohydrates, and plenty of vegetables. Each serving is approximately 350 calories, making it a satisfying yet moderate meal choice.

Conclusion

This Turkey Pot Pie with Cornbread Crust is more than just a meal; it’s a slice of nostalgia wrapped in warmth and comfort. Whether you’re recreating cherished memories or starting new traditions, this dish is sure to become a family favorite. Enjoy the medley of flavors and the heartwarming satisfaction it brings to your table. Happy cooking!

Related update: Turkey Pot Pie With Cornbread Crust

Related update: Blast Of Color Mexican Stuffed Bell Peppers

Mummy Meatballs with Spaghetti | Made by Meaghan Moineau

Mummy Meatballs with Spaghetti

Intro

When my kids were young, Halloween was always a cherished time filled with giggles, costumes, and whimsical meals. One of the highlights of the season was our tradition of making Mummy Meatballs with Spaghetti. I still remember their wide eyes and delighted laughter as they helped wrap the meatballs in “bandages” of rice noodles, eagerly anticipating the spooky feast to come. Now, I’m thrilled to share this beloved family recipe with you. It’s a dish that combines hearty meatballs with playful presentation, making it perfect for a Halloween dinner or any time you want to add a bit of fun to your meal.

Why You’ll Love It

This recipe is more than just a clever presentation; it’s a delicious and hearty meal that brings smiles to both kids and adults alike. The meatballs are juicy and flavorful, with a perfect blend of Italian seasoning and parmesan cheese, while the spaghetti provides a comforting base. The “mummy” wrapping adds an element of surprise and whimsy, making it a great hit at Halloween parties. Plus, it’s a wonderful way to involve the whole family in the kitchen. The process of assembling the mummies encourages creativity and fun, turning meal prep into a delightful activity.

Ingredients

  • 1 pound lean ground beef
  • 1/4 cup bread crumbs
  • 1 egg
  • 1 teaspoon garlic paste
  • 1 teaspoon Italian seasoning
  • 1/4 cup grated parmesan cheese
  • Salt, to taste
  • Black pepper, to taste
  • 8 green pimiento stuffed olives
  • 8 ounces cooked spaghetti noodles
  • 2 cups spaghetti sauce
  • 4 ounces cooked extra wide egg noodles

Instructions

  1. In a large bowl, combine the lean ground beef, bread crumbs, egg, garlic paste, Italian seasoning, parmesan cheese, salt, and black pepper. Mix until well combined.
  2. Preheat your oven to 350°F (175°C) and grease an 8-hole muffin tin.
  3. Using an ice cream scoop, divide the meatball mixture into the muffin tin, ensuring each portion is evenly distributed.
  4. Bake the meatballs for 35 minutes or until they reach an internal temperature of 160°F (71°C) using an instant-read thermometer.
  5. Once cooked, drain the meatballs on a cookie rack.
  6. While the meatballs are baking, heat the spaghetti sauce in a saucepan over medium heat.
  7. Cook the spaghetti and rice noodles separately according to package directions.
  8. Drain the spaghetti and keep it warm, then cool the rice noodles in cold water and drain.
  9. Slice the meatballs in half horizontally to create two pieces, each with a flat surface.
  10. Pat the rice noodles dry with paper towels, then layer them over the top of each meatball half to resemble mummy bandages. Tuck sliced olives in for eyes.
  11. Let the meatballs sit for about 15 minutes so they become more tacky and hold together better.
  12. Reheat the meatballs by microwaving them on a microwave-safe plate for a minute.
  13. Carefully place each mummy meatball onto a nest of sauced spaghetti and serve immediately.

Tips

For best results, make sure to pat the rice noodles dry thoroughly to ensure they stick to the meatballs effectively. You can use a paper towel to gently press and remove excess moisture. If you’re working with young children, let them help by arranging the rice noodles and olives – it’s a fun way to get them involved. Lastly, if you want a richer flavor, consider simmering your spaghetti sauce with a splash of red wine or additional herbs before serving.

Variations & Substitutions

Feel free to experiment with this recipe based on your dietary preferences or ingredient availability. You can substitute ground turkey or chicken for the beef if you prefer a lighter option. For a gluten-free version, use gluten-free bread crumbs and spaghetti noodles. Vegetarians can substitute the meatballs with plant-based alternatives and use vegan cheese. You can also spice up the meatballs by adding a pinch of red pepper flakes for a bit of heat.

Storage

Leftover mummy meatballs can be stored in an airtight container in the refrigerator for up to three days. To reheat, simply microwave them until warmed through or place them in a preheated oven at 350°F (175°C) for about 10 minutes. If you have extra spaghetti and sauce, store them separately to maintain the best texture.

FAQ

Can I make the meatballs ahead of time?

Yes, you can prepare the meatballs in advance. Simply follow the recipe to bake them, then allow them to cool and store them in the refrigerator. When ready to serve, reheat them in the oven or microwave, then assemble the mummies with rice noodles and olives.

What can I serve with Mummy Meatballs?

These meatballs pair wonderfully with a simple side salad or garlic bread. If you’re hosting a Halloween party, consider serving them alongside other themed dishes like “witch’s brew” soup or “ghostly” mashed potatoes for a complete festive meal.

Can I freeze the meatballs?

Absolutely! You can freeze the baked meatballs before assembling them into mummies. Simply place them in a freezer-safe container and store them for up to two months. Thaw in the refrigerator overnight before reheating and assembling.

Nutrition

This recipe offers a balanced meal with protein from the meatballs and carbohydrates from the pasta. The inclusion of parmesan cheese adds calcium, while the olives contribute healthy fats. To enhance the nutritional profile, consider serving with a side of steamed vegetables or a fresh salad.

Conclusion

Mummy Meatballs with Spaghetti is a delightful dish that brings joy and nostalgia to the table. Whether you’re crafting a fun Halloween meal or simply indulging in a playful dinner, this recipe is sure to be a hit. With its flavorful meatballs, creative presentation, and versatility, it’s a meal that’s as enjoyable to make as it is to eat. I hope this recipe becomes as cherished in your home as it has been in ours. Enjoy the smiles and laughter it brings, and happy cooking!

Related update: Mummy Meatballs with Spaghetti

Related update: Turkey Pot Pie With Cornbread Crust

Slow Cooker Red Beans and Rice | Made by Meaghan Moineau

Slow Cooker Red Beans and Rice

Intro

There’s something incredibly comforting about a pot of slow-cooked red beans and rice simmering away, filling your home with tantalizing aromas. This dish takes me back to my childhood, spent in the vibrant kitchens of my grandmother’s house in the South. She would often prepare this hearty meal on Sundays, letting it cook slowly as we went about our day. By evening, we’d gather around her large wooden table, eager to dig into the savory goodness before us. The recipe I’m sharing today is inspired by those cherished memories, but with a convenient twist for the modern cook—a slow cooker!

Why You’ll Love It

This Slow Cooker Red Beans and Rice recipe is not just delicious, it’s also incredibly easy to make. Here are a few reasons why you’ll fall head over heels for this dish:

  • Effortless Preparation: Simply add all ingredients to your slow cooker and let it do its magic.
  • Rich, Savory Flavors: The combination of spices, sausage, and red beans creates a depth of flavor that is both comforting and satisfying.
  • Perfect for Busy Days: With minimal prep and the ability to cook all day, it’s an ideal choice for busy weeknights or lazy weekends.
  • Budget-Friendly: Utilizing pantry staples and affordable ingredients, this dish is kind to your wallet.
  • Family Favorite: The comforting flavors are a hit with kids and adults alike.

Ingredients

  • Ancho chili powder
  • Bay leaves
  • Butter
  • Canned red beans
  • Diced canned tomatoes
  • Cayenne pepper
  • Red onion
  • Rice
  • Sausage
  • Water
  • White pepper

Instructions

  1. Place all of your ingredients into the slow cooker and stir to mix everything well.
  2. Allow to cook all day on low for 6 hours (if with rice), or longer if needed without rice.
  3. Serve with cornbread and enjoy! (I like to take a whole piece and mix it up really well, YUM!)

Tips

  • Soak Your Beans: If you’re using dried beans instead of canned, be sure to soak them overnight before adding them to the slow cooker to ensure they cook fully.
  • Spice Levels: Adjust the cayenne pepper to suit your heat preference. Start with a pinch and add more if you like it spicy.
  • Use Good Quality Sausage: This will greatly enhance the flavor of the dish. Consider using smoked sausage for an extra depth of flavor.

Variations & Substitutions

This recipe is wonderfully adaptable. Here are some variations and substitutions you can try:

  • Vegetarian Option: Skip the sausage and add more vegetables like bell peppers and zucchini.
  • Different Beans: While red beans are traditional, you can use black beans or kidney beans for a different twist.
  • Spice Mix: Experiment with adding smoked paprika or cumin for a smoky flavor profile.
  • Grains Variety: Substitute rice with quinoa or farro for a different texture and added nutrients.

Storage

This dish makes great leftovers! Here’s how you can store it:

  • Refrigerate: Store in an airtight container in the fridge for up to 4 days.
  • Freeze: Portion into freezer-safe bags or containers and freeze for up to 3 months. Thaw in the refrigerator overnight before reheating.
  • Reheat: Warm on the stovetop over medium heat, stirring occasionally, until heated through. You can also reheat in the microwave in 1-minute intervals, stirring in between.

FAQ

Can I make this dish on the stovetop instead of a slow cooker?

Yes, absolutely! To prepare on the stovetop, sauté the onion and sausage in butter until the onion is translucent. Add the remaining ingredients and simmer on low heat for about 1-2 hours, stirring occasionally, until the beans are tender.

What kind of sausage works best for this recipe?

Smoked sausage is a great choice for this recipe as it adds a wonderful smoky flavor. Andouille sausage is traditional and particularly delicious, but you can use any spicy or mild sausage you prefer.

Can I add more vegetables to this recipe?

Definitely! This recipe is very flexible, and adding more vegetables like bell peppers, celery, or carrots can enhance the flavor and nutrition.

Nutrition

While I don’t have the exact nutritional breakdown for this dish, it’s worth noting that red beans are a great source of protein and fiber, and using whole grain rice can boost the fiber content even more. Just be mindful of the sodium content if you’re using canned beans and tomatoes. Balancing with fresh ingredients where possible is always a good idea!

Conclusion

Slow Cooker Red Beans and Rice is a warm, comforting, and flavorful dish that’s perfect for any day of the week. Whether you’re reminiscing about Southern roots or simply looking for an easy and delicious meal, this recipe is sure to satisfy. With its rich flavors and simple preparation, it’s a dish that brings people together, just like it did in my grandmother’s kitchen. Give it a try, and let me know how it brings warmth and happiness to your table!

Related update: Slow Cooker Red Beans and Rice

Related update: Mummy Meatballs with Spaghetti

Fish Pie With Fresh and Smoked Salmon | Made by Meaghan Moineau

Fish Pie With Fresh and Smoked Salmon

Intro

There is something inherently comforting about a fish pie, especially when it’s cold outside and the days grow shorter. This Fish Pie with Fresh and Smoked Salmon takes me back to cozy evenings at my grandmother’s kitchen, where the scent of baking fish pie filled the air, promising warmth and nourishment. The combination of fresh and smoked salmon brings a delightful depth of flavor, reminiscent of those cherished family gatherings. Whether you’re an experienced cook or a kitchen novice, this recipe will guide you in creating a dish that warms both the heart and the stomach.

Why You’ll Love It

This fish pie is a celebration of flavors and textures, perfect for sharing with family and friends. The blend of fresh and smoked salmon creates a rich, smoky profile, while the creamy mashed potatoes provide a comforting topping. The addition of savoy cabbage and a touch of horseradish adds a unique twist that makes this pie stand out. Not only is it delicious, but it’s also a nutritious meal option that’s packed with healthy omega-3s and vitamins from the salmon and vegetables.

Ingredients

  • 3 large potatoes, peeled and cut into chunks
  • 2 tablespoons butter
  • 2 tablespoons prepared horseradish
  • 1/4 cup milk, plus more if needed
  • 1 pound fresh salmon
  • 1/2 lemon, juiced
  • 1 bay leaf
  • 5 black peppercorns
  • 1/4 pound dry smoked salmon, roughly chopped
  • 1 onion, chopped
  • 1 tablespoon olive oil
  • 1/2 small savoy cabbage, chopped
  • 1/2 cup white wine
  • 1/2 cup chicken stock
  • 1 teaspoon dried chives
  • 1 teaspoon dried tarragon
  • 1 tablespoon cornstarch, dissolved in water
  • 1/2 cup plain Greek yogurt

Instructions

  1. Preheat your oven to 400°F (200°C).
  2. In a large pot, boil the peeled and chopped potatoes in salted water until tender, about 15 minutes. Drain and return to the pot.
  3. Add butter, horseradish, and 2 tablespoons of milk to the potatoes. Mash until smooth, adding more milk if needed for a creamy consistency. Set aside.
  4. In a medium skillet, place the fresh salmon and add enough water to almost cover it. Add lemon juice, bay leaf, and peppercorns. Cover and poach over medium heat for 12-15 minutes, until the salmon is opaque and flakes easily. Remove the salmon and cut it into large chunks.
  5. Heat olive oil in a pan over medium heat. Sauté the onion until tender, then add the chopped cabbage. Sauté for 2-3 minutes, stirring occasionally.
  6. Add white wine, chicken stock, chives, and tarragon to the cabbage mixture. Cover and simmer for 10 minutes.
  7. Stir in the cornstarch mixture until the sauce thickens. Remove from heat and add Greek yogurt, stirring well to combine.
  8. Gently fold both the fresh and smoked salmon into the cabbage mixture. Spoon the mixture into a baking dish.
  9. Top with the mashed potato mixture, spreading it evenly over the surface.
  10. Bake in the preheated oven for 15 minutes or until the top starts to brown.

Tips

For a perfectly mashed potato topping, make sure the potatoes are well-drained before mashing. If you prefer a crispier top, consider brushing the mashed potatoes with a bit of melted butter before baking. To save time, you can prepare the salmon and cabbage mixture ahead of time and refrigerate until ready to assemble the pie.

Variations & Substitutions

If you don’t have fresh salmon, feel free to use thawed frozen salmon fillets. You can also experiment with different herbs like dill or parsley for a fresh twist. For a dairy-free version, substitute the Greek yogurt with a plant-based yogurt alternative and use olive oil instead of butter in the mashed potatoes.

Storage

Leftover fish pie can be stored in an airtight container in the refrigerator for up to 3 days. To reheat, cover with foil and bake in a preheated oven at 350°F (175°C) until heated through. You can also freeze the pie before baking for up to 2 months. When ready to eat, thaw overnight in the fridge and bake as directed.

FAQ

Can I use other types of fish in this pie?

Yes, you can substitute the salmon with other firm white fish like cod or haddock. Just ensure the fish you choose is suitable for poaching and flaking.

What can I serve with fish pie?

Fish pie is a complete meal on its own, but it pairs wonderfully with a simple green salad or steamed vegetables for added freshness and crunch.

Is it necessary to use smoked salmon?

While smoked salmon adds a unique depth of flavor, you can omit it if you prefer. Simply increase the quantity of fresh salmon or add another type of fish for variety.

Nutrition

This fish pie is a nutritious option, rich in omega-3 fatty acids from the salmon, which are beneficial for heart health. The addition of cabbage provides fiber and vitamins, making this dish a well-rounded choice for a balanced meal.

Conclusion

This Fish Pie with Fresh and Smoked Salmon is more than just a meal; it’s a comforting embrace on a plate. The harmonious blend of flavors and the nostalgia it brings make it a delightful addition to any dining table. Whether you’re reliving cherished memories or creating new ones, this dish is sure to become a family favorite. Enjoy every bite of this heartwarming classic!

Related update: Fish Pie With Fresh and Smoked Salmon

Related update: Italian Beef Braciole

Blackberry Balsamic Drumsticks | Made by Meaghan Moineau

Blackberry Balsamic Drumsticks

Intro

There’s something magical about the combination of sweet and savory that brings back memories of family gatherings and warm summer nights. Growing up, Sundays were reserved for family dinners at my grandmother’s house. She was a culinary wizard who could transform any simple ingredient into a feast fit for royalty. Her secret? A garden brimming with fresh produce and an innate sense for pairing unusual flavors. One summer evening, she introduced us to a dish that would become a family favorite: Blackberry Balsamic Drumsticks. These succulent pieces of chicken, infused with the essence of ripe blackberries and aromatic balsamic vinegar, were a revelation. It’s a dish that not only tantalizes your taste buds but also carries the warmth of those cherished family moments. Today, I’m excited to share this special recipe with you, hoping it brings as much joy to your table as it has to mine.

Why You’ll Love It

Blackberry Balsamic Drumsticks are a delightful blend of sweet, tangy, and savory flavors that will have your taste buds dancing with joy. The unique combination of fresh blackberries and balsamic vinegar creates a mouthwatering glaze that elevates ordinary chicken drumsticks to a gourmet level. Not only is this dish incredibly tasty, but it’s also easy to prepare, making it perfect for both weeknight dinners and special occasions. The marinade, enriched with rosemary and mustard, infuses the chicken with a depth of flavor that is both comforting and sophisticated. Plus, who doesn’t love a dish that can be prepped in advance and left to marinate while you enjoy your day?

Ingredients

  • 8 skin-on chicken drumsticks
  • 1 cup fresh blackberries
  • 1/4 cup balsamic vinegar
  • 1/4 cup demerara sugar
  • 1 tablespoon fresh rosemary, chopped
  • 2 tablespoons butter
  • 2 tablespoons whole grain mustard
  • Salt and pepper to taste

Instructions

  1. Place blackberries, butter, 1/4 cup water, rosemary, sugar, and vinegar in a small saucepan.
  2. Cook over medium-high heat, stirring occasionally, until the mixture is slightly reduced, about 10-15 minutes.
  3. Remove from heat and stir in mustard, salt, and pepper. Allow the marinade to cool.
  4. Place the drumsticks in a large ziplock bag. Pour the cooled marinade over the top and seal the bag.
  5. Toss to coat the drumsticks evenly with the marinade.
  6. Refrigerate and marinate for 24 hours, allowing the flavors to infuse.
  7. When ready to cook, preheat the oven to 375°F (190°C).
  8. Arrange drumsticks on a cookie sheet lined with tin foil.
  9. Bake for 25 minutes, turning once halfway through the cooking time.
  10. Serve hot with your preferred side dish.

Tips

For the best results, use fresh blackberries when in season. They impart a natural sweetness and vibrant color to the dish. If fresh rosemary isn’t available, dried rosemary can be used, but use only half the amount as dried herbs are more potent. When cooking the marinade, keep an eye on it to prevent it from reducing too much, as it should remain syrupy and flavorful.

Variations & Substitutions

If you’re looking to switch things up, consider these variations:
Spicy Kick: Add a pinch of red pepper flakes to the marinade for a spicy twist.
Herbal Infusion: Substitute thyme or sage for rosemary for a different herbal note.
Sweetness Swap: Honey or maple syrup can be used in place of demerara sugar for a different sweetness profile.
Chicken Cuts: If drumsticks aren’t your preference, this marinade works wonderfully with chicken thighs or wings as well.

Storage

Leftover drumsticks can be stored in an airtight container in the refrigerator for up to 3 days. To reheat, place them in an ovenproof dish and warm at 350°F (175°C) until heated through. For a quick option, you can also microwave them on medium power. The flavors deepen over time, making leftovers equally enjoyable.

FAQ

Can I use frozen blackberries?

Yes, frozen blackberries can be used if fresh ones are unavailable. Ensure they are fully thawed and drained before adding to the marinade to avoid excess liquid.

Is it necessary to marinate the drumsticks for 24 hours?

While marinating for 24 hours yields the best flavor, if you’re short on time, even a few hours will still impart a delicious taste. Aim for at least 4 hours if possible.

Can I grill the drumsticks instead of baking them?

Absolutely! Grilling adds a smoky flavor that complements the sweet and tangy glaze. Grill the drumsticks over medium heat, turning frequently, until cooked through.

Nutrition

While exact nutritional values can vary based on portion size and specific brands of ingredients used, each serving of Blackberry Balsamic Drumsticks is approximately 250 calories. This includes a good amount of protein and some natural sugars from the blackberries and demerara sugar.

Conclusion

Blackberry Balsamic Drumsticks are more than just a meal; they’re a culinary experience that combines the richness of tradition with the excitement of bold flavors. Whether you’re gathering with family or hosting friends, this dish is sure to impress and become a staple in your recipe repertoire. Give it a try, and let the flavors transport you to a place of comfort, warmth, and delightful nostalgia. Happy cooking!

Related update: Blackberry Balsamic Drumsticks

Related update: chettinad egg curry