Easy Thanksgiving Entertaining | Made by Meaghan Moineau

Easy Thanksgiving Entertaining

Intro

Thanksgiving has always been a time for family, friends, and unforgettable meals. As a child, I remember the warmth of the kitchen, the smell of spices, and the sound of laughter that filled our home. My grandmother would always have a special treat ready for us kids—a homemade pumpkin spice ice cream that was both comforting and delicious. Now that I host Thanksgiving, I’ve adapted her recipe to make it even easier, so I can spend more time with my loved ones and less time in the kitchen. This Easy Thanksgiving Entertaining recipe brings together the flavors of the season with minimal fuss, making it the perfect addition to your holiday table.

Why You’ll Love It

This ice cream recipe is a delightful twist on traditional Thanksgiving desserts. Here are a few reasons why you’ll fall in love with it:

  • Simple Ingredients: With just a handful of ingredients, you can create a dessert that’s both luxurious and comforting.
  • Quick Preparation: Spend less time cooking and more time enjoying with family and friends.
  • Seasonal Flavors: The combination of pumpkin spice and creamy goodness captures the essence of fall.
  • Kid-Friendly: This treat is a hit with kids and adults alike, making it perfect for gatherings.

Ingredients

  • 2 cups heavy cream
  • 1 cup whole milk
  • 1/2 cup sugar
  • 1 teaspoon vanilla extract
  • Pinch of salt
  • 1 cup crushed pumpkin spice cookies

Instructions

  1. In a large mixing bowl, whisk together the heavy cream, whole milk, sugar, vanilla extract, and salt until the sugar has completely dissolved.
  2. Gently fold in the crushed pumpkin spice cookies, ensuring they are evenly distributed throughout the mixture.
  3. Pour the mixture into an ice cream machine and freeze according to the manufacturer’s instructions.
  4. Once the ice cream reaches a soft-serve consistency, transfer it to an airtight container and freeze until firm, about 2-4 hours.
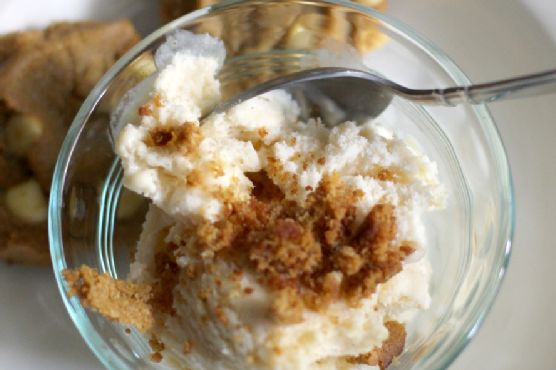
  5. When ready to serve, scoop into bowls and garnish with an additional pumpkin spice cookie for an extra touch of festivity and crunch.

Tips

For the best results, make sure your ice cream mixture is well chilled before adding it to the ice cream machine. This will help it freeze faster and achieve a creamier texture. If you don’t have an ice cream machine, you can pour the mixture into a shallow dish, freeze it, and stir every 30 minutes until it reaches the desired consistency.

Variations & Substitutions

If you’re looking to switch things up, consider these delicious variations:

  • Spiced Apple Cider: Replace the pumpkin spice cookies with crushed gingersnap cookies and add a teaspoon of cinnamon.
  • Chocolate Pumpkin: Stir in 1/2 cup of mini chocolate chips for a chocolatey twist.
  • Dairy-Free Option: Substitute coconut milk for heavy cream and almond milk for whole milk to make it dairy-free.

Storage

Store any leftover ice cream in an airtight container in the freezer for up to two weeks. To prevent ice crystals from forming, press a piece of plastic wrap directly onto the surface of the ice cream before sealing the container.

FAQ

Can I make this ice cream without an ice cream machine?

Yes, you can! Simply pour the mixture into a shallow dish and freeze, stirring every 30 minutes to break up ice crystals until it reaches the desired consistency.

How can I make this recipe more festive?

Consider adding a tablespoon of your favorite liqueur, such as bourbon or rum, for an adult version. You can also top the ice cream with caramel sauce or whipped cream for an extra indulgent treat.

Is there a way to make this ice cream less sweet?

Feel free to reduce the sugar to 1/4 cup if you prefer a less sweet dessert. The cookies will still provide plenty of flavor and sweetness.

Nutrition

While this ice cream is a treat, it can be enjoyed in moderation as part of a balanced diet. A single serving (1/2 cup) contains approximately:

  • Calories: 250
  • Fat: 18g
  • Carbohydrates: 22g
  • Protein: 3g

Conclusion

This Easy Thanksgiving Entertaining dessert is more than just ice cream—it’s a memory in the making. Perfect for sharing with loved ones, it’s a sweet reminder of the warmth and togetherness that the holiday season brings. Whether you’re serving it to a crowd or enjoying a quiet evening in, this ice cream is sure to become a cherished part of your Thanksgiving tradition. So go ahead, scoop up some joy, and savor the flavors of the season!

Related update: Easy Thanksgiving Entertaining

Related update: Cacao-Pecan Shortbread Cookies

Square Deviled Eggs | Made by Meaghan Moineau

Square Deviled Eggs: A Fun Twist on a Classic Appetizer

Intro

There is something truly delightful about deviled eggs. They are a timeless appetizer, cherished at family gatherings, holiday dinners, and picnics alike. As a child, I remember standing on a stool in my grandmother’s kitchen, watching her expertly prepare deviled eggs. The aroma of boiled eggs mingled with the tangy scent of mustard filled the air, and I was entranced by the magic of this simple dish. Today, I’m excited to share a unique twist on this classic recipe: Square Deviled Eggs. Perfect for surprising your guests or adding a touch of whimsy to your dining table, these square-shaped delights are not only fun to make but also utterly delicious!

Why You’ll Love It

Square Deviled Eggs are not just a visual treat; they also offer a delightful culinary experience. Here’s why you’ll love them:

  • Fun and Unique: The square shape adds a playful twist to the traditional deviled egg, making it a conversation starter at any gathering.
  • Kid-Friendly: The creamy filling is soft and mild, making it a hit with children and adults alike.
  • Versatile: Perfect for parties, picnics, or as a unique addition to your holiday spread.

Ingredients

  • Medium-sized cooked eggs
  • Cream cheese
  • Ham

Instructions

  1. Begin by preparing your hard-boiled eggs. Place the eggs in a saucepan and cover them with cold water.
  2. Bring the water to a boil over medium heat. Once boiling, let the eggs cook for 5 minutes.
  3. Remove the saucepan from heat and let the eggs stand covered in hot water for 10 minutes.
  4. Once cooled, peel the eggs.
  5. To create the square shape, use an Egg cuber or Square Egg Press (see note below for purchase options). Slide each peeled egg into the press and screw the top down gently, pushing the egg into the corners.
  6. Allow the eggs to cool completely before removing them from the mold. For the best results, use medium-sized eggs.
  7. For the filling, mash the egg yolks with cream cheese and finely chopped ham until smooth and creamy.
  8. Carefully fill the square-shaped egg whites with the creamy yolk mixture. Serve chilled.

Tips

Here are some tips to ensure your Square Deviled Eggs turn out perfectly every time:

  • Plan Ahead: If you plan to serve these at a party, consider investing in multiple egg cubers to save time.
  • Egg Size: Medium-sized eggs work best to fit into the egg press molds.
  • Cooling Time: Make sure the eggs are completely cooled before removing them from the mold for a perfect square shape.

Variations & Substitutions

If you’re looking to mix things up, consider these variations and substitutions:

  • Spicy Twist: Add a dash of hot sauce or sprinkle of cayenne pepper to the filling for a spicy kick.
  • Vegetarian Option: Omit the ham and add finely chopped herbs like dill or chives for a refreshing flavor.
  • Cheese Lovers: Substitute cream cheese with a sharp cheddar for an extra cheesy flavor.

Storage

Store any leftover Square Deviled Eggs in an airtight container in the refrigerator for up to two days. For best quality, consume them as soon as possible. The texture and flavor are at their peak when fresh.

FAQ

Where can I purchase an Egg cuber or Square Egg Press?

Egg cubers or square egg presses are available online through major retailers such as Amazon or specialty kitchen stores. They are an affordable and fun addition to your kitchen tools.

Can I make Square Deviled Eggs in advance?

Yes, you can prepare the eggs and filling in advance. Simply store them separately in the refrigerator and assemble just before serving.

Nutrition

Square Deviled Eggs are a nutritious appetizer option. The eggs provide a good source of protein, while cream cheese and ham add a touch of richness. For a lighter version, consider using low-fat cream cheese.

Conclusion

Square Deviled Eggs are sure to bring joy and surprise to your dining table. Whether you’re hosting a party, enjoying a picnic, or simply looking for a fun way to enjoy a classic dish, these eggs are a delightful choice. With a touch of nostalgia and a modern twist, they are perfect for all occasions. So grab your Egg cuber, invite your loved ones, and enjoy this whimsical take on an old favorite!

Related update: Square Deviled Eggs

Related update: Guacamole

Related update: Easy Thanksgiving Entertaining

OREO Cookie Balls – Snowman | Made by Meaghan Moineau

OREO Cookie Balls – Snowman

Intro

As the first snowflakes start to fall, there’s a certain magic that fills the air. Growing up, my siblings and I would rush outside, our noses turning rosy as we built snowmen in the front yard. Those chilly afternoons always ended with us huddled around the kitchen table, indulging in sweet treats that our mom had prepared. One of our favorite snowy day indulgences was her OREO Cookie Balls—transformed into adorable snowmen. These delightful bites encapsulate the joy of winter and the warmth of family gatherings.

Why You’ll Love It

These OREO Cookie Balls are the perfect combination of rich, chocolatey goodness and creamy decadence, all encased in a fun, wintry theme. They’re incredibly easy to make, requiring minimal ingredients, and are an absolute hit at any holiday gathering. Whether you’re hosting a festive party or simply enjoying a cozy night in, these snowman-themed treats will bring smiles to all.

Ingredients

  • 1 package of OREO Cookies
  • 8 oz cream cheese, softened
  • 16 oz Baker’s chocolate, melted
  • Rolo chocolate candy
  • Black gel icing
  • Orange gel icing
  • Additional supplies to decorate snowmen (e.g., mini chocolate chips, pretzel sticks)

Instructions

  1. Take the entire package of OREO Cookies, including the filling, and crush them in a large gallon ziplock bag until you have fine crumbs.
  2. Empty the cookie crumbs into a large mixing bowl.
  3. Add the softened cream cheese to the bowl.
  4. Mix well on medium speed until fully combined and smooth.
  5. Use a 1-inch cookie scoop to portion out the mixture, then roll into balls using the palms of your hands.
  6. Place the cookie balls on a cookie sheet and freeze for about 10 minutes to firm up.
  7. Melt the Baker’s chocolate according to the package instructions.
  8. Dip each cookie ball into the melted chocolate, ensuring it is fully coated, and then place on a wax paper-covered cookie sheet.
  9. Decorate with Rolo candies for hats, and use black and orange gel icing to create eyes and noses. Additional supplies can be used for further decoration, such as mini chocolate chips for buttons or pretzel sticks for arms.
  10. Place the decorated cookie balls in the refrigerator for an hour to harden completely.

Tips

For the best results, ensure your cream cheese is thoroughly softened before mixing. This will help achieve a smooth, homogeneous mixture. When dipping the cookie balls in chocolate, use a fork to lift them out, allowing excess chocolate to drip off for a cleaner finish.

Variations & Substitutions

Feel free to get creative with the decorations! You can use colored sprinkles or edible glitter for added festive flair. If you’re not a fan of Baker’s chocolate, white chocolate can also be used for a different flavor profile. Vegan cream cheese and chocolate alternatives can turn this recipe into a plant-based delight.

Storage

Store these OREO Cookie Balls in an airtight container in the refrigerator for up to a week. If you’d like to make them ahead of time, they can also be frozen for up to a month. Just be sure to thaw them in the refrigerator before serving.

FAQ

Can I use a different type of cookie instead of OREOs?

While OREOs provide the classic taste and texture, you can experiment with other sandwich cookies for different flavors. Just ensure they’re similar in composition for best results.

Is it necessary to freeze the cookie balls before dipping them in chocolate?

Freezing helps the balls hold their shape and makes them easier to dip in chocolate. This step is important for achieving a smooth coating.

How can I make these treats gluten-free?

Simply substitute the OREO Cookies with a gluten-free sandwich cookie option. Ensure all other ingredients, like the chocolate and cream cheese, are also certified gluten-free.

Nutrition

While these treats are indulgent, it’s good to savor them in moderation. Each snowman OREO Cookie Ball is approximately 120 calories, with the majority coming from healthy fats and carbohydrates. Enjoy as a festive treat alongside a balanced diet.

Conclusion

OREO Cookie Balls – Snowman are a whimsical and delicious addition to any winter celebration. They capture the joy of the season and are perfect for sharing with loved ones. Whether you’re reminiscing about childhood snow days or creating new memories with your own family, these treats will warm your heart and delight your taste buds. Gather your ingredients, invite the kids to help with the decorating, and enjoy the magic of creating these sweet little snowmen together!

Related update: OREO Cookie Balls – Snowman

Related update: Valentine Hearts

BBQ Mac and Cheese | Made by Meaghan Moineau

BBQ Mac and Cheese

Intro

There’s something incredibly comforting about a bowl of warm, cheesy pasta that just takes you back to childhood. I remember visiting my grandmother’s house every Sunday, where the aroma of her signature mac and cheese, bubbling away in the oven, would greet me at the door. As time passed, I experimented with her classic recipe, infusing it with a smoky BBQ twist that brings a delightful kick to the traditional flavors. Today, I’m thrilled to share my BBQ Mac and Cheese recipe with you—a dish that’s not only a family favorite but also a crowd-pleaser at every gathering.

Why You’ll Love It

This BBQ Mac and Cheese is the ultimate comfort food with a deliciously modern twist. It’s rich and creamy, with the perfect hint of smoky sweetness that sets it apart from the classic mac and cheese. The combination of gooey cheddar and tangy Parmesan, coupled with the subtle heat of jalapeño and the aromatic blend of spices, creates a symphony of flavors that will have you coming back for more. Whether you’re serving it as a main dish or a hearty side, this recipe is sure to be a hit with both kids and adults alike.

Ingredients

  • 1 cup cottage cheese
  • 1/2 cup Parmesan cheese, grated
  • 1/4 cup ketchup
  • 2 tablespoons brown sugar
  • 1 jalapeño, seeded and chopped
  • 2 tablespoons Italian parsley, chopped
  • 1 cup milk
  • 2 cloves garlic, minced
  • 1/2 cup diced onion
  • 1 teaspoon ground cumin
  • Salt and black pepper to taste
  • 2 tablespoons butter
  • 2 cups shredded cheddar cheese
  • 1/2 cup Italian style breadcrumbs
  • 8 ounces macaroni

Instructions

  1. Prepare the macaroni according to the package instructions. Drain and set aside.
  2. In a food processor, combine the cottage cheese, milk, Parmesan cheese, ketchup, brown sugar, jalapeño, garlic, parsley, ground cumin, salt, and black pepper. Blend until smooth and creamy.
  3. In a frying pan, melt 1 tablespoon of butter over medium heat. Add the diced onions and sauté until softened and transparent, about 5 minutes. Remove from heat and set aside.
  4. In another frying pan, melt the remaining tablespoon of butter. Add the breadcrumbs and toss to coat. Continue to brown the breadcrumbs slightly, stirring occasionally. Remove from heat and set aside.
  5. In a large pot, combine the cooked macaroni, onion mixture, cheese sauce, and shredded cheddar cheese. Stir over low heat until the cheese is melted and the pasta is evenly coated.
  6. Transfer the mac and cheese to a baking dish. Sprinkle the toasted breadcrumbs evenly over the top.
  7. Bake in a preheated oven at 350°F (175°C) for 15-20 minutes, or until the top is golden and bubbly. Serve hot and enjoy!

Tips

For the best flavor, use freshly grated Parmesan and cheddar cheeses. If you prefer a spicier kick, leave the seeds in the jalapeño or add a pinch of cayenne pepper to the cheese sauce. This dish pairs beautifully with a simple green salad or grilled vegetables for a balanced meal.

Variations & Substitutions

If you’re looking to switch things up, try using smoked gouda or mozzarella instead of cheddar for a unique flavor profile. For a gluten-free version, substitute the macaroni with your favorite gluten-free pasta and use gluten-free breadcrumbs. Vegetarians can enjoy this dish as is, but for a heartier meal, consider adding cooked bacon or grilled chicken for added protein.

Storage

Leftovers can be stored in an airtight container in the refrigerator for up to 3 days. Reheat in the oven or microwave until warmed through. If the pasta appears dry, add a splash of milk before reheating to restore its creamy texture.

FAQ

Can I make this recipe in advance?

Yes, you can prepare the mac and cheese up to the baking step and refrigerate it for up to 24 hours. When you’re ready to serve, bake it as directed, adding a few extra minutes if necessary to ensure it’s heated through.

What can I use if I don’t have a food processor?

If you don’t have a food processor, you can use a blender to puree the cheese sauce ingredients. Alternatively, mash the cottage cheese with a fork and whisk the remaining sauce ingredients until smooth.

Can I freeze BBQ Mac and Cheese?

Yes, you can freeze this dish. Allow it to cool completely, then transfer to a freezer-safe container. Freeze for up to 2 months. Thaw overnight in the refrigerator before reheating.

Nutrition

This BBQ Mac and Cheese is a rich and indulgent dish, perfect for special occasions or when you need a comforting meal. While exact nutritional values will vary based on portion size and any modifications, be mindful of the cheese and butter content, which contribute generously to the calorie count.

Conclusion

BBQ Mac and Cheese is a delightful twist on a classic comfort food that combines creamy, cheesy goodness with a touch of smoky sweetness. Whether you’re reminiscing about family dinners or creating new memories at your own table, this recipe is sure to become a favorite. Gather your loved ones, serve up a warm bowl of this delicious dish, and enjoy the smiles all around.

Related update: BBQ Mac and Cheese

Related update: Couscous with olives

Tropical Ice Pops | Made by Meaghan Moineau

Tropical Ice Pops

Intro

Growing up, summers meant long days of sunshine, backyard games, and the sweet relief of a frozen treat to cool us down. I fondly remember racing my siblings to the freezer, each of us hoping to grab the last homemade ice pop. There’s something magical about the burst of fruity flavors on a hot day. Those memories inspired this Tropical Ice Pops recipe, a delightful blend of exotic fruits and creamy coconut that takes me back to those carefree summer days.

Why You’ll Love It

These Tropical Ice Pops are more than just a treat; they’re a mini vacation in every bite. You’ll love the refreshing combination of creamy coconut and juicy tropical fruits. Not only are they delicious, but they’re also made with wholesome ingredients, so you can indulge guilt-free. Plus, they’re easy to make, customizable, and perfect for kids and adults alike. Whether you’re hosting a summer barbecue or just need a moment of bliss, these ice pops are sure to satisfy.

Ingredients

  • 3/4 cup unsweetened coconut beverage
  • 1/4 cup light coconut milk
  • 1 fresh mango, peeled and chopped
  • 1 1/2 tablespoons maple syrup, plus 2-3 tablespoons for coconut mixture
  • 1 fresh pineapple, peeled and chopped
  • Popsicle moulds

Instructions

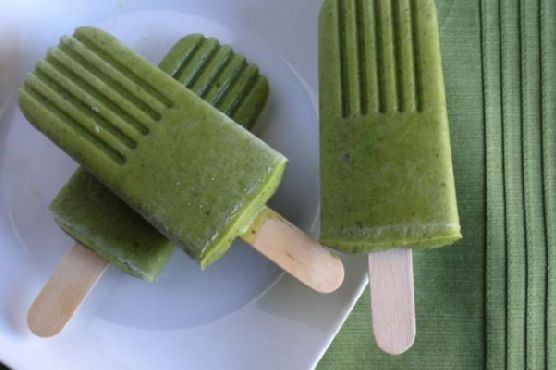
  1. Puree the mango, pineapple, 3/4 cup of coconut beverage, and 1 1/2 tablespoons of maple syrup in a blender until smooth.
  2. Pour equal amounts of the fruit mixture into each of the popsicle moulds, filling them about halfway.
  3. In a small bowl, mix the light coconut milk with 1/4 cup of coconut beverage and 2-3 tablespoons of maple syrup. Adjust the sweetness to your taste.
  4. Pour equal amounts of the coconut mixture over the fruit puree in the moulds, filling them to the top.
  5. Insert a popsicle stick into each mould, leaving about a quarter of the stick above the mould.
  6. Freeze the popsicles for about 2 to 3 hours, or until solid.
  7. To remove the ice pops from the moulds, run them under warm to hot water for about 5 to 10 seconds before pulling them out.

Tips

For the best results, make sure your fruits are ripe and sweet. The natural sugars will enhance the flavor of the ice pops. If you prefer a smoother texture, strain the fruit puree before pouring it into the moulds to remove any fibrous bits. Remember to taste the coconut mixture before pouring it over the fruit puree and adjust the sweetness to your liking. Using a funnel or a jug with a spout can make pouring the mixtures into the moulds easier and less messy.

Variations & Substitutions

Feel free to get creative with your Tropical Ice Pops by trying different fruits or ingredients. Swap the mango or pineapple for passion fruit, kiwi, or papaya for a different tropical twist. If you prefer a creamier texture, use full-fat coconut milk instead of light coconut milk. For added texture, consider adding shredded coconut or chia seeds to the coconut mixture. If you’re watching your sugar intake, you can substitute maple syrup with honey or a sugar-free sweetener of your choice.

Storage

Store the Tropical Ice Pops in the freezer for up to two weeks. Keep them in the popsicle moulds or transfer them to a freezer-safe bag or container to save space. Be sure to separate each ice pop with parchment paper if stacking them to prevent sticking.

FAQ

Can I use canned fruits instead of fresh?

Yes, you can use canned fruits if fresh ones are not available. Just be sure to drain any syrup or juice before blending. Keep in mind that the flavor may vary slightly depending on the type of canned fruit used.

What if I don’t have popsicle moulds?

No worries! You can use small paper cups or silicone muffin cups as an alternative. Simply pour the mixtures into the cups and cover with foil. Make a small slit in the foil to insert the popsicle stick, then freeze as directed.

How do I make these vegan?

This recipe is already vegan-friendly as it uses maple syrup and coconut milk. Just ensure that any additional ingredients you use, like toppings or variations, are also plant-based.

Nutrition

Each Tropical Ice Pop contains approximately:

  • Calories: 70
  • Fat: 3g
  • Carbohydrates: 10g
  • Sugar: 8g
  • Protein: 1g

Note that these values are estimated and can vary based on the specific ingredients and quantities used.

Conclusion

Tropical Ice Pops are a delicious and refreshing way to enjoy the vibrant flavors of summer. With their simple ingredients and easy preparation, they make for the perfect homemade treat to share with family and friends. Whether you’re reminiscing about your own childhood summers or creating new memories, these ice pops are sure to bring a smile to your face. Enjoy the taste of the tropics and keep cool with every bite!

Related update: Tropical Ice Pops

Watching What I Eat: Peanut Butter Banana Oat Breakfast Cookies with Carob / Chocolate Chips | Made by Meaghan Moineau

Watching What I Eat: Peanut Butter Banana Oat Breakfast Cookies with Carob / Chocolate Chips

Intro

There’s a special kind of comfort in the aroma of freshly baked cookies wafting through the house. It takes me back to Sunday mornings at my grandmother’s kitchen. She had a way of using the simplest ingredients to create the most magical treats that brought the family together. Today, I’m sharing a recipe that combines my love for those nostalgic flavors with a modern twist: Peanut Butter Banana Oat Breakfast Cookies with Carob or Chocolate Chips. These cookies are not only delicious but also packed with wholesome ingredients, making them a perfect start to your day or a delightful snack anytime.

Why You’ll Love It

These breakfast cookies are a wonderful blend of flavors and textures. The creamy peanut butter and ripe bananas create a rich, moist base, while the oats add a hearty texture. Whether you choose chocolate or carob chips, you’ll get a burst of sweetness that complements the nuttiness perfectly. Plus, these cookies are easy to make and require just one bowl, making cleanup a breeze. They’re also versatile, allowing you to customize them to your taste and dietary needs. You’ll love how they are both satisfying and nourishing, giving you a delicious way to fuel your day.

Ingredients

  • 2 ripe bananas, mashed
  • 1/4 cup butter flavor shortening
  • 1/2 cup chocolate chips or carob chips
  • 1/2 cup creamy peanut butter
  • 1/4 cup chopped nuts (optional)
  • 1 1/2 cups oatmeal
  • 1/4 cup unsweetened applesauce
  • 1 teaspoon vanilla extract
  • 1/4 cup vanilla protein powder

Instructions

  1. Preheat your oven to 350 degrees Fahrenheit.
  2. In a large bowl, mix the mashed bananas and peanut butter until completely combined.
  3. Add in the applesauce, vanilla protein powder, and vanilla extract. Mix until all ingredients are fully incorporated.
  4. Add the oatmeal and nuts to the banana mixture and combine thoroughly.
  5. If you want the carob or chocolate chips mixed throughout, add them now. Let the dough rest for 10 minutes.
  6. Drop the cookie dough by spoonfuls onto a parchment paper-lined cookie sheet and flatten them into circles. If you prefer the chips on top, add them now.
  7. Bake the cookies for 20-30 minutes, depending on your preference for texture, until they are golden brown and done.
  8. Remove from the oven and let them rest on the cookie sheet for 5 minutes, then transfer to a cooling rack.
  9. If you want traditional fork marks, use a pizza cutter or sharp knife to score the tops while they’re still warm.
  10. Once completely cool, store in a covered container. Enjoy them on their own or with a cup of tea.

Tips

For best results, use ripe bananas as they will be sweeter and easier to mash. Letting the dough rest allows the oats to absorb some of the moisture, which helps with texture. If you’re using chocolate chips, consider high-quality dark chocolate for added depth of flavor. And remember, baking times can vary depending on your oven, so keep an eye on the cookies to achieve your desired level of doneness.

Variations & Substitutions

If you’re looking to switch things up, try using almond butter instead of peanut butter for a different flavor profile. You can also swap out the nuts for seeds like sunflower or pumpkin seeds if you have nut allergies. For a vegan option, use plant-based butter and ensure your chocolate chips are dairy-free. Feel free to experiment with different types of oats, such as steel-cut or rolled oats, to find the texture you like best.

Storage

These cookies are best stored in an airtight container at room temperature, where they will stay fresh for up to a week. For longer storage, you can refrigerate them for up to two weeks or freeze them for up to three months. To enjoy frozen cookies, simply let them thaw at room temperature or give them a quick warm-up in the microwave.

FAQ

Can I make these cookies gluten-free?

Absolutely! To make these cookies gluten-free, use certified gluten-free oats. This will ensure that your cookies are safe for those with gluten sensitivities or celiac disease.

What can I use instead of vanilla protein powder?

If you don’t have vanilla protein powder, you can substitute it with an equal amount of flour or almond meal. Alternatively, you can omit it entirely, though this may slightly alter the texture of the cookies.

Are these cookies suitable for kids?

Yes, these cookies are a great treat for kids! They are made with wholesome ingredients and can be a fun and nutritious way to satisfy their sweet tooth. Just be sure to adjust the nuts and chocolate based on your child’s dietary needs and preferences.

Nutrition

Each cookie is approximately 120 calories, with 5 grams of protein, 15 grams of carbohydrates, and 6 grams of fat. These values may vary based on the specific brands of ingredients you use. Remember, they are a treat, so enjoy them in moderation as part of a balanced diet.

Conclusion

These Peanut Butter Banana Oat Breakfast Cookies are a delightful blend of nostalgia and nutrition, offering a perfect balance of flavors and textures that are sure to please. Whether you’re enjoying them fresh out of the oven or as a quick grab-and-go breakfast, they’re a testament to the fact that eating well doesn’t have to mean sacrificing taste. I hope these cookies bring a little bit of warmth and joy to your mornings, just as they do to mine. Happy baking!

Related update: Watching What I Eat: Peanut Butter Banana Oat Breakfast Cookies with Carob / Chocolate Chips

Related update: Peppermint Patties

Related update: Easy Cheesy Scrambled Eggs

PB Cup Stuffed Brownie Bites | Made by Meaghan Moineau

PB Cup Stuffed Brownie Bites

Intro

There’s something undeniably magical about the combination of peanut butter and chocolate. It takes me back to my childhood when I would eagerly unwrap peanut butter cups and savor each bite. Fast forward to today, and I’ve found a way to combine that nostalgic flavor with another favorite treat: brownies. These PB Cup Stuffed Brownie Bites are a delightful blend of rich, fudgy brownie with a surprise peanut butter center. They’re perfect for any occasion, whether it’s a simple family gathering or a festive celebration.

Why You’ll Love It

These brownie bites are a surefire hit for several reasons:

  • Easy to Make: No complicated steps or fancy equipment required. Just mix, bake, and enjoy!
  • Irresistibly Delicious: The combination of gooey brownie and creamy peanut butter is simply irresistible.
  • Perfectly Portable: These bites are ideal for parties, picnics, or any time you need a sweet treat on the go.
  • Kid-Friendly: Little hands will love helping to push the peanut butter cups into the brownies!

Ingredients

  • 1 cup granulated sugar
  • 3/4 cup all-purpose flour
  • 2 large eggs
  • 1/2 teaspoon salt
  • 1/2 cup vegetable oil
  • 1 teaspoon vanilla extract
  • 1/3 cup unsweetened cocoa powder
  • 1/2 cup sweet semi chocolate chips
  • 12 Reese’s peanut butter cups

Instructions

  1. Preheat your oven to 350°F (175°C) and prepare a mini muffin pan with cooking spray.
  2. In a medium-sized bowl, whisk together the granulated sugar, flour, eggs, salt, vegetable oil, vanilla extract, and cocoa powder until well combined.
  3. Gently stir in the semi sweet chocolate chips, being careful not to over mix the batter.
  4. Scoop the batter into the prepared mini muffin pan, filling each slot about ¾ of the way full to allow room for rising.
  5. Bake in the preheated oven for 8-10 minutes, or until a toothpick inserted into the center comes out almost clean. It’s okay if they’re slightly underdone.
  6. Once the brownies are done, immediately press a peanut butter cup into the center of each brownie bite.
  7. Let the brownies set in the pan for a couple of minutes before removing them to cool completely on a wire rack.

Tips

  • Ensure the brownie bites are slightly underdone before adding the peanut butter cups for a gooey center.
  • Use a small cookie scoop to evenly distribute the batter into the muffin pan.
  • Allow the brownies to cool completely before storing them to maintain their texture.

Variations & Substitutions

If you want to switch things up a bit, here are some ideas:

  • Nut Butter Cups: Try using almond or cashew butter cups for a different flavor profile.
  • Gluten-Free: Substitute the all-purpose flour with a 1:1 gluten-free flour blend.
  • Dark Chocolate: Replace semi sweet chocolate chips with dark chocolate chips for a richer taste.

Storage

Store these delightful bites in an airtight container at room temperature for up to 3 days. For longer storage, you can refrigerate them for up to a week or freeze them for up to 3 months. Just ensure they are completely cooled before storing to prevent condensation.

FAQ

Can I make these brownie bites ahead of time?

Absolutely! These brownie bites can be made a day in advance and stored in an airtight container. They’re a great option for preparing ahead of time for parties or gatherings.

What if I don’t have a mini muffin pan?

If you don’t have a mini muffin pan, a regular muffin pan will work, though you may need to adjust the baking time. Check the brownies for doneness with a toothpick until it comes out almost clean.

Can I use a different type of chocolate chip?

Yes, you can use milk chocolate or even white chocolate chips if you prefer. Each type will add a unique flavor to the brownie bites.

Nutrition

Please note that nutritional information can vary based on the brands and quantities of ingredients used. Here’s a general idea per brownie bite:

  • Calories: 150
  • Carbohydrates: 18g
  • Protein: 2g
  • Fat: 8g
  • Sugar: 12g

Conclusion

PB Cup Stuffed Brownie Bites are a deliciously indulgent treat that combines the best of both worlds—rich chocolate and creamy peanut butter. They’re easy to make, delightful to share, and sure to become a favorite in your dessert repertoire. Whether you’re baking for a special occasion or just to satisfy a sweet craving, these brownie bites are a perfect choice. Give them a try and watch them disappear in no time!

Related update: PB Cup Stuffed Brownie Bites

Crispy Italian Cauliflower Poppers Appetizer | Made by Meaghan Moineau

Crispy Italian Cauliflower Poppers Appetizer

Intro

There’s something truly magical about the aroma of Italian herbs wafting through the kitchen, reminiscent of cozy family gatherings and hearty laughter. When I was a child, Sunday afternoons were reserved for family feasts at my grandmother’s house. The kitchen was always bustling, filled with the clinking sounds of pots and pans, and the air heavy with the rich scent of garlic and basil. This Crispy Italian Cauliflower Poppers Appetizer recipe brings me back to those cherished times, offering a modern twist on my grandmother’s classic Italian flavors. It’s a dish that’s sure to bring warmth and joy to your table, just as it did to ours.

Why You’ll Love It

  • Delightfully Crispy: These poppers boast a perfectly crunchy exterior with a tender interior, making them an irresistible snack.
  • Easy to Make: Simple steps and ingredients make this dish accessible for cooks of all levels.
  • Versatile: Perfect for parties, game nights, or simply as a delicious side dish.
  • Healthy Twist: Packed with the goodness of cauliflower, these poppers are a nutritious alternative to other fried snacks.
  • Kid-Friendly: Even the pickiest eaters will love these cheesy, flavorful bites.

Ingredients

  • 1 can of diced tomatoes, undrained
  • 1 large head of cauliflower, cut into florets
  • 2 large eggs
  • 1 cup all-purpose flour
  • 1/4 cup fresh basil, chopped
  • 3 cloves garlic, minced
  • 1 teaspoon garlic powder
  • 1/2 teaspoon black fresh ground pepper
  • 4 tablespoons olive oil, divided
  • 1 cup panko bread crumbs
  • 1/2 cup fresh parmesan cheese, grated
  • 1/2 teaspoon crushed red pepper flakes
  • 1/2 teaspoon salt, or to taste
  • 1 tablespoon water

Instructions

  1. Preheat your oven to 400°F (200°C). Brush a large baking sheet with 1 tablespoon of olive oil.
  2. In a large, shallow dish, combine the breadcrumbs, Parmesan cheese, garlic powder, salt, black pepper, and 2 tablespoons of olive oil. Toss well with a fork until the oil is completely dispersed.
  3. In a medium bowl, whisk together the eggs and 1 tablespoon of water.
  4. Place the flour in a large resealable bag. Add half of the cauliflower florets, seal, and shake to coat well. Use a fine mesh strainer to remove excess flour, then place the floured cauliflower on a plate. Repeat with the remaining florets.
  5. Working in batches, dip the floured florets into the egg mixture, ensuring they are completely coated. Transfer to the breadcrumb mixture, pressing to help the breadcrumbs adhere.
  6. Arrange the breaded cauliflower on the prepared baking sheet, leaving space between each floret for optimal crispiness. Spray the tops lightly with cooking spray.
  7. Bake for 20 minutes, then flip the pieces and bake for an additional 15 minutes, or until crunchy on the outside and tender on the inside.
  8. While the cauliflower is baking, prepare the marinara sauce. Pulse the undrained tomatoes in a food processor until mostly broken down.
  9. In a medium saucepan, heat 1 tablespoon of olive oil with the minced garlic and crushed red pepper flakes over medium heat until just sizzling. Add the tomatoes and simmer for about 10 minutes, allowing the marinara to thicken slightly. Stir in 2 tablespoons of fresh basil and season with salt and pepper to taste.
  10. Once the cauliflower is done, transfer to a serving dish and sprinkle with the remaining basil. Serve hot with the prepared marinara sauce.

Tips

  • Fresh is Best: Use fresh, high-quality ingredients for the best flavor, especially when it comes to basil and garlic.
  • Even Coating: Ensure each cauliflower floret is evenly coated in flour, egg, and breadcrumbs for consistent crisps.
  • Don’t Crowd the Pan: Leave space between florets on the baking sheet to allow them to crisp up properly.
  • Flavor Boost: Add a pinch of Italian seasoning to the breadcrumb mixture for an extra flavor punch.

Variations & Substitutions

  • Spicy Version: Increase the crushed red pepper flakes for a spicier kick.
  • Gluten-Free: Substitute the flour and breadcrumbs with gluten-free alternatives.
  • Cheesy Twist: Add shredded mozzarella to the breadcrumb mixture for a gooey cheese pull effect.
  • Herb Swap: Use parsley or oregano in place of basil if preferred.

Storage

Store leftover cauliflower poppers in an airtight container in the refrigerator for up to 3 days. To reheat, place them in a preheated oven at 350°F (175°C) for about 10 minutes, or until warmed through and crispy.

FAQ

Can I make these cauliflower poppers in advance?

Yes, you can prepare the cauliflower poppers up to the baking step a day in advance. Store them, covered, in the refrigerator and bake just before serving for maximum freshness and crispiness.

Can I use frozen cauliflower for this recipe?

Fresh cauliflower is recommended for the best texture, but you can use frozen cauliflower in a pinch. Ensure it’s thoroughly thawed and patted dry to remove excess moisture before coating.

What can I serve with these poppers?

These poppers are delicious on their own with the marinara sauce, but you can also serve them alongside other appetizers like bruschetta, caprese salad, or a charcuterie board for a complete Italian-themed spread.

Nutrition

While specific nutritional values will vary based on exact ingredient brands and quantities used, this recipe is a healthier alternative to deep-fried snacks, packed with fiber from the cauliflower and offering essential nutrients from the fresh ingredients.

Conclusion

These Crispy Italian Cauliflower Poppers are a delightful fusion of tradition and modern culinary creativity. Whether you’re hosting a gathering or just enjoying a quiet evening at home, this dish is sure to satisfy both your taste buds and nostalgic cravings. So gather your loved ones, and let these poppers bring a touch of Italian magic to your table, creating new memories alongside cherished old ones.

Related update: Crispy Italian Cauliflower Poppers Appetizer

Related update: Basic Hummus

Lasagne Roll Ups | Made by Meaghan Moineau

Lasagne Roll Ups: A Comforting Twist on a Classic

Intro

There’s something truly magical about the aroma of lasagne baking in the oven, wafting through the house and drawing everyone to the kitchen. Growing up, Sunday afternoons at my grandmother’s were always marked by the warmth of her kitchen and the heartiness of her meals. Her lasagne was a staple, a dish that brought our family together, layered with love and tradition. Today, I’m excited to share my own twist on this beloved classic: Lasagne Roll Ups. They maintain all the comforting flavors of traditional lasagne but with a fun and modern presentation that’s perfect for family dinners or an impressive dish for guests.

Why You’ll Love It

Lasagne Roll Ups are not only delicious but offer a delightful experience in both cooking and eating. Here’s why you’ll love this recipe:

  • Easy to Serve: Each roll is a perfect, tidy portion, making serving a breeze.
  • Rich in Flavor: With fresh basil, nutmeg, and a hint of lemon, these roll-ups are bursting with layers of flavor.
  • Customizable: You can easily adapt the recipe to suit dietary needs or preferences.
  • Make-Ahead Friendly: Prepare them in advance and simply bake before serving.
  • Kid-Friendly: The fun roll-up style is sure to be a hit with the little ones.

Ingredients

  • Fresh finely-chopped basil leaves
  • Red thinly-sliced bell peppers
  • Black pepper
  • Chicken broth
  • Dried thyme
  • Garlic cloves
  • Fresh lemon juice
  • Nutmeg
  • Olive oil
  • Finely-chopped onion
  • Parmesan cheese
  • Dry lasagne pasta sheets
  • Red dried pepper flakes
  • Ricotta cheese
  • Salt
  • Shredded mozzarella cheese
  • Frozen packet spinach, thawed and drained
  • Unsalted butter

Instructions

  1. In a skillet, cook the garlic, onion, red pepper flakes, thyme, and salt and pepper to taste in the olive oil over moderately-low heat, stirring, until the onion is softened.
  2. Reserve 3 tablespoons of the onion mixture in a bowl. To the onions in the skillet, add the bell peppers and chicken broth, and simmer the mixture, covered, for 10 minutes, or until the peppers are very soft.
  3. In a blender, puree the mixture until smooth, return it to the skillet, and swirl in the unsalted butter. Stir in the basil and fresh lemon juice.
  4. Cook the lasagne noodles according to package directions, rinse with cold water, and drain.
  5. Preheat the oven to 375 degrees Fahrenheit.
  6. In a bowl with the reserved cooked onions, combine 1/4 cup Parmesan cheese, mozzarella, ricotta, freshly grated nutmeg to taste, spinach, and salt and pepper. Mix well.
  7. Spoon 1 cup of sauce into an ungreased 9- by 9- by 2-inch baking pan. Spread 3 tablespoons of filling on each noodle, roll up as for a jelly roll, and place seam-side down in the pan. Repeat until all the noodles are used.
  8. Top with remaining sauce, cover with foil, and bake for 25 minutes. Uncover, sprinkle with remaining Parmesan cheese, and bake uncovered until golden, about 5 more minutes.

Tips

For the best results, keep these tips in mind:

  • Ensure the spinach is thoroughly drained to prevent watery filling.
  • For ease of rolling, do not overfill the lasagne sheets.
  • Freshly grating nutmeg adds a depth of flavor that pre-ground can’t match.
  • Allow the roll-ups to rest for a few minutes before serving to help them set and enhance the flavors.

Variations & Substitutions

Lasagne Roll Ups are versatile, and you can easily tweak the recipe to fit your needs:

  • Vegetarian: Substitute chicken broth with vegetable broth.
  • Gluten-Free: Use gluten-free lasagne noodles.
  • Meat Lovers: Add cooked ground beef or sausage to the filling for a heartier dish.
  • Cheese Variations: Try using a blend of cheeses such as provolone or fontina for a different flavor profile.

Storage

Store any leftovers in an airtight container in the refrigerator for up to 3 days. To freeze, place the roll-ups in a single layer in a freezer-safe dish and cover tightly. They can be frozen for up to 3 months. To reheat, thaw in the refrigerator overnight and bake at 350 degrees Fahrenheit until heated through.

FAQ

Can I make Lasagne Roll Ups ahead of time?

Absolutely! You can assemble the roll-ups a day in advance and store them in the refrigerator. When ready to serve, simply bake them as per the instructions. They also freeze well, making them a great option for meal prep.

What can I serve with Lasagne Roll Ups?

Lasagne Roll Ups are quite filling on their own, but they pair beautifully with a simple green salad or garlic bread for a complete meal. For something lighter, consider serving them alongside steamed vegetables or a fresh tomato salad.

How can I prevent the noodles from sticking together?

After cooking the noodles, rinse them under cold water and toss them with a small amount of olive oil to prevent sticking. This will make handling and rolling them much easier.

Nutrition

While the exact nutritional content can vary based on specific ingredients and quantities used, each serving of Lasagne Roll Ups typically provides a balanced mix of carbohydrates, proteins, and fats, with plenty of calcium and vitamin-rich spinach. It’s a hearty meal that satisfies without being overly indulgent.

Conclusion

Lasagne Roll Ups are more than just a meal; they’re an experience that brings the nostalgia of family gatherings to your table with a fresh twist. Whether you’re serving them up for a busy weeknight dinner or a special occasion, these roll-ups are sure to impress and satisfy. I hope this recipe becomes a beloved addition to your culinary repertoire. Enjoy the warmth, flavor, and joy that each bite brings!

Related update: Lasagne Roll Ups

Related update: Steak with lemon and capers

Spinach, Tomato & Onion Couscous | Made by Meaghan Moineau

“`html

Spinach, Tomato & Onion Couscous

Intro

There’s something special about recipes that transcend time and place, and this Spinach, Tomato & Onion Couscous is one such dish. It always takes me back to summer evenings at my grandmother’s kitchen. I remember the gentle hum of conversation blending with the sound of sizzling onions and the fragrant aroma of tomatoes and spices enveloping the room. It was in those moments that I learned the magic of simple, fresh ingredients coming together to create something greater than the sum of its parts. This couscous dish is a modern twist on the flavors I grew up with—a warm, comforting, and nutritious meal that never fails to bring joy to the table.

Why You’ll Love It

This couscous recipe is a delightful combination of flavors and textures. The earthy spinach pairs beautifully with the sweet, juicy tomatoes and the sharp, creamy feta. Toasted pine nuts add a satisfying crunch, while the whole-wheat couscous serves as a wholesome base. It’s quick to prepare, making it perfect for busy weeknights, yet it’s elegant enough to serve at a dinner party. Whether you’re a seasoned cook or just starting out, you’ll appreciate how effortless and rewarding this dish is to make.

Ingredients

  • 1 cup whole-wheat couscous
  • 2 tablespoons olive oil
  • 1 medium red onion, thinly sliced
  • 2 cups fresh spinach, washed and dried
  • 2 medium tomatoes, diced
  • 1/4 cup pine nuts
  • 1/2 cup crumbled feta cheese
  • 1 1/2 cups water
  • 1 teaspoon salt, divided
  • Salt and pepper, to taste

Instructions

  1. Bring the water, along with half the salt, to a boil in a small pan.
  2. Once boiling, add the couscous, stir, and cover with a lid. Remove the pot from the heat, and allow it to sit for 5 to 7 minutes while you cook the vegetables.
  3. Heat a large pan over medium-high heat and add the 2 tablespoons of olive oil. Once the oil is hot, add the onions and sauté until they begin to brown.
  4. Add the tomatoes and remaining salt and sauté until they begin to wilt, about 20 to 30 seconds.
  5. Add the spinach and sauté just until it wilts but remains bright green.
  6. Stir the pine nuts into the vegetable mixture and remove the pan from the heat. Season with salt and pepper to taste.
  7. Pour the couscous into a large bowl, add the sautéed vegetables along with the crumbled feta, and toss everything together.
  8. Top with the extra crumbled feta and enjoy while hot.

Tips

For best results, use fresh spinach and ripe tomatoes. If you prefer a stronger flavor, consider using sun-dried tomatoes instead of fresh ones. Toasting the pine nuts before adding them to the dish enhances their flavor profile. Be sure not to overcook the spinach; it should be just wilted and maintain its vibrant green color.

Variations & Substitutions

While this recipe is delicious as is, there are plenty of ways to make it your own. You can substitute quinoa or bulgur for the couscous if you’re looking for a gluten-free option. Add a pinch of red pepper flakes if you enjoy a bit of spice. For a Mediterranean twist, consider adding sliced olives or roasted red peppers. If you’re vegan, you can skip the feta or use a plant-based cheese alternative.

Storage

This dish is best enjoyed fresh, but you can store leftovers in an airtight container in the refrigerator for up to 3 days. To reheat, warm it gently in a pan over low heat or in the microwave. If the couscous has absorbed too much moisture, you can add a splash of water or olive oil to restore its texture.

FAQ

Can I make this dish ahead of time?

Yes, you can prepare the couscous and the vegetable mixture separately and store them in the refrigerator. When you’re ready to serve, combine them and reheat gently. This can save you time, especially if you’re hosting a gathering.

What can I serve with Spinach, Tomato & Onion Couscous?

This dish is versatile and pairs well with grilled chicken, fish, or tofu. A simple green salad or roasted vegetables would complement it nicely. You can also serve it as a standalone vegetarian main course.

Is this recipe kid-friendly?

Absolutely! The flavors are mild and approachable, making it a hit with kids. You might want to chop the spinach and tomatoes into smaller pieces for younger children. It’s a great way to introduce them to new vegetables and whole grains.

Nutrition

This recipe is not only delicious but also nutritious. It’s packed with fiber from the whole-wheat couscous and spinach, healthy fats from the olive oil and pine nuts, and protein from the feta cheese. It’s a well-rounded meal that will keep you satisfied and nourished.

Conclusion

Spinach, Tomato & Onion Couscous is more than just a meal; it’s an experience that brings together the warmth of family gatherings and the joy of sharing good food. I hope this recipe brings as much happiness to your kitchen as it does to mine. Whether you’re making it for a casual dinner or a special occasion, it’s sure to be a hit. Enjoy the rich flavors, the vibrant colors, and the comforting nostalgia in every bite. Happy cooking!

“`

Related update: Spinach, Tomato & Onion Couscous

Related update: Ratatouille With Brie