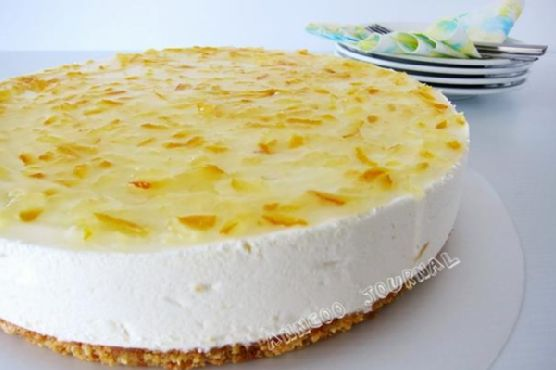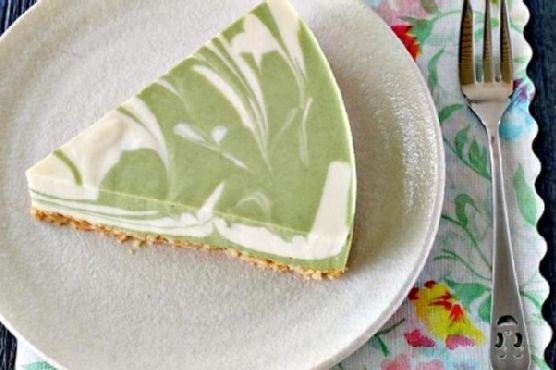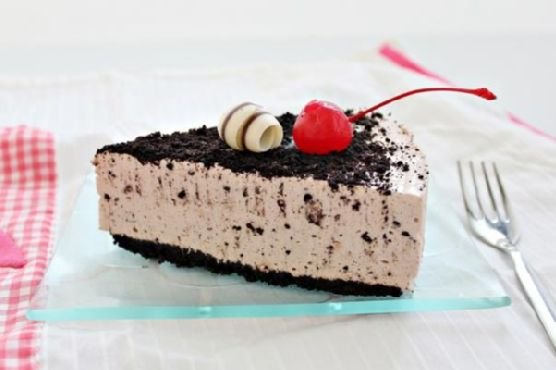
Oreo Hazelnut and Banana Cheesecake
Intro
There’s something truly magical about the combination of Oreo cookies, hazelnut, and bananas nestled in a creamy cheesecake. This Oreo Hazelnut and Banana Cheesecake is not just a dessert; it’s a nostalgic journey back to my childhood when my grandmother would surprise us with her homemade banana cakes, always topped with a sprinkle of something crunchy. I remember sitting at the kitchen table, the sweet aroma wrapping around me like a warm hug. Today, I recreate those cherished memories with a modern twist, using beloved Oreos and a hint of Nutella, to bring comfort and joy to your table.
Why You’ll Love It
This cheesecake is a delightful fusion of flavors and textures that will captivate your taste buds. Here are a few reasons why you’ll adore this dessert:
- It’s no-bake, making it perfect for warm days or when you want a fuss-free dessert.
- The creamy texture, combined with the crunch of Oreo cookies, offers a satisfying mouthfeel.
- The hazelnut spread adds a rich, nutty flavor that perfectly complements the sweetness of the bananas.
- It’s a show-stopping dessert that’s sure to impress your family and friends.
Ingredients
- Skinless bananas
- Butter
- Cream cheese
- Gelatin powder
- Lemon juice
- Milk
- Nutella
- Oreo cookies
- Water
- Fresh whipping cream
Instructions
- Mix crushed Oreo cookies with butter and press them firmly into a 9-inch cake pan. Put in the refrigerator and chill until firm.
- Whisk fresh whipping cream until soft peaks form, then set aside.
- Put gelatin and water in a bowl and soak for a while. Then place the bowl in a double boiler and heat until the gelatin dissolves. Set aside.
- Beat cream cheese at medium speed with 3 tablespoons of fresh milk until smooth. Add in hazelnut spread, continue to beat for about 1 minute.
- Mash bananas and mix well with 1/2 tablespoon lemon juice, then add into the cream cheese mixture, mix well again and transfer to a large bowl.
- Add whipped cream to the cream cheese mixture with a hand whisk, mix well and add dissolved gelatin into it.
- Lastly, fold in 20g crushed Oreo cookies with a rubber spatula.
- Pour cream cheese mixture into the prepared cake pan and refrigerate for at least 4 hours or overnight.
- Remove the chilled cheesecake from the cake pan and sprinkle extra crushed Oreo biscuits over it before serving.
Tips
To ensure your cheesecake is a smashing success, consider these tips:
- Make sure your cream cheese is at room temperature for a smoother texture.
- Whisk the whipping cream until it forms soft peaks to ensure it blends well with the cream cheese mixture.
- Chill the cheesecake for at least 4 hours to set it properly, but overnight is best for a firmer texture.
- Use a springform pan for easy removal and a clean presentation.
Variations & Substitutions
Feel free to customize this cheesecake to suit your preferences or dietary needs:
- Swap out the Nutella for another nut butter, like almond or peanut butter, for a different flavor profile.
- Use gluten-free Oreo cookies if you’re catering to those with gluten sensitivities.
- Try adding a tablespoon of instant coffee to the cream cheese mixture for a mocha twist.
Storage
This cheesecake can be stored in an airtight container in the refrigerator for up to 5 days. If you need to store it longer, consider freezing individual slices wrapped in plastic wrap and placed in a freezer-safe container for up to 2 months. To serve, thaw the slices in the refrigerator overnight.
FAQ
Can I make this cheesecake without gelatin?
Yes, you can substitute gelatin with agar-agar for a vegetarian version. Be sure to follow the package instructions for proper usage as it sets differently than gelatin.
What if I don’t have a double boiler?
If you don’t have a double boiler, you can use a heatproof bowl set over a pot of simmering water. Just be sure the bowl doesn’t touch the water to gently dissolve the gelatin.
Can I use frozen bananas?
It’s best to use fresh bananas for this cheesecake as frozen bananas can release excess moisture, which might alter the texture of the cheesecake.
Nutrition
Nutritional information can vary based on the specific ingredients used, but a typical slice of this cheesecake (based on 12 servings) provides approximately:
- Calories: 350
- Fat: 22g
- Carbohydrates: 32g
- Protein: 6g
Conclusion
This Oreo Hazelnut and Banana Cheesecake is more than just a dessert; it’s a celebration of flavors and memories. Whether you’re serving it for a special occasion or as a sweet ending to a family meal, it’s sure to become a favorite in your dessert repertoire. I hope this recipe brings warmth and joy to your home, just as it does to mine. Enjoy every delicious bite!
Related update: Oreo Hazelnut and Banana Cheesecake