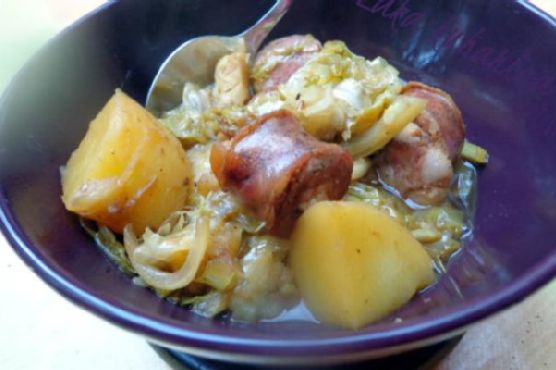
Cabbage and sausages in beer | Made by Meaghan Moineau
Title: A Heartwarming Bowl: Cabbage and Sausages in BeerDescription: Dive into a comfort food classic with our Cabbage and Sausages in Beer recipe. This simple yet flavorful main dish combines savory smoked sausages with the earthy goodness of cabbage and the subtle sweetness of beer. Perfect for a cozy family dinner, this dish will fill your kitchen with mouthwatering aromas and your heart with nostalgia.
---
There are certain dishes that transport us back in time, evoking memories that are as rich and comforting as the flavors themselves. Our Cabbage and Sausages in Beer recipe is one such culinary time machine, whisking me back to countless family gatherings in my grandmother's warm, bustling kitchen.
A Stroll Down Memory Lane
Growing up, Sunday dinners at Grandma's house were a cherished ritual. The savory aroma of smoked sausages simmering in beer would greet us at the door, mingling with the laughter of cousins and the comforting hum of adult conversation. The centerpiece of our family feast was always a heaping bowl of cabbage and sausages, tender and steaming, served with a side of thick, crusty bread.
Grandma had a knack for turning simple ingredients into something magical. She would melt a generous pat of butter in her well-loved pot, adding diced onions that would sizzle and turn golden, filling the room with a sweet, caramelized scent. A sprinkle of sugar and salt would follow, her wooden spoon working its way around the pan with the precision of years of practice.
Next came the beer—a splash of golden liquid that bubbled and hissed as it hit the pan, its malty aroma inviting everyone to gather around. The sausages were nestled in among the cabbage and potatoes, their smoky essence infusing the entire dish. The pot, brimming with promise, would simmer gently, allowing the flavors to meld into a comforting symphony.
Creating Your Own Memories
To recreate this dish, start by melting butter in a large pan over medium-low heat. Add the onions, a pinch of sugar, and a dash of salt. Stir frequently, watching as the onions transform into a golden hue, about 5-8 minutes. Pour in the beer, scraping up any flavorful bits clinging to the bottom of the pan.
Introduce the smoked sausages, green cabbage, and potatoes into this aromatic mix. Let the dish simmer, covered, for 20 minutes or until the vegetables are tender and full of flavor. Serve the sausages and veggies in big bowls, ensuring each serving is accompanied by plenty of the rich cooking liquid. A sprinkle of freshly cracked pepper adds the final touch.
A Dish for Every Occasion
This recipe, with its simple ingredients and deep, satisfying flavors, makes for a perfect main dish. It's a 3 out of 10 on the difficulty scale, making it accessible for cooks of all skill levels. Whether you're looking to create new family traditions or simply need a hearty meal for a chilly evening, this Cabbage and Sausages in Beer will not disappoint.
As you savor each bite, let the comforting flavors remind you of the warmth of family and the simple joys of a meal shared with loved ones. Here's to creating your own cherished memories around the dining table. Enjoy!