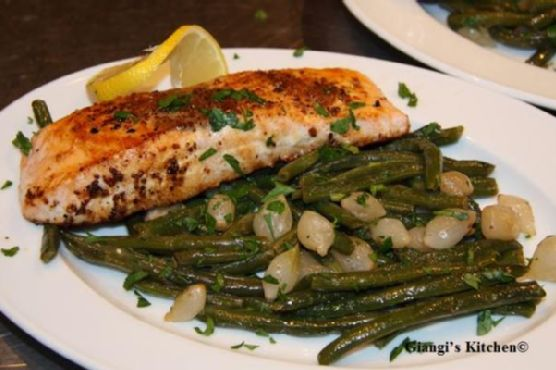
Green Beans with Pearl Onions and Salmon
Intro
As the cool breeze of autumn sets in, I often find myself reminiscing about family dinners at my grandmother’s house. Her kitchen, always filled with the comforting aroma of delicious home-cooked meals, was a sanctuary of love and laughter. One dish that stood out was her Green Beans with Pearl Onions and Salmon—a delightful medley that brought together the freshness of vegetables and the rich flavor of perfectly cooked salmon. Today, I’m sharing this cherished recipe with you, hoping it brings the same warmth and joy to your table as it does to mine.
Why You’ll Love It
This dish is a perfect blend of simplicity and elegance, making it ideal for both weeknight dinners and special occasions. You’ll love the way the tender green beans and sweet pearl onions complement the flaky, savory salmon. The addition of brown sugar adds a subtle sweetness that balances the dish beautifully. Moreover, it’s a healthy, one-pan meal that’s quick to prepare, leaving you with more time to enjoy with your loved ones.
Ingredients
- 1 lb frozen green beans
- 1 cup frozen pearl onions
- 2 tablespoons olive oil
- 1 tablespoon unsalted butter, plus 1 teaspoon
- 1/4 cup chicken stock
- 1 tablespoon brown sugar
- Salt and pepper, to taste
- 2 skinless salmon steaks
Instructions
- In a large pot, add some water, the frozen green beans, and frozen pearl onions. Cover and cook over medium heat until they are tender. Drain and set aside.
- In a large skillet over medium-high heat, melt 1 tablespoon of butter and the olive oil. Add the green beans and pearl onions and sauté for 1 minute.
- Add the chicken stock and cook for another minute until the stock is evaporated.
- Add 1 tablespoon of butter and the brown sugar; lower the heat to low and mix gently until slightly caramelized. Remove from the heat and keep warm.
- Return the skillet back to medium-high heat and melt the remaining teaspoon of butter in the center. Add the salmon, season with salt and pepper generously. Cook for 3-5 minutes until a golden crust is formed.
- Turn the salmon and cook for another 3 minutes.
- Place the green beans with pearl onions on the plate and top with the salmon. Serve immediately.
Tips
- For perfectly cooked salmon, ensure your skillet is hot before adding the fish. This helps achieve a nice, crispy crust.
- Do not overcrowd the pan when cooking salmon to ensure even cooking.
- Adjust the seasoning according to your taste. A touch of lemon juice can also brighten the flavors.
Variations & Substitutions
Variations:
- Add some crushed garlic to the green beans and onions for an extra layer of flavor.
- Include some chopped fresh herbs like dill or parsley as a garnish for a fresh touch.
Substitutions:
- If you prefer a different protein, chicken breast or shrimp would work well with this dish.
- Feel free to use fresh green beans and onions if available, adjusting the cooking time accordingly.
Storage
Store any leftovers in an airtight container in the refrigerator for up to 2 days. Reheat gently in a skillet over low heat until warmed through. Avoid using the microwave as it can make the salmon rubbery.
FAQ
Can I use fresh green beans and onions instead of frozen?
Absolutely! Fresh green beans and onions can be used in place of frozen ones. Just be sure to adjust the cooking time, as fresh vegetables may take a bit longer to tenderize.
What should I do if I don’t have chicken stock?
If chicken stock is not available, you can substitute it with vegetable stock or even a bit of water with added salt for flavor. The goal is to deglaze the pan and add moisture to the dish.
How can I tell when the salmon is done?
Salmon is done when it flakes easily with a fork and the flesh is opaque. Be careful not to overcook it, as this can lead to dry, tough fish. The internal temperature should reach 145°F (63°C).
Nutrition
This dish is not only delicious but also nutritious. Salmon is a great source of omega-3 fatty acids and high-quality protein. The green beans and pearl onions provide fiber and essential vitamins, making it a balanced meal.
Conclusion
Green Beans with Pearl Onions and Salmon is a dish that beautifully combines flavors and textures, making it a standout meal in any household. It’s a recipe that brings a touch of nostalgia and comfort, perfect for sharing with family and friends. I hope this recipe finds a special place in your kitchen, just as it has in mine. Enjoy the warmth and joy of a cozy meal, and don’t forget to share your experience in the comments below!
Related update: Green Beans with Pearl Onions and Salmon