Pork with Blueberry Sauce | Made by Meaghan Moineau

Pork with Blueberry Sauce

Intro

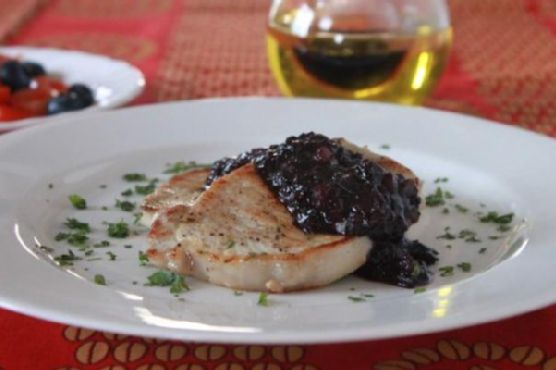
There’s something uniquely satisfying about combining savory flavors with a touch of sweetness. It reminds me of summer evenings spent at my grandmother’s house, where she would always surprise us with her inventive dishes. One of my fondest memories is of her tangy pork chops served with a delightful fruit sauce that seemed to encapsulate the essence of the season. Inspired by those cherished moments, I’ve crafted this recipe for Pork with Blueberry Sauce. It’s a dish that promises to bring a burst of flavor to your dinner table, and I’m excited to share it with you.

Why You’ll Love It

This Pork with Blueberry Sauce is a symphony of flavors. The juicy pork chops are perfectly seasoned and seared to golden perfection, while the blueberry sauce provides a sweet and tangy counterpoint. The balsamic vinegar adds depth, and the lime zest gives it a zesty punch. Whether you’re hosting a dinner party or enjoying a quiet meal at home, this dish is sure to impress. Plus, it’s easy to make and requires just a few simple ingredients!

Ingredients

  • Pork chops
  • Salt and pepper
  • Canola oil
  • Fresh pint blueberries
  • Brown sugar
  • Balsamic vinegar
  • Red diced onion
  • Lime zest
  • Parsley, for garnish

Instructions

  1. Preheat the oven to 400 degrees Fahrenheit.
  2. In a nonreactive bowl, mash the blueberries with the brown sugar to your desired consistency and set aside.
  3. Heat a sauté pan over medium heat. Season the pork chops with salt and pepper on both sides.
  4. Add canola oil to the sauté pan. Brown the pork chops on both sides until golden and crispy, about 2-3 minutes on each side. Remove from the pan and place on a baking dish to finish cooking in the oven, if necessary. If the pork is thin, keep it warm aside until the sauce is ready.
  5. In the same pan, add the chopped red onion and sauté until translucent.
  6. Add the mashed blueberry-sugar mixture and balsamic vinegar. Cook until the sauce thickens, about 2-3 minutes.
  7. Add the lime zest and juice to the sauce, seasoning with salt and pepper to taste.
  8. If you placed the pork in the oven, remove it and place on serving plates. Serve the sauce on top and garnish with parsley or cilantro. Enjoy!

Tips

To get the perfect sear on your pork chops, make sure your pan is hot before adding the meat. This will help achieve a crispy exterior while keeping the inside juicy. Additionally, letting the pork rest after cooking allows the juices to redistribute, resulting in tender and flavorful meat.

Variations & Substitutions

If you’re looking to switch things up, you can substitute pork chops with chicken breasts or turkey cutlets. For a vegetarian version, consider using seared tofu or tempeh. You can also experiment with different fruits like raspberries or blackberries for the sauce, adjusting the sugar to taste.

Storage

Leftover pork with blueberry sauce can be stored in an airtight container in the refrigerator for up to 3 days. To reheat, gently warm it in a pan over medium-low heat, adding a splash of water if the sauce has thickened too much during storage.

FAQ

Can I use frozen blueberries for this recipe?

Yes, you can use frozen blueberries if fresh ones are not available. Just make sure to thaw them and drain any excess liquid before mashing them with the sugar.

What can I serve with Pork with Blueberry Sauce?

This dish pairs beautifully with a variety of sides. Consider serving it with creamy mashed potatoes, roasted vegetables, or a simple green salad to complement the flavors.

Nutrition

While the exact nutritional content can vary based on the specific ingredients and portion sizes used, this dish is a good source of protein from the pork and antioxidants from the blueberries. It’s a balanced meal that offers both nutrients and flavor.

Conclusion

This Pork with Blueberry Sauce is more than just a meal; it’s an experience that brings together the best of sweet and savory. Whether you’re cooking for your family or hosting guests, this dish is sure to delight everyone at the table. I hope it becomes a favorite in your home, just as it has in mine. Enjoy the journey of flavors and happy cooking!

Related update: Pork with Blueberry Sauce

Related update: Smoked Salmon and Mascarpone Calzone

Chinese Potstickers | Made by Meaghan Moineau

Chinese Potstickers | Made by Meaghan Moineau

Title: Unveiling the Art of Chinese Potstickers: A Delicious Journey from My Family's Kitchen
Description: Dive into the captivating world of Chinese Potstickers with our authentic recipe, bursting with flavors of lean ground pork, water chestnuts, and aromatic spices. This dish is a culinary bridge between past and present, enriched with a nostalgic family tale that warms the heart. Perfect as an appetizer, this recipe is rated 6/10 in difficulty, making it an exciting kitchen adventure for culinary enthusiasts.

---


A Culinary Bridge to My Heritage: Chinese Potstickers


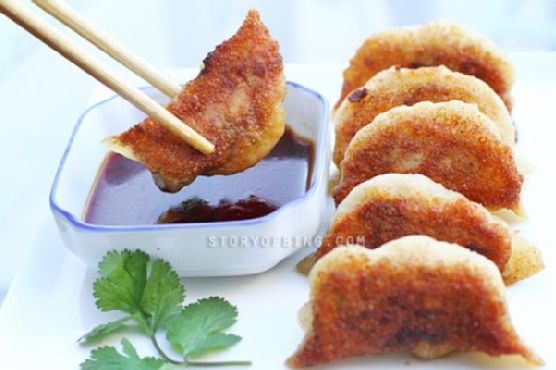
Chinese Potstickers are more than just a delightful treat; they are a culinary emblem that brings my family together, echoing stories of laughter and tradition that span generations. This dish, known for its crisp, golden exterior and juicy, flavorful interior, embodies the essence of Chinese cuisine in every bite.


Ingredients


- 200g lean ground pork (or substitute with ground chicken)


- 1 teaspoon sea salt


- 1 teaspoon fine sugar


- 1/2 teaspoon ground black pepper


- 2 teaspoons light soy sauce


- 2 teaspoons sesame oil


- 1 tablespoon Shaoxing Huatiao wine


- 100g canned water chestnuts (or substitute with spinach or cabbage)


- 2-3 tablespoons finely chopped scallions


- Dumpling wrappers


- Plain flour (for dusting)


- 2-3 tablespoons vegetable oil


- 1/3 cup water


Instructions


1. Prepare the Filling: In a large mixing bowl, combine 200g of lean ground pork with sea salt, sugar, black pepper, light soy sauce, sesame oil, and Shaoxing Huatiao wine. Chop the water chestnuts into small pieces and add them to the mixture along with finely chopped scallions. Mix thoroughly.
2. Prepare the Wrappers: Thaw dumpling wrappers if frozen. Dust a dish and your working surface with flour. Carefully separate the dumpling wrappers and lay them out.
3. Assemble the Potstickers: Place 1.5 teaspoons of filling in the center of each wrapper. Lightly wet the rims with water, fold, and pleat as instructed, ensuring a tight seal. Arrange the prepared dumplings on a floured dish.
4. Cook the Potstickers: Heat vegetable oil in a frying pan. Place the potstickers flat-side down and fry until golden brown. Add water, cover the pan, and steam for 4-5 minutes. Remove the lid to let the base crisp up again.
5. Serve: Transfer to a plate and serve immediately with a vinegar dip made of balsamic or black Chinese vinegar and thinly sliced ginger. Enhance with soy sauce, chili oil, or sesame oil as desired.

A Family's Culinary Tale


As I prepare these delicious potstickers, I am transported back to my grandmother's kitchen—a warm haven filled with the intoxicating aroma of sizzling dumplings and her gentle laughter. Each pleat I form echoes the patient hands of my grandmother teaching me the art of dumpling-making, an experience woven with stories of her childhood in China. The kitchen was our storytelling stage, where tales of resilience and joy unfolded with every fold of dough.


These potstickers were the highlight of our family gatherings, a dish that symbolized unity and love. The crispy potstickers served with a tangy vinegar dip were not just an appetizer; they were a ceremonial opening to an evening filled with laughter and cherished memories.


Difficulty and Classification


Difficulty: 6/10
Classification: Appetizer

Whether you're a seasoned cook or a culinary novice, this recipe offers a delightful challenge that promises rewarding results. Share this dish with loved ones and create your own stories, adding to the rich tapestry of traditions that Chinese Potstickers bring to the table.

Read more about Appetizers

Read more about Main Dishes

Read more about Desserts

Siew Mai | Made by Meaghan Moineau

Siew Mai | Made by Meaghan Moineau

Title: "Savor the Tradition: Crafting Authentic Siew Mai at Home"
Description:

Journey into the heart of Asian cuisine with our detailed guide to making authentic Siew Mai. Discover the blend of succulent pork, fragrant glutinous rice, and traditional Chinese flavors that make this dish a cherished family favorite. Infused with a personal story and rated for difficulty, this recipe will guide you in creating an appetizer that’s sure to impress.


---


Savor the Tradition: Crafting Authentic Siew Mai at Home

In the world of dim sum, Siew Mai holds a special place. These delicate dumplings, with their tender pork filling and aromatic glutinous rice, are a staple in Cantonese cuisine and beloved by many. Today, I invite you to dive into the art of making Siew Mai from scratch — a journey filled with rich flavors and nostalgic family memories.


Ingredients:

*For the Pork Filling:*


- Wonton wrappers


- 700g minced fatty pork


- 2 tablespoons corn starch


- 1 teaspoon salt


- 1 teaspoon white ground pepper


- 1/2 teaspoon sugar


- 1 teaspoon Worcestershire sauce or Maggie Seasoning Sauce


- 2 tablespoons Shaoxing Huatiao wine


- 2 tablespoons sesame oil


- 80g canned water chestnuts, finely chopped


- 4 large Chinese mushrooms, finely chopped


- Carrot, finely diced for garnish


- Cooked whole shrimp


*For the Glutinous Rice Filling:*


- Raw glutinous rice, prepared as per instructions (see link to Glutinous Rice in Lotus Leaf)


- 2 lap cheongs (Chinese sausages)


- Shallots


- Ginger


- Cooking oil


- Dried shrimps


- Cooked dried scallops


- Mushrooms


- Water


- Light soy sauce


- Oyster sauce


- White ground pepper


Instructions:
1. Preparing the Pork Filling:

Start by mincing 700g of fatty pork and place it in a large mixing bowl. Add corn starch, salt, white ground pepper, sugar, Worcestershire sauce, Shaoxing Huatiao wine, and sesame oil.


Next, roughly chop the water chestnuts and Chinese mushrooms before adding them to the pork mixture. Mix all ingredients well to combine. Set aside the mixture along with the finely diced carrot for garnish.


2. Preparing the Glutinous Rice Filling:

Soak the lap cheongs in boiling water until the skin separates. Remove the skin, dice the sausages, and pan fry until golden. Prepare the glutinous rice as per the instructions detailed in the Glutinous Rice in Lotus Leaf recipe. Once ready, combine with the fried lap cheong pieces and set aside to cool.


3. Assembling the Dumplings:

Lay a wonton wrapper flat and place a teaspoon of the pork or glutinous rice filling in the center. Wet the edges of the wrapper and gather it around the filling, squeezing gently to form a tight dumpling. Top each pork Siew Mai with a whole shrimp and some carrot for a pop of color. For the glutinous rice Siew Mai, add extra lap cheong pieces on top if desired.


Arrange the dumplings in a steamer lined with baking paper, ensuring steam can circulate through small holes. Steam over boiling water for 14-15 minutes until cooked through.


4. Serving and Storage:

Serve the dumplings hot. Uncooked dumplings can be frozen for future enjoyment. Simply dust them with flour to prevent sticking before storage.


A Family Memory:

Every Sunday morning, my family would gather at my grandmother’s house, the air filled with the aroma of steaming Siew Mai. My grandmother, with her deft hands, would teach us the art of folding dumplings, her stories interwoven with each precise fold. It was more than just cooking; it was a lesson in tradition and love. These moments, rich with laughter and shared stories, are forever etched in my mind, making Siew Mai more than a dish, but a cherished family tradition.


Difficulty Level: 7/10
Classification: Appetizer

Creating Siew Mai is a rewarding endeavor that brings both flavor and tradition to your table. Whether you're a novice or a seasoned cook, this dish will challenge your culinary skills while offering a taste of cherished Asian heritage. Enjoy crafting these delicious dumplings and creating memories of your own.

Read more about Appetizers

Read more about Main Dishes

Read more about Desserts

Pork Carnitas Tacos | Made by Meaghan Moineau

Pork Carnitas Tacos | Made by Meaghan Moineau

Unforgettable Pork Carnitas Tacos: A Taste of Tradition and Togetherness


A Culinary Journey Down Memory Lane


There's something truly magical about the way food can evoke cherished memories and transport us back to special moments spent with loved ones. In our family, Pork Carnitas Tacos have always held a special place in our hearts. Not only is this dish a tantalizing blend of flavors and textures, but it also serves as a delicious reminder of countless family gatherings, where the kitchen buzzed with laughter and the air was filled with the irresistible aroma of simmering pork and fresh cilantro.


The Recipe: Pork Carnitas Tacos


Difficulty: 6/10
Category: Main Dish

Ingredients:

- 2 cups water

- 3 lbs lean pork butt


- 4 cloves garlic, minced


- Sea salt and ground pepper to taste


- 2 tablespoons olive oil


- 1 cup orange juice


- 1 cup milk


- Corn tortillas


- Salsa fresca


- 2 ripe avocados, sliced


- Fresh cilantro, chopped


- 1 onion, finely chopped


- 2 limes, sliced into wedges


Instructions:

1. Prepare the Pork:

In a large Dutch oven, combine the pork, garlic, sea salt, ground pepper, and water. Bring the mixture to a boil, then reduce the heat, cover, and let it simmer over medium-low heat for 45 minutes to one hour. This slow cooking process ensures the meat becomes tender and infused with the aromatic flavors of garlic and spices.


2. Shred and Brown the Pork:

Once cooked, drain the pork well. Allow it to cool until it's manageable, then shred the meat by hand or with the tines of a fork, discarding any remaining fat. Return the shredded pork to the Dutch oven, heating the olive oil over medium heat. Add the orange juice and milk, cooking until the liquid evaporates and the pork is beautifully browned. Season with additional salt and pepper to taste.


3. Prepare the Toppings:

Chop the onion and cilantro, and slice the avocado and limes. Place each in small individual bowls for an inviting serving presentation.


4. Assemble the Tacos:

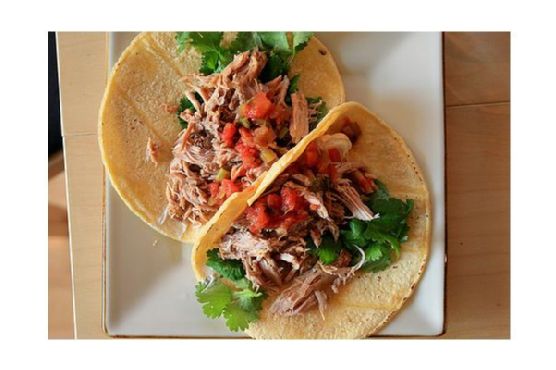
Heat the corn tortillas in a dry frying pan to keep them warm and pliable. For each taco, stack two tortillas and layer them with warm carnitas. Top with chopped cilantro, onion, avocado slices, and a squeeze of fresh lime juice for that perfect burst of citrusy brightness.


A Nostalgic Family Memory


Growing up, weekends at Grandma's house were synonymous with the sizzle of carnitas on the stove. I remember sitting on a stool by the kitchen counter, watching in awe as she effortlessly transformed simple ingredients into a feast that brought us all together. The highlight of those afternoons was gathering around the table, each of us eagerly assembling our tacos, swapping stories, and savoring the rich, savory flavors that felt like a warm embrace.


Even as I recreate this dish today, I can almost hear the echoes of playful banter and feel the familial warmth that made those gatherings so special. Pork Carnitas Tacos are more than just a meal; they are a bridge to the past, a reminder of the joy that comes from shared moments and the love that binds us together.


Conclusion


Pork Carnitas Tacos are a delightful main dish that combines the heartiness of seasoned pork with the freshness of vibrant toppings. With a difficulty rating of 6/10, it's a recipe that balances simplicity with a touch of culinary finesse. Whether you're creating new memories or reliving cherished ones, these tacos promise to bring a touch of tradition and a whole lot of flavor to your table. So gather your loved ones, roll up your sleeves, and let the delicious journey begin!

Read more about Appetizers

Read more about Main Dishes

Read more about Desserts

Chinese Potstickers | Made by Meaghan Moineau

Chinese Potstickers | Made by Meaghan Moineau

Deliciously Nostalgic: Crafting Perfect Chinese Potstickers at Home


Description

Dive into the rich flavors and textures of Chinese potstickers, a delightful culinary journey wrapped in a delicate dumpling. This detailed guide not only provides a step-by-step recipe but also shares a heartwarming family story that will inspire you to bring a taste of tradition to your kitchen. Perfect as an appetizer or a savory snack, these potstickers will soon become a family favorite.

---


A Taste of Tradition: Chinese Potstickers


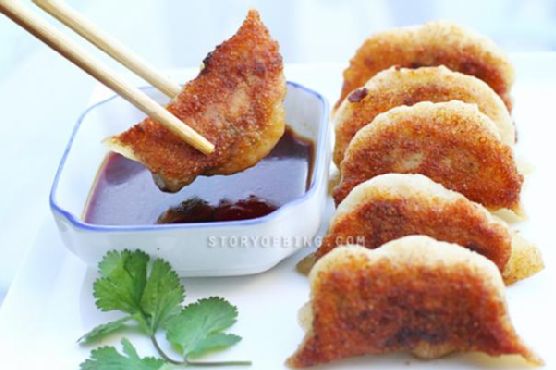
The sizzling sound of dumplings hitting the hot pan, the aroma of sesame oil wafting through the kitchen, and the anticipation of that first bite—making Chinese potstickers is more than just preparing a meal; it's about creating memories. For me, these potstickers are a culinary heirloom passed down through generations, each fold and pleat crafted with love.


Ingredients


- 200g lean ground pork (or substitute with ground chicken)


- 100g canned water chestnuts, chopped (or substitute with spinach or cabbage)


- 1 teaspoon sea salt


- 1 teaspoon fine sugar


- 1/2 teaspoon black ground pepper


- 2 teaspoons light soy sauce


- 2 teaspoons sesame oil


- 1 tablespoon Shaoxing Huatiao wine


- 2-3 tablespoons finely chopped scallions


- Dumpling wrappers (thawed if frozen)


- Plain flour for dusting


- 2-3 tablespoons vegetable oil


- 1/3 cup water


Instructions


1. Prepare the Filling:

- In a large mixing bowl, combine the ground pork with sea salt, sugar, ground pepper, soy sauce, sesame oil, and Shaoxing Huatiao wine.


- Add the chopped water chestnuts to the mixture. For a twist, you can use spinach or cabbage instead.


- Stir in the finely chopped scallions and mix all ingredients well.


2. Assemble the Dumplings:

- Dust your working surface with flour. Carefully separate the dumpling wrappers and lay them out.


- Place about 1.5 teaspoons of the pork filling in the center of each wrapper.


- Lightly wet the edges of the wrapper with water. Bring the edges together and pinch at the center.


- Create pleats on one side of the dumpling, folding towards the center and pinching to seal. Repeat on the other side, ensuring three pleats per side.


3. Cooking the Potstickers:

- Heat vegetable oil in a frying pan over high heat.


- Place the dumplings flat-side down in the pan and fry until the bottoms are golden brown.


- Add water, cover the pan, and steam for 4-5 minutes. Remove the cover and let them crisp up for another minute.


4. Serving Suggestion:

- Serve the potstickers with a vinegar dip made of balsamic or black Chinese vinegar and thinly sliced ginger. Enhance the dip with soy sauce, chili oil, or sesame oil for extra flavor.


A Family Memory


Growing up, Sunday afternoons were reserved for dumpling-making in my grandmother's kitchen. Her nimble fingers would work magic, transforming simple ingredients into delectable bites. As children, my siblings and I would gather around the table, our hands dusted with flour, trying to mimic her expert pleats. Laughter and stories filled the room, each dumpling a testament to our shared love and heritage. These potstickers are more than a dish; they're a connection to those cherished days, a reminder that food has the power to bring families together.


Difficulty: 6/10

Classification: Appetizer


Creating Chinese potstickers is a rewarding experience that combines the art of cooking with the joy of tradition. Whether you're new to dumpling-making or a seasoned pro, this recipe promises delicious results that will delight your senses and bring a touch of nostalgia to your dining table. Enjoy!

Read more about Appetizers

Read more about Main Dishes

Read more about Desserts

Vietnamese Banh Mi | Made by Meaghan Moineau

Vietnamese Banh Mi | Made by Meaghan Moineau

Title: "Savory Memories: Crafting the Perfect Vietnamese Banh Mi"
Description: Dive into the delightful world of Vietnamese cuisine with our authentic Banh Mi recipe. Learn how to combine flavorful ingredients and create a sandwich that’s not just a meal, but a nostalgic journey. Perfectly balanced with tender pork, fresh herbs, and tangy pickles, this Banh Mi is rated 5/10 in difficulty and is a fulfilling main dish.

---


A Taste of Home: The Vietnamese Banh Mi


In the realm of Vietnamese cuisine, Banh Mi stands out as a testament to the country's rich culinary tapestry. This delightful sandwich, with its perfect balance of flavors and textures, has not only become a street food favorite but also a cherished dish in our family. Today, I’m excited to share both a beloved recipe and a heartwarming story that brings this dish to life.


Ingredients


- Rolls


- Pork loin, thinly sliced


- 2 cloves garlic, minced


- 3 tablespoons fish sauce


- 1 tablespoon sugar


- Freshly ground black pepper


- 1 small onion, sliced


- 2 tablespoons vegetable oil


- 1 teaspoon sesame seed oil


- Mayonnaise


- Fresh cilantro sprigs


- Pickled carrot and daikon


- Pâté


- Cucumber, sliced


- Jalapeño, sliced


Instructions


1. Marinate the Pork: In a large plastic bag, combine garlic, fish sauce, sugar, black pepper, onion, vegetable oil, and sesame seed oil. Mix well until the sugar dissolves completely. Add the thinly sliced pork loin to the marinade, ensuring each piece is well-coated. Seal the bag and let it marinate in the refrigerator for at least 1 hour to absorb all the flavors.
2. Cook the Pork: Heat a pan over medium heat. Remove the pork from the marinade and cook the slices in a single layer. Once one side is cooked, flip each piece to ensure even cooking on both sides. Once done, let the pork rest for 10 minutes before slicing into strips.
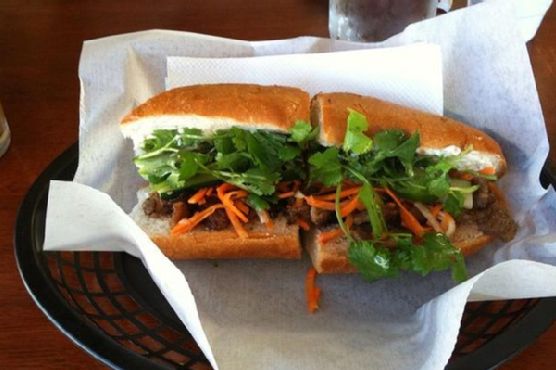
3. Assemble the Banh Mi: Slice the rolls in half and spread a generous layer of mayonnaise on one side. Add a layer of pâté on the other side. Carefully layer the pork strips, pickled carrot and daikon, cucumber slices, jalapeño, and cilantro sprigs inside the roll. Close the sandwich and serve immediately.

A Nostalgic Journey


Growing up, Banh Mi was more than just a meal; it was a symbol of home and togetherness. I vividly remember Sunday mornings bustling with activity in our kitchen. My grandmother, with her gentle hands and wise smile, would carefully prepare the marinade, a secret recipe she brought with her from Vietnam. As the pork sizzled on the pan, the aroma would fill our home, drawing everyone to the kitchen.


We would gather around the table, eagerly waiting to assemble our sandwiches. Each ingredient was a story, from the tart pickled vegetables representing the vibrant markets of Saigon, to the fresh cilantro, reminiscent of the herbs in our garden. The Banh Mi was not just a sandwich; it was a bridge to our heritage and a delicious reminder of the love that bound our family together.


Recipe Difficulty and Classification


This Vietnamese Banh Mi recipe is rated 5/10 in difficulty, making it accessible for home cooks while still providing a satisfying culinary challenge. Classified as a main dish, it offers a complete meal experience that is both filling and flavorful.


Whether you’re a seasoned chef or a home cook exploring new cuisines, this Banh Mi recipe invites you to savor not just a meal, but a memory. As you take your first bite, may it transport you to a place of warmth, nostalgia, and culinary delight. Enjoy!

Read more about Appetizers

Read more about Main Dishes

Read more about Desserts