Bourbon Street Beignets | Made by Meaghan Moineau

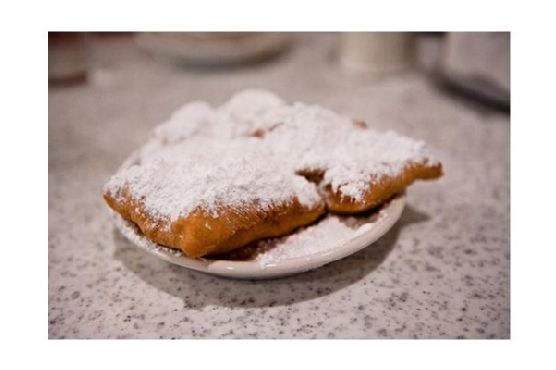
Bourbon Street Beignets: A Taste of New Orleans

Intro

There’s something magical about the first bite of a warm beignet, dusted with a generous layer of powdered sugar. My first encounter with these delightful pastries was on a humid summer evening in New Orleans. The air was filled with the lively sounds of jazz, and the sweet aroma of these golden bites wafted through the streets. Every bite took me back to that bustling corner of the French Quarter, where laughter mingled with the sounds of trumpets and saxophones. Today, I’m thrilled to share with you a recipe that brings a piece of Bourbon Street right into your kitchen.

Why You’ll Love It

This Bourbon Street Beignets recipe is a love letter to New Orleans’ vibrant culinary scene. You’ll love the simplicity and authenticity of this recipe, which captures the essence of traditional beignets found in the heart of the French Quarter. The light, airy texture paired with the delicate sweetness of powdered sugar is an unbeatable combination. Plus, making these at home is a delightful way to bring a touch of Southern charm to your dessert table.

Ingredients

  • 1 egg
  • 3 1/2 cups flour, divided
  • 1 cup heavy cream
  • Vegetable oil, for frying
  • Powdered sugar, for dusting
  • 1/2 teaspoon salt
  • 2 tablespoons shortening
  • 1/4 cup sugar
  • 1 cup hot water
  • 1 package (or 2 1/4 teaspoons) active dry yeast

Instructions

  1. Dissolve the yeast in warm water according to package instructions and set aside.
  2. In a large bowl, combine sugar, shortening, salt, and hot water. Stir until the shortening is melted and the sugar is dissolved. Allow the mixture to cool to lukewarm.
  3. Add the heavy cream, egg, 3 cups of flour, and the yeast mixture to the sugar-shortening mix.
  4. Attach the bowl to a stand mixer with a dough hook. Turn to speed “2” and mix for 2 minutes.
  5. Add the remaining flour, 1/2 cup at a time, mixing until the dough clings to the hook and cleans the sides of the bowl, about 5 minutes longer.
  6. Place the dough on a lightly floured board and roll into a 10×24 inch rectangle.
  7. Using a sharp knife, cut the dough into 2-inch squares.
  8. In a large heavy saucepan or deep fat fryer, heat the oil to 360 degrees Fahrenheit.
  9. Fry the doughnuts, turning to brown on both sides, about 3 minutes.
  10. Drain on absorbent towels and sprinkle generously with powdered sugar while warm.

Tips

For the best results, ensure your water is warm but not too hot when dissolving the yeast, as excessively hot water can kill the yeast. When frying, maintain a consistent oil temperature to achieve that perfect golden brown color. A candy thermometer can be a helpful tool to ensure the oil stays at the right temperature.

Variations & Substitutions

If you’re feeling adventurous, try adding a splash of vanilla extract or a hint of nutmeg to the dough for additional depth of flavor. For a gluten-free version, substitute the all-purpose flour with a gluten-free flour blend, keeping in mind that the texture might vary slightly. You can also experiment with different toppings; a drizzle of chocolate or caramel sauce can add a decadent twist.

Storage

Beignets are best enjoyed fresh and warm, but if you have leftovers, store them in an airtight container at room temperature for up to 2 days. To reheat, pop them in a preheated oven at 350 degrees Fahrenheit for a few minutes until warmed through. Avoid the microwave, as it can make them tough.

FAQ

Can I make the dough ahead of time?

Yes, you can prepare the dough ahead of time. Once the dough is mixed and kneaded, cover it tightly with plastic wrap and store it in the refrigerator for up to 24 hours. Allow it to come to room temperature before rolling and cutting.

Why are my beignets greasy?

Greasy beignets are often a result of oil that’s not hot enough. Make sure your oil is at 360 degrees Fahrenheit before frying. If the temperature drops too low, the beignets will absorb more oil instead of cooking quickly on the outside.

Can I freeze beignets?

Yes, you can freeze beignets. After frying, allow them to cool completely, then place them in a single layer on a baking sheet and freeze until solid. Transfer to a freezer-safe bag or container. To reheat, bake in a preheated oven at 350 degrees Fahrenheit until heated through.

Nutrition

While beignets are a treat to be savored, it’s worth noting that they are an indulgent dessert. High in carbohydrates and sugar, they are best enjoyed in moderation. Pairing them with a cup of coffee can create a balanced experience, reminiscent of a New Orleans café.

Conclusion

Making Bourbon Street Beignets at home is a delightful adventure that brings the spirit of New Orleans right to your kitchen. With their crisp exterior and soft, airy center, these beignets are sure to become a family favorite. Whether you’re reminiscing about a past visit to the French Quarter or simply looking to enjoy a taste of the South, this recipe is your ticket to a sweet escape. So go ahead, dust off that powdered sugar, and let the good times roll!

Related update: Bourbon Street Beignets

Hush Puppies | Made by Meaghan Moineau

Deliciously Crispy Hush Puppies

Intro

Ah, hush puppies! Just the mention of these golden, crispy delights brings back fond memories of summer barbecues at my grandparents’ house in the deep South. I can vividly remember sitting on the porch, the warm evening breeze on my face, while my grandmother expertly fried up a batch of hush puppies in her old cast-iron skillet. The aroma was irresistible, and the taste, simply unforgettable. These small, round cornmeal-based fritters have a unique charm, drawing people together with their simple yet satisfying flavor. Today, I’m excited to share this cherished family recipe with you, so you too can create wonderful memories over a plate of freshly made hush puppies.

Why You’ll Love It

Hush puppies are the perfect side dish for any occasion. Whether you’re hosting a fish fry, a barbecue, or just looking for a quick snack, these delicious morsels are sure to be a hit. Here’s why you’ll love them:

  • Quick and Easy: With a prep time of just 15 minutes, you can have a batch ready in no time.
  • Simple Ingredients: Made with pantry staples, you probably already have everything you need.
  • Crispy Exterior, Soft Interior: The perfect combination of textures makes every bite satisfying.
  • Versatile: Hush puppies pair well with a variety of meals and can be customized to your liking.

Ingredients

  • 1 cup cornmeal
  • 1 cup all-purpose flour
  • 1 tablespoon baking powder
  • 1 teaspoon salt
  • 1 egg
  • 1/2 cup milk
  • 1 small onion, finely chopped
  • Oil, for frying

Instructions

  1. Place the cornmeal, flour, baking powder, and salt into a large mixing bowl and stir until well combined.
  2. In a medium mixing bowl, crack the egg and beat it with a fork until it is well mixed. Add the chopped onion and milk to the egg and mix well.
  3. Pour the egg, milk, and onion mixture into the cornmeal and flour mixture. Stir until the batter is smooth and well combined.
  4. In a deep-fat fryer or a heavy skillet, pour in enough oil to fill 2-3 inches. Heat the oil over medium-high heat.
  5. Once the oil is hot, carefully drop heaping teaspoons of batter into the pan. You may fry 5-6 hush puppies at a time.
  6. The hush puppies will sink at first, then rise to the surface. Fry until they are golden brown, about 1-2 minutes.
  7. Use a slotted spoon to remove the hush puppies from the oil and let them drain on paper towels.
  8. Serve warm and enjoy!

Tips

For the best results, make sure your oil is hot before adding the batter. This ensures a crispy exterior without absorbing too much oil. If your hush puppies are browning too quickly, reduce the heat slightly.

Variations & Substitutions

Feel free to get creative with your hush puppies! Here are a few ideas:

  • Spicy Kick: Add a diced jalapeño or a pinch of cayenne pepper to the batter for a spicy version.
  • Cheesy Delight: Mix in a handful of shredded cheddar cheese for a cheesy twist.
  • Herb Infusion: Add chopped fresh herbs like parsley or chives for an herby flavor.
  • Gluten-Free: Replace the all-purpose flour with a gluten-free flour blend to make them gluten-free.

Storage

If you have leftovers (which is rare!), store them in an airtight container in the refrigerator for up to 3 days. To reheat, place them in a preheated oven at 350°F (175°C) for about 10 minutes until warmed through and crisp.

FAQ

Can I make hush puppies in advance?

While hush puppies are best enjoyed fresh, you can prepare the batter in advance and store it in the refrigerator for up to 24 hours. Just give it a good stir before frying.

Can I freeze hush puppies?

Yes, you can freeze cooked hush puppies. Allow them to cool completely, then place them in a single layer on a baking sheet and freeze until solid. Transfer to a freezer bag and store for up to 3 months. Reheat in the oven at 350°F (175°C) until heated through.

What can I serve with hush puppies?

Hush puppies are a versatile dish that pairs well with many meals. They are a classic accompaniment to fried fish, but also go well with barbecue, soups, or salads.

Nutrition

While hush puppies are a delicious treat, they are fried and should be enjoyed in moderation. Here’s a rough estimate of the nutritional value per serving (3 hush puppies):

  • Calories: 150
  • Fat: 7g
  • Carbohydrates: 18g
  • Protein: 3g

Conclusion

There’s something incredibly comforting about homemade hush puppies. Their crispy exterior and fluffy interior make them an irresistible treat that brings back cherished memories of family gatherings and Southern hospitality. Whether you’re serving them at a barbecue, a seafood feast, or just as a snack, they are sure to be a crowd-pleaser. I hope this recipe brings as much joy to your kitchen as it has to mine. Enjoy every crispy bite!

Related update: Hush Puppies

Related update: Easy Chicken Wings

Mardi Gras Shrimp Étouffée | Made by Meaghan Moineau

Mardi Gras Shrimp Étouffée | Made by Meaghan Moineau

Title: Celebrate Mardi Gras with a Classic Shrimp Étouffée Recipe
Description: Dive into the vibrant flavors of New Orleans with our Mardi Gras Shrimp Étouffée recipe. This classic dish combines perfectly seasoned shrimp with a rich, savory sauce, served over fluffy rice. Whether you're celebrating Mardi Gras or simply craving some Southern comfort, this dish is sure to delight. Plus, discover a heartwarming family memory that makes this dish even more special.

---


Mardi Gras Shrimp Étouffée: A Flavorful Journey to New Orleans


Mardi Gras is a time of celebration, vibrant colors, and tantalizing flavors. It's that time of year when the streets of New Orleans come alive with parades, music, and culinary delights that captivate the senses. One dish that stands out among the festive foods is the classic Shrimp Étouffée. With its rich blend of spices and succulent shrimp, this dish is the perfect way to bring a taste of Mardi Gras into your home.


Ingredients:


- 4 tablespoons butter


- 4 tablespoons flour


- 2 green bell peppers, diced


- 3 celery stalks, diced


- 1 large yellow onion, diced


- 3 garlic cloves, minced


- 1 teaspoon dried thyme


- 2 tablespoons tomato paste


- 1 tablespoon Worcestershire sauce


- 2 tablespoons Creole seasoning


- 2 cups chicken broth


- 1 pound shrimp, peeled and deveined


- 1 tablespoon butter


- 3 scallions, sliced


- 1 diced fresh tomato


- Cooked rice for serving


Instructions:


1. Prepare the Roux: Heat a heavy pot over low heat. Add the butter and cook for about 10-12 minutes until it turns a light golden brown, stirring occasionally to prevent burning. Whisk in the flour until smooth, continuing to cook for about 8 minutes on low. The mixture should resemble slightly loose peanut butter.
2. Cook the Vegetables: Add in the diced bell peppers, celery, and onion. Stir to coat the veggies with the roux. Cook for another 10-15 minutes until softened.
3. Enhance the Flavor: Stir in the minced garlic and dried thyme, cooking for about a minute until fragrant. Add the tomato paste, Worcestershire sauce, Creole seasoning, and chicken broth. Simmer on low for 30-40 minutes, stirring occasionally, until the sauce is slightly thickened.
4. Add the Shrimp: Stir in the shrimp, turn off the heat, and cover with a lid. Allow the shrimp to cook for 5-8 minutes until they're just cooked through. Finish with an additional tablespoon of butter for added richness.
5. Serve and Garnish: Serve the Shrimp Étouffée over a bed of cooked rice. Garnish with sliced scallions and fresh diced tomato.

A Nostalgic Family Memory:


Growing up, Mardi Gras was more than just a festival; it was a cherished family tradition. Every year, my grandmother would gather the family in her cozy kitchen to prepare her famous Shrimp Étouffée. The air would be filled with laughter, stories, and the aroma of simmering spices. As a child, I remember being entrusted with the "important" job of stirring the roux, feeling a sense of pride as I watched the mixture transform.


Grandma would recount tales of her own childhood in New Orleans, weaving stories of parades and jazz into the fabric of our meal. To this day, whenever I make Shrimp Étouffée, I am transported back to those joyful gatherings, and I feel a connection to the generations before me who celebrated with this same beloved dish.


Difficulty Rating: 6/10


Classification: Main Dish


Bring the spirit of Mardi Gras into your home with this Shrimp Étouffée recipe. It's a dish that not only delights the taste buds but also warms the heart with its rich history and family ties. Enjoy and laissez les bons temps rouler! (Let the good times roll!)

Read more about Appetizers

Read more about Main Dishes

Read more about Desserts

Barbecued Shrimp & Grits | Made by Meaghan Moineau

Barbecued Shrimp & Grits | Made by Meaghan Moineau

Savoring Southern Comfort: Barbecued Shrimp & Grits


A Nostalgic Twist on a Southern Classic


Introduction


There’s something undeniably heartwarming about the rich, savory flavors of Southern cuisine. Among the myriad of dishes that capture the essence of Southern hospitality, Barbecued Shrimp & Grits stands out as a true classic. This dish not only tantalizes the taste buds with its delightful combination of textures and flavors but also evokes cherished memories of family gatherings and warm summer evenings. Today, I’m sharing a treasured recipe that brings together the smoky goodness of bacon, the creamy comfort of grits, and the tangy kick of barbecue sauce. Let’s dive into this delectable journey!


Ingredients


- Bacon


- Barbecue sauce


- Butter


- Garlic cloves


- Grits


- Raw shrimp


- Salt


- Scallions


- Sharp cheddar cheese


- Water


Instructions


1. Prepare the Bacon: Fry bacon until crisp, crumble, and set aside. The aroma of sizzling bacon is just the beginning of our culinary adventure.
2. Prep the Shrimp: Peel and devein the shrimp. For that smoky, char-grilled flavor, skewer and grill them for 2-3 minutes on each side, or until they turn a lovely shade of pink. Alternatively, you can fry them over medium heat for about 5-8 minutes total, until perfectly cooked.
3. Sauté the Garlic: In 1 tablespoon of butter, sauté minced garlic until fragrant. This will infuse the dish with a subtle, yet robust flavor.
4. Cook the Grits: Bring water to a boil and stir in the grits. Cover and let them cook for 5 minutes before reducing the heat to low. Stir in sharp cheddar cheese, the remaining butter, sautéed garlic, and a pinch of salt to create a creamy, dreamy base.
5. Toss the Shrimp: Coat the cooked shrimp in your favorite barbecue sauce for that signature tangy and sweet glaze.
6. Assemble the Dish: In a bowl, layer the creamy grits, barbecue shrimp, crispy bacon, and freshly sliced scallions. Serve it piping hot, with an optional drizzle of extra barbecue sauce for added flair.

Family Memory


Every summer, our family would gather at my grandparent’s old farmhouse, a place where time seemed to stand still amidst the rolling hills and sprawling oak trees. My grandmother, a true Southern belle, would prepare her famous Shrimp & Grits, a dish that was as much a part of our family tradition as the laughter and stories shared around the table.


I remember the anticipation building as the aroma of bacon and garlic wafted through the screen doors, signaling the feast that awaited us. My cousins and I would scamper around the porch, while the adults chattered and clinked glasses of sweet tea. As we finally settled down to eat, the first bite of creamy grits paired with the tangy barbecue shrimp would silence the room, if only momentarily, as we all savored the comforting flavors.


Even now, each time I prepare this dish, I’m transported back to those sun-drenched afternoons, surrounded by family, love, and the unmistakable taste of home.


Difficulty Rating


Difficulty: 5/10

This dish is perfect for home cooks looking to impress with minimal effort. It requires basic cooking techniques and simple ingredients that come together beautifully.


Classification


Category: Main Dish

Barbecued Shrimp & Grits is a hearty and satisfying main course that pays homage to the rich culinary heritage of the South. Whether you’re sharing it with family or enjoying a cozy dinner for two, this dish is sure to become a beloved favorite.


Conclusion


Barbecued Shrimp & Grits is more than just a meal; it's a celebration of flavors and memories that bring people together. I encourage you to try this recipe and create your own cherished moments with family and friends. After all, food is not just about nourishment, but also about creating connections and savoring life’s simple pleasures.

Read more about Appetizers

Read more about Main Dishes

Read more about Desserts

South Carolina Style Pulled Pork | Made by Meaghan Moineau

South Carolina Style Pulled Pork | Made by Meaghan Moineau

Title: Savoring Southern Comfort: The Ultimate South Carolina Style Pulled Pork Recipe
Description: Dive into the heart of Southern cuisine with our South Carolina Style Pulled Pork recipe. This dish captures the essence of family gatherings, smoky barbecues, and the rich traditions of the American South. Follow our detailed guide to recreate this mouthwatering main dish, complete with a nostalgic tale that brings warmth to your culinary adventure. Rated 7/10 in difficulty, this recipe is perfect for those who cherish the art of slow cooking and the joy of sharing a hearty meal with loved ones.

---


South Carolina Style Pulled Pork: A Taste of Tradition


There's something inherently comforting about the aroma of slow-cooked pork wafting through the air, mingling with the sweet and tangy notes of a well-crafted barbecue sauce. This South Carolina Style Pulled Pork is not just a dish but a tribute to the time-honored tradition of Southern barbecues—a tradition that, for many, is synonymous with family, laughter, and the joy of good food.


Ingredients:

- 1 Boston butt pork shoulder

- 1 cup apple cider vinegar


- 1 cup barbecue sauce


- 1 tablespoon chili powder


- 2 tablespoons Dijon mustard


- 4 cloves garlic, minced


- 1 tablespoon ground cumin


- 2 tablespoons hoisin sauce


- 3 tablespoons honey


- 1/4 cup maple syrup


- 1 teaspoon crushed red pepper flakes


- 2 tablespoons soy sauce


- 1 tablespoon table salt


- 3 tablespoons tomato paste


- 2 tablespoons vegetable oil


- 2 tablespoons Worcestershire sauce


- 1 large yellow onion, diced


Instructions:

1. Prepare the Marinade: Combine Dijon mustard, apple cider vinegar, soy sauce, Worcestershire sauce, honey, and crushed red pepper flakes in a bowl. Massage the mixture into the pork shoulder or use a ziplock bag to ensure full coverage. Refrigerate for at least 3 hours, or up to 3 days, for optimal flavor infusion.
2. Prepping the Grill: Remove the marinated pork from the fridge at least an hour before cooking. Let it come to room temperature. Meanwhile, soak wood chips in water, and prepare a two-level fire on your grill, placing the soaked wood chips on the hot coals for added smokiness.
3. Smoking the Pork: Place the pork in a disposable aluminum pan on the side of the grill opposite the coals. Maintain a temperature of 275°F by adding briquettes as needed. Smoke the pork for about 3 hours, basting occasionally with the marinade.
4. Oven Cooking: Preheat your oven to 325°F. Wrap the pork in heavy-duty foil and bake for 2 hours until fork-tender.
5. Resting the Meat: Place the foil-wrapped pork in a brown paper bag, crimp the end shut, and let it rest for an hour.
6. Making the Barbecue Sauce: While the pork rests, sauté onions and garlic in oil until translucent. Add tomato paste, hoisin sauce, maple syrup, and the remaining ingredients. Simmer for 30 minutes and set aside.
7. Shred and Serve: Shred the pork and mix with a cup of barbecue sauce. Serve with additional sauce on the side.

A Nostalgic Flavor Journey


Growing up, family barbecues were the highlight of my summers. The smoky scent of pork mingling with laughter and the clinking of glasses set the scene for unforgettable evenings. I remember my grandmother, the queen of Southern cooking, meticulously preparing her famous pulled pork for our annual family reunion. As kids, we’d sneak bites of the tender meat before it even hit the table, earning playful scolds from the adults.


The secret, she'd say with a wink, was in the marinade—a blend of tangy, sweet, and spicy flavors that danced on the palate. Her recipe, a closely guarded family treasure, was passed down to me, and I now carry the torch, sharing her legacy with my own children. Every time I prepare this dish, I’m transported back to those sun-drenched afternoons, surrounded by the warmth of family and the simple joy of sharing a meal together.


Difficulty: 7/10

Classification: Main Dish


This South Carolina Style Pulled Pork is not just about the flavors but the memories it evokes—making it a truly special dish to share with your loved ones. So fire up your grill, gather your family, and embark on a culinary journey that promises to delight your senses and warm your heart.

Read more about Appetizers

Read more about Main Dishes

Read more about Desserts

Classic Buttermilk Pie | Made by Meaghan Moineau

Classic Buttermilk Pie | Made by Meaghan Moineau

Title: A Slice of Nostalgia: Crafting the Perfect Classic Buttermilk Pie
Description: Dive into the heartwarming world of classic Southern desserts with our detailed guide on baking the perfect Buttermilk Pie. Experience a taste of tradition with a story that brings warmth to your kitchen, while enjoying a dessert that is a staple for any family gathering. Simple ingredients and step-by-step instructions make this a delightful treat to prepare and savor.

---


There are few desserts that capture the essence of Southern tradition quite like the Classic Buttermilk Pie. With its rich, custardy filling and buttery crust, this pie is more than just a sweet treat; it's a slice of history that brings back memories of family gatherings and cherished moments around the dinner table.


Ingredients:

- 1/2 cup butter, melted

- 1 cup buttermilk


- 3 large eggs


- 3 tablespoons all-purpose flour


- 2 cups sugar


- 1 unbaked 9-inch pie shell


- 1 teaspoon vanilla extract


Instructions:

1. Preheat the Oven: Set your oven to 325 degrees Fahrenheit to ensure a gentle, even bake for the custard filling.
2. Prepare the Filling: In a mixing bowl, slightly beat the eggs. Gradually add in the sugar and flour, ensuring a smooth consistency without lumps. Stir in the melted butter, mixing thoroughly.
3. Combine Flavors: Pour in the buttermilk and vanilla extract, blending them into the egg mixture until well combined.
4. Prepare the Pie Shell: Lightly dust the unbaked pie shell with a bit of flour to help the filling adhere and bake evenly.
5. Assemble the Pie: Pour the prepared batter into the pie shell. Sprinkle a little more flour on top, which will help create a slight crust on the custard as it bakes.
6. Bake to Perfection: Place the pie in the preheated oven and bake for approximately 1 hour, or until the custard is set and a gentle jiggle is observed only in the center.

Family Nostalgia:

Growing up, family gatherings at my grandmother's house were never complete without the presence of her famous Buttermilk Pie. I remember the anticipation that would build as the sweet aroma wafted through the house, signaling that dessert time was near. My cousins and I would circle the kitchen like bees to honey, eagerly waiting for that first slice.

Grandma would always serve the pie warm, its golden crust giving way to a rich, creamy filling that melted in our mouths. Each bite was a comforting reminder of the love and care she poured into all her recipes. Now, every time I bake this pie, it feels like a warm hug from her, a cherished tradition I am proud to continue and share with my own family.


Difficulty Rating: 3/10

This pie is classified as a Dessert, and its simplicity makes it an approachable recipe for bakers of all skill levels, yet it delivers a profound depth of flavor that belies its ease of preparation.

---


This Classic Buttermilk Pie is not just a dessert—it's a connection to the past, a testament to the enduring power of family recipes to bring people together. Whether you're a seasoned baker or new to the kitchen, this pie is sure to become a beloved addition to your culinary repertoire. Enjoy a slice of nostalgia and savor the sweetness of tradition with every bite.

Read more about Appetizers

Read more about Main Dishes

Read more about Desserts

Jean’s Seafood Gumbo | Made by Meaghan Moineau

Jean's Seafood Gumbo | Made by Meaghan Moineau

Title: "Stirring Up Tradition: Jean's Seafood Gumbo - A Heartfelt Creole Classic"


Description:

Dive into the rich flavors and history of Jean's Seafood Gumbo, a classic Creole dish that brings together family traditions and the bold taste of Louisiana. This main dish, with a difficulty rating of 8/10, promises a culinary journey through the bayous, capturing the essence of Southern hospitality in every savory bite.

---


A Whiff of the Past: The Allure of Jean's Seafood Gumbo


There’s something magical about certain dishes, those that have the power to transport us back in time, evoking memories of family gatherings, laughter, and the comforting hum of a bustling kitchen. One such dish in my family is Jean’s Seafood Gumbo, a recipe that has been passed down through generations, each iteration infused with love and a dash of Creole spirit.


Growing up, Sundays at Grandma Jean’s house were nothing short of an event. The aroma of her gumbo would greet us at the door, a warm invitation that promised a day filled with hearty laughter and full bellies. We’d gather in her cozy kitchen, the heart of our family home, watching as she expertly peeled shrimp and chopped vegetables, her hands a blur of practiced precision. Grandma Jean would often tell stories of her own childhood in Louisiana, where she learned the art of gumbo from her mother, who learned it from her own.


Each ingredient was carefully selected and prepared, with fresh shrimp and blue crabs forming the soul of the dish. The process was a family affair, with each of us taking turns stirring the pot and adding a pinch of this or a dash of that, under Grandma Jean’s watchful eye. It was here, enveloped in the fragrant steam of the gumbo pot, that we learned the importance of patience, of letting the roux develop its deep, nutty hue, and allowing the flavors to meld into a harmonious symphony.


A Step-by-Step Guide to Jean's Seafood Gumbo


Ingredients:

- Fresh shrimp, blue fresh crabs


- Celery, parsley, green peppers, onion, green onions, garlic


- Bay leaves, tomato paste, vegetable oil, flour


- Salt, black ground pepper, dried thyme, Worcestershire sauce


- Whole canned tomatoes, Tabasco sauce, Creole seasoning


- Smoked andouille, filé powder, fresh okra


- White Louisiana rice


Instructions:
1. Create the Stock: In a large 14-16 quart pot, bring two quarts of water to a boil. Peel and devein shrimp, saving the heads and hulls. Boil these in the pot for 30 minutes to an hour for a rich Creole stock. Strain and discard the heads and hulls.
2. Prepare the Crabs: Clean the fresh crabs, discarding the hard shell and yellow insides. Set aside.
3. Chop the Vegetables: Dice celery, parsley, peppers, onions, and garlic, keeping the celery and parsley separate.
4. Start the Gumbo: Return the shrimp stock to the stove, adding crabs and bay leaves. Stir in celery, parsley, and tomato paste, bringing the pot to a gentle boil before reducing to a simmer.
5. Make the Roux: In a heavy skillet, heat vegetable oil over medium-low heat and slowly add flour, stirring continuously until the roux reaches a dark mahogany color.
6. Combine Ingredients: Add onions, garlic, and green peppers to the roux. Pour the mixture into the gumbo pot, adding water if necessary, and bring to a boil. Reduce the heat, cover, and let the gumbo simmer.
7. Season and Simmer: Add salt, pepper, thyme, Worcestershire sauce, Tabasco sauce, and Creole seasoning to taste. Fry the sausages and okra separately before adding to the gumbo. Stir in chopped tomatoes, bringing everything to a boil, then simmer for 2½ to 3 hours.
8. Finish the Dish: Add shrimp and stir in filé powder, cooking for an additional 20-30 minutes. Adjust seasonings as needed.
9. Serve: Serve over white Louisiana rice and enjoy the taste of tradition.

Rating and Classification


Difficulty: 8/10
Classification: Main Dish

As the years have passed, Jean’s Seafood Gumbo has remained a cherished symbol of family unity and culinary heritage. It’s more than just a meal; it’s a celebration of our roots, a testament to the power of food to bring people together. Whether you’re a seasoned chef or a gumbo novice, this dish is sure to fill your home with warmth, laughter, and the irresistible essence of Creole cuisine.

Read more about Appetizers

Read more about Main Dishes

Read more about Desserts

Jambalaya Stew | Made by Meaghan Moineau

Jambalaya Stew | Made by Meaghan Moineau

# A Hearty Bowl of Jambalaya Stew: A Taste of Tradition


**Description:** Dive into the rich flavors of New Orleans with our Jambalaya Stew, a delightful blend of savory chicken sausage, succulent shrimp, and vibrant vegetables. This hearty dish is perfect for family gatherings and a breeze to make. Join us as we explore the comforting nostalgia of this family favorite, with a sprinkle of history and a dash of spice.


---


## A Culinary Journey: Rediscovering Jambalaya Stew


There's something magical about a pot of Jambalaya simmering on the stove, the aroma of spices filling the kitchen, and the promise of a comforting meal waiting to be shared. This Jambalaya Stew is not just a recipe; it's a journey back to cherished family memories, a dish that brings loved ones together around the table.


### Ingredients You'll Need


- **4 cooked Italian sweet chicken sausage links**


- **1 can of diced tomatoes**


- **1 onion, chopped**


- **1 yellow and 1 green bell pepper, diced**


- **2 stalks of celery, chopped**


- **4 cups of low sodium chicken broth**


- **1 cup of brown rice**


- **3 cloves of garlic, minced**


- **2 tablespoons of Cajun seasoning**


- **A dash of hot sauce (or to taste)**


- **1 teaspoon of dried oregano**


- **1 teaspoon of dried thyme**


- **1 pound of raw shrimp, peeled and deveined**


### Cooking Instructions


1. **Combine Ingredients:** In a large pot, add all ingredients except the shrimp. Stir them together until well mixed.


2. **Bring to a Boil:** Heat the pot on the stove until it reaches a boil.


3. **Simmer:** Reduce the heat to medium-low. Cover the pot and let it simmer for about 35 minutes, or until the vegetables are tender and the rice is fluffy.


4. **Add Shrimp:** Stir in the shrimp, then re-cover the pot. Cook for an additional 6 minutes, or until the shrimp are tender and cooked through.


5. **Season to Taste:** If desired, add salt, black pepper, or more hot sauce to suit your taste.


6. **Serve and Enjoy:** Ladle the stew into bowls, serve hot, and enjoy the flavors of this traditional dish.


### A Nostalgic Family Tale


Growing up, Sundays were always a special day in our household. It was a time to slow down, gather the family, and enjoy a hearty meal together. My grandmother's Jambalaya Stew was the star of these Sunday gatherings. The kitchen would be a flurry of activity, with family members chopping vegetables, stirring pots, and sharing stories.


One particular Sunday stands out in my memory. It was a chilly afternoon, and as the stew simmered away on the stove, the warmth from the kitchen crept into every corner of the house. I remember my grandmother, her apron dusted with flour, telling tales of her own childhood in New Orleans, where Jambalaya was a staple at every family feast. Each spoonful of the stew was like a warm hug, a reminder of the love and care that went into every meal.


Even today, every time I make this Jambalaya Stew, I'm transported back to those cherished Sundays. It's more than just a dish—it's a celebration of family, tradition, and the simple joy of sharing a meal with those you love.


### Difficulty Rating and Classification


- **Difficulty:** 4/10 - This recipe is straightforward, making it perfect for both novice cooks and seasoned chefs.


- **Classification:** Main Dish - With its hearty ingredients and robust flavors, this Jambalaya Stew is sure to be the centerpiece of any meal.


Embrace the flavors of the South and create your own family memories with this Jambalaya Stew. Whether it's a casual weeknight dinner or a special family gathering, this dish is sure to warm hearts and fill bellies. Enjoy!

Read more about Appetizers

Read more about Main Dishes

Read more about Desserts