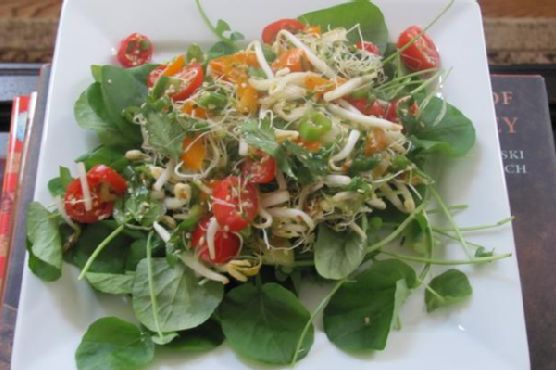
Watercress Salad With Miso-Lime Dressing
Intro
There’s something about the crisp, refreshing bite of a fresh salad that can transport you to a summer day, no matter what the season. This Watercress Salad with Miso-Lime Dressing is not just a dish; it’s a journey back to the lush gardens of my childhood. I fondly remember visiting my grandmother’s garden every summer. Her garden was abundant with vibrant greens, each leaf kissed by the sun. Among the rows of vegetables and herbs, watercress was always my favorite. The spicy, peppery leaves were irresistible, and I would often sneak a handful to munch on while she wasn’t looking. It’s no surprise that watercress remains a beloved ingredient in my kitchen. This recipe is inspired by those summers, combining the freshness of garden greens with a tangy miso-lime dressing that brings everything together in a perfect harmony of flavors.
Why You’ll Love It
This salad is a celebration of flavor and texture. It’s not just a salad; it’s an experience. Here’s why you’ll fall in love with it:
- Fresh and Nutritious: Packed with vibrant greens and crunchy vegetables, this salad is a powerhouse of nutrients.
- Easy to Make: With simple steps and readily available ingredients, you can whip this salad up in no time.
- Flavorful Dressing: The Miso-Lime Dressing is the star, offering a perfect balance of tangy, sweet, and savory flavors.
- Versatile: Great as a side dish or a light meal, and easily customizable to suit different tastes and dietary needs.
Ingredients
- Fresh sprouts
- Fresh mung bean sprouts
- Entire green onions, sliced
- Grape tomatoes, halved
- Diced orange bell pepper
- Cilantro, chopped
- Sesame seeds
- Watercress leaves
- Miso-lime dressing (recipe follows)
- Fresh squeezed lime juice
- Sesame oil
- White miso
Instructions
- In a large bowl, toss together the fresh sprouts, mung bean sprouts, sliced green onions, grape tomatoes, diced orange bell pepper, chopped cilantro, and sesame seeds.
- In a small bowl, whisk together the fresh squeezed lime juice, sesame oil, and white miso to create your Miso-Lime Dressing.
- Pour the dressing over the mixed sprouts and vegetables in the large bowl. Toss until everything is evenly coated.
- Divide the watercress leaves evenly among four plates, creating a bed for the salad.
- Top each plate with the mixed sprout salad, evenly distributing the Miso-Lime Dressing among them.
- Serve immediately and enjoy the delicious flavors!
Tips
- Choose Fresh Ingredients: Fresh, high-quality ingredients make all the difference. Look for crisp, vibrant watercress and sprouts for the best flavor and texture.
- Miso-Lime Dressing Consistency: Adjust the dressing’s consistency by adding a little water if it’s too thick or more lime juice for extra tang.
- Toast the Sesame Seeds: For an added depth of flavor, lightly toast the sesame seeds before adding them to the salad.
Variations & Substitutions
Feel free to make this salad your own by experimenting with different ingredients and flavors:
- Protein Boost: Add grilled chicken, shrimp, or tofu for a more filling meal.
- Nutty Flavor: Swap sesame seeds for toasted almonds or pine nuts for a different crunch.
- Spicy Kick: Add a dash of chili flakes or sliced jalapeños for some heat.
- Other Greens: If watercress is unavailable, arugula or baby spinach make excellent substitutes.
Storage
This salad is best enjoyed fresh, but if you have leftovers, store them in an airtight container in the refrigerator for up to two days. Keep the dressing separate if you plan to store the salad for later, to prevent the greens from wilting.
FAQ
Can I make the dressing ahead of time?
Absolutely! The Miso-Lime Dressing can be made in advance and stored in the fridge for up to a week. Just give it a good shake or stir before using.
Is this salad vegan-friendly?
Yes, this salad is naturally vegan. Just ensure that all your ingredients, especially the miso, are vegan-certified if you follow a strict vegan diet.
Can I use another type of miso?
White miso is recommended for its mild flavor, but if you prefer a stronger taste, yellow or red miso can be used. Keep in mind that they will affect the overall flavor of the dressing.
Nutrition
This refreshing salad is not only delicious but also packed with nutrients. Watercress is a superfood rich in vitamins A, C, and K, while the sprouts provide a good source of protein and fiber. The Miso-Lime Dressing adds a healthy dose of probiotics thanks to the fermented miso, making this dish both tasty and nourishing.
Conclusion
Whether you’re looking to add more greens to your diet or simply searching for a delightful salad to brighten up your meals, this Watercress Salad with Miso-Lime Dressing is a fantastic choice. With its refreshing flavors, easy preparation, and health benefits, it’s a dish that you’ll want to make again and again. I hope this salad brings a bit of the garden’s joy to your table, just as it does to mine. Enjoy every crunchy, flavorful bite!
Related update: Watercress Salad With Miso-Lime Dressing
Related update: Yorkshire Pudding
Related update: Traditional Panzanella