Avocado Nests | Made by Meaghan Moineau

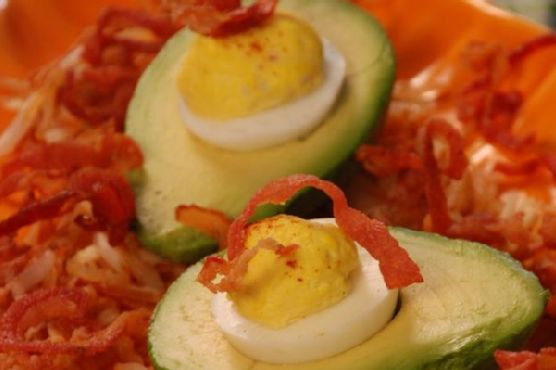
It was one of those lazy Sunday mornings when I found myself staring into the abyss of my fridge, hoping for some culinary inspiration to jump out and bite me. The chill of early spring was still hanging in the air, and I was craving something that felt both cozy and a bit indulgent. That’s when I noticed I had a couple of avocados sitting on the counter, at that perfect stage of ripeness where they practically beg to be eaten. A quick scan of the fridge and pantry revealed the usual suspects: eggs, bacon, and a trusty bag of frozen hash browns. And just like that, the idea for Avocado Nests was born. This dish is incredibly satisfying, combining the creamy richness of avocados with the savory crunch of bacon and hash browns. It’s a little bit of everything you love about brunch, with a fun twist.

Jump to Recipe

What You’ll Need

So, here’s the deal: you’re likely just a few steps away from a deliciously satisfying meal, because most of these ingredients are staples you probably have on hand.

  • Avocados — perfectly ripe, because isn’t that always the goal?
  • Hardboiled Eggs — get these ready before you start.
  • Frozen Hash Browns — because who has time to grate potatoes on a Sunday morning?
  • Bacon — smoky, crispy, and just the right touch of indulgence.
  • Mayonnaise — or cream cheese if you’re feeling fancy.
  • Salt and pepper — the dynamic duo of seasoning.

How to Make Avocado Nests

  1. First, cook your frozen hash browns according to the package directions. You want them golden and crispy but not too dark. The smell of them browning should fill your kitchen with that warm, inviting aroma.
  2. While those are cooking, cut your bacon into thin strips. You can either bake them in the oven or fry them up in a pan until they reach your desired crispiness. A little sizzle and a waft of that smoky scent, and you know they’re ready.
  3. Next up, time to make some deviled eggs. Pop out those egg yolks and mix them with a spoonful of mayonnaise or cream cheese until smooth. Season with a sprinkle of salt and pepper before scooping the mixture back into the egg white halves.
  4. Take your avocados and carefully cut them in half. Remove the seed and peel them gently. You’re aiming for a seamless, intact avocado half here.
  5. Layer the cooked hash browns onto a serving plate and sprinkle with the crispy bacon pieces. This is your flavorful nest bed, inviting those avocados to rest.
  6. Finally, nestle a deviled egg half into the seed cavity of each avocado half. Place the filled avocados onto the bed of hash browns and bacon. Voilà, your Avocado Nests are ready to enjoy!

Cook’s Notes

Okay, real talk: the key to nailing this dish is timing. Get those hash browns and bacon going first so you can focus on prepping the other ingredients. If you’re planning to make this ahead of time, keep the elements separate until you’re ready to serve — nobody likes soggy hash browns. Leftovers can be stored in an airtight container in the fridge for a day or two, and they make for a surprisingly good next-day lunch. Just reheat the hash browns and bacon separately for the best texture.

Make It Your Own

Here are a few fun twists to make these Avocado Nests even more personal:

  • Swap the bacon for crispy tofu if you’re aiming for a vegetarian version. Just season it well!
  • Mix in a bit of hot sauce or Sriracha into the egg yolk mixture for a spicy kick.
  • Use sweet potato hash browns instead for a slightly sweeter, more complex flavor profile.
  • Jump out of the brunch box and add a sprinkle of feta or blue cheese crumbles for an extra punch of flavor.

If you try this, I’d love to hear how it turns out — drop a comment or tag me on social media! There’s nothing better than sharing a little homemade magic. Enjoy your cozy brunch adventure!

Related update: Avocado Nests

Related update: Chia Seed Pudding

Framework Cuts Laptop 13 Pro Prices | Analysis by Brian Moineau

TL;DR

  • Framework cut Laptop 13 Pro DIY Edition prices by qualifying ADATA’s XPG MARS 970 Gen 5 SSDs, applying the reductions to existing pre-orders, and upgrading 500GB buyers to 1TB at a lower price; it also flagged potential CPU price hikes in the coming weeks. [1][2]
  • Apple raised U.S. MacBook prices on June 25, 2026 by $200 on MacBook Air ($1,099 → $1,299) and $300 on MacBook Pro ($1,699 → $1,999), shifting the thin‑and‑light value bar; Framework’s move turns that public reset into a competitive wedge. [3]
  • The real story is thermals and controllers: an efficient Gen 5 SSD in a 13.5‑inch chassis widens bill‑of‑materials options and lets a modular OEM hold or cut prices while sealed rivals absorb or pass through costs. [5]

What the source said

VideoCardz reported that Framework responded to Apple’s Mac price hikes by lowering prices on Laptop 13 Pro DIY Edition configs that now include ADATA’s XPG MARS 970 PCIe Gen 5 storage, with 1TB and 2TB options for new orders. Framework said it would automatically move existing pre-orders to the ADATA drive, apply the reduced price, and upgrade 500GB selections to 1TB at a lower price, while warning that CPU pricing could rise soon. Pre‑built systems are unchanged because they ship with Gen 4 SSDs. [1][2]

Why it matters

Framework’s switch during a 2026 NAND/DRAM squeeze shows how a small modular vendor can arbitrage component pricing mid‑cycle and pass savings to customers on June pre-orders instead of waiting for a new model year. The company used configurability—swapping a Gen 5 SSD qualification—to cut real dollars while signaling that future CPU costs may lift some SKUs. [2]

Apple’s across‑the‑board Mac increases on June 25, 2026 reset cross‑shop math: Air at $1,299 and Pro at $1,999 change student, developer, and SMB budgets heading into the August–September U.S. back‑to‑school window. A rival offering a $1,199 DIY base (as launched in April 2026) plus cheaper Gen 5 storage can scoop fence‑sitters who notice a $100–$300 spread. [3][4]

Original analysis

Framework lowers Laptop 13 Pro prices: what’s actually changing

The headline is storage, not the CPU or screen: Framework is swapping to ADATA’s XPG MARS 970 (1TB/2TB) Gen 5 SSD with rated sequential up to 11,000/10,000 MB/s (10,500/9,500 MB/s for 1TB), a thin profile suitable for notebooks, and a 5‑year warranty. Engineers will zero in on the controller: the drive uses Silicon Motion’s SM2508, which brings Gen 5 throughput at lower power than first‑wave controllers that needed bulky heatsinks. In a 13.5‑inch, 3:2 laptop, cooler Gen 5 widens thermal headroom and enables BOM choices others can’t mirror quickly. [5][6]

Framework says it will shift all existing 13 Pro pre‑orders with the older Gen 5 option to ADATA’s drive, reprice them down, and upgrade 500GB orders to 1TB at a lower price—an unusually customer‑friendly move in a rising‑cost environment. It simultaneously warned that CPU pricing could increase “in the coming weeks,” a tell that SSD savings offset anticipated processor inflation rather than herald broad deflation. [2]

Meanwhile, Apple’s June 25 price hike added $200 to MacBook Air and $300 to MacBook Pro, changing the perceived gap with Windows/Linux ultralights for the next semester of buyers. Framework’s 13 Pro DIY Edition launched at $1,199 in April 2026, which now sits $100 under the Air before the SSD repricing rolls in. Perception moves switchers as much as the raw sticker. [3][4]

— Back‑of‑envelope calculation

  • Apple’s increase: +$200 (Air), +$300 (Pro). Amortized over 36 months, $200 ≈ $5.56/month and $300 ≈ $8.33/month; those deltas often equal a 1TB SSD upgrade or a RAM step in a modular build. If you planned for $1,099 and now see $1,299, that $200 gap can fund a 1TB Gen 5 SSD in a DIY machine, narrowing total cost of ownership in the $1,000–$1,500 band. [3]

— A 2×2: how laptop makers respond to the memory crunch

  • X‑axis: Cost strategy

    • Absorb temporarily
    • Pass‑through quickly
  • Y‑axis: Product architecture

    • Closed/sealed
    • Modular/DIY
  • Quadrants with examples:

    • Closed + Absorb: Apple (until June 2026), then a shift right as hedges run out. [3]
    • Closed + Pass‑through: Premium Windows OEMs (e.g., Dell XPS 13 or HP Spectre x360 base trims in 2025) that bump RAM/SSD pricing or prune low‑capacity configs.
    • Modular + Absorb: Framework consuming cheaper 2025 SSD inventory to delay hikes, then partially reverting in 2026. [2]
    • Modular + Pass‑through via supplier swap: Framework’s ADATA switch with instant repricing—change the ingredient, move the price, keep the promise. [2]

— Historical analogue

Thailand’s 2011 floods throttled HDD output and doubled drive prices, forcing OEMs to raise system prices or alter specs through 2012–2013. Contemporary coverage shows how quickly supply shocks cascaded into product decisions and how long recovery took, a rhyme with 2026’s NAND/DRAM dynamics. Expect 6–18 months of churn rather than a six‑week blip. [7][8]

— Contrarian read

Sequential peaks at 2TB (11,000/10,000 MB/s) exceed the 1TB variant’s 10,500/9,500 MB/s, a reminder that not all Gen 5 wins are uniform across capacities. If Framework’s mix skews to 1TB for cost reasons, early buyers may trade a few percent of sequential speed for cooler sustained performance that benefits laptops more. [5]

— Named‑stakeholder breakdown

  • Framework: Gains trust by repricing June 2026 pre‑orders downward and telegraphing CPU risk to pull demand forward. [2]
  • Apple: Protects margin during a memory supercycle but opens a flank to value‑driven prosumers and students priced at $1,100–$1,300. [3]
  • ADATA/XPG and Silicon Motion: Land a laptop‑class Gen 5 design‑in that validates thin‑profile controllers beyond desktops. [5][6]
  • Western Digital/SanDisk and Phison (OEM mix): Maintain presence in prebuilt Gen 4 stacks but lose DIY mindshare to “cooler Gen 5” narratives. [2]
  • Buyers: DIY flexibility turns into dollars when a supplier swap yields an automatic 500GB→1TB upgrade and a lower invoice. [2]

What others are missing

The laptop‑scale thermal budget is the hinge: many early Gen 5 SSDs targeted desktop peak throughput and ran hot, forcing 13‑inch notebooks to throttle or burn fan and battery headroom. ADATA’s MARS 970 is specced for thin‑profile operation without oversized heatsinks, which fits a 13.5‑inch, 3:2 chassis better than “banner 11 GB/s” drives that heat‑soak under real workloads. Controller choice (SM2508) plus thermals, not just raw sequential, is what lets Framework price‑cut without cooking the chassis. [5][6]

What to watch next

  1. By July 31, 2026, Framework raises the price of at least one Laptop 13 Pro CPU configuration for new orders, citing the CPU cost signal disclosed on June 25. [2]
  2. By September 30, 2026, at least one major Windows OEM publicly trims a base storage capacity (e.g., 512GB → 256GB) or raises storage upgrade prices on a named model, documenting a pass‑through strategy similar to Apple’s.
  3. By December 31, 2026, a second laptop brand markets a “thin Gen 5” SSD supplier swap with an efficiency/thermals pitch, indicating that ADATA/SMI’s approach influenced competitors. [6]

My take

Framework turned a component qualification into both a pricing event and a positioning story at the end of June 2026. Apple’s $200–$300 hike forces shoppers in the $1,000–$2,000 bracket to rerun the spreadsheet, and Framework filled a cell with a cooler Gen 5 option plus an automatic 500GB→1TB upgrade. If the SM2508‑based MARS 970 behaves in a 13‑inch chassis the way early reviews suggest on desktops, Gen 5 becomes a sane default rather than a marketing checkbox. Expect indecisive DIY buyers to convert now, and a slice of Mac‑curious students to test a repairable rig while Cupertino rides the memory cycle. [3][6]

Sources

  1. Framework lowers Laptop 13 Pro prices in response to Apple’s Mac price hikes — VideoCardz (https://videocardz.com/newz/framework-lowers-laptop-13-pro-prices-in-response-to-apples-mac-price-hikes) — Reports the price cuts tied to ADATA’s XPG MARS 970 Gen 5 SSD qualification and changes to existing pre‑orders.

  2. Navigating the volatile silicon market: updates on memory and storage pricing — Framework Community Blog (https://community.frame.work/t/navigating-the-volatile-silicon-market-updates-on-memory-and-storage-pricing/78800) — Official June 25, 2026 post confirming the ADATA switch, 500GB→1TB upgrade, and a warning about imminent CPU price increases.

  3. Apple raises Mac and iPad prices, spares iPhone for now — TechCrunch (https://techcrunch.com/2026/06/25/apple-raises-mac-and-ipad-prices-spares-iphone-for-now/) — Details Apple’s June 25, 2026 MacBook Air ($1,099→$1,299) and MacBook Pro ($1,699→$1,999) increases.

  4. Framework Laptop 13 Pro is a major overhaul for the modular, upgradeable laptop — Ars Technica (https://arstechnica.com/gadgets/2026/04/framework-laptop-13-pro-is-the-first-major-revision-to-the-original-framework-laptop/) — Provides April 2026 launch context and the $1,199 DIY Edition base price.

  5. XPG MARS 970 PLUS PCIe Gen5 x4 M.2 SSD — ADATA Datasheet (https://webapi3.adata.com/storage/downloadfile/datasheet_xpg_mars_970_plus_pcie_gen5_x4_m2_ssd_20251205.pdf) — Confirms capacities, 11,000/10,000 MB/s peaks (lower at 1TB), thin‑profile design, and 5‑year warranty.

  6. Framework’s Laptop 13 Pro DIY Edition now costs less than before — Tom’s Hardware (https://www.tomshardware.com/laptops/frameworks-laptop-13-pro-diy-edition-now-costs-less-than-before-but-a-cpu-price-hike-might-be-coming-cheaper-pcie-5-0-drives-from-adata-upgrade-customers-from-500gb-to-1tb-for-free) — Notes the Silicon Motion SM2508 controller and adds performance/efficiency context for Gen 5 in laptops.

  7. Disk prices double after flood — The Register (https://www.theregister.com/off-prem/2011/11/03/disk-prices-double-after-flood-and-could-double-again/395838) — Documents the 2011 Thai flood HDD shock and rapid OEM price/spec reactions.

  8. Hard drive prices slide as Thai flood aftermath subsides — Computerworld (https://www.computerworld.com/article/1471491/hard-drive-prices-slide-as-thai-flood-aftermath-subsides.html) — Tracks the multi‑quarter recovery timeline post‑2011, a template for prolonged component volatility.



Related update: We recently published an article that expands on this topic: read the latest post.

Soft Croatian corn bread – proja | Made by Meaghan Moineau

Last Tuesday, I found myself in one of those delightful culinary conundrums: a craving for something comforting yet uncomplicated, something that would warm the soul without demanding too much time or attention. The answer came to me as I stood in front of my pantry: Soft Croatian corn bread, or proja. This gem of a recipe is perfect for those moments when you want something special but don’t want to spend hours in the kitchen. It’s rich with the rustic flavors of corn and cheese, and the best part? You probably already have most of the ingredients on hand. Plus, it pairs wonderfully with soups and stews, making it a great choice for the changing seasons.

Jump to Recipe

What You’ll Need

In this recipe, the magic happens with just a few pantry staples and a couple of fresh items. Chances are, you already have most of this lying around:

  • 1 cup all-purpose flour
  • 1 teaspoon baking powder
  • 1 cup corn grits
  • 1 cup cornmeal
  • 1 cup cottage cheese
  • 3 large eggs
  • 1 cup natural yogurt
  • 1/4 cup olive oil
  • 1 teaspoon salt
  • 1 cup mineral water

How to Make Soft Croatian corn bread – proja

  1. Preheat your oven to 220°C (or about 430°F). Time to get that kitchen nice and toasty.
  2. In a large mixing bowl, crack in the eggs and sprinkle the salt. Whisk until the mixture becomes slightly frothy.
  3. Add the all-purpose flour, corn grits, cornmeal, and baking powder. Stir until everything is just combined.
  4. Pour in the olive oil and yogurt, mixing until you have a smooth batter that glistens with promise.
  5. Gradually add the mineral water, stirring consistently to achieve a thin, pourable batter. Don’t rush — let the batter tell you when it’s ready.
  6. Gently fold in the cottage cheese, ensuring it’s evenly distributed. The batter should be light and slightly lumpy.
  7. Lightly grease a baking pan with butter, then pour in the batter. Smooth the top with a spatula, giving it a little jiggle to settle.
  8. Bake in the preheated oven for about 30 minutes. You’ll know it’s done when the top is golden, and a toothpick inserted in the center comes out clean.

Cook’s Notes

Proja is forgiving, but here are a few tips to keep in mind. Make sure your batter is on the thinner side before baking; this ensures a tender crumb. If the top is browning too quickly in the oven, cover it with foil halfway through. Leftovers can be wrapped tightly and stored in the refrigerator for up to three days. To reheat, just pop a slice in the oven or toaster, and it comes back to life like magic.

Make It Your Own

Looking to add your own twist to this lovely loaf? Here are some fun variations:

  • Swap the cottage cheese for feta for a tangier kick.
  • Add a handful of chopped olives for a Mediterranean vibe.
  • Mix in some sun-dried tomatoes for a pop of color and flavor.
  • Replace the mineral water with beer for a richer, deeper flavor.

If you try this, I’d love to hear how it turns out — drop a comment or tag me! Your kitchen stories are always my favorite part. Happy baking, and remember: the best recipes are the ones that make you smile.

Related update: Soft Croatian corn bread – proja

Related update: Cavatappi pasta with salmon crab surimi

Flour-Less Peanut Butter Cookies | Made by Meaghan Moineau

I was having one of those days where everything seemed to go sideways. You know the kind — you spill your morning coffee, forget your umbrella, and then it starts pouring on your way home. I needed a pick-me-up, pronto. That’s when I remembered these Flour-Less Peanut Butter Cookies. They’re everything I needed: sweet, comforting, and ridiculously easy to make. The best part? You can whip them up with just a few pantry staples, and they’re done in under 20 minutes. Perfect for those days when you need a win, no matter how small.

Jump to Recipe

What You’ll Need

The beauty of these cookies lies in their simplicity. Chances are you have these ingredients tucked away in your kitchen already. Here’s what you need:

  • Peanut butter – smooth or chunky, your call
  • Honey – adds the perfect sweetness
  • Egg – binds it all together
  • Baking soda – gives them a little lift
  • Vanilla extract – just a splash for depth

How to Make Flour-Less Peanut Butter Cookies

  1. Preheat your oven to 350°F (175°C). This is crucial to get that perfectly soft center.
  2. In a large mixing bowl, combine the peanut butter, honey, egg, baking soda, and vanilla extract. Stir until everything is smooth and well-blended.
  3. Using a spoon, drop dollops of the dough onto a lightly greased cookie sheet. Keep them about 2 inches apart since they’ll spread a little.
  4. Bake for about 12 minutes. You’ll know they’re ready when the edges are set but the centers are still soft to the touch.
  5. Let the cookies cool on the sheet for a few minutes, then transfer them to a rack to cool completely. They’ll firm up as they cool, so resist the urge to eat them straight away!

Cook’s Notes

These cookies are incredibly forgiving, but a few tips can ensure they turn out perfect every time. If your peanut butter is particularly oily, give it a good stir before measuring. When mixing, ensure everything is well-combined but don’t overdo it; overmixing can make the cookies tough. If you like your cookies on the sweeter side, you can increase the honey slightly or add a touch of sugar.

Store these cookies in an airtight container at room temperature for up to a week — if they last that long! You can also freeze the dough balls to bake later; just add a couple of minutes to the baking time.

Make It Your Own

Want to mix things up? Here are some tasty variations:

  • Chocolate Lovers: Stir in some chocolate chips or chunks before baking for a rich, decadent treat.
  • Nuts About Nuts: Swap half the peanut butter for almond butter for a nutty twist.
  • Spice It Up: Add a sprinkle of cinnamon or a pinch of cayenne for a warm, spicy note.
  • Salty Sweet: Top each cookie with a sprinkle of sea salt right before baking for that perfect salty-sweet balance.

If you try this, I’d love to hear how it turns out — drop a comment or tag me! There’s nothing better than sharing a little cookie joy. Happy baking!

Related update: Flour-Less Peanut Butter Cookies