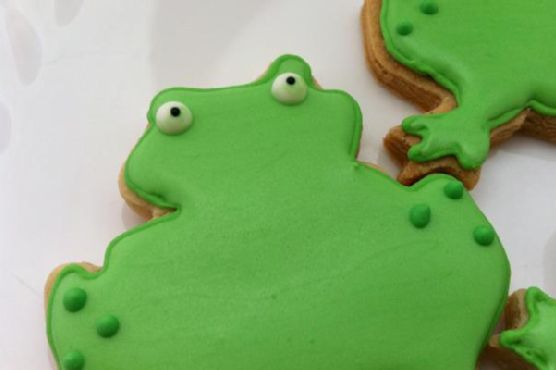
Brown Sugar & Spice Sugar Cookie Frogs
Intro
There is something magical about the aroma of freshly baked cookies wafting through the house. It reminds me of my childhood, when my grandmother would let me sneak a taste of cookie dough while she carefully rolled and cut the cookies, her hands perfectly steady despite her age. Over the years, I have carried forward her tradition of baking for every special occasion, but with my own twist. These Brown Sugar & Spice Sugar Cookie Frogs are a tribute to those cherished memories. The warm spices combined with the sweetness of brown sugar create a delightful cookie that both kids and adults will love.
Why You’ll Love It
These cookies are not only cute and whimsical, but they’re also packed with flavor. The combination of cinnamon, ginger, nutmeg, and allspice gives them a warm, cozy spice, perfect for any season. The brown sugar adds a depth of sweetness that pairs beautifully with the buttery richness of the cookie. Plus, they’re incredibly fun to make, especially with little helpers who will enjoy cutting out the frog shapes. Whether you’re baking for a family gathering, a holiday, or just because, these cookies are sure to bring smiles to everyone who tries them.
Ingredients
- 2 1/2 cups unbleached all-purpose flour
- 1 teaspoon baking powder
- 1 teaspoon ground cinnamon
- 1/2 teaspoon ground ginger
- 1/4 teaspoon ground nutmeg
- 1/4 teaspoon ground allspice
- 3/4 cup granulated sugar
- 3/4 cup light brown sugar, packed
- 1 cup unsalted butter, softened
- 1 large egg
- 1 teaspoon vanilla extract
Instructions
- Whisk the flour, baking powder, cinnamon, ginger, nutmeg, and allspice together in a medium bowl. Set aside.
- In a large bowl, cream the granulated sugar, brown sugar, and butter together until light and fluffy.
- Add the egg and vanilla extract to the butter mixture and mix until well-blended.
- Gradually add the flour mixture to the wet ingredients, beating just until combined. Be sure to scrape down the sides and bottom of the bowl to incorporate all ingredients. If necessary, knead in any stray bits of flour by hand.
- Roll the dough out on a floured surface to about 1/4 inch thickness. Cut into frog shapes using a cookie cutter.
- Place the cookies on parchment-lined baking sheets, leaving a bit of space between them.
- Bake in a preheated oven at 350°F (175°C) for 9-12 minutes, depending on the size of your cutters, until the edges are lightly golden.
- Let the cookies sit on the baking sheet for a few minutes before transferring them to a cooling rack to cool completely.
Tips
For the best results, make sure your butter is softened to room temperature before you start. This will help it cream more easily with the sugars, creating a smooth and fluffy texture. If the dough feels too sticky when rolling, lightly flour your rolling pin and work surface. Lastly, be sure to chill the dough for about 30 minutes if it’s too soft to handle; this will make cutting the shapes much easier.
Variations & Substitutions
If you want to switch things up, try adding some finely chopped nuts for a bit of crunch, or substitute part of the flour with whole wheat flour for a nuttier flavor. You can also experiment with different shapes if frogs aren’t your style—stars and hearts are always popular choices. For a holiday twist, add a pinch of cloves to the spice mix, or glaze the cookies with a simple icing made from powdered sugar and milk after they’ve cooled.
Storage
Store these cookies in an airtight container at room temperature for up to a week. If you want to keep them longer, you can freeze the baked cookies in a freezer-safe container for up to three months. Just make sure to separate layers with parchment paper to prevent sticking. To enjoy, simply thaw at room temperature.
FAQ
Can I make the dough ahead of time?
Yes, you can prepare the dough in advance. Wrap it tightly in plastic wrap and store it in the refrigerator for up to two days. When you’re ready to bake, let it sit at room temperature for a few minutes to make it easier to roll out.
What can I use if I don’t have a frog-shaped cookie cutter?
No worries! You can use any cookie cutter shape you like, or even cut the dough into squares or circles using a knife or a glass. The taste will be just as delightful, no matter the shape.
Can I use dark brown sugar instead of light brown sugar?
Yes, you can use dark brown sugar if that’s what you have on hand. It will give the cookies a slightly deeper molasses flavor, which can be a lovely variation.
Nutrition
These cookies contain approximately 150 calories per serving (2 cookies), with 8g of fat, 20g of carbohydrates, and 2g of protein. They are a delightful treat best enjoyed in moderation.
Conclusion
These Brown Sugar & Spice Sugar Cookie Frogs not only bring a touch of whimsy to your table but also fill your home with the comforting aroma of spices and sweetness. They’re easy to make, delightfully customizable, and perfect for sharing with loved ones. I hope this recipe becomes a cherished part of your baking traditions, just as it has in mine. Happy baking!
Related update: Brown sugar & Spice Sugar cookie frogs
Related update: Shortbread Lemon Bars