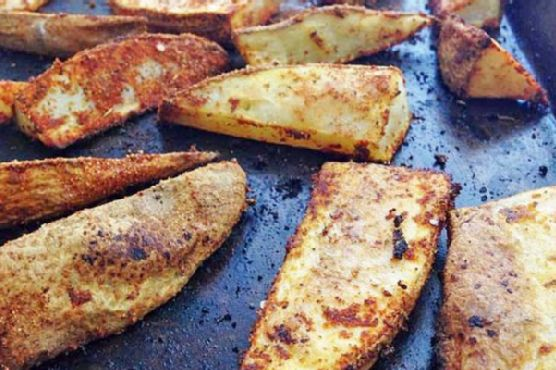
Cajun Potato Wedges | Made by Meaghan Moineau

Cajun Potato Wedges

Intro

There’s something truly magical about the aroma of spices mingling with the earthy scent of potatoes roasting in the oven. It takes me back to my childhood, where Sunday afternoons meant the whole family gathered in the kitchen, eagerly awaiting my grandma’s famous Cajun Potato Wedges. Her kitchen was a haven of warmth and laughter, with the spicy aroma of these wedges filling the air. Each bite was a burst of flavor, a perfect balance of heat and comfort. Today, I’m excited to share this beloved recipe with you, inviting you to create your own cherished memories with these delicious Cajun Potato Wedges.

Why You’ll Love It

These Cajun Potato Wedges are not just another side dish; they are a flavorful adventure for your taste buds. With their crispy exterior and fluffy interior, they bring a delightful texture that pairs perfectly with the bold, spicy seasoning. Whether you’re serving them as a snack, a side dish, or even a party appetizer, these wedges are sure to be a hit. Plus, they’re easy to make and don’t require any fancy ingredients—just good old-fashioned pantry staples with a Cajun twist.

Ingredients

  • 3-4 russet potatoes
  • 2 tablespoons olive oil
  • 1 teaspoon salt
  • 1 teaspoon cayenne pepper
  • 1 teaspoon garlic powder
  • 1 teaspoon onion powder
  • 1 teaspoon paprika
  • 1 teaspoon Italian seasoning
  • 1/2 teaspoon black pepper

Instructions

  1. Preheat your oven to 425 degrees Fahrenheit (220 degrees Celsius).
  2. Wash and scrub the russet potatoes thoroughly. Slice each potato into ½ inch thick wedges, about half the length of the potato.
  3. In a small bowl, combine the cayenne pepper, garlic powder, onion powder, paprika, Italian seasoning, salt, and black pepper. Mix well to create the spice mixture.
  4. Spray a cookie sheet with olive oil cooking spray to prevent sticking.
  5. Place the potato wedges on the cookie sheet. Drizzle with olive oil and toss to coat evenly.
  6. Sprinkle the spice mixture over the potatoes, ensuring each wedge is well-seasoned. Toss again if necessary to distribute the spices evenly.
  7. Bake in the preheated oven for 25 minutes. Remove from the oven, flip the wedges over, and return to the oven for an additional 5 minutes, or until the wedges are golden brown and crispy.
  8. Once done, remove from the oven and let them cool slightly. Serve warm with your favorite dipping sauce.

Tips

For the crispiest wedges, make sure not to overcrowd the pan. This allows for better air circulation and even cooking. Also, keep the potato skins on for added texture and nutrition. If you want an extra kick, feel free to adjust the amount of cayenne pepper to your taste. Remember, the key to perfect wedges is a hot oven and a good toss of oil and spices.

Variations & Substitutions

Feel free to get creative with this recipe! You can substitute sweet potatoes for a different flavor profile or add Parmesan cheese for a cheesy twist. If you prefer a milder version, reduce the cayenne pepper or omit it altogether. You can also experiment with different herbs and spices, such as rosemary or thyme, to suit your personal taste.

Storage

These Cajun Potato Wedges are best enjoyed fresh from the oven. However, if you have leftovers, store them in an airtight container in the refrigerator for up to 3 days. To reheat, simply place them on a baking sheet and warm in the oven at 350 degrees Fahrenheit (175 degrees Celsius) until heated through. This will help retain their crispiness.

FAQ

Can I make these potato wedges in an air fryer?

Yes, you can! Prepare the wedges as instructed and preheat your air fryer to 400 degrees Fahrenheit (200 degrees Celsius). Arrange the wedges in a single layer in the air fryer basket and cook for 15-20 minutes, shaking the basket halfway through, until they are crispy and golden.

What dipping sauces go well with Cajun Potato Wedges?

These wedges are versatile and pair well with a variety of dipping sauces. Consider serving them with ranch dressing, spicy aioli, or a tangy barbecue sauce. For a healthier option, try a Greek yogurt dip with herbs.

Nutrition

While I don’t have exact nutritional information, these Cajun Potato Wedges are a great source of carbohydrates and provide some fiber, especially if you leave the skins on. The olive oil adds healthy fats, and the spices contribute antioxidants. Just remember to enjoy them in moderation as part of a balanced diet.

Conclusion

These Cajun Potato Wedges are more than just a recipe; they’re a gateway to cherished memories and new traditions. Whether you’re looking to spice up your dinner routine or impress guests at your next gathering, these wedges are sure to deliver. Easy to prepare and bursting with flavor, they embody the essence of comfort food with a kick. So gather your ingredients, preheat your oven, and let the aroma of Cajun spices fill your home. Enjoy every crispy, savory bite!

Related update: Cajun Potato Wedges

Wild Blueberry Lemon Muffins | Made by Meaghan Moineau

Wild Blueberry Lemon Muffins

Intro

There’s something inexplicably comforting about the aroma of freshly baked muffins wafting through the house. It takes me back to Sunday mornings in my grandmother’s cozy kitchen, where the sun would gently stream through the lace curtains, casting delicate patterns on the worn wooden table. Those mornings were filled with the chatter of family and the irresistible scent of golden-brown muffins cooling on the counter. Today, I’m thrilled to share a recipe that captures that warmth and nostalgia: Wild Blueberry Lemon Muffins. These muffins combine the tartness of lemons with the sweet burst of wild blueberries, creating a delightful treat that’s perfect for breakfast, brunch, or any moment in between.

Why You’ll Love It

These Wild Blueberry Lemon Muffins are the embodiment of simple pleasures. Each bite offers a perfect balance of sweetness and tartness, with the wild blueberries providing juicy pops of flavor. The muffins are moist, tender, and crowned with a tangy lemon glaze that elevates them from ordinary to extraordinary. Whether you’re hosting a brunch or looking for a delightful weekday breakfast, these muffins are sure to impress. Plus, they’re incredibly easy to make, requiring just a few staple ingredients and minimal effort.

Ingredients

  • 2 cups all-purpose flour
  • 2 teaspoons baking powder
  • 1/4 teaspoon salt
  • 1/2 cup unsalted butter, softened
  • 1 cup granulated sugar, plus 1/8 cup for lemon zest
  • 1 large egg
  • 1 cup buttermilk
  • 1 teaspoon vanilla extract
  • 1 tablespoon fresh lemon juice
  • 1 tablespoon lemon zest
  • 1 cup canned wild blueberries, drained
  • 1 cup powdered sugar

Instructions

  1. Preheat your oven to 375°F (190°C). Line 16 muffin cups with paper liners.
  2. Mash 1/8 cup of sugar with the lemon zest in a small bowl until the sugar is moistened and fragrant.
  3. In a medium-sized bowl, whisk together the flour, baking powder, and salt. Set aside.
  4. Using an electric mixer, beat 1 cup of sugar and the softened butter together in a large bowl until light and fluffy.
  5. Add the egg to the butter mixture, beating well after each addition.
  6. Mix in the buttermilk, vanilla extract, and lemon sugar gradually, ensuring each ingredient is fully incorporated.
  7. Slowly add the flour mixture to the wet ingredients, mixing until the batter is smooth and free of lumps.
  8. Fold in the wild blueberries gently with a large spatula, being careful not to crush them.
  9. Divide the batter equally among the prepared muffin tins, filling each about 3/4 full.
  10. Bake for about 35 minutes, or until a cake tester inserted into the center of a muffin comes out clean.
  11. Allow the muffins to cool in the pan for a few minutes before transferring them to a wire rack.
  12. Prepare the lemon glaze by combining the lemon juice, remaining lemon zest, and powdered sugar in a small bowl.
  13. Spoon about 1 tablespoon of glaze over each muffin, letting it drip down the sides.

Tips

For the best muffins, ensure your butter is at room temperature before you start. This allows it to incorporate more air, resulting in fluffier muffins. Also, when folding in the blueberries, do so gently to avoid breaking them and turning your batter purple. Finally, don’t skip the glaze—it’s what ties everything together with a delightful zing!

Variations & Substitutions

If you can’t find canned wild blueberries, fresh or frozen ones will work just as well. Just make sure to pat them dry if using frozen to avoid excess moisture. For a dairy-free version, substitute the buttermilk with almond milk mixed with a splash of lemon juice. You can also try adding a handful of chopped nuts, like almonds or walnuts, for some extra texture.

Storage

These muffins are best enjoyed fresh, but they can be stored in an airtight container at room temperature for up to three days. If you want to keep them longer, they freeze beautifully. Just wrap each muffin individually in plastic wrap and place them in a resealable plastic bag. They can be frozen for up to two months. To enjoy, simply thaw at room temperature or warm them in the oven for a few minutes.

FAQ

Can I use regular blueberries instead of wild blueberries?

Absolutely! Regular blueberries can be used as a substitute if wild blueberries aren’t available. Keep in mind that wild blueberries tend to be smaller and more intensely flavored, so you might notice a slight difference in taste and texture with regular blueberries.

How can I make my muffins rise higher?

To achieve higher rising muffins, make sure your baking powder is fresh. Additionally, starting with a higher oven temperature for the first 5 minutes of baking can create a burst of steam, which helps the muffins rise. Then, reduce the temperature to the specified 375°F for the remainder of the baking time.

Can I make these muffins gluten-free?

Yes, you can make these muffins gluten-free by using a gluten-free all-purpose flour blend. Ensure the blend contains xanthan gum or a similar binding agent, which helps mimic the texture of traditional flour.

Nutrition

Each muffin is approximately 210 calories, with 8g of fat, 32g of carbohydrates, and 2g of protein. The nutritional content can vary slightly based on ingredient brands and portion sizes.

Conclusion

These Wild Blueberry Lemon Muffins are more than just a treat; they’re a little piece of nostalgia wrapped in a paper liner. With their sunny lemon flavor and sweet blueberries, they’re sure to brighten any day. Whether you enjoy them with a cup of tea or as a grab-and-go breakfast, these muffins are a delightful reminder of the simple joys in life. I hope this recipe brings as much joy to your kitchen as it has to mine. Happy baking!

Related update: Wild Blueberry Lemon Muffins

Chicken Suya | Made by Meaghan Moineau

Deliciously Spiced Chicken Suya: A Taste of West Africa

Intro

Chicken Suya is a delightful and spicy grilled chicken recipe originating from West Africa, particularly Nigeria. This dish holds a special place in my heart, as it reminds me of warm summer evenings in Lagos, where the aroma of sizzling suya from roadside vendors filled the air. As a child, my family and I would often take strolls through the bustling city streets, stopping to indulge in this delectable treat. The succulent, spicy flavor of Chicken Suya has been a cherished part of my culinary journey, and I’m thrilled to share this recipe with you.

Why You’ll Love It

There are countless reasons to fall in love with Chicken Suya. Here are just a few:

  • Bold Flavors: The suya spice blend is a powerhouse of taste, combining ground peanuts, ginger, garlic, and chili powder to create a savory and slightly spicy profile that is utterly irresistible.
  • Simple Ingredients: Despite its complex flavor, Chicken Suya requires only a handful of ingredients that you likely already have in your pantry.
  • Versatile Dish: This dish can serve as a main course, appetizer, or even a snack. It’s perfect for gatherings, barbecues, or a cozy night in.
  • Healthy and Satisfying: Grilling the chicken keeps it lean, while the spices provide a burst of nutrition and taste.

Ingredients

  • 2-3 tablespoons suya spice
  • 1 whole chicken, cut into parts
  • 1 teaspoon chili powder
  • 2 tablespoons groundnut oil (or any cooking oil)
  • 2 seasoning cubes
  • 1 onion, sliced
  • 2 tomatoes, sliced
  • Salt to taste

Instructions

  1. Preheat your oven to 500°F (260°C).
  2. Wash the chicken pieces thoroughly and pat them dry with a paper towel.
  3. In a large bowl, combine the suya spice, chili powder, seasoning cubes, and salt. Mix well.
  4. Add the chicken to the bowl, ensuring that each piece is generously coated with the spice mixture.
  5. Drizzle the groundnut oil over the seasoned chicken and give it a good mix to ensure even distribution.
  6. Arrange the chicken pieces on a baking sheet lined with aluminum foil.
  7. Place the baking sheet in the preheated oven and grill for 40 minutes. Be sure to check the chicken occasionally, flipping it to ensure it cooks evenly on both sides.
  8. Once the chicken is cooked through and has a beautiful char, remove it from the oven.
  9. Serve hot, garnished with sliced onions, tomatoes, and an extra sprinkle of suya spice for added flavor.

Tips

  • For an authentic taste, try using a grill instead of an oven. The smoky flavor from the charcoal enhances the suya’s taste.
  • If you prefer a milder heat, adjust the amount of chili powder to suit your taste.
  • Rest the chicken for a few minutes after grilling to allow the juices to redistribute, ensuring a moist and flavorful bite.

Variations & Substitutions

If you’re looking to shake things up, consider these variations:

  • Protein Swap: While chicken is traditional, you can use beef, goat meat, or even tofu for a vegetarian option.
  • Nut-Free: If you have a peanut allergy, substitute the suya spice with a nut-free spice blend.
  • Additional Veggies: Add bell peppers or mushrooms to the grill for an extra layer of flavor and texture.

Storage

Leftover Chicken Suya can be stored in an airtight container in the refrigerator for up to 3 days. To reheat, place the chicken in a preheated oven at 350°F (175°C) for about 10 minutes or until warmed through. You can also freeze the cooked chicken for up to 2 months. Thaw overnight in the refrigerator before reheating.

FAQ

Can I prepare the suya spice blend at home?

Absolutely! To make your own suya spice blend, you can combine roasted peanuts, ground ginger, garlic powder, onion powder, paprika, and chili powder. Blend them together until you reach a fine consistency. Store in an airtight jar for future use.

How can I make my Chicken Suya extra crispy?

For an extra crispy texture, finish the grilled chicken under the broiler for a few minutes. Keep a close eye on it to prevent burning, and you’ll achieve a delightful crunch.

Nutrition

Chicken Suya is a nutritious option rich in protein and flavor. While exact nutritional values depend on portion sizes, a typical serving provides:

  • Calories: Approximately 250-300 per serving
  • Protein: 25-30g
  • Fat: 15-20g
  • Carbohydrates: 5-10g

It’s a great choice for those looking to maintain a balanced diet without sacrificing taste.

Conclusion

Chicken Suya is more than just a meal; it’s a culinary experience that transports you to the vibrant streets of West Africa. With its bold flavors and tantalizing aroma, it’s sure to become a favorite in your household. Whether you’re hosting a gathering or enjoying a quiet dinner at home, this dish promises to deliver satisfaction with every bite. I hope you enjoy making and eating this Chicken Suya as much as I do. Bon appétit!

Related update: Chicken Suya

Related update: Rotisserie Chicken and Bean Tostadas

Guacamole | Made by Meaghan Moineau

The Best Homemade Guacamole

Intro

There’s nothing quite like the taste of fresh guacamole. I remember the first time I tried it at a family gathering when I was a child. The creamy texture combined with a hint of spice and citrusy notes was unlike anything I’d tasted before. My uncle, who had just returned from a trip to Mexico, made a batch for us, and since then, guacamole has been a staple at all our family gatherings. Today, I’ll share with you my take on this classic recipe, inspired by that nostalgic experience.

Why You’ll Love It

This guacamole recipe is perfect for any occasion. Whether you’re hosting a party, enjoying a quiet night in, or looking for a healthy snack, this guacamole will be your go-to. The creamy texture of the avocados paired with the freshness of herbs like cilantro, basil, and oregano creates a perfect balance of flavors. Plus, it’s quick and easy to make!

Ingredients

  • 3 ripe Haas avocados
  • 1/4 cup finely chopped onion
  • 1 jalapeño pepper, seeded and minced
  • 2 tablespoons fresh cilantro, chopped
  • 1/2 teaspoon salt
  • 1/4 teaspoon black pepper
  • 2 tablespoons fresh lime juice
  • 1 tablespoon fresh basil, chopped
  • 1 tablespoon fresh oregano, chopped

Instructions

  1. Cut the avocados in half lengthwise. Remove the pit by driving a chef’s knife into it and twisting gently to loosen.
  2. Scoop the avocado flesh out of the skin and into a mixing bowl.
  3. Using a fork, mash the avocado to your desired consistency.
  4. Add the chopped onion, jalapeño, cilantro, basil, and oregano to the mashed avocado.
  5. Mix until all the ingredients are well incorporated.
  6. Season the guacamole with salt, black pepper, and lime juice to taste.
  7. Serve immediately or chill for a more pronounced flavor.
  8. If not serving immediately, store in the refrigerator with plastic film wrap pressed onto the surface of the guacamole to prevent browning.

Tips

When choosing avocados, look for ones that are slightly soft to the touch but not mushy. A ripe avocado will yield gently to pressure. To prevent the guacamole from turning brown, ensure the plastic wrap is touching the entire surface of the guacamole. This minimizes air contact, which causes oxidation.

Variations & Substitutions

Feel free to customize your guacamole. For a spicier kick, leave the seeds in the jalapeño or add a dash of cayenne pepper. If you’re not a fan of cilantro, you can omit it or replace it with parsley. For a twist, try adding diced tomatoes or roasted corn for extra texture and flavor.

Storage

Store leftover guacamole in an airtight container in the refrigerator. Press a piece of plastic wrap directly onto the surface before sealing to keep it fresh for up to two days. Remember, the sooner you enjoy it, the better it tastes!

FAQ

Can I make guacamole in advance?

Yes, you can prepare guacamole a few hours in advance. Just make sure to store it with plastic wrap pressed against the surface to prevent browning. The lime juice also helps preserve its vibrant color.

What can I serve with guacamole?

Guacamole is incredibly versatile. Serve it with tortilla chips, as a topping for tacos, or alongside grilled chicken or fish. It’s also a great addition to sandwiches and burgers for an extra burst of flavor.

Nutrition

Avocados are packed with healthy fats, fiber, and essential nutrients. This guacamole recipe is not only delicious but also offers a good source of vitamins C, E, K, and B-6, as well as potassium and folate. Enjoy it as a healthy snack or as part of a balanced meal.

Conclusion

Whether you’re a long-time fan of guacamole or trying it for the first time, this recipe is sure to become a favorite. Its simplicity and freshness make it a standout dish that’s perfect for any occasion. So gather your ingredients and enjoy a taste of this classic, nostalgic treat. Remember, the best dishes are those shared with family and friends. Happy guacamole making!

Related update: Guacamole

Easy Chicken Wings | Made by Meaghan Moineau

Easy Chicken Wings

Intro

There’s something undeniably comforting about enjoying a plate of homemade chicken wings. When I was a child, my family had a tradition of gathering around the kitchen on Sunday afternoons to cook together. My grandmother would always be in charge of the chicken wings, skillfully mixing her secret sauce that had everyone licking their fingers with delight. These moments were filled with laughter, stories, and the irresistible aroma of cooking chicken wings. Today, I’m excited to share with you a recipe for Easy Chicken Wings that captures those cherished family memories and delivers the same deliciousness with a simple yet flavorful twist.

Why You’ll Love It

This Easy Chicken Wings recipe is a crowd-pleaser for numerous reasons. It’s quick to prepare, making it perfect for those spontaneous cravings or last-minute gatherings. The combination of sweet, smoky, and spicy flavors ensures every bite is a taste sensation. Plus, it’s versatile enough to accommodate various dietary preferences with simple substitutions. Whether you’re hosting a party, watching the big game, or simply want a comforting meal, these chicken wings are sure to become a favorite in your household.

Ingredients

  • Chicken wings & drumettes
  • Ketchup
  • Smoky BBQ sauce
  • Honey
  • Sesame oil
  • Capsico sauce
  • Oil for frying

Instructions

  1. Clean and wash the chicken wings and drumettes under running water, then pat them dry with paper towels.
  2. Heat oil in a pan over medium heat. Once the oil is hot, add the chicken wings and fry for 3-4 minutes or until they are golden brown. Remove from the oil and set aside.
  3. In another pan, combine ketchup, smoky BBQ sauce, honey, sesame oil, and Capsico sauce. Stir the mixture over medium flame for a few minutes until it becomes sticky and thickens.
  4. Add the fried wings into the sauce and toss them together until they are thoroughly coated with the sauce.
  5. Serve hot with your favorite dips and enjoy!

Tips

For the best results, ensure your oil is hot before adding the chicken wings to prevent them from becoming greasy. You can test this by dropping a small piece of bread into the oil; if it sizzles and browns quickly, the oil is ready. Additionally, patting the chicken wings dry before frying helps in achieving a crispy texture.

Variations & Substitutions

If you prefer a less spicy version, you can reduce or omit the Capsico sauce. For those who enjoy extra heat, consider adding a pinch of cayenne pepper to the sauce. To make this dish gluten-free, ensure that your BBQ sauce and ketchup are gluten-free certified. You might also try substituting maple syrup for honey to create a slightly different sweetness profile.

Storage

These chicken wings are best enjoyed fresh, but if you have leftovers, store them in an airtight container in the refrigerator for up to 3 days. To reheat, place them in an oven preheated to 350°F (175°C) for about 10 minutes, or until heated through. This will help maintain their crispiness.

FAQ

Can I bake these chicken wings instead of frying them?

Absolutely! To bake, preheat your oven to 400°F (200°C) and place the wings on a baking sheet lined with parchment paper. Bake for 25-30 minutes, flipping halfway through, until they are golden and cooked through. Then follow the remaining steps to coat them in the sauce.

What can I serve with these chicken wings?

These wings pair wonderfully with a variety of sides. Consider serving them with celery and carrot sticks, a classic coleslaw, or even a fresh garden salad. For dipping, ranch or blue cheese dressing adds a creamy complement to the spicy wings.

Nutrition

While I don’t have exact nutritional information for this recipe, chicken wings are a good source of protein. Keep in mind that frying adds additional calories, so if you’re watching your intake, baking might be a better option. Adjust the sauce quantities to suit your dietary needs, especially if reducing sugar or sodium is a priority.

Conclusion

These Easy Chicken Wings are more than just a dish; they’re a gateway to fond memories and joyous gatherings. With their delightful flavor and simple preparation, they are sure to become a staple in your kitchen. Whether you’re reliving old traditions or creating new ones, this recipe is a testament to the joy of sharing good food with loved ones. I hope you find as much pleasure in making and enjoying these wings as I have. Happy cooking!

Related update: Easy Chicken Wings

Rustic Brie Toasts with Wild Mushroom, Cranberry and Shallot | Made by Meaghan Moineau

Rustic Brie Toasts with Wild Mushroom, Cranberry, and Shallot

Intro

There’s something remarkably comforting about the scent of earthy mushrooms mingling with the crisp sweetness of cranberries and the savory richness of melted brie. This recipe for Rustic Brie Toasts with Wild Mushroom, Cranberry, and Shallot captures the essence of autumn in every bite. I remember my grandmother preparing something similar during our family gatherings in the fall. She’d gather us around her long wooden table, the fireplace crackling in the background, and serve these toasty delights as a warm-up to our festive meals. The aroma alone would draw us in, and the first bite was always a revelation of flavors. These toasts are a nod to those cherished moments and are perfect for sharing new memories with loved ones.

Why You’ll Love It

This recipe is a perfect blend of savory and sweet, offering a gourmet twist on the classic toast. The combination of creamy brie with the nuttiness of wild mushrooms and the tartness of cranberries creates a complex flavor profile that’s sure to impress. Not only are these toasts a breeze to make, but they also serve as an elegant appetizer for any occasion. Whether you’re hosting a dinner party or enjoying a quiet night by the fireplace, these toasts will elevate your dining experience.

Ingredients

  • Diced wild mushrooms
  • Diced shallot
  • 1/4 cup dried cranberries (juice sweetened if possible)
  • Fresh thyme
  • Rustic baguette
  • Olive oil
  • Wedge of beautiful brie cheese
  • Salt and pepper

Instructions

  1. Start by preheating your oven to 350 degrees Fahrenheit.
  2. While the oven is preheating, heat the olive oil in a sauté pan over medium heat.
  3. Add the diced shallot, wild mushrooms, cranberries, and a few sprigs of fresh thyme to the pan.
  4. Sauté the mixture for a few minutes until the shallot begins to wilt and the mushrooms are tender.
  5. Season with salt and pepper to taste and set aside to cool.
  6. Slice a rustic baguette into 12 pieces.
  7. Place a slice of brie on each piece of bread.
  8. Top each toast with a spoonful of the cranberry, mushroom, and shallot mixture.
  9. Arrange the toasts on an oiled cookie sheet.
  10. Bake the toasts for 15 minutes or until the brie just begins to melt.
  11. Remove from oven and serve warm. Enjoy!

Tips

  • For a more intense flavor, allow the mushroom mixture to marinate for an hour before assembling the toasts.
  • Use a sharp knife or serrated bread knife to ensure clean slices of baguette.
  • Consider using a mix of wild mushrooms for a more complex flavor profile.

Variations & Substitutions

If you prefer a different cheese, camembert can be a lovely substitute for brie, offering a similar creamy texture. For those who enjoy a bit of heat, consider adding a pinch of red pepper flakes to the mushroom mixture. If you’re avoiding gluten, opt for gluten-free bread or crackers.

Storage

While these toasts are best enjoyed fresh, any leftovers can be stored in an airtight container in the refrigerator for up to two days. To reheat, place them back in the oven at a low temperature until warmed through. Avoid microwaving, as this can make the bread soggy.

FAQ

Can I prepare the mushroom mixture in advance?

Yes, you can prepare the mushroom mixture a day in advance. Store it in an airtight container in the refrigerator and assemble the toasts just before baking.

What type of cranberries should I use?

For this recipe, juice-sweetened dried cranberries add just the right amount of sweetness. However, you can use regular dried cranberries if you prefer.

Is there a way to make this recipe vegan?

Absolutely! Replace the brie with a vegan cheese alternative and use olive oil or vegan butter for sautéing.

Nutrition

This appetizer is a delightful treat but remember that it is rich and indulgent. Each toast provides a balance of carbohydrates from the baguette, healthy fats from the olive oil and cheese, and a touch of sweetness from the cranberries. Consume in moderation as part of a balanced diet.

Conclusion

Rustic Brie Toasts with Wild Mushroom, Cranberry, and Shallot are a wonderful way to celebrate the flavors of the season. They’re simple to prepare, yet sophisticated enough to make any occasion feel special. Whether you’re rekindling old traditions or starting new ones, these toasts are sure to bring warmth and joy to your table. Enjoy them with a glass of your favorite wine or a mug of hot cider for a truly cozy experience. Bon appétit!

Related update: Rustic Brie Toasts with Wild Mushroom, Cranberry and Shallot

Related update: Roasted Red Pepper & Tomato Salsa

Gluten Free Quinoa and Corn Flour Crepes | Made by Meaghan Moineau

Gluten Free Quinoa and Corn Flour Crepes

Intro

Crepes have always held a special place in my heart. Growing up, Sundays were reserved for family brunches where my grandmother would whip up her famous crepes. We would gather around the kitchen, eagerly waiting for our turn to enjoy those golden, delicate pancakes. As I grew older and my dietary needs changed, I sought to recreate those cherished moments with a gluten-free twist. Enter the Gluten Free Quinoa and Corn Flour Crepes, a modern take on a timeless classic. These crepes are not only a nod to my past but also a delicious new memory in the making.

Why You’ll Love It

Our Gluten Free Quinoa and Corn Flour Crepes are a delightful blend of tradition and innovation. Here’s why you’ll fall head over heels for them:

  • Gluten-Free Goodness: Made with quinoa and corn flour, these crepes cater to those with gluten sensitivities without compromising on taste or texture.
  • Nutrient-Rich: Packed with proteins and fiber, they make for a wholesome breakfast or snack.
  • Versatile: Fill them with sweet or savory fillings, and they become the perfect canvas for any meal.
  • Easy to Make: With simple ingredients and straightforward steps, they’re perfect for beginner cooks and seasoned chefs alike.

Ingredients

  • 2 tablespoons virgin coconut oil, melted
  • 1 cup corn flour
  • 2 tablespoons ground flax seeds
  • 1 tablespoon maple syrup
  • 1 cup quinoa flour
  • 2 1/2 cups hemp milk, plus more if needed
  • 1/2 teaspoon sea salt
  • 1/4 cup tapioca flour
  • 1/4 teaspoon xanthan gum

Instructions

  1. Whisk the corn flour, quinoa flour, tapioca flour, sea salt, and xanthan gum together in a large bowl.
  2. In a separate bowl, mix the hemp milk, ground flax seeds, maple syrup, and melted coconut oil.
  3. Combine the wet ingredients with the dry ingredients, mixing gently. If the batter is too thick, add more hemp milk, a few tablespoons at a time, until you achieve a pourable consistency.
  4. Allow the batter to rest in the refrigerator for at least 30 minutes. This step is crucial for the dry ingredients to fully absorb the liquids, ensuring smooth and pliable crepes.
  5. Heat a nonstick skillet over medium heat and add a small amount of coconut oil.
  6. Pour about 1/2 cup of batter into the skillet, swirling the pan to spread the batter into a thin layer. Quickly fill any holes with additional batter.
  7. Cook until the top of the crepe looks dry, about 1 minute. Gently loosen the edges with a spatula and flip the crepe, cooking the other side for 30 to 60 seconds.
  8. Transfer the cooked crepe to a plate and keep warm. You can fill the crepe while it’s still in the pan with your choice of fillings.
  9. Repeat the process, adding more coconut oil as needed, until all the batter is used.

Tips

  • Rest the Batter: Allowing the batter to rest is key. This helps to achieve the right texture and prevents the crepes from breaking.
  • Adjust Consistency: The batter should be thin enough to spread easily. Don’t hesitate to add more hemp milk if needed.
  • Perfect Flip: Practice makes perfect! Use your fingers or a spatula to flip the crepes gently.

Variations & Substitutions

  • Flour Alternatives: If you don’t have quinoa flour, you can substitute it with almond flour or buckwheat flour for a different flavor profile.
  • Filling Ideas: Enjoy them with nut butter and bananas for a sweet treat, or try smoked salmon and cream cheese for a savory option.
  • Milk Options: Substitute hemp milk with almond milk or coconut milk for a different taste.

Storage

To store leftover crepes, place them in an airtight container, separating each crepe with parchment paper to prevent sticking. They can be refrigerated for up to three days. To reheat, simply warm them in a skillet over low heat until heated through.

FAQ

Can I make the batter ahead of time?

Yes, you can prepare the batter up to a day in advance. Store it in the refrigerator and give it a good stir before using. You may need to adjust the consistency with a little more hemp milk if it’s thickened overnight.

What if my crepes keep sticking to the pan?

Ensure your skillet is well-heated and use a good nonstick pan. Adding a small amount of coconut oil before each crepe can also help prevent sticking.

Nutrition

Each serving of these gluten-free crepes is not only delicious but also packed with nutrients. You’ll find a good source of protein, fiber, and healthy fats, making them a balanced choice for any meal.

Conclusion

Whether you’re reminiscing about cherished family gatherings or creating new traditions, these Gluten Free Quinoa and Corn Flour Crepes are a delightful addition to any meal. With their delicate texture and versatile nature, they’ll quickly become a staple in your kitchen. So go ahead, give them a try and watch as they bring joy to your table, one crepe at a time.

Related update: Gluten Free Quinoa and Corn Flour Crepes

Related update: Spicy Coconut French Toast

OREO Cookie Balls – Snowman | Made by Meaghan Moineau

OREO Cookie Balls – Snowman

Intro

As the first snowflakes start to fall, there’s a certain magic that fills the air. Growing up, my siblings and I would rush outside, our noses turning rosy as we built snowmen in the front yard. Those chilly afternoons always ended with us huddled around the kitchen table, indulging in sweet treats that our mom had prepared. One of our favorite snowy day indulgences was her OREO Cookie Balls—transformed into adorable snowmen. These delightful bites encapsulate the joy of winter and the warmth of family gatherings.

Why You’ll Love It

These OREO Cookie Balls are the perfect combination of rich, chocolatey goodness and creamy decadence, all encased in a fun, wintry theme. They’re incredibly easy to make, requiring minimal ingredients, and are an absolute hit at any holiday gathering. Whether you’re hosting a festive party or simply enjoying a cozy night in, these snowman-themed treats will bring smiles to all.

Ingredients

  • 1 package of OREO Cookies
  • 8 oz cream cheese, softened
  • 16 oz Baker’s chocolate, melted
  • Rolo chocolate candy
  • Black gel icing
  • Orange gel icing
  • Additional supplies to decorate snowmen (e.g., mini chocolate chips, pretzel sticks)

Instructions

  1. Take the entire package of OREO Cookies, including the filling, and crush them in a large gallon ziplock bag until you have fine crumbs.
  2. Empty the cookie crumbs into a large mixing bowl.
  3. Add the softened cream cheese to the bowl.
  4. Mix well on medium speed until fully combined and smooth.
  5. Use a 1-inch cookie scoop to portion out the mixture, then roll into balls using the palms of your hands.
  6. Place the cookie balls on a cookie sheet and freeze for about 10 minutes to firm up.
  7. Melt the Baker’s chocolate according to the package instructions.
  8. Dip each cookie ball into the melted chocolate, ensuring it is fully coated, and then place on a wax paper-covered cookie sheet.
  9. Decorate with Rolo candies for hats, and use black and orange gel icing to create eyes and noses. Additional supplies can be used for further decoration, such as mini chocolate chips for buttons or pretzel sticks for arms.
  10. Place the decorated cookie balls in the refrigerator for an hour to harden completely.

Tips

For the best results, ensure your cream cheese is thoroughly softened before mixing. This will help achieve a smooth, homogeneous mixture. When dipping the cookie balls in chocolate, use a fork to lift them out, allowing excess chocolate to drip off for a cleaner finish.

Variations & Substitutions

Feel free to get creative with the decorations! You can use colored sprinkles or edible glitter for added festive flair. If you’re not a fan of Baker’s chocolate, white chocolate can also be used for a different flavor profile. Vegan cream cheese and chocolate alternatives can turn this recipe into a plant-based delight.

Storage

Store these OREO Cookie Balls in an airtight container in the refrigerator for up to a week. If you’d like to make them ahead of time, they can also be frozen for up to a month. Just be sure to thaw them in the refrigerator before serving.

FAQ

Can I use a different type of cookie instead of OREOs?

While OREOs provide the classic taste and texture, you can experiment with other sandwich cookies for different flavors. Just ensure they’re similar in composition for best results.

Is it necessary to freeze the cookie balls before dipping them in chocolate?

Freezing helps the balls hold their shape and makes them easier to dip in chocolate. This step is important for achieving a smooth coating.

How can I make these treats gluten-free?

Simply substitute the OREO Cookies with a gluten-free sandwich cookie option. Ensure all other ingredients, like the chocolate and cream cheese, are also certified gluten-free.

Nutrition

While these treats are indulgent, it’s good to savor them in moderation. Each snowman OREO Cookie Ball is approximately 120 calories, with the majority coming from healthy fats and carbohydrates. Enjoy as a festive treat alongside a balanced diet.

Conclusion

OREO Cookie Balls – Snowman are a whimsical and delicious addition to any winter celebration. They capture the joy of the season and are perfect for sharing with loved ones. Whether you’re reminiscing about childhood snow days or creating new memories with your own family, these treats will warm your heart and delight your taste buds. Gather your ingredients, invite the kids to help with the decorating, and enjoy the magic of creating these sweet little snowmen together!

Related update: OREO Cookie Balls – Snowman

Related update: Valentine Hearts

Tuna Mexi Melts | Made by Meaghan Moineau

Tuna Mexi Melts

Intro

Welcome to a delightful fusion of flavors with our Tuna Mexi Melts! This recipe is a warm homage to my childhood, where every family gathering would invariably feature a platter of deliciously cheesy, spicy snacks. My grandmother, the undisputed queen of kitchen creativity, would whip up her signature tuna melts with a twist that made them memorable. Now, I’m thrilled to share this cherished recipe with you, hoping it brings as much joy to your table as it has to ours for generations.

Why You’ll Love It

These Tuna Mexi Melts are more than just a snack; they’re a celebration of bold, vibrant flavors. The creamy, spicy tuna mixture topped with melted pepper jack cheese on crispy French bread is a treat for your taste buds. Whether you’re looking for a quick lunch, a party appetizer, or a cozy dinner option, these melts are versatile and easy to make, ensuring you’ll have more time to enjoy with your loved ones.

Ingredients

  • 1 loaf of French bread
  • 2 tablespoons butter, melted
  • 1 teaspoon chile powder
  • 1 teaspoon cumin
  • 1 teaspoon garlic powder
  • 1/2 cup sour cream
  • 2 cans of tuna, drained
  • 1/2 cup green onions, chopped
  • 1 jalapeno, diced
  • 1 tablespoon lime juice
  • 1/4 cup cilantro, chopped
  • 2 roma tomatoes, diced
  • 1/2 teaspoon paprika
  • Salt, to taste
  • 1 cup shredded cheddar cheese
  • 8 slices pepper jack cheese
  • Your favorite picante sauce

Instructions

  1. Preheat your oven to 350 degrees Fahrenheit.
  2. Start by preparing the picante sauce. Combine all sauce ingredients in a food processor and blend until smooth. Season with salt to taste.
  3. Slice the French bread into 1-inch slices. Brush each slice with melted butter.
  4. Sprinkle the slices with cumin, chile powder, and garlic powder for added flavor.
  5. In a mixing bowl, combine sour cream, tuna, green onions, jalapeno, lime juice, cilantro, roma tomatoes, paprika, and shredded cheddar cheese. Mix until well combined.
  6. Spoon a generous amount of the tuna mixture onto each bread slice.
  7. Top each with a slice of pepper jack cheese.
  8. Place the prepared slices on a baking sheet and bake for 10-15 minutes, or until the cheese is melted and bubbling.
  9. Serve warm with a side of picante sauce for dipping.

Tips

For the best results, use fresh, crusty French bread. If you prefer a spicier kick, consider adding extra jalapeno or a pinch of cayenne pepper. Make sure to drain the tuna well to avoid a soggy mixture. Always taste the mixture before placing it on the bread to adjust seasoning to your preference.

Variations & Substitutions

If you want to switch things up, try using different types of cheese. Monterey Jack or even a sharp cheddar can add a unique flavor profile. For those who prefer a lighter version, Greek yogurt can be a substitute for sour cream. Vegetarians can replace tuna with mashed chickpeas for a similar texture.

Storage

Tuna Mexi Melts are best enjoyed fresh out of the oven. However, if you have leftovers, store them in an airtight container in the refrigerator for up to two days. To reheat, place them in the oven at 350 degrees Fahrenheit until warmed through.

FAQ

Can I make the tuna mixture in advance?

Absolutely! You can prepare the tuna mixture a day ahead and store it in the refrigerator. This can enhance the flavors, making your melts even tastier.

What can I serve with Tuna Mexi Melts?

These melts pair wonderfully with a fresh salad or a bowl of tomato soup. They also make a great addition to a party platter with other finger foods.

Can I use canned tuna in oil?

Yes, you can use canned tuna in oil, but make sure to drain it thoroughly to prevent the mixture from becoming too oily.

Nutrition

While these tasty treats are indulgent, they do provide a good source of protein from the tuna and calcium from the cheese. To make them a bit healthier, consider using whole grain bread and reducing the amount of cheese.

Conclusion

Tuna Mexi Melts are a delightful, easy-to-make treat that will become a household favorite. With their bold flavors and cheesy goodness, they are perfect for any occasion. Whether you’re reminiscing about family gatherings or creating new memories, these melts bring comfort and joy to every bite. Enjoy the warmth and satisfaction of making a dish that is not only delicious but also a piece of my family’s culinary history. Happy cooking!

Related update: Tuna Mexi Melts

Related update: OREO Cookie Balls – Snowman

Cinnamon Sugar Fried Apples | Made by Meaghan Moineau

Cinnamon Sugar Fried Apples

Intro

There’s something about the aroma of cinnamon and apples wafting through the kitchen that just feels like home. Growing up, my grandmother would often make a batch of her famous cinnamon sugar fried apples on chilly autumn afternoons. She’d tell me stories of how her mother taught her the recipe, and we’d share laughter and warmth over this simple yet delightful treat. Today, I’m excited to share this beloved recipe with you, allowing you to create your own sweet memories.

Why You’ll Love It

These cinnamon sugar fried apples are a delightful treat that combines the tartness of fresh apples with the warm, sweet flavors of cinnamon and sugar. The crispy batter encasing the tender apple slices provides a perfect texture contrast, making each bite a delicious experience. Whether you serve them as a dessert, a snack, or a unique side dish, these fried apples are sure to become a family favorite.

Ingredients

  • 1 cup all-purpose flour
  • 3-4 fresh apples, cored and sliced 1 cm thick
  • 1/2 cup brown sugar
  • 1 tablespoon ground cinnamon
  • 2 large eggs, lightly beaten
  • 1/4 cup granulated sugar
  • Zest of 1 lemon
  • 1 cup milk
  • Vegetable oil, for frying
  • 1/4 teaspoon salt
  • 2 tablespoons unsalted butter, melted

Instructions

  1. In a mixing bowl, combine all-purpose flour, salt, and granulated sugar. Slowly whisk in the milk, followed by the lightly beaten eggs, lemon zest, and melted unsalted butter. Mix until the batter is smooth and lump-free.
  2. Cover the bowl with plastic wrap and let the batter rest at room temperature for 30 minutes. This step allows the flour to fully hydrate and results in a better texture.
  3. Meanwhile, prepare your apples by coring and slicing them into 1 cm thick rings. Set them aside.
  4. Heat the vegetable oil in a deep skillet or frying pan over medium heat until it reaches 350°F (175°C).
  5. Once the batter has rested, dip each apple slice into the batter, ensuring it is fully coated.
  6. Carefully place the battered apple slices into the hot oil. Fry them in batches, making sure not to overcrowd the pan.
  7. Fry each side until golden brown, about 2-3 minutes per side. Use a slotted spoon to remove the apples from the oil and drain them well on a plate lined with double paper towels.
  8. In a small bowl, mix together the brown sugar and ground cinnamon. Sprinkle this mixture over the hot fried apple slices.
  9. Serve the cinnamon sugar fried apples immediately for the best taste and texture.

Tips

To ensure the best results, make sure your oil is at the right temperature before frying. If the oil is too hot, the batter will burn before the apple is cooked through. If it’s too cool, the apples will absorb too much oil and become soggy. Use a thermometer for accuracy. Additionally, using a tart apple variety like Granny Smith will provide a nice balance with the sweetness of the cinnamon sugar coating.

Variations & Substitutions

If you’d like to change things up, consider adding a pinch of nutmeg or ginger to the cinnamon sugar mixture for a spicier kick. For a different flavor profile, try using apple cider in place of milk in the batter. If you’re looking for a gluten-free option, substitute the all-purpose flour with a gluten-free flour blend.

Storage

While these fried apples are best enjoyed fresh, you can store any leftovers in an airtight container in the refrigerator for up to two days. To reheat, place them on a baking sheet and warm them in a preheated oven at 350°F (175°C) for about 5-7 minutes. This will help them regain some of their original crispiness.

FAQ

Can I use other fruits instead of apples?

Yes, you can experiment with other fruits like pears or peaches. Make sure the fruit is firm enough to hold its shape during frying.

What is the best type of apple for this recipe?

Granny Smith apples are a great choice because of their tart flavor and firm texture, which holds up well during frying. However, feel free to use your favorite apple variety.

Can I make the batter in advance?

Yes, you can prepare the batter a day in advance. Store it covered in the refrigerator and give it a good stir before using.

Nutrition

While I don’t have exact nutritional information, it’s important to note that these fried apples are a treat and should be enjoyed in moderation. They are rich in sugars and fats, but also offer the benefits of fiber and vitamins from the apples. Pair them with a balanced diet for a delightful indulgence.

Conclusion

Cinnamon sugar fried apples are more than just a dessert; they’re a connection to fond memories and a way to create new ones with family and friends. Whether you’re serving them at a gathering or enjoying them on a cozy night in, these apples are sure to bring warmth and joy. I hope this recipe finds a special place in your heart and kitchen, just as it has in mine.

Related update: Cinnamon Sugar Fried Apples

Gluten Free Dairy Free Buttermilk Biscuits | Made by Meaghan Moineau

Gluten Free Dairy Free Buttermilk Biscuits

Intro

There’s something magical about the aroma of freshly baked biscuits wafting through the house. It takes me back to my childhood when Sunday mornings meant gathering around the kitchen table with my family, eagerly anticipating the warm, flaky biscuits my grandmother would pull from the oven. She had a way of making everything feel cozy and perfect. Now, in my own kitchen, I strive to recreate that same warmth and love, especially for those among us who have dietary restrictions. Today, I’m excited to share a recipe that captures the essence of my grandmother’s biscuits—Gluten Free Dairy Free Buttermilk Biscuits.

Why You’ll Love It

These biscuits are a game-changer for anyone with gluten or dairy sensitivities. They’re deliciously flaky, with a tender crumb that will melt in your mouth. You won’t miss the gluten or dairy, I promise! The combination of almond flour and arrowroot flour gives them a wonderful texture, while the dairy-free buttermilk adds just the right amount of tang. Whether you’re serving them with breakfast, alongside dinner, or simply enjoying them with some jam, these biscuits are sure to become a staple in your home.

Ingredients

  • 2 cups blanched almond flour
  • 1/2 cup arrowroot flour
  • 1 tablespoon baking powder
  • 1/2 teaspoon xanthan gum
  • 1 tablespoon sugar
  • 1/2 teaspoon salt
  • 1/4 cup Earth Balance butter (or any dairy-free butter alternative)
  • 2 large eggs
  • 1 cup dairy-free buttermilk (see instructions for making this)

Instructions

  1. Preheat your oven to 400 degrees Fahrenheit.
  2. Make the buttermilk by stirring together 1 cup of soy milk (or any other milk alternative) and 1 tablespoon of vinegar. Let it stand for a few minutes to curdle.
  3. In a large mixing bowl, combine the almond flour, arrowroot flour, baking powder, xanthan gum, sugar, and salt. Stir until well combined.
  4. Add the Earth Balance butter to the dry ingredients. Use a pastry cutter or fork to cut the butter into the flour mixture until it resembles coarse crumbs.
  5. Stir in the eggs and prepared buttermilk. If the dough seems too wet, add an extra 1-2 tablespoons of almond flour. The dough should be sticky but not overly wet.
  6. Lightly grease a baking pan. Roll the dough into golf-ball sized balls and place them on the pan, close together but not touching.
  7. Lightly press each ball to flatten slightly, giving them a more traditional biscuit shape.
  8. Bake in the preheated oven for 17-20 minutes, or until the biscuits are nicely browned and cooked through.

Tips

Here are a few tips to ensure your biscuits turn out perfectly:

  • Ensure all your ingredients are at room temperature, as this helps them blend more easily.
  • Don’t overwork the dough; handle it just enough to bring it together.
  • For an even richer flavor, consider adding a teaspoon of nutritional yeast to the dry ingredients.

Variations & Substitutions

If you want to change things up, here are some variations and substitutions you can try:

  • Flour Substitutes: If you don’t have arrowroot flour, you can use tapioca starch or cornstarch as an alternative.
  • Butter Alternatives: Coconut oil can be used in place of Earth Balance butter for a different flavor profile.
  • Flavor Additions: Add a teaspoon of dried herbs, like rosemary or thyme, for a savory twist.

Storage

These biscuits are best enjoyed fresh out of the oven. However, if you have leftovers, store them in an airtight container at room temperature for up to two days. For longer storage, freeze them in a single layer, then transfer to a freezer-safe bag. To reheat, simply pop them in a warm oven or toaster oven until heated through.

FAQ

Can I make these biscuits without eggs?

Yes! You can substitute the eggs with a flaxseed meal. Mix 2 tablespoons of flaxseed meal with 6 tablespoons of water and let it sit for a few minutes to thicken before adding to the dough.

What if I don’t have xanthan gum?

Xanthan gum helps to bind the ingredients and give the biscuits their structure. If you don’t have it on hand, you can try using ground chia seeds or a gluten-free flour blend that includes xanthan gum.

Can I use a different milk alternative for the buttermilk?

Absolutely! Any milk alternative, such as almond milk, oat milk, or coconut milk, can be used to make the buttermilk. Just be sure to use an unsweetened variety for best results.

Nutrition

Each biscuit (based on 12 servings) contains approximately:

  • Calories: 150
  • Protein: 4g
  • Carbohydrates: 10g
  • Fat: 11g
  • Fiber: 2g

Conclusion

I hope this recipe brings a touch of nostalgia and warmth to your kitchen, just as it does in mine. These Gluten Free Dairy Free Buttermilk Biscuits are a delightful treat, perfect for any occasion. Whether you’re serving them to family, friends, or enjoying them on a quiet morning, they are sure to satisfy. Happy baking!

Related update: Gluten Free Dairy Free Buttermilk Biscuits

Related update: Gluten Free Quinoa and Corn Flour Crepes

Watermelon, Kiwi, Apple and Frozen Banana Smoothie | Made by Meaghan Moineau

Watermelon, Kiwi, Apple, and Frozen Banana Smoothie

Intro

There’s something undeniably refreshing about a homemade smoothie, especially when it combines the vibrant flavors of summer fruits. I remember spending long summer days at my grandmother’s house, where she would often surprise me with her delightful fruit concoctions. One of my fondest memories is sitting on her porch swing, sipping a cool glass of her watermelon, kiwi, apple, and frozen banana smoothie. The taste was not just a treat for my taste buds but also a journey back to those carefree childhood afternoons. Today, I’m excited to share this nostalgic recipe with you, bringing a piece of my past into your present.

Why You’ll Love It

This smoothie is a celebration of fresh, fruity flavors that will invigorate your senses and brighten your day. It’s perfect for breakfast, a midday snack, or a post-workout refreshment. Not only is it delicious, but it’s also packed with vitamins and nutrients, giving you an energy boost without the guilt. With the natural sweetness of watermelon and the tangy twist of kiwi, this smoothie is a delightful way to enjoy the bounty of summer fruits all year round. Plus, it’s incredibly easy to make, requiring minimal prep time and just a handful of ingredients.

Ingredients

  • 1 cup apple juice
  • 1 frozen banana
  • 1 cup ice cubes
  • 2 kiwi fruits, peeled and chopped
  • 2 cups seeded or seedless watermelon, chopped

Instructions

  1. Place all the ingredients in a blender.
  2. Blend on high speed until the mixture is smooth and creamy.
  3. Pour the smoothie into a glass.
  4. Enjoy your refreshing and healthy drink!

Tips

For the best smoothie experience, make sure to use a ripe banana for a naturally sweet flavor. If you prefer a thicker texture, you can add more frozen banana or reduce the amount of apple juice. Adjust the sweetness by adding honey or agave syrup if needed. To enhance the flavors, consider adding a pinch of salt or a splash of lime juice.

Variations & Substitutions

Feel free to customize this smoothie to suit your taste and dietary needs. You can substitute apple juice with coconut water for a tropical twist or almond milk for a creamier texture. If kiwi isn’t your favorite, swap it for strawberries or blueberries. For added nutrition, consider sneaking in a handful of spinach or kale. You can also sprinkle some chia seeds or flaxseeds for extra fiber and omega-3 fatty acids.

Storage

This smoothie is best enjoyed fresh, but if you have leftovers, store them in an airtight container in the refrigerator for up to 24 hours. Give it a good shake or stir before drinking, as the ingredients may separate over time. For longer storage, you can freeze the smoothie in a freezer-safe container or ice cube tray. Thaw it in the fridge or blend it again before serving.

FAQ

Can I use fresh banana instead of frozen?

Yes, you can use a fresh banana, but keep in mind that the smoothie will be less thick and creamy. To compensate, you might want to add more ice cubes or reduce the amount of apple juice.

Is this smoothie vegan?

Yes, this smoothie is naturally vegan as all the ingredients are plant-based. As long as you don’t add any dairy products, it will remain vegan-friendly.

Can I make this smoothie ahead of time?

While it’s best to enjoy this smoothie fresh, you can prepare it ahead of time. Store it in the refrigerator for up to 24 hours or freeze it for later use. Just remember to give it a good shake or re-blend before drinking.

Nutrition

This smoothie is a powerhouse of nutrients. It’s rich in vitamins A, C, and K, thanks to the watermelon and kiwi. The frozen banana provides potassium and fiber, while apple juice adds additional vitamins and a touch of sweetness. This drink is also hydrating and low in calories, making it an excellent choice for a healthy lifestyle.

Conclusion

This watermelon, kiwi, apple, and frozen banana smoothie is not just a delightful beverage but also a nod to cherished memories and the simple joys of life. Whether you’re looking for a quick breakfast option or a refreshing treat on a hot day, this smoothie is sure to satisfy. Gather your ingredients, blend them to perfection, and indulge in a burst of fruity flavors that will transport you to sunlit afternoons and carefree moments. Enjoy each sip, knowing you’re nourishing your body and soul.

Related update: Watermelon, Kiwi, Apple and Frozen Banana Smoothie

Related update: Gluten Free Dairy Free Buttermilk Biscuits

Related update: Summer Fruit Sangria

Crispy Pineapple Fritters | Made by Meaghan Moineau

Crispy Pineapple Fritters: A Delightful Treat for Any Occasion

Intro

There’s something magical about the smell of freshly fried fritters wafting through the kitchen, bringing back memories of sunlit afternoons at my grandmother’s house. She would whip up a batch of her famous pineapple fritters, and we’d gather around the kitchen table, eagerly awaiting the first bite. The crispy exterior, the sweet and juicy pineapple inside, and a dusting of powdered sugar on top made for an unforgettable treat. Today, I’m thrilled to share this beloved recipe with you, updated for a new generation while preserving that nostalgic charm.

Why You’ll Love It

These Crispy Pineapple Fritters are a perfect blend of sweet and savory, with a satisfying crunch that makes them irresistibly good. Whether you’re serving them as a snack, dessert, or even a breakfast treat, these fritters are sure to delight everyone at the table. They’re easy to make, require simple ingredients, and are wonderfully versatile, allowing you to add your favorite toppings or enjoy them just as they are.

Ingredients

  • Canned pineapple rings
  • Flour
  • Cornstarch
  • Egg
  • Baking powder
  • Salt
  • Milk
  • Panko breadcrumbs
  • Canola oil

Instructions

  1. Prepare the batter by combining the flour, cornstarch, baking powder, salt, egg, and milk in a shallow dish. Whisk with a fork to create a smooth, pancake-like batter.
  2. In another shallow dish, place the panko breadcrumbs.
  3. Pour about an inch of canola oil into a large skillet and preheat the oil over medium-high heat.
  4. Pat the pineapple rings as dry as possible between sheets of paper towels to ensure they fry up crispy.
  5. Dip each pineapple ring into the batter, tapping off any excess, then coat well in the panko crumbs.
  6. Immediately fry the coated rings in the hot oil until they’re golden brown on both sides, about 2-3 minutes per side.
  7. Remove the fritters from the oil and drain them on paper towels.
  8. Serve the fritters hot, warm, or at room temperature. Optional garnishes include powdered sugar, cinnamon sugar, ice cream, or whipped cream.

Tips

For the best results, ensure your oil is at the right temperature. You can test this by dropping a small piece of batter into the oil; if it sizzles and browns quickly, you’re ready to fry. Also, be sure not to overcrowd the skillet, as this can lower the oil temperature and result in soggy fritters.

Variations & Substitutions

If you’re looking to switch things up, try using fresh pineapple instead of canned for a slightly tangier flavor. You can also experiment with different coatings, such as crushed cereal or coconut flakes, for added texture. For a dairy-free version, substitute the milk with almond or coconut milk, and for a gluten-free option, use gluten-free flour and breadcrumbs.

Storage

To store any leftover fritters, let them cool completely, then place them in an airtight container. They can be kept in the refrigerator for up to three days. To reheat, simply pop them in the oven at 350°F (175°C) for about 10 minutes or until heated through. Avoid microwaving, as it can make them soggy.

FAQ

Can I make these fritters ahead of time?

Yes, you can prepare the batter and coat the pineapple rings in advance. Store them in the refrigerator until you’re ready to fry. However, for the crispiest texture, it’s best to fry them just before serving.

What can I serve with pineapple fritters?

Pineapple fritters pair wonderfully with a scoop of vanilla ice cream or a dollop of whipped cream. For a more decadent treat, try drizzling them with caramel or chocolate sauce.

Nutrition

While the exact nutritional content will depend on the specific ingredients and portion sizes used, a typical serving of crispy pineapple fritters provides a delightful combination of carbohydrates, a moderate amount of fat from the frying process, and the natural sugars found in pineapple. Enjoy them as an occasional treat as part of a balanced diet.

Conclusion

Crispy Pineapple Fritters are a delightful way to bring a touch of tropical sweetness to any occasion. With their crunchy coating and juicy center, they’re sure to become a favorite in your household as they have in mine. I hope this recipe brings you as much joy and as many cherished memories as it has brought to my family. Happy cooking!

Related update: Crispy Pineapple Fritters

Related update: Fluffy frittata with spinach

Gluten And Dairy Free Peanut Butter Cups | Made by Meaghan Moineau

Gluten And Dairy Free Peanut Butter Cups

Intro

There’s something utterly comforting about the combination of chocolate and peanut butter, a pairing as timeless as a warm embrace on a chilly day. Growing up, I fondly remember my grandmother’s kitchen, a treasure trove of sweet aromas and delightful treats. She always had a stash of peanut butter cups tucked away in a tin, ready to be brought out during family gatherings. Over the years, I’ve embraced a gluten and dairy-free lifestyle, but my love for this classic treat remains unchanged. This recipe is my homage to those cherished moments with a modern twist, ensuring that everyone, regardless of dietary restrictions, can indulge in this nostalgic delight.

Why You’ll Love It

If you’re a fan of creamy, nutty flavors encased in rich, velvety chocolate, these gluten and dairy-free peanut butter cups will quickly become a staple in your dessert repertoire. They are simple to make, require minimal ingredients, and are free from gluten and dairy, making them accessible for those with dietary restrictions. More than just a treat, they are a delightful reminder that sometimes, the simplest things in life bring the most joy.

Ingredients

  • 1 cup Enjoy Life semi-sweet chocolate chips
  • 2 tablespoons non-hydrogenated shortening
  • 1/2 cup creamy peanut butter
  • 2 tablespoons agave nectar
  • 1/4 teaspoon salt

Instructions

  1. Line a mini muffin tin with paper liners or spray with cooking oil.
  2. In a small bowl, mix together the creamy peanut butter, agave nectar, and salt. Set aside.
  3. In a heatproof bowl, combine the chocolate chips and shortening. Set the bowl over a pot of simmering water, ensuring that the water does not touch the bottom of the bowl.
  4. Stir the chocolate and shortening gently until fully melted and smooth.
  5. Spoon 1 teaspoon of the melted chocolate into each of the prepared mini muffin cups.
  6. Top the chocolate with a scant teaspoon of the peanut butter mixture.
  7. Finish by topping each cup with another teaspoon of the melted chocolate.
  8. Refrigerate the peanut butter cups until they are set, about 1-2 hours.
  9. Store the set peanut butter cups in an airtight container in the refrigerator.

Tips

For the best results, ensure that the chocolate and shortening are melted gently. Avoid overheating, as this can cause the chocolate to seize. If you don’t have a double boiler, a heatproof bowl over a pot of simmering water works perfectly. Patience is a virtue when it comes to setting these cups, so resist the urge to peek too soon!

Variations & Substitutions

This recipe is wonderfully flexible. If you prefer a different nut butter, almond or cashew butter can be substituted for peanut butter. For a touch of texture, consider mixing in a handful of chopped nuts or seeds into the peanut butter filling. If agave nectar isn’t available, maple syrup or honey (if not strictly vegan) can be used as an alternative sweetener.

Storage

These peanut butter cups are best stored in an airtight container in the refrigerator. They’ll keep well for up to two weeks, making them a perfect make-ahead treat. For longer storage, you can freeze them and enjoy a quick indulgence straight from the freezer.

FAQ

Can I use a different type of chocolate?

Absolutely! While semi-sweet chocolate provides a balanced sweetness, you can opt for dark chocolate if you prefer a richer, more intense flavor. Just ensure it is dairy-free to keep the recipe compliant with dietary needs.

Is there a substitute for shortening?

If you don’t have non-hydrogenated shortening on hand, coconut oil can be a good alternative. It will help the chocolate set with a smooth texture, though it may impart a slight coconut flavor.

Nutrition

These peanut butter cups are rich in flavor and moderately indulgent, making them a treat best enjoyed in moderation. The use of natural ingredients like agave nectar and creamy peanut butter offers a slightly healthier twist on traditional versions, with healthy fats and a touch of protein. As always, it’s important to consider portion sizes to maintain a balanced diet.

Conclusion

Creating these gluten and dairy-free peanut butter cups is more than just a culinary exercise—it’s a way to rekindle the warmth of cherished memories while crafting new ones. Whether you’re preparing them for a family gathering or simply to satisfy a personal craving, their simplicity and rich flavor will undoubtedly make them a favorite. I hope this recipe brings as much joy to your kitchen as it has to mine, and that each bite transports you to your own happy memories of yesteryears.

Related update: Gluten And Dairy Free Peanut Butter Cups

Related update: Crispy Pineapple Fritters

Cheesy Potato Corn Scones | Made by Meaghan Moineau

Cheesy Potato Corn Scones

Intro

There’s something undeniably comforting about the aroma of freshly baked scones wafting through the kitchen. It instantly takes me back to my grandmother’s cozy farmhouse, where every Sunday morning, she would whip up a batch of her famous scones. Her secret ingredient? Love, of course, but also a touch of creativity that transformed simple ingredients into something extraordinary. Today, I’m sharing a delightful twist on the classic scone recipe—Cheesy Potato Corn Scones. This recipe captures the essence of those cherished mornings with a modern, cheesy twist that will have you reaching for seconds.

Why You’ll Love It

These Cheesy Potato Corn Scones are a perfect blend of savory flavors and soft textures, making them an irresistible treat for any occasion. Whether you’re hosting a brunch, looking for a satisfying snack, or simply want to enjoy a warm, cheesy delight, these scones have got you covered. The addition of potato flakes gives them a unique lightness, while the cheddar cheese and cornmeal provide a rich, hearty flavor. Plus, they’re easy to make and guaranteed to impress your family and friends!

Ingredients

  • 1 cup water
  • 1/2 cup potato flakes
  • 1/3 cup diced unsalted butter
  • 1 1/2 cups all-purpose flour
  • 1/2 cup yellow cornmeal
  • 1 cup shredded cheddar cheese, divided
  • 1 tablespoon baking powder
  • 1 teaspoon salt
  • 1 tablespoon poppy seeds
  • 3/4 cup milk

Instructions

  1. Preheat your oven to 400°F (200°C). Lightly grease a baking sheet and set aside.
  2. In a small saucepan, bring the water just to a simmer; remove from heat.
  3. Stir in the potato flakes until they are moistened.
  4. Add the diced butter to the potato mixture and stir until it is fully incorporated.
  5. In a large bowl, combine the flour, cornmeal, 3/4 cup of the cheddar cheese, baking powder, salt, and poppy seeds.
  6. Stir in the potato mixture and milk until just combined.
  7. With floured hands, gently knead and fold the dough for five to six strokes, or until it comes together in one mass.
  8. Pat the dough lightly to flatten it into a 9-inch circle on the prepared baking sheet.
  9. Using a pizza cutter or a floured knife, cut the dough into eight wedges (do not separate).
  10. Sprinkle the edges with the remaining cheese.
  11. Bake in the preheated oven for about 25 minutes or until lightly browned.
  12. Gently pull or cut the scones to separate. Serve warm and enjoy!

Tips

For the best results, use cold butter and work quickly to keep it from melting before baking. If you notice the dough is too sticky while kneading, feel free to add a little more flour, a tablespoon at a time. Additionally, using freshly grated cheddar cheese will enhance the flavor and melt beautifully in the scones.

Variations & Substitutions

If you want to experiment with flavors, consider adding chopped fresh herbs like chives or rosemary to the dough. For a spicy kick, try mixing in some diced jalapeños. If you’re looking for a gluten-free option, substitute the all-purpose flour with a 1:1 gluten-free flour blend. You can also use any other type of cheese you prefer, such as mozzarella or gouda, to change up the taste.

Storage

These scones are best enjoyed fresh out of the oven, but they can be stored in an airtight container at room temperature for up to two days. To reheat, simply place them in a 350°F (175°C) oven for 5-10 minutes. For longer storage, freeze the scones in a single layer and then transfer them to a resealable freezer bag. They can be reheated straight from the freezer in the oven at 350°F (175°C) for about 15 minutes.

FAQ

Can I make the dough ahead of time?

Yes, you can prepare the dough up to a day in advance. Wrap it tightly in plastic wrap and store it in the refrigerator. When you’re ready to bake, simply shape, cut, and bake the scones as instructed.

Can I use real potatoes instead of potato flakes?

While potato flakes are convenient and help create a fluffy texture, you can use mashed potatoes as a substitute. Just ensure they are smooth and not too wet, and adjust the flour accordingly if the dough becomes too sticky.

Nutrition

Each serving of these Cheesy Potato Corn Scones is approximately 220 calories, with 12g of fat, 22g of carbohydrates, and 6g of protein. They are a delightful indulgence, offering a comforting balance of flavors and textures.

Conclusion

These Cheesy Potato Corn Scones are a testament to the magic that happens when simple ingredients come together with a touch of love and creativity. Whether you’re savoring them with a morning coffee, serving them at a brunch gathering, or enjoying them as a cozy snack, they are sure to bring warmth and joy to your table. I hope this recipe becomes a cherished addition to your collection, just as it has in mine. Happy baking!

Related update: Cheesy Potato Corn Scones

Candy Cane Chocolate Marshmallows | Made by Meaghan Moineau

Candy Cane Chocolate Marshmallows

Intro

As the holiday season approaches, there’s a unique joy in the air, one that brings with it the aroma of nostalgia and sweet treats. I remember my childhood days when my grandmother would hand us candy canes every Christmas, and we’d spend hours trying to perfect our hot chocolate game. Those candy canes weren’t just sweet delights; they were the essence of our festive spirit. Today, I want to share a recipe that combines those cherished memories with a modern twist: Candy Cane Chocolate Marshmallows. This delicious treat is perfect for sharing with family and friends or simply enjoying alone with a good book by the fireplace.

Why You’ll Love It

This recipe is a delightful fusion of flavors and textures that will take your taste buds on a festive journey. The cool and minty candy canes complement the rich, velvety chocolate, while the fluffy marshmallow center adds a delightful contrast. It’s a simple yet decadent treat that is perfect for gifting or enjoying as a cozy dessert on a chilly evening. Plus, it’s an easy recipe that you can whip up in no time, making it ideal for last-minute holiday preparations.

Ingredients

  • Candy canes
  • Dark chocolate
  • Marshmallows
  • Milk chocolate

Instructions

  1. Crush candy canes using the bottom of a glass, a mallet, or any tool that works for you. Aim for a mix of fine and chunky pieces for a textured coating.
  2. Set up a double boiler to melt the chocolate. If you don’t have one, you can place a heatproof bowl over a pot of simmering water, ensuring the bowl doesn’t touch the water.
  3. Break the dark chocolate and milk chocolate into small pieces and melt them together in the double boiler, stirring occasionally until smooth.
  4. Using a skewer or a fork, dip each marshmallow into the melted chocolate, ensuring it’s evenly coated.
  5. Roll the chocolate-covered marshmallow in the crushed candy cane pieces, pressing slightly to ensure the candy adheres well.
  6. Place the coated marshmallows on a sheet of wax paper to set.
  7. Chill the marshmallows in the refrigerator for at least an hour or until the chocolate has fully hardened.
  8. Store the marshmallows in an airtight container to maintain freshness.
  9. Enjoy these marshmallows on their own or dunk them into a steaming mug of hot chocolate for an extra indulgent treat.

Tips

To make the process even smoother, here are a few tips:

  • Choose high-quality chocolate for the best flavor. A mix of dark and milk chocolate provides a rich and balanced taste.
  • If you’re short on time, you can crush the candy canes in advance and store them in a sealed bag to maintain freshness.
  • To add an extra layer of flavor, consider adding a drop of peppermint extract to the melted chocolate.

Variations & Substitutions

Feel free to get creative with this recipe. Here are some variations and substitutions you might enjoy:

  • Chocolate Variations: Use white chocolate for a sweeter, creamier coating, or try a flavored chocolate bar for a unique twist.
  • Marshmallow Options: Consider using flavored marshmallows, such as peppermint or vanilla, to add an extra dimension of taste.
  • Nutty Crunch: Add chopped nuts, like almonds or pistachios, to the crushed candy canes for a nutty crunch.

Storage

Store your Candy Cane Chocolate Marshmallows in an airtight container in a cool, dry place. They should last for up to two weeks, although they are often too delicious to resist for that long! If you live in a warmer climate, consider storing them in the refrigerator to prevent the chocolate from melting.

FAQ

Can I use regular chocolate chips instead of chocolate bars?

Yes, you can use chocolate chips if you prefer. They melt just as well and are often more convenient. However, be sure to choose high-quality chips for the best flavor.

How can I prevent the chocolate from seizing while melting?

Ensure that no water or steam comes into contact with the chocolate as it melts. Use a dry bowl and utensils, and melt the chocolate slowly over low heat. Stir continuously to promote even melting.

Can I use this recipe for other holidays?

Absolutely! Simply swap the candy cane pieces for other festive toppings. For example, you could use colored sprinkles for Easter or crushed gingerbread cookies for a cozy winter treat.

Nutrition

These Candy Cane Chocolate Marshmallows are a delightful indulgence. While they are a treat best enjoyed in moderation, they offer a moment of festive joy. Remember, the holidays are about balance and enjoyment!

Conclusion

Candy Cane Chocolate Marshmallows are a festive delight that brings together the best of holiday flavors in one delightful treat. Whether you’re sharing them at a holiday gathering, gifting them to friends, or enjoying them on a quiet evening at home, they are sure to bring smiles and warm memories. I hope this recipe adds a touch of sweetness to your holiday season, just as it has to mine. Happy cooking, and enjoy every delicious bite!

Related update: Candy Cane Chocolate Marshmallows

Related update: Coconut Almond Cheesecake

Related update: Cheesy Potato Corn Scones

Summer Rolls | Made by Meaghan Moineau

Fresh and Flavorful Summer Rolls

Introduction

There’s something undeniably nostalgic about the first bite of a fresh summer roll. For me, it brings back memories of lazy summer afternoons spent in my grandmother’s kitchen, where the air was filled with the aroma of fresh herbs and the gentle sound of rice paper softening in water. She would tell stories of her youth while expertly rolling each piece, her hands moving with a practiced grace that I longed to emulate. Now, every time I prepare this dish, I feel a connection to those cherished moments, and I’m thrilled to share this recipe with you.

Why You’ll Love It

Summer rolls are a delightful combination of fresh ingredients and vibrant flavors that are perfect for any occasion. They’re incredibly versatile, making them suitable for a light lunch, a refreshing appetizer, or even a fun party snack. The combination of creamy avocado, crunchy vegetables, and spicy tofu wrapped in delicate rice paper creates a textural harmony that’s both satisfying and refreshing. Plus, they’re naturally gluten-free and can be easily adapted for vegan diets, making them a crowd-pleaser for all your friends and family.

Ingredients

  • 1 avocado, sliced
  • 1 cucumber, cut into strips
  • Fresh cilantro sprigs
  • 2 cloves garlic, minced
  • 1 tablespoon pureed lemongrass
  • 1 cup pineapple, cut into strips
  • 1 red bell pepper, cut into strips
  • Rice paper sheets
  • 1 cup cooked vermicelli noodles
  • 2 tablespoons sesame oil
  • 3 tablespoons soy sauce
  • 1 tablespoon sugar
  • 8 ounces spicy tofu, sliced
  • 1 tablespoon sambal oelek

Instructions

  1. Place all marinade ingredients (garlic, pureed lemongrass, sesame oil, soy sauce, sugar, and sambal oelek) in a zip lock bag with the sliced tofu.
  2. Seal the bag and shake to coat the tofu thoroughly. Place in the fridge for at least half an hour or up to one day to let the flavors meld.
  3. When ready to assemble the rolls, fill a shallow pan with water and submerge a piece of rice paper in it. Leave it in the water, turning once, until the sheet is flexible.
  4. Place the softened rice paper on a flat, moist surface. Near the edge closest to you, arrange a piece of avocado and a piece of marinated tofu.
  5. Add 2-4 pieces each of cucumber, pineapple, and red bell pepper on top of the tofu and avocado.
  6. Top with a small amount of vermicelli noodles and a few sprigs of cilantro.
  7. Take the edge of the rice paper and, holding the filling tightly, begin to roll it as if rolling a burrito. Be sure to fold the sides inward as you go.
  8. Place the finished roll on a platter to dry. Repeat the steps until you run out of ingredients.
  9. Serve the summer rolls with Thai chili sauce or spicy peanut sauce for dipping.

Tips

To ensure your summer rolls come out perfectly, keep the following tips in mind:

  • Keep the rice paper moist but not too wet to prevent tearing.
  • Don’t overfill the rolls, as this can make them difficult to wrap.
  • Work quickly once the rice paper is softened, as it can become sticky if left for too long.

Variations & Substitutions

Summer rolls are incredibly flexible, allowing you to tailor them to your taste preferences or dietary needs. Here are some variations you might consider:

  • Protein: Swap out the spicy tofu for shrimp, chicken, or even tempeh for a different protein profile.
  • Vegetables: Feel free to add or substitute vegetables such as carrots, lettuce, or mint for additional flavor and texture.
  • Sauce: Try different dipping sauces like hoisin sauce, sweet chili sauce, or a simple soy-vinegar mix.

Storage

Summer rolls are best enjoyed fresh, but if you need to store them, wrap each roll individually in plastic wrap to prevent sticking, and place them in an airtight container in the fridge. They should last for up to two days. When ready to eat, let them come to room temperature for the best flavor and texture.

FAQ

Can I make summer rolls ahead of time?

Yes, you can prepare summer rolls a few hours in advance. Be sure to wrap them tightly in plastic wrap to keep them fresh and prevent them from drying out.

What can I use instead of rice paper?

If you can’t find rice paper, you might try using large lettuce leaves or collard greens as a wrap alternative, but note that the texture will be different.

Is there a way to make these rolls spicy?

Absolutely! You can add a bit of sliced fresh chili or increase the amount of sambal oelek in the marinade for an extra kick.

Nutrition

Each summer roll is approximately 150 calories, depending on the specific ingredients used. They are low in fat and packed with vitamins and minerals from the fresh vegetables, making them a nutritious choice for snacking or meals.

Conclusion

Summer rolls are a delightful way to savor the fresh flavors of the season, offering a perfect balance of taste and texture. Whether you’re a seasoned chef or a novice in the kitchen, this recipe is approachable and rewarding. I hope it brings as much joy and nostalgia to your table as it does to mine. Happy rolling!

Related update: Summer Rolls

Related update: Crunchy Prawn Skewers With Lemony Avocado Dip

Watching What I Eat: Peanut Butter Banana Oat Breakfast Cookies with Carob / Chocolate Chips | Made by Meaghan Moineau

Watching What I Eat: Peanut Butter Banana Oat Breakfast Cookies with Carob / Chocolate Chips

Intro

There’s a special kind of comfort in the aroma of freshly baked cookies wafting through the house. It takes me back to Sunday mornings at my grandmother’s kitchen. She had a way of using the simplest ingredients to create the most magical treats that brought the family together. Today, I’m sharing a recipe that combines my love for those nostalgic flavors with a modern twist: Peanut Butter Banana Oat Breakfast Cookies with Carob or Chocolate Chips. These cookies are not only delicious but also packed with wholesome ingredients, making them a perfect start to your day or a delightful snack anytime.

Why You’ll Love It

These breakfast cookies are a wonderful blend of flavors and textures. The creamy peanut butter and ripe bananas create a rich, moist base, while the oats add a hearty texture. Whether you choose chocolate or carob chips, you’ll get a burst of sweetness that complements the nuttiness perfectly. Plus, these cookies are easy to make and require just one bowl, making cleanup a breeze. They’re also versatile, allowing you to customize them to your taste and dietary needs. You’ll love how they are both satisfying and nourishing, giving you a delicious way to fuel your day.

Ingredients

  • 2 ripe bananas, mashed
  • 1/4 cup butter flavor shortening
  • 1/2 cup chocolate chips or carob chips
  • 1/2 cup creamy peanut butter
  • 1/4 cup chopped nuts (optional)
  • 1 1/2 cups oatmeal
  • 1/4 cup unsweetened applesauce
  • 1 teaspoon vanilla extract
  • 1/4 cup vanilla protein powder

Instructions

  1. Preheat your oven to 350 degrees Fahrenheit.
  2. In a large bowl, mix the mashed bananas and peanut butter until completely combined.
  3. Add in the applesauce, vanilla protein powder, and vanilla extract. Mix until all ingredients are fully incorporated.
  4. Add the oatmeal and nuts to the banana mixture and combine thoroughly.
  5. If you want the carob or chocolate chips mixed throughout, add them now. Let the dough rest for 10 minutes.
  6. Drop the cookie dough by spoonfuls onto a parchment paper-lined cookie sheet and flatten them into circles. If you prefer the chips on top, add them now.
  7. Bake the cookies for 20-30 minutes, depending on your preference for texture, until they are golden brown and done.
  8. Remove from the oven and let them rest on the cookie sheet for 5 minutes, then transfer to a cooling rack.
  9. If you want traditional fork marks, use a pizza cutter or sharp knife to score the tops while they’re still warm.
  10. Once completely cool, store in a covered container. Enjoy them on their own or with a cup of tea.

Tips

For best results, use ripe bananas as they will be sweeter and easier to mash. Letting the dough rest allows the oats to absorb some of the moisture, which helps with texture. If you’re using chocolate chips, consider high-quality dark chocolate for added depth of flavor. And remember, baking times can vary depending on your oven, so keep an eye on the cookies to achieve your desired level of doneness.

Variations & Substitutions

If you’re looking to switch things up, try using almond butter instead of peanut butter for a different flavor profile. You can also swap out the nuts for seeds like sunflower or pumpkin seeds if you have nut allergies. For a vegan option, use plant-based butter and ensure your chocolate chips are dairy-free. Feel free to experiment with different types of oats, such as steel-cut or rolled oats, to find the texture you like best.

Storage

These cookies are best stored in an airtight container at room temperature, where they will stay fresh for up to a week. For longer storage, you can refrigerate them for up to two weeks or freeze them for up to three months. To enjoy frozen cookies, simply let them thaw at room temperature or give them a quick warm-up in the microwave.

FAQ

Can I make these cookies gluten-free?

Absolutely! To make these cookies gluten-free, use certified gluten-free oats. This will ensure that your cookies are safe for those with gluten sensitivities or celiac disease.

What can I use instead of vanilla protein powder?

If you don’t have vanilla protein powder, you can substitute it with an equal amount of flour or almond meal. Alternatively, you can omit it entirely, though this may slightly alter the texture of the cookies.

Are these cookies suitable for kids?

Yes, these cookies are a great treat for kids! They are made with wholesome ingredients and can be a fun and nutritious way to satisfy their sweet tooth. Just be sure to adjust the nuts and chocolate based on your child’s dietary needs and preferences.

Nutrition

Each cookie is approximately 120 calories, with 5 grams of protein, 15 grams of carbohydrates, and 6 grams of fat. These values may vary based on the specific brands of ingredients you use. Remember, they are a treat, so enjoy them in moderation as part of a balanced diet.

Conclusion

These Peanut Butter Banana Oat Breakfast Cookies are a delightful blend of nostalgia and nutrition, offering a perfect balance of flavors and textures that are sure to please. Whether you’re enjoying them fresh out of the oven or as a quick grab-and-go breakfast, they’re a testament to the fact that eating well doesn’t have to mean sacrificing taste. I hope these cookies bring a little bit of warmth and joy to your mornings, just as they do to mine. Happy baking!

Related update: Watching What I Eat: Peanut Butter Banana Oat Breakfast Cookies with Carob / Chocolate Chips

Related update: Peppermint Patties

Related update: Easy Cheesy Scrambled Eggs

PB Cup Stuffed Brownie Bites | Made by Meaghan Moineau

PB Cup Stuffed Brownie Bites

Intro

There’s something undeniably magical about the combination of peanut butter and chocolate. It takes me back to my childhood when I would eagerly unwrap peanut butter cups and savor each bite. Fast forward to today, and I’ve found a way to combine that nostalgic flavor with another favorite treat: brownies. These PB Cup Stuffed Brownie Bites are a delightful blend of rich, fudgy brownie with a surprise peanut butter center. They’re perfect for any occasion, whether it’s a simple family gathering or a festive celebration.

Why You’ll Love It

These brownie bites are a surefire hit for several reasons:

  • Easy to Make: No complicated steps or fancy equipment required. Just mix, bake, and enjoy!
  • Irresistibly Delicious: The combination of gooey brownie and creamy peanut butter is simply irresistible.
  • Perfectly Portable: These bites are ideal for parties, picnics, or any time you need a sweet treat on the go.
  • Kid-Friendly: Little hands will love helping to push the peanut butter cups into the brownies!

Ingredients

  • 1 cup granulated sugar
  • 3/4 cup all-purpose flour
  • 2 large eggs
  • 1/2 teaspoon salt
  • 1/2 cup vegetable oil
  • 1 teaspoon vanilla extract
  • 1/3 cup unsweetened cocoa powder
  • 1/2 cup sweet semi chocolate chips
  • 12 Reese’s peanut butter cups

Instructions

  1. Preheat your oven to 350°F (175°C) and prepare a mini muffin pan with cooking spray.
  2. In a medium-sized bowl, whisk together the granulated sugar, flour, eggs, salt, vegetable oil, vanilla extract, and cocoa powder until well combined.
  3. Gently stir in the semi sweet chocolate chips, being careful not to over mix the batter.
  4. Scoop the batter into the prepared mini muffin pan, filling each slot about ¾ of the way full to allow room for rising.
  5. Bake in the preheated oven for 8-10 minutes, or until a toothpick inserted into the center comes out almost clean. It’s okay if they’re slightly underdone.
  6. Once the brownies are done, immediately press a peanut butter cup into the center of each brownie bite.
  7. Let the brownies set in the pan for a couple of minutes before removing them to cool completely on a wire rack.

Tips

  • Ensure the brownie bites are slightly underdone before adding the peanut butter cups for a gooey center.
  • Use a small cookie scoop to evenly distribute the batter into the muffin pan.
  • Allow the brownies to cool completely before storing them to maintain their texture.

Variations & Substitutions

If you want to switch things up a bit, here are some ideas:

  • Nut Butter Cups: Try using almond or cashew butter cups for a different flavor profile.
  • Gluten-Free: Substitute the all-purpose flour with a 1:1 gluten-free flour blend.
  • Dark Chocolate: Replace semi sweet chocolate chips with dark chocolate chips for a richer taste.

Storage

Store these delightful bites in an airtight container at room temperature for up to 3 days. For longer storage, you can refrigerate them for up to a week or freeze them for up to 3 months. Just ensure they are completely cooled before storing to prevent condensation.

FAQ

Can I make these brownie bites ahead of time?

Absolutely! These brownie bites can be made a day in advance and stored in an airtight container. They’re a great option for preparing ahead of time for parties or gatherings.

What if I don’t have a mini muffin pan?

If you don’t have a mini muffin pan, a regular muffin pan will work, though you may need to adjust the baking time. Check the brownies for doneness with a toothpick until it comes out almost clean.

Can I use a different type of chocolate chip?

Yes, you can use milk chocolate or even white chocolate chips if you prefer. Each type will add a unique flavor to the brownie bites.

Nutrition

Please note that nutritional information can vary based on the brands and quantities of ingredients used. Here’s a general idea per brownie bite:

  • Calories: 150
  • Carbohydrates: 18g
  • Protein: 2g
  • Fat: 8g
  • Sugar: 12g

Conclusion

PB Cup Stuffed Brownie Bites are a deliciously indulgent treat that combines the best of both worlds—rich chocolate and creamy peanut butter. They’re easy to make, delightful to share, and sure to become a favorite in your dessert repertoire. Whether you’re baking for a special occasion or just to satisfy a sweet craving, these brownie bites are a perfect choice. Give them a try and watch them disappear in no time!

Related update: PB Cup Stuffed Brownie Bites

Basic Hummus | Made by Meaghan Moineau

Basic Hummus: A Timeless Classic

Intro

Welcome to my warm and inviting kitchen, where today we’re diving into the luscious world of hummus. This basic hummus recipe is not just a dish; it’s a heartfelt connection to my childhood. I remember sitting in my grandmother’s cozy kitchen, a swirl of fragrant spices in the air, as she would blend her magic hummus. The ritual was always the same: a squeeze of lemon here, a dash of cumin there, and always, always a drizzle of the finest olive oil to finish. Those cherished memories inspire this recipe, and I’m thrilled to share it with you.

Why You’ll Love It

This hummus is the epitome of simplicity and flavor. It’s creamy, smooth, and rich with the earthy goodness of chickpeas and tahini. You’ll love how versatile it is—perfect as a spread, a dip, or even a side dish. It’s not just a healthy snack; it’s a culinary canvas for your creativity. Plus, it takes less than 10 minutes to whip up, making it perfect for last-minute gatherings or a quick snack.

Ingredients

  • 1 can of chickpeas
  • 3 tablespoons olive oil
  • Juice of 1 lemon
  • 2 cloves garlic
  • 1/4 cup tahini
  • 2-4 tablespoons water
  • 1 teaspoon cumin
  • Salt to taste

Instructions

  1. Puree the tahini in the food processor for about a minute until it becomes a smooth paste.
  2. Add the olive oil, garlic, lemon juice, cumin, and salt. Pulse until the ingredients are well incorporated.
  3. Add the chickpeas in two batches. Wait for the first batch to become completely smooth before adding the next.
  4. For a smoother hummus, add more lemon juice or water to reach your desired consistency.
  5. Pour the hummus into a bowl. Garnish with extra chickpeas, a sprinkle of paprika, and a drizzle of extra virgin olive oil.
  6. Serve with warm whole wheat pita bread.

Tips

For the creamiest hummus, consider peeling the chickpeas. It’s a bit of extra work, but the velvety texture is worth it. Also, make sure to use fresh lemon juice and good quality tahini for the best flavor. If you like a little heat, add a dash of cayenne pepper or hot paprika.

Variations & Substitutions

Feel free to experiment with flavors! Try adding roasted red peppers for a smoky twist, or a handful of fresh herbs like parsley or cilantro for an herby kick. If tahini isn’t available, you can substitute with a mild nut butter, though the flavor will change slightly. For a lower-fat version, reduce the olive oil and add more water or non-dairy yogurt.

Storage

Store your hummus in an airtight container in the refrigerator for up to a week. If it thickens over time, simply stir in a little water or olive oil to revive its creamy texture. You can also freeze hummus for up to three months; just be sure to thaw it fully in the fridge and give it a good stir before serving.

FAQ

Can I use dried chickpeas instead of canned?

Absolutely! If you prefer cooking from scratch, soak dried chickpeas overnight and then cook until tender. They can then be used in place of canned chickpeas. This can enhance the flavor and texture of your hummus.

Why is my hummus not smooth?

If your hummus isn’t as smooth as you’d like, it might be that the chickpeas weren’t cooked enough. Cooking them longer can help, or try peeling the chickpeas before blending. Also, make sure your food processor is strong enough to handle the job.

What can I serve with hummus?

Hummus pairs beautifully with fresh vegetables, pita chips, crackers, or even as a spread on sandwiches and wraps. It also makes a great accompaniment to grilled meats or falafel.

Nutrition

This hummus is rich in protein and healthy fats, making it a heart-healthy choice. Chickpeas provide fiber and essential nutrients, while tahini and olive oil offer a dose of beneficial fats. Enjoy in moderation as part of a balanced diet.

Conclusion

There you have it—a simple and delicious hummus recipe that’s bound to become a staple in your home. Whether you’re hosting a gathering, preparing a snack, or simply indulging in a moment of nostalgia, this hummus will bring warmth and flavor to your table. I hope it becomes a cherished part of your culinary repertoire, just as it has been in mine. Happy blending!

Related update: Basic Hummus

Related update: How to Make Easy Cheesy Garlic Bread

Related update: Tzadziki