Drunken Turkey Chili | Made by Meaghan Moineau

Drunken Turkey Chili | Made by Meaghan Moineau

Title: Drunken Turkey Chili: A Hearty Bowl of Comfort and Memories
Description: Dive into a bowl of Drunken Turkey Chili, a savory and flavorful dish that combines lean turkey, fresh vegetables, and a splash of light beer for a unique twist. This main dish recipe is not only packed with taste but also comes with a heartwarming family story that makes it a cherished favorite.

---


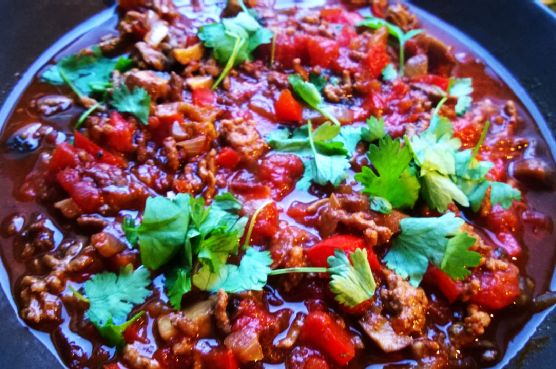
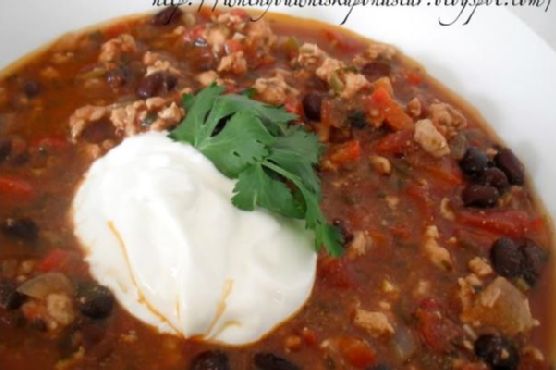
As the leaves begin to turn and a crisp chill fills the air, there's nothing quite like cozying up with a steaming bowl of chili. While everyone has their go-to chili recipe, our family swears by a unique version that’s been passed down for generations: Drunken Turkey Chili.


Ingredients:

- 2 tablespoons extra virgin olive oil


- 1 large white onion, diced


- 1 red bell pepper, diced


- 3 cloves of garlic, minced


- 2 jalapeno peppers, seeded and minced


- 1 teaspoon smoked paprika


- 1 tablespoon chili powder


- 1 teaspoon ground cumin


- 1/2 teaspoon black pepper


- 1 teaspoon unsweetened cocoa powder


- 1 pound lean ground turkey meat


- 1 can (28 ounces) canned tomatoes, peeled


- 1 can (15 ounces) black beans, drained and rinsed


- 1 cup light beer


- 1 tablespoon low sodium soy sauce


- 1/4 cup fresh cilantro, chopped


Instructions:

1. Gently heat the oil in a large pot, ensuring it doesn’t smoke.


2. Add the onion, bell pepper, garlic, and jalapenos. Sauté over medium heat until the vegetables are soft, about 5 minutes.


3. Stir in the smoked paprika, chili powder, ground cumin, black pepper, and cocoa powder to coat the vegetables evenly.


4. Add the ground turkey, sautéing for 3-4 minutes until just cooked through, breaking it up with a spoon or spatula.


5. Drain the juice from the canned tomatoes into the pot, then finely chop the tomatoes and add them to the mix.


6. Stir in the black beans, light beer, and soy sauce.


7. Add the chopped cilantro and stir well. Cover and allow to simmer over low heat for 5 to 10 minutes.


8. Turn off the heat and let the chili rest for about 15 minutes before serving.


Optional Garnishes:

Top your chili with low-fat sour cream, grated cheese, avocado slices, or chopped green onions. I personally enjoy pairing it with crunchy tortilla chips.


A Family Memory:

Every fall, our family would gather at my grandmother's house for our annual autumn supper. The highlight was always her Drunken Turkey Chili. As a child, I remember the enticing aroma of spices and simmering turkey welcoming us as we walked through the door. Grandma would be stirring the pot with a wooden spoon, her apron dusted with flour from her morning baking.


One year, my cousin accidentally added too much beer to the pot. We nervously watched as Grandma tasted it, and to our surprise, she chuckled and said, "Well, it seems the turkey's having a party!" That version of the chili turned out to be a hit, and from then on, the "drunken" element became a beloved part of our tradition.


Difficulty Rating: 3/10
This dish is classified as a Main Dish and is perfect for those looking for a hearty yet simple meal to prepare. Its delightful flavors and ease of preparation make it an excellent choice for family gatherings or a cozy night at home.

So, the next time you’re in need of a comforting meal that warms both the stomach and the soul, give our Drunken Turkey Chili a try. It’s more than just a dish; it’s a bowl full of cherished memories.

Read more about Appetizers

Read more about Main Dishes

Read more about Desserts

Bacon & Potato Soup, Gluten & Dairy Free | Made by Meaghan Moineau

Bacon & Potato Soup, Gluten & Dairy Free | Made by Meaghan Moineau

Title: A Bowl of Comfort: Bacon & Potato Soup, Gluten & Dairy Free
Description: Dive into the warmth and nostalgia of a family-favorite recipe, Bacon & Potato Soup. This hearty, gluten and dairy-free dish combines crispy bacon, tender potatoes, and savory cabbage in a rich broth that warms the soul. Join us as we explore the flavors and the cherished family memories that make this soup a beloved household staple.

---


As the leaves begin to turn and the air grows crisp, there's nothing quite like a comforting bowl of soup to chase away the chill. Our Bacon & Potato Soup, gluten and dairy-free, is the perfect remedy. With its rich aroma and hearty ingredients, it’s a dish that brings back fond memories of family gatherings around the dinner table.


Growing up, soup was more than just a meal; it was a tradition. Every autumn, as the first signs of fall appeared, my grandmother would pull out her well-worn stock pot and begin preparing her famous Bacon & Potato Soup. The smell of sizzling bacon mixed with the sweet aroma of onions would fill the kitchen, creating a welcoming atmosphere that drew everyone in.


Ingredients:

- 2 tablespoons olive oil


- 8 ounces lean bacon, chopped


- 1 large yellow onion, diced


- 3 garlic cloves, minced


- 6 cups chicken stock


- 4 large red baking potatoes, diced


- 2 cups shredded savoy cabbage


- 1 tablespoon Worcestershire sauce


- 1 tablespoon Dijon mustard


- Salt and pepper, to taste


- 1/4 cup flat-leaf parsley, chopped


- Lemon wedges and gluten-free garlic croutons, for garnish


Instructions:

1. In a large stock pot, heat the olive oil over medium-high heat. Add the chopped bacon and onions, cooking until the bacon is crisp and the onions are translucent.


2. Add the garlic and cook for one more minute, until fragrant.


3. Pour in the chicken stock, and add the diced potatoes, shredded cabbage, Worcestershire sauce, and Dijon mustard. Mix well, and season with salt and pepper.


4. Bring the soup to a boil, then reduce the heat and simmer for 30 minutes, or until the potatoes are tender but not falling apart.


5. Remove the pot from heat and allow it to cool for 5 minutes. Transfer 2 1/2 cups of the soup to a blender and pulse quickly to achieve a coarse puree.


6. Pour the blended portion back into the stock pot and return to heat. Cook, stirring often, for 5-10 minutes or until heated through.


7. Stir in the chopped parsley before serving.


8. Ladle the soup into serving bowls and garnish with a wedge of lemon and gluten-free garlic croutons.


A Taste of Nostalgia:

I remember one particular autumn evening when the wind howled outside, and the first flurries of snow danced in the air. My family gathered in the cozy warmth of the kitchen, where the soup simmered gently on the stove. We huddled around the table, bowls of steaming soup in hand, as my grandmother recounted stories of her own childhood. The rich flavors of bacon and potato mingled with the comforting memories of family, creating a moment that has stayed with me all these years.


This recipe is more than a meal; it's a connection to the past. Each spoonful brings back the laughter and love shared at that table, and I hope it brings the same warmth and joy to your home.


Difficulty: 4/10
Classification: Main Dish

Embrace the changing seasons with this delicious Bacon & Potato Soup. Whether you're creating new family traditions or simply savoring a cozy night in, this gluten and dairy-free recipe is sure to become a cherished favorite.

Read more about Appetizers

Read more about Main Dishes

Read more about Desserts

Cauliflower Chickpea Stew | Made by Meaghan Moineau

Cauliflower Chickpea Stew | Made by Meaghan Moineau

Title: Wholesome Comfort: Cauliflower Chickpea Stew to Warm Your Soul
Description: Discover the heartwarming flavors of our Cauliflower Chickpea Stew, a nourishing blend of spices and vegetables that transports you to cozy family dinners. With a difficulty rating of 6/10, this hearty main dish is perfect for both novice and seasoned cooks alike. Dive into a recipe steeped in nostalgia and unforgettable family memories.

---


A Nostalgic Family Dinner: Cauliflower Chickpea Stew

There's something magical about the aroma of spices wafting through the kitchen, reminiscent of cherished family gatherings around the dinner table. One such dish that never fails to evoke warm memories for me is the Cauliflower Chickpea Stew. This hearty and flavorful stew was a staple in my childhood home, especially during the cooler months when the air was crisp, and the evenings were spent wrapped in the warmth of family.


Ingredients for a Cozy Night In:

- Olive oil


- Brown rice


- Twice the amount of water as rice


- Garlic cloves


- Turmeric


- Salt & pepper


- Onion


- Canned tomatoes


- Tomato puree


- Fresh ginger


- Fresh chili


- Cinnamon


- Garam masala


- Paprika


- Sweet potatoes


- Lemon (juice)


- Cauliflower


- Canned chickpeas


Instructions:
1. Infuse the Aroma: Begin by heating a generous splash of olive oil in a large saucepan over high heat. Crush the garlic cloves and fry them with turmeric, salt, and pepper for about a minute. This aromatic base sets the stage for the comforting flavors to come.
2. Toasty Grains: Add the brown rice to the pan, allowing it to fry for 4-5 minutes. The rice should start to toast, absorbing the fragrant spices and oil.
3. Simmering Serenity: Pour in the water, bringing it to a boil before reducing the heat to low-medium. Cover and let it simmer for 30 minutes, allowing the rice to soak up the flavors and reach perfect tenderness.
4. Building Layers of Flavor: While the rice simmers, in a separate pot, sauté diced onion until translucent. Add canned tomatoes, tomato puree, freshly grated ginger, chopped chili, cinnamon, garam masala, and paprika. Let these ingredients meld together, creating a rich and inviting sauce.
5. Hearty Additions: Stir in cubed sweet potatoes, cauliflower florets, and canned chickpeas. Allow these to cook in the sauce until the vegetables are tender and the flavors have melded beautifully.
6. Finishing Touches: Just before serving, squeeze fresh lemon juice over the stew, brightening the dish with a zesty finish.
A Dish Steeped in Memory

As a child, I remember this stew being a centerpiece at family dinners. My mother would prepare it with such care, filling the house with its aromatic allure. It was more than just a meal; it was a symbol of togetherness, a dish that brought everyone to the table, sharing stories and laughter.


Difficulty Rating: 6/10

This Cauliflower Chickpea Stew is a delightful main dish that's accessible to both new and seasoned cooks, offering a rewarding culinary experience that captures the essence of home-cooked comfort.


Whether you're seeking a nourishing meal for a cozy night in or a dish to share with loved ones, this stew is a testament to the power of food to connect and comfort. Embrace the warmth and nostalgia it brings, and create your own cherished memories around the table.

Read more about Appetizers

Read more about Main Dishes

Read more about Desserts

Ancho Chipotle Chili | Made by Meaghan Moineau

Ancho Chipotle Chili | Made by Meaghan Moineau

Title: "Spice Up Your Dinner Table with Ancho Chipotle Chili: A Hearty Family Favorite"
Description: Dive into the rich and smoky flavors of Ancho Chipotle Chili, a dish that brings warmth and nostalgia to any dinner table. Discover how this simple yet robust recipe, rated 6/10 in difficulty, can transform into a cherished family tradition. Perfect as a main dish, this chili combines savory ground beef, vibrant bell peppers, and the deep flavors of ancho and chipotle chiles, offering a symphony of taste in every bite.

---


There’s something uniquely comforting about a pot of chili simmering on the stove, its fragrant spices wafting through the house. For my family, Ancho Chipotle Chili isn't just a meal; it's a treasured tradition that brings us back to simpler times. This dish, rich in flavor and steeped in nostalgia, has been a staple at our family gatherings for generations.


Ingredients You'll Need:


- Dried ancho chile


- Vegetable bouillon powder


- Cumin


- Dried chipotle chile


- Fresh cilantro


- Ground beef


- Mushrooms


- Onion


- Dried oregano


- Red bell pepper


- Salt and pepper


- Tomato sauce


- Water


Instructions:


1. Prepare the Chiles: Start by slicing open the dried ancho and chipotle chiles to remove the seeds and pith. In a warm skillet over medium heat, toast the chiles for a few seconds on each side until they become fragrant—be careful not to burn them! Remember to wear gloves or wash your hands thoroughly after handling the chiles.
2. Soak the Chiles: Place the toasted chiles in a bowl or saucepan, pouring 250ml of boiling water over them. Allow them to soak for at least 15 minutes to soften.
3. Saute the Vegetables: In a large pot, sauté the chopped red bell pepper, onion, and mushrooms over medium heat until they are tender and aromatic.
4. Crisp the Beef: Meanwhile, in a separate skillet, fry the ground beef until it is crispy and browned.
5. Blend the Chiles: Once soaked, blend the chiles along with their soaking liquid to create a smooth paste.
6. Combine Ingredients: Add the crispy beef to the pot with sautéed vegetables, followed by the tomato sauce and blended chiles. If the mixture requires more liquid, add beef or vegetable broth (or water mixed with bouillon powder) until everything is adequately covered.
7. Season and Simmer: Season the chili with salt, pepper, cumin, and oregano to taste. Allow it to simmer gently for about 45 minutes, or until it reaches your desired thickness.
8. Serve: Ladle the chili into bowls and garnish with fresh cilantro for a burst of freshness.

A Taste of Family Tradition


Every time I prepare Ancho Chipotle Chili, I am transported back to my grandmother's kitchen. I remember the joy of watching her work her magic, effortlessly blending spices and ingredients. The kitchen was always filled with the laughter of cousins and the clatter of dishes, a symphony of sounds that signaled a meal made with love.


One particular memory stands out: a chilly autumn evening when the whole family gathered after a day of apple picking. We were all huddled around the table, bowls of steaming chili in front of us, as my grandmother recounted stories of our ancestors' culinary adventures. That night, the warmth of the chili was more than just physical; it was a reminder of our shared history and the love that binds us.


Difficulty Rating: 6/10


This Ancho Chipotle Chili recipe is moderately easy to prepare, making it accessible for both novice and experienced cooks. With a bit of patience and attention to detail, you'll create a dish that's sure to become a beloved staple in your own family tradition.


Classification: Main Dish


Whether served at a family gathering or a casual weeknight dinner, this chili is sure to satisfy and delight. Its robust flavors and hearty ingredients make it the perfect main dish to warm your heart and soul. So, gather your loved ones, share stories, and savor the taste of tradition with every spoonful.

Read more about Appetizers

Read more about Main Dishes

Read more about Desserts

How to Make the Best Chili | Made by Meaghan Moineau

How to Make the Best Chili | Made by Meaghan Moineau

The Ultimate Comfort: How to Make the Best Chili


Discover the Heartwarming Recipe That's Been a Family Favorite for Generations


Chili holds a special place in many hearts, often evoking memories of cozy family gatherings and the delightful aroma that fills the kitchen on a chilly day. This blog post will guide you through making the best chili you've ever tasted, with a recipe that's easy to follow and bursting with flavor. This hearty dish is the perfect main course to warm your soul and satisfy your taste buds.


Ingredients You'll Need:


- 1 bell pepper, chopped


- 1 can of kidney beans


- 1 can of pinto beans


- 1 pound lean ground beef


- 1 large onion, chopped


- 1 can of tomato juice


- 1 can of tomato paste (optional substitute)


- 2 cups water


- 2 tablespoons chili powder


- 1 teaspoon cayenne pepper


- 1 teaspoon ground cumin


- 1 teaspoon black pepper


- 1 teaspoon oregano


- 1 tablespoon white sugar


Instructions:


1. Brown the Ground Beef: In a deep skillet, brown the lean ground beef over medium heat until it is fully cooked, then drain the excess fat.
2. Combine Ingredients: In a large pot over high heat, add the cooked ground beef, tomato juice, kidney beans, pinto beans, water, and tomato paste. Stir in the chili powder, cumin, black pepper, oregano, sugar, cayenne pepper, chopped bell pepper, and onions.
3. Bring to a Boil: Allow the mixture to come to a boil, stirring occasionally.
4. Simmer: Once boiling, reduce the heat and let it simmer uncovered for 2 hours. This allows the flavors to meld perfectly, creating a rich and savory chili.

A Nostalgic Memory


I vividly remember the first time I helped my grandmother make this chili. It was a cold winter evening, and the snow was gently falling outside. The kitchen was warm and inviting, filled with laughter and the comforting aroma of simmering spices. My grandmother handed me a wooden spoon, and with her guidance, I stirred the pot, watching as the ingredients melded into a rich, hearty stew. We shared stories and sipped hot cocoa while the chili simmered, creating a cherished memory that I hold dear to this day. Every time I prepare this dish, I'm transported back to that cozy kitchen, surrounded by love and the promise of a delicious meal shared with family.


Difficulty Rating: 4/10


With its straightforward instructions and readily available ingredients, this chili recipe is perfect for cooks of all skill levels. The most challenging part is waiting patiently as the chili simmers, allowing the flavors to develop fully.


Classification: Main Dish


This chili is more than just a meal—it's an experience. Perfect for family dinners, potlucks, or anytime you crave something hearty and satisfying. Serve it with a side of cornbread or over a bed of rice for an even heartier meal.


Conclusion


Making the best chili doesn't have to be complicated. With this simple recipe, you can create a dish that's not only delicious but also steeped in tradition and nostalgia. Whether you're a seasoned chef or a novice cook, this chili will become a staple in your kitchen, bringing warmth and joy to your family for years to come. So, grab your ingredients and get ready to savor the ultimate comfort food!

Read more about Appetizers

Read more about Main Dishes

Read more about Desserts

Chicken Sausage, White Bean and Cabbage Soup | Made by Meaghan Moineau

Chicken Sausage, White Bean and Cabbage Soup | Made by Meaghan Moineau

Title: A Hearty Hug in a Bowl: Chicken Sausage, White Bean, and Cabbage Soup
Description: Discover the comforting flavors of our Chicken Sausage, White Bean, and Cabbage Soup—a perfect blend of savory and wholesome ingredients. This easy-to-make, one-pot wonder is ideal for chilly nights and family gatherings. With a touch of nostalgia and warmth in every spoonful, this recipe is a must-try for anyone seeking a delicious and nourishing meal.

---


As the leaves turn golden and the air gets crisp, there’s nothing quite like a steaming bowl of soup to bring warmth and comfort to your soul. Our Chicken Sausage, White Bean, and Cabbage Soup is more than just a dish—it's a heartfelt embrace, a reminder of cozy family dinners, and a delicious way to celebrate the flavors of the season.


Ingredients


- Olive oil


- 1 white onion, chopped


- 2 diced carrots


- Salt and black pepper to taste


- 3 cloves garlic, minced


- 1/2 teaspoon crushed red pepper flakes


- 1 pound Italian mild chicken sausage


- 6 cups low sodium vegetable stock


- 2 cans white beans, drained and rinsed


- 1 small green cabbage, thinly sliced


Instructions


1. Start with Sautéing: In a large pot, heat olive oil over medium heat. Add chopped onions and sauté until tender, about 8 minutes.
2. Add Vegetables: Toss in diced carrots and continue cooking for another 5 minutes. Season with salt, pepper, garlic, and red pepper flakes; cook for another minute.
3. Cook the Sausage: Remove the sausage from its casing and break it into small chunks in the pot. Toss with vegetables to brown the meat, cooking for another 8-10 minutes.
4. Simmer the Soup: Pour in the vegetable stock, enough to cover all ingredients, and bring to a gentle simmer.
5. Incorporate Beans and Cabbage: Add the white beans and cabbage, stirring to combine. Simmer, covered, until the cabbage is wilted but not mushy, about 10 minutes. Taste and adjust seasoning with more salt or pepper if needed.

A Nostalgic Note


This soup takes me back to my grandmother's kitchen, where I spent countless chilly afternoons enveloped in the warmth of her loving care. The aroma of sautéed onions and garlic would drift through the house, a sign that something truly special was being prepared. As a child, I loved watching her add each ingredient with precision and care, taking the time to let the flavors meld into something magical. Her secret ingredient wasn't in the spice rack but rather in the love and joy she infused into every meal. Each bite was a reminder of her nurturing spirit and the cherished family memories we created around her table.


Difficulty and Classification


Difficulty: 3/10 - This soup is straightforward and perfect for beginners and seasoned cooks alike, offering a hassle-free cooking experience.
Classification: Main Dish - Packed with protein and hearty vegetables, this soup is a fulfilling main dish that holds its own as a complete and satisfying meal.

Whether you're looking to recreate a piece of nostalgia or simply enjoy a flavorful and hearty meal, this Chicken Sausage, White Bean, and Cabbage Soup is sure to become a beloved favorite in your home. Gather your loved ones and savor the simple joys of cooking and sharing a meal together.

Read more about Appetizers

Read more about Main Dishes

Read more about Desserts

Farro & Leek Soup | Made by Meaghan Moineau

Farro & Leek Soup | Made by Meaghan Moineau

Title:

Hearty Comfort in a Bowl: The Timeless Allure of Farro & Leek Soup


Description:

Dive into the nourishing warmth of Farro & Leek Soup, a dish that marries the rustic charm of ancient grains with the delicate flavors of leeks and herbs. This blog post takes you on a culinary journey, complete with a heartwarming family memory, and offers a simple yet flavorful recipe that’s perfect for any season. Discover why this soup is not just a meal, but a cherished tradition.


---


A Nostalgic Journey with Farro & Leek Soup

There's something deeply comforting about a bowl of soup. It’s warmth, aroma, and the memories it evokes. For me, Farro & Leek Soup is a gateway to cherished family moments. Growing up, our kitchen was the heart of the home, especially during the chilly months when my grandmother would lovingly prepare this hearty soup. The scent of leeks and herbs wafting through the house was the signal that warmth and love were soon to embrace us.


The Secret to a Simple Yet Flavorful Soup
What makes Farro & Leek Soup so special is its simplicity. With just a few humble ingredients, you can create a dish that is not only satisfying but also deeply nourishing. Here's how you can recreate this classic family favorite:
Ingredients:

- 2 tablespoons olive oil


- 3 white leeks, thinly sliced


- 200 grams farro


- 2 stalks of celery, diced


- 2 carrots, diced


- 1 onion, diced


- 4 cups meat stock (homemade is best, no bouillon cubes)


- 1 sprig of thyme


- 1 bay leaf


- Parmesan cheese, for garnish


- Salt & pepper, to taste


Instructions:
1. Prepare the Base: In a heavy-bottomed pot, heat the olive oil over medium-low heat. Add the leeks, celery, carrots, and onion. Sweat the vegetables until they become translucent and soft, ensuring they do not brown. If they start to stick, reduce the heat and add a spoonful of water.
2. Incorporate the Farro: Add the farro to the pot, toasting it with the vegetables for 1-2 minutes to enhance its nutty flavor.
3. Simmer with Stock and Herbs: Introduce the thyme, bay leaf, and meat stock to the mix. Season with salt and pepper to your preference. Bring the soup to a low simmer and let it cook for 30-40 minutes until the farro is tender, stirring occasionally.
4. Adjust the Consistency: Depending on your preference, you can adjust the consistency of the soup. For a stew-like texture, hold back some of the stock. For a more soupy consistency, feel free to add more stock.
5. Finish and Serve: Drizzle with extra virgin olive oil, sprinkle with freshly grated Parmesan cheese, and serve hot with a side of toasty bread.
A Dish Beyond the Kitchen

Every spoonful of this soup takes me back to my grandmother's kitchen, where laughter mingled with the aroma of cooking. It was a place where stories were shared, and bonds were strengthened. Today, as I prepare Farro & Leek Soup for my own family, I am reminded of the timeless nature of food and its power to connect generations.


Difficulty Level: 4/10
Classification: Main Dish

With its rich flavors and wholesome ingredients, Farro & Leek Soup is more than just a meal; it is a tradition, a memory, a hug in a bowl. Whether you're seeking comfort on a cold day or a light yet satisfying main dish, this soup is sure to become a cherished favorite in your home, just as it has in mine.

Read more about Appetizers

Read more about Main Dishes

Read more about Desserts

Baked Ziti Or Rigatoni | Made by Meaghan Moineau

Baked Ziti Or Rigatoni | Made by Meaghan Moineau

Title: "Savor the Comfort: Baked Ziti/Rigatoni Recipe to Warm the Heart and Home"
Description: Dive into the rich, comforting flavors of this Baked Ziti or Rigatoni recipe—a classic Italian-American dish that's sure to become a family favorite. With gooey mozzarella, creamy ricotta, and a savory tomato sauce, this main dish is both easy to prepare and delightful to eat. Follow along as we share not only the simple steps to this delicious pasta bake but also a nostalgic family story that highlights the warmth and love this dish brings to the table.

---


A Taste of Home: Baked Ziti/Rigatoni


When the air turns crisp and the leaves begin to fall, there's nothing quite like indulging in a hearty dish that feels like a warm hug. Baked Ziti or Rigatoni is that dish for many families, a staple at gatherings and a beacon of comfort on chilly evenings. This recipe is a straightforward yet flavorful delight, earning a difficulty rating of 4 out of 10, making it an accessible main dish for cooks of all levels.


Ingredients:

- Cooked ziti or rigatoni

- 1 egg


- 1 cup Parmesan cheese, divided


- 1 cup ricotta cheese


- 2 cups shredded mozzarella cheese


- 3 1/2 cups spaghetti sauce, divided


Instructions:

1. Preheat your oven to 375°F (190°C).

2. In a large mixing bowl, combine the cooked ziti, egg, 1/2 cup of Parmesan cheese, ricotta, shredded mozzarella, and 1 1/2 cups of spaghetti sauce. Mix until well blended.


3. In a 2 1/2 quart baking dish, spread 1/2 cup of spaghetti sauce evenly across the bottom.


4. Pour the ziti mixture into the baking dish, spreading it out evenly.


5. Top the ziti mixture with the remaining 1 1/2 cups of spaghetti sauce.


6. Sprinkle the top with the remaining 1/2 cup of Parmesan cheese.


7. Bake in the preheated oven for 30 minutes, or until the top is slightly browned and bubbly.


8. Allow to cool for a few minutes before serving.


A Family Memory


For me, Baked Ziti has always been more than just a meal; it's a cherished family tradition. I remember one particularly chilly autumn day when my grandmother decided to teach me how to make her famous Baked Ziti. The kitchen was filled with the scent of simmering tomato sauce and fresh herbs, a sensory invitation to warmth and comfort.


As we prepared the dish together, my grandmother shared stories of her own childhood, recounting how her mother would make this very dish for Sunday dinners. It was a ritual of love, bringing the family together after a long week. We laughed as we accidentally spilled a bit of mozzarella on the floor, and she playfully nudged me with her elbow, reminding me that cooking is just as much about the memories we create as it is about the food itself.


When the ziti emerged from the oven, golden and bubbling, it was as if time had slowed down, allowing us to savor the moment. Each bite was rich and satisfying, filled with the flavors of tradition and the warmth of family bonds. Even now, years later, every time I bake ziti, I am transported back to that cozy kitchen, enveloped by the love and laughter of generations past.


Conclusion


Baked Ziti or Rigatoni is more than just a recipe; it's a bridge to the past, a tradition to be savored and shared. Whether you're cooking for loved ones or enjoying a quiet meal at home, this dish promises comfort and joy with every bite. So gather your ingredients, preheat your oven, and let this simple yet exquisite recipe become a part of your family's cherished memories.

Read more about Appetizers

Read more about Main Dishes

Read more about Desserts

Chicken and Roasted Broccoli Salad With Goat Cheese | Made by Meaghan Moineau

Chicken and Roasted Broccoli Salad With Goat Cheese | Made by Meaghan Moineau

# Nostalgic Flavors: Chicken and Roasted Broccoli Salad with Goat Cheese


## A Taste of Home: Family Gatherings and Culinary Memories


Growing up, my family had a tradition of gathering every Sunday for a hearty meal. The kitchen would be filled with laughter, the clatter of pots and pans, and the mouthwatering aroma of delicious dishes. One of the standout recipes that often graced our table was the Chicken and Roasted Broccoli Salad with Goat Cheese. This dish, with its perfect blend of savory chicken, tangy goat cheese, and roasted broccoli, is not just a meal—it's a cherished memory.


### Ingredients:


- 1 head of broccoli, chopped into florets


- 2 garlic cloves, minced


- 4 oz goat cheese, crumbled


- Juice from 1 lemon


- 3 tbsp olive oil


- 1 tsp dried oregano


- 1/2 tsp freshly ground pepper


- 1 red bell pepper, sliced


- A pinch of red pepper flakes


- Salt, to taste


- 2 cups cooked shredded chicken


- 1 tsp sugar


### Instructions:


1. **Preheat the Oven:** Begin by heating your oven to a scorching 500 degrees Fahrenheit. Place a sturdy baking sheet on the lowest rack. This high heat is essential for achieving perfectly roasted broccoli.


2. **Prepare the Broccoli:** In a large bowl, toss the broccoli florets with minced garlic, olive oil, salt, pepper, and a dash of red pepper flakes. For an added touch of sweetness, sprinkle in the sugar.


3. **Roast the Broccoli:** Spread the broccoli mixture evenly on the preheated baking sheet. Roast in the oven for about 15-20 minutes, or until the broccoli is tender and has a slight char.


4. **Assemble the Salad:** In a large serving bowl, combine the roasted broccoli, shredded chicken, and red bell pepper slices. Drizzle with lemon juice and sprinkle with dried oregano.


5. **Add the Goat Cheese:** Finish the salad by crumbling goat cheese over the top. Its creamy texture and tangy flavor will elevate the dish.


6. **Serve:** Toss everything gently to combine, ensuring an even distribution of ingredients. Serve warm or at room temperature.


### A Family Memory:


I vividly remember one particular Sunday when my grandmother decided to add her unique twist to this classic dish. With her usual flair, she infused the salad with extra lemon juice and a touch of oregano, creating a symphony of flavors that lingered on our taste buds. That afternoon, we gathered around the table, reminiscing about old times and sharing stories that spanned generations. The Chicken and Roasted Broccoli Salad with Goat Cheese became more than just a meal—it was a symbol of love, tradition, and the bonds that tie us together.


### Difficulty Rating: 4/10


This dish is straightforward and perfect for cooks of all levels. The simple steps and readily available ingredients make it an ideal choice for a relaxing Sunday dinner.


### Classification: Main Dish


With its hearty combination of protein, vegetables, and cheese, this salad serves as a satisfying main dish. It’s perfect for a family meal or a casual dinner with friends.


---


Whether you're recreating family memories or crafting new ones, the Chicken and Roasted Broccoli Salad with Goat Cheese is a delightful dish that will warm your heart and satisfy your palate. Enjoy the nostalgia and flavors that come with each bite!

Read more about Appetizers

Read more about Main Dishes

Read more about Desserts

Jambalaya Stew | Made by Meaghan Moineau

Jambalaya Stew | Made by Meaghan Moineau

# A Hearty Bowl of Jambalaya Stew: A Taste of Tradition


**Description:** Dive into the rich flavors of New Orleans with our Jambalaya Stew, a delightful blend of savory chicken sausage, succulent shrimp, and vibrant vegetables. This hearty dish is perfect for family gatherings and a breeze to make. Join us as we explore the comforting nostalgia of this family favorite, with a sprinkle of history and a dash of spice.


---


## A Culinary Journey: Rediscovering Jambalaya Stew


There's something magical about a pot of Jambalaya simmering on the stove, the aroma of spices filling the kitchen, and the promise of a comforting meal waiting to be shared. This Jambalaya Stew is not just a recipe; it's a journey back to cherished family memories, a dish that brings loved ones together around the table.


### Ingredients You'll Need


- **4 cooked Italian sweet chicken sausage links**


- **1 can of diced tomatoes**


- **1 onion, chopped**


- **1 yellow and 1 green bell pepper, diced**


- **2 stalks of celery, chopped**


- **4 cups of low sodium chicken broth**


- **1 cup of brown rice**


- **3 cloves of garlic, minced**


- **2 tablespoons of Cajun seasoning**


- **A dash of hot sauce (or to taste)**


- **1 teaspoon of dried oregano**


- **1 teaspoon of dried thyme**


- **1 pound of raw shrimp, peeled and deveined**


### Cooking Instructions


1. **Combine Ingredients:** In a large pot, add all ingredients except the shrimp. Stir them together until well mixed.


2. **Bring to a Boil:** Heat the pot on the stove until it reaches a boil.


3. **Simmer:** Reduce the heat to medium-low. Cover the pot and let it simmer for about 35 minutes, or until the vegetables are tender and the rice is fluffy.


4. **Add Shrimp:** Stir in the shrimp, then re-cover the pot. Cook for an additional 6 minutes, or until the shrimp are tender and cooked through.


5. **Season to Taste:** If desired, add salt, black pepper, or more hot sauce to suit your taste.


6. **Serve and Enjoy:** Ladle the stew into bowls, serve hot, and enjoy the flavors of this traditional dish.


### A Nostalgic Family Tale


Growing up, Sundays were always a special day in our household. It was a time to slow down, gather the family, and enjoy a hearty meal together. My grandmother's Jambalaya Stew was the star of these Sunday gatherings. The kitchen would be a flurry of activity, with family members chopping vegetables, stirring pots, and sharing stories.


One particular Sunday stands out in my memory. It was a chilly afternoon, and as the stew simmered away on the stove, the warmth from the kitchen crept into every corner of the house. I remember my grandmother, her apron dusted with flour, telling tales of her own childhood in New Orleans, where Jambalaya was a staple at every family feast. Each spoonful of the stew was like a warm hug, a reminder of the love and care that went into every meal.


Even today, every time I make this Jambalaya Stew, I'm transported back to those cherished Sundays. It's more than just a dish—it's a celebration of family, tradition, and the simple joy of sharing a meal with those you love.


### Difficulty Rating and Classification


- **Difficulty:** 4/10 - This recipe is straightforward, making it perfect for both novice cooks and seasoned chefs.


- **Classification:** Main Dish - With its hearty ingredients and robust flavors, this Jambalaya Stew is sure to be the centerpiece of any meal.


Embrace the flavors of the South and create your own family memories with this Jambalaya Stew. Whether it's a casual weeknight dinner or a special family gathering, this dish is sure to warm hearts and fill bellies. Enjoy!

Read more about Appetizers

Read more about Main Dishes

Read more about Desserts

Tex-Mex Burger | Made by Meaghan Moineau

Tex-Mex Burger | Made by Meaghan Moineau

# Savoring the Southwest: Crafting the Perfect Tex-Mex Burger


## A Nostalgic Culinary Journey


Growing up in the heart of Texas, my family and I would often gather in the backyard on warm summer evenings, the air buzzing with laughter and the smell of something delicious wafting from the grill. It was on these golden evenings that my mother introduced us to the Tex-Mex Burger—a dish that would become a family favorite and a symbol of our shared love for bold flavors and simple pleasures.


I remember the first time she made it. The sun was setting, casting an amber glow across our backyard. My siblings and I watched in awe as she skillfully mixed ground beef with salsa and a medley of spices. It was like watching a magician at work. When she handed each of us a burger, the first bite was transformative. The crispy exterior of the patty gave way to a juicy, flavorful core, perfectly balanced by the creamy avocado and the kick of pepper jack cheese.


## Crafting Your Own Tex-Mex Burger


### Ingredients:


- Ground beef


- Salsa


- Avocado


- Pepper jack cheese


- Hamburger buns


- Red onion


- Chili powder


- Cumin


- Paprika


- Cilantro


- Salt


- Pepper


### Instructions:


1. **Preheat the Broiler:** Begin by preheating your broiler. This will ensure a delightful crust on your patties.


2. **Prepare the Frying Pan:** Heat a large frying pan over medium-high heat. We want it hot enough to sear the burgers to perfection.


3. **Make the Patties:** In a large mixing bowl, combine the ground beef with salsa, chili powder, cumin, paprika, salt, and pepper. Mix until the ingredients are evenly distributed.


4. **Form the Patties:** Shape the mixture into patties, pressing slightly in the center for even cooking.


5. **Cook the Patties:** Place the patties in the hot frying pan. Cook each side for approximately 4-5 minutes, ensuring a nice crust forms.


6. **Melt the Cheese:** In the last minute of cooking, place a slice of pepper jack cheese on each patty. Allow it to melt beautifully over the patty.


7. **Assemble the Burger:** Toast the hamburger buns lightly, then layer each with a slice of avocado, a juicy patty, and a few slices of red onion. Garnish with fresh cilantro.


## A Flavorful Main Dish


The Tex-Mex Burger is more than just a meal; it’s a tribute to the culinary melding of robust Texan and vibrant Mexican flavors. With its harmonious blend of spices and fresh ingredients, it promises a taste of the Southwest in every bite.


### Difficulty Rating: 4/10


This dish is surprisingly easy to prepare, making it perfect for both novice cooks and seasoned chefs looking to spice up their culinary repertoire. As a Main Dish, it’s ideal for family dinners, backyard barbecues, or any occasion that calls for a hearty, flavorful meal.


## A Family Tradition


Even now, whenever we gather as a family, someone inevitably suggests we make those unforgettable Tex-Mex Burgers. They’ve become a beloved tradition, a culinary heirloom passed down through flavors and memories. As you embark on crafting your own Tex-Mex Burger, may you find the same joy and connection that this dish has brought to my family for generations. Happy cooking!

Read more about Appetizers

Read more about Main Dishes

Read more about Desserts

Creamy White Chili

I remember the first time I tried my grandma's Creamy White Chili. It was a cold winter day and she had spent hours in the kitchen preparing this warm and comforting dish for our family. The aroma of the chicken, beans, and spices filled the house, creating a cozy and inviting atmosphere. As we all sat down to enjoy this delicious meal together, I knew that this recipe would become a family favorite for years to come.

Ingredients:

- 1 lb chicken, diced

- 1 onion, chopped

- 2 cloves garlic, minced

- 1 can great northern beans, drained and rinsed

- 1 can chicken broth

- 1 can green chilies

- 1 tsp cumin

- 1 tsp oregano

- 1/2 tsp black pepper

- 1/2 tsp salt

- 1/2 cup heavy whipping cream

- 1/4 cup sour cream

- 1/4 cup shredded cheddar cheese

- 1 tbsp olive oil

Instructions:

1. In a heavy saucepan, sauté chicken, onion, and garlic in olive oil until chicken is cooked.

2. Add chicken broth, beans, green chilies, cumin, oregano, black pepper, and salt. Simmer on low heat for 20 minutes.

3. Remove from heat and stir in heavy whipping cream and sour cream.

4. Top with shredded cheddar cheese before serving.

Making this Creamy White Chili recipe is relatively easy, with a difficulty rating of 5 out of 10. It is a hearty and satisfying main dish that is perfect for a cozy family dinner or a gathering with friends. The creamy texture and flavorful spices make it a standout dish that will become a favorite in your household as well. Enjoy!