Moroccan Chicken Pitas | Made by Meaghan Moineau

Moroccan Chicken Pitas | Made by Meaghan Moineau

Title: Savoring Tradition: Moroccan Chicken Pitas and Family Memories

Description: Dive into the vibrant flavors of Moroccan cuisine with our recipe for Moroccan Chicken Pitas. This delightful dish combines aromatic spices and fresh ingredients to create a meal rich in tradition and taste. Join us as we explore the preparation of these flavorful pitas and share a nostalgic family story that makes this dish all the more special. Rated at a moderate difficulty of 6/10, this recipe serves as a delectable main dish for any occasion.


---


Moroccan Chicken Pitas: A Journey Through Flavor and Time


There's something truly special about preparing a meal that not only tantalizes the taste buds but also evokes cherished memories. Moroccan Chicken Pitas are one such dish, combining the vibrant spices of Morocco with the warmth of family tradition. This recipe, with its medley of flavors and textures, transports me back to joyful gatherings and lively conversations around the dinner table.


Ingredients:


- Pita bread


- Skinless boneless chicken breasts


- Paprika


- Coriander


- Cinnamon


- Cumin


- Cayenne pepper


- Garlic


- Ginger


- Salt


- Olive oil


- Fresh Italian parsley


- Cooked quinoa


- Canned diced petite tomatoes


- Yellow diced onion


- Lemon (juice)


- Diced Medjool dates


- Olive oil


- Sea salt


- Greek yogurt


- Diced cucumber


- Mint


- Lemon (juice)


Instructions:


1. Prepare the Spice Rub:

- In a small dish, combine paprika, coriander, cinnamon, cumin, cayenne pepper, garlic, ginger, and salt. Stir thoroughly.


2. Marinate the Chicken:

- Using a meat mallet, pound the chicken breasts until they're about 1/2 inch thick.


- Generously rub the spice mixture on all sides of the chicken breasts. Cover and refrigerate for about an hour.


3. Prepare the Tabbouleh:

- Combine cooked quinoa, canned diced petite tomatoes, yellow diced onion, lemon juice, diced Medjool dates, olive oil, and sea salt.


- Adjust salt and oil to taste. Cover and chill while the chicken is marinating. (Tip: Enjoy a handful of pita chips with a scoop of this refreshing mix!)


4. Grill the Chicken:

- Prepare the grill to medium heat.


- Grill the marinated chicken until thoroughly cooked, about 16 minutes. I prefer mine with a slight char for added flavor.


5. Assemble the Pitas:

- Half and split open the pita bread.


- Fill each half with slices of grilled chicken, tabbouleh, and a generous dollop of the yogurt sauce made from Greek yogurt, diced cucumber, mint, and lemon juice.


A Nostalgic Family Memory:


The aroma of Moroccan spices takes me back to my grandmother's kitchen, where the air was always filled with mouth-watering scents and laughter. Every Sunday, our family would gather for a feast, and my grandmother's Moroccan Chicken Pitas were always the star of the show. I remember her meticulously preparing the spices, her hands working with the ease and grace that only years of practice can bring.


As children, we would hover around the kitchen, eager for a taste. She would shoo us away with a playful smile, always making sure there was extra tabbouleh for us to nibble on with pita chips. These pitas were more than a meal; they were a celebration of our heritage and the love that bound us together. Each bite was a reminder of the warmth and joy that filled our family gatherings.


Difficulty Rating: 6/10


Classification: Main Dish


---


Whether you're looking to relive a cherished memory or create new ones, Moroccan Chicken Pitas offer a delicious journey through flavors and time. With its blend of spices and fresh ingredients, this dish is sure to impress at any gathering and bring a touch of Moroccan magic to your table.

Read more about Appetizers

Read more about Main Dishes

Read more about Desserts

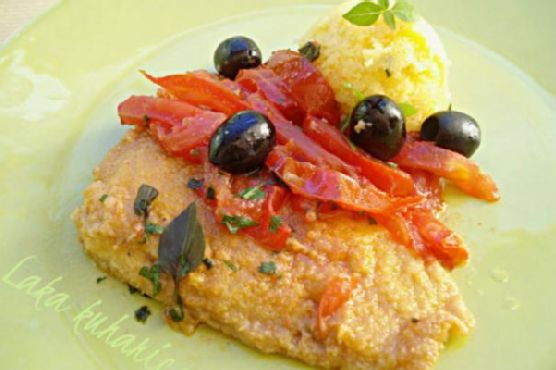
Cod with tomatoes, olives and polenta | Made by Meaghan Moineau

Cod with tomatoes, olives and polenta | Made by Meaghan Moineau

Title: Savoring Tradition: Cod with Tomatoes, Olives, and Polenta - A Heartfelt Italian Feast
Description: Dive into the flavors of the Mediterranean with our Cod with Tomatoes, Olives, and Polenta recipe. This main dish, rated at a moderate difficulty of 5/10, combines the fresh taste of cod with the tangy depth of olives and tomatoes, all served alongside creamy polenta. It's a nostalgic culinary journey that warms the soul and brings back cherished family memories.

---


A Culinary Journey Through Time: Cod with Tomatoes, Olives, and Polenta

In the heart of our family kitchen, the aroma of cod simmering with ripe tomatoes and briny olives was synonymous with Sunday gatherings. This dish, steeped in tradition and rich in flavor, was a staple at our family table. It was a recipe passed down from my Nonna, a cherished family heirloom that we lovingly recreated, preserving its authenticity with each preparation.


Ingredients:

- Fresh cod fillets


- Black olives


- Tomatoes


- Dry white wine


- Fresh parsley


- Olive oil


- Fresh and dry oregano


- Corn flour


- Instant corn polenta


- Salt


- White pepper


- Water


Instructions:
1. Prepare the Cod: If your fillets are frozen, be sure to thaw them beforehand. In a shallow dish, mix corn flour with a pinch of salt and white pepper. Dredge each fillet through the seasoned flour, coating evenly.
2. Sauté the Fillets: Heat olive oil in a large skillet over medium heat. Sauté the fillets, allowing them to cook for about 3 minutes on each side until they develop a golden crust. Once done, sprinkle the fillets with a splash of dry white wine, letting it sizzle and infuse the fish with its delicate aroma.
3. Create the Sauce: Add chopped tomatoes and black olives to the skillet, letting them mingle with the fish. Cook this vibrant mixture for about 5 minutes, until the tomatoes soften and release their juices.
4. Finish with Herbs: Before serving, garnish the fillets with freshly chopped parsley and a sprinkle of oregano, both dry and fresh, to elevate the dish with their fragrant essence.
5. Craft the Polenta: In a separate pot, bring water to a boil. Add a dash of white wine, a sprinkle of salt, and a hint of dry oregano. Gradually stir in the instant polenta, whisking continuously for about 5 minutes until it thickens to your desired consistency. If the mixture becomes too thick, add a bit more boiling water.
6. Serve: Allow the polenta to cool slightly before serving it alongside the cod, ensuring each bite is a comforting blend of flavors.
A Taste of Nostalgia:

This dish is more than just a meal; it's a portal to cherished memories. I remember standing on a stool beside my mother, my small hands eager to help as she expertly coated the cod in flour, her eyes twinkling with the joy of passing down our family tradition. The kitchen was filled with laughter and stories of my grandparents' adventures in the Italian countryside, where this recipe was born.


As the sun dipped below the horizon, our family gathered around the table, the comforting warmth of this dish uniting us. Each bite was a celebration of our heritage, a reminder of the love and labor that went into creating this masterpiece.


Difficulty: 5/10
Classification: Main Dish

---


Whether you're recreating this dish for a special occasion or a cozy family dinner, our Cod with Tomatoes, Olives, and Polenta is a delightful reminder of the simple pleasures of life. It's a taste of nostalgia, a journey through tradition, and a testament to the power of food to bring families together. Enjoy this recipe, and may it become a beloved part of your own culinary story.

Read more about Appetizers

Read more about Main Dishes

Read more about Desserts

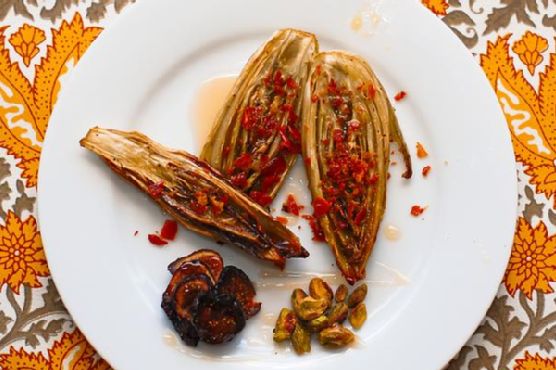
Roasted Endive Salad With Prosciutto, Figs and Pistachios | Made by Meaghan Moineau

Roasted Endive Salad With Prosciutto, Figs and Pistachios | Made by Meaghan Moineau

A Taste of Nostalgia: Roasted Endive Salad With Prosciutto, Figs, and Pistachios


An Ode to Family Gatherings and Flavorful Traditions


Description: Dive into the harmonious blend of flavors in our Roasted Endive Salad with Prosciutto, Figs, and Pistachios. This dish brings together the crisp texture of roasted red and green endive, the rich saltiness of prosciutto, the sweet chewiness of figs, and the crunchy delight of pistachios, all drizzled with a touch of honey. Perfect as an appetizer, this recipe is a testament to how simple ingredients can transform into an unforgettable culinary experience.
Difficulty: 5/10
Category: Appetizer

---


A Culinary Journey Down Memory Lane


Growing up, family gatherings were the highlight of every season. Whether it was a holiday celebration or a simple weekend get-together, the kitchen was always bustling with activity. My grandmother, the heart and soul of our family, had a knack for turning ordinary ingredients into extraordinary dishes. One of her signature creations was the Roasted Endive Salad, a dish that never failed to bring a smile to our faces.


I remember one particular autumn afternoon, the air crisp and leaves painting the ground in hues of gold and crimson. My cousins and I would play outside, our laughter echoing through the trees, while the aroma of roasting endive wafted from the kitchen window. The anticipation of savoring that first bite was almost as delightful as the dish itself.


My grandmother would meticulously prepare the endives, her hands moving with the grace and precision that only years of practice could bring. She'd roast them to perfection, their edges turning a beautiful golden brown. Meanwhile, the prosciutto sizzled in the skillet, its savory scent mingling with the sweet fragrance of dried figs.


When the time came to sit around the table, the Roasted Endive Salad was always a centerpiece. Each bite was a symphony of flavors—the bitterness of the endive balanced by the sweetness of figs, the crunch of pistachios, and the delicate saltiness of prosciutto, all enveloped in the warm embrace of honey.


The Recipe


Ingredients:

- Red and green endive


- Olive oil


- Prosciutto


- Dried figs


- Pistachio nuts


- Honey


Instructions:

1. Preheat your oven (*ding, this is a great toaster oven candidate) to 350°F. Line a rimmed baking sheet with aluminum foil.


2. Wash the endive and remove any unsightly outer leaves. Slice each endive head in half from the stem to the tip.


3. Arrange the endive cut side up on the foil-lined baking sheet. Coat generously with olive oil.


4. Bake at 350°F for 30 minutes, or until the outer edges are golden brown.


5. Meanwhile, fry the prosciutto in a skillet until crispy. Drain onto paper towels, then crumble and set aside.


6. When the endive is done roasting, arrange three pieces on a plate alongside a handful of sliced dried figs and pistachio nuts.


7. Drizzle a spoonful of honey over the plate, then sprinkle the endive with about 1/4th of the crumbled prosciutto.


Conclusion


This Roasted Endive Salad with Prosciutto, Figs, and Pistachios is more than just a dish—it's a bridge to cherished memories and a testament to the power of simple, quality ingredients. Whether you're recreating a family tradition or starting a new one, may each bite bring warmth and joy to your table, just as it has to mine.

Read more about Appetizers

Read more about Main Dishes

Read more about Desserts

Strawberry Shortcake with Homemade Donuts | Made by Meaghan Moineau

Strawberry Shortcake with Homemade Donuts | Made by Meaghan Moineau

Title: Indulge in Nostalgia with Strawberry Shortcake Donuts: A Sweet Family Tradition
Description:

Dive into the world of heavenly desserts with our Strawberry Shortcake with Homemade Donuts. This unique twist on a classic favorite is not just about the delightful flavors of strawberries and whipped cream—it’s a culinary journey down memory lane. Perfect for dessert lovers seeking a comforting treat that’s equal parts nostalgia and innovation. Whether you're a seasoned baker or a novice in the kitchen, this recipe is a delightful challenge worth every minute. Rated at a moderate difficulty of 6 out of 10, these donuts are sure to become a cherished addition to your dessert repertoire.


---


Strawberry Shortcake Donuts: A Recipe to Relive Memories

There’s something magical about the aroma of freshly baked donuts wafting through the kitchen. It takes me back to sunlit Saturday mornings in my grandmother’s warm, inviting home. Her kitchen was a place of wonder, filled with laughter, stories, and the irresistible smell of her famous Strawberry Shortcake. Today, I’m sharing a special version of this nostalgic treat: Strawberry Shortcake with Homemade Donuts.


Ingredients:

- 2 cups cake flour


- 1 tablespoon baking powder


- ½ teaspoon salt


- ½ cup shortening (or vegetable lard)


- ¾ cup granulated sugar


- 3 egg yolks


- 1 cup sour cream


- 1 teaspoon vanilla extract


- ½ cup whole milk


- 1 cup confectioners sugar


- Fresh strawberries


- Whipped cream


Instructions:
1. Prepare the Dry Ingredients: In a mixing bowl, combine 2 cups of cake flour, 1 tablespoon of baking powder, and ½ teaspoon of salt. If nutmeg is your muse, feel free to add a pinch, though I prefer the simple, clean taste without it. Set this mixture aside.
2. Blend the Wet Ingredients: Using a stand mixer, blend ½ cup of shortening and ¾ cup of granulated sugar on low speed until the mixture resembles fine sand. Gradually add in the 3 egg yolks, mixing on low speed for about a minute.
3. Combine and Chill: Alternate adding your dry ingredients with 1 cup of sour cream to the mixer, ensuring you scrape down the sides of the bowl occasionally. Add 1 teaspoon of vanilla extract and mix until just incorporated. Cover and refrigerate the batter for 15-20 minutes.
4. Preheat and Pipe: Preheat your oven to 350°F. Spoon the batter into a ziplock bag and cut a corner to create a makeshift piping bag. Pipe the batter into a greased donut pan.
5. Bake and Ice: Bake for 10-12 minutes until the donuts are light and fluffy. Meanwhile, in a saucepan over low heat, warm ½ cup of whole milk. Whisk in 1 cup of confectioners sugar until smooth to create a simple icing. Dip the cooled donuts in the icing or drizzle it over the top.
6. Assemble the Shortcakes: Slice the donuts in half, resembling an English muffin. Layer with freshly sliced strawberries and a generous dollop of whipped cream.

---


A Sweet Journey Back in Time

Every bite of these Strawberry Shortcake Donuts is a step back into cherished family moments. I vividly remember sitting at my grandmother’s kitchen table, the sun painting patterns on the floor as she regaled us with tales of her youth. Her strawberry shortcake was a staple at family gatherings, a symbol of love and togetherness. Now, with a modern twist, these donuts bring those cherished memories back to life.


This recipe is rated a 6 out of 10 in difficulty, making it a fun challenge for both baking enthusiasts and those new to the craft. Classified as a dessert, it’s perfect for ending a meal on a sweet note or indulging in a midday treat. So, roll up your sleeves, embrace the nostalgia, and create new memories with every delicious bite.

Read more about Appetizers

Read more about Main Dishes

Read more about Desserts

Orange-Fig Teacake with Caramel Glaze | Made by Meaghan Moineau

Orange-Fig Teacake with Caramel Glaze | Made by Meaghan Moineau

Title: "Savoring Sweet Memories: The Delightful Dance of Orange-Fig Teacake with Caramel Glaze"
Description:

Indulge in the harmonious blend of citrusy and fruity notes with our Orange-Fig Teacake, crowned with a luscious caramel glaze. This blog post will guide you through crafting this exquisite dessert while sharing a heartfelt family memory that adds a sprinkle of nostalgia to the mix. Discover the joy of baking and the magic of cherished moments wrapped in a delectable teacake.


---


The Orange-Fig Teacake with Caramel Glaze: A Slice of Nostalgia

There's something undeniably comforting about the aroma of a freshly baked cake wafting through the house. Every year, as the summer sun began to mellow into the gentle warmth of autumn, my grandmother would prepare her legendary Orange-Fig Teacake. The enticing fusion of zesty oranges and sweet figs, complemented by a rich caramel glaze, made it a dessert to remember. It was more than just a cake; it was a tradition, a marker of seasons changing, and a canvas for family memories.


Ingredients:

- 2 cups all-purpose flour


- 1 1/2 teaspoons baking powder


- 1 teaspoon ground cardamom


- 1/2 teaspoon salt


- 1 cup unsalted butter, softened


- 1 cup sugar


- 3 large eggs


- 1/2 cup heavy cream, plus more for caramel


- 1 teaspoon vanilla extract


- 2 navel oranges


- 6-8 fresh figs


- 1 cup sugar (for caramel sauce)


- 1/4 cup water


- 2 tablespoons butter


Instructions:

1. Preheat your oven to 350°F (175°C). Prepare a 9" springform pan by spraying it with baking spray or buttering and sprinkling it with 2 tablespoons of sugar.


2. Zest one orange and add the zest to your mixing bowl. Peel both oranges, removing all pith, and slice into 1/4" rounds. Halve the figs.


3. In a large bowl, combine the softened butter, orange zest, and sugar. Beat until light and fluffy.


4. Add the eggs, heavy cream, and vanilla extract to the mixture. Beat well until smooth.


5. Sift together the flour, baking powder, cardamom, and salt. Gently incorporate the dry ingredients into the batter.


6. Arrange the fig halves and orange slices in the prepared pan. Spoon the batter over the fruit, spreading it evenly and tapping the pan to release air bubbles.


7. Bake for approximately 45 minutes, or until a tester comes out clean. Allow the cake to cool slightly before inverting it onto a rack to cool completely.


8. For the caramel glaze, combine sugar and water in a saucepan over medium-high heat. Once the sugar turns a golden amber, turn off the heat and slowly add the warmed heavy cream, stirring constantly.


9. Add the butter, stirring until smooth. Let the glaze cool for a few minutes before brushing it over the cake while still warm.


A Slice of Memory:

I vividly recall the annual family gatherings where my grandmother would serve this delightful creation. As children, my siblings and I would gather around the kitchen table, eagerly watching her expertly layer the figs and oranges before gently spreading the batter. The kitchen would fill with the sweet and spicy aroma of baking cardamom and citrus. The anticipation of that first bite, the sweet burst of orange and fig mingling with the creamy caramel, was pure bliss. Each slice of the teacake was a reminder of the love and warmth that bound our family together.


With every bite of this Orange-Fig Teacake, I am transported back to those cherished moments, surrounded by laughter and the comforting embrace of family. I hope this recipe brings the same joy and warmth to your home as it has to mine.


Difficulty Rating: 6/10
Classification: Dessert

Whether you're a seasoned baker or a novice in the kitchen, this teacake offers a delightful challenge that promises to reward you with a taste experience steeped in history and heart. Enjoy the journey of baking, and may each bite bring you as much joy as it has brought my family over the years.

Read more about Appetizers

Read more about Main Dishes

Read more about Desserts

Knockwurst with sauerkraut | Made by Meaghan Moineau

Knockwurst with sauerkraut | Made by Meaghan Moineau

Title: A Taste of Tradition: Knockwurst with Sauerkraut
Description: Dive into a heartwarming culinary journey with our Knockwurst with Sauerkraut recipe. This delightful main dish blends savory and sweet flavors, capturing the essence of a cherished family tradition. Rated 5 out of 10 in difficulty, it's a dish that's as accessible as it is delicious. Join us as we explore the rich history and personal stories behind this comforting classic.

---


A Taste of Tradition: Knockwurst with Sauerkraut


There’s something magical about the way food can transport us back in time, evoking memories long tucked away in the corners of our minds. For me, Knockwurst with Sauerkraut is one such dish that never fails to whisk me back to the warm, bustling kitchen of my grandmother’s house.


Every Sunday, my family would gather around her old wooden dining table, the air thick with anticipation and the fragrant aroma of knockwurst sizzling in the pan. My grandmother, with her flour-dusted apron and twinkling eyes, would hum her favorite tunes as she prepared this beloved meal, a ritual that has since become a cherished family tradition.


Ingredients:

- 1 onion, chopped

- 1 cup beer


- 1 cup water


- 2 tablespoons cornstarch


- 2 tablespoons brown mustard


- 1 tablespoon molasses


- 1 teaspoon caraway seed


- 1/2 teaspoon ground allspice


- 1/4 teaspoon pepper


- 1 rutabaga, peeled and cubed


- 6 cooked knockwurst sausages


- 2 cooking apples, cored and cut into wedges


- 1 can (16 ounces) sauerkraut, drained and rinsed


Instructions:


1. Brown the Knockwurst: Begin by buttering a medium fry pan. Heat the knockwurst until browned, about 10-12 minutes, ensuring they are evenly cooked and flavorful.
2. Prepare the Sauerkraut: Drain the sauerkraut, rinse it under cold water, and drain well to remove excess salt and tang.
3. Cook the Onion: In a large pot, cook the chopped onion until tender but not browned, allowing its natural sweetness to emerge.
4. Combine and Thicken: Stir in the beer for a rich, malty base. In a 2-cup glass measure, combine water, cornstarch, brown mustard, molasses, caraway seed, allspice, and pepper. Stir this mixture into the onions and cook until thickened and bubbly.
5. Add the Vegetables: Add the cubed rutabaga, cover, and cook for 15 minutes until slightly softened.
6. Mix Everything Together: Stir in the browned knockwurst, apple wedges, and rinsed sauerkraut. Cover and cook for an additional 15 to 20 minutes, allowing the flavors to meld and the apples to become tender.

A Nostalgic Memory


As a child, I remember standing on tiptoes, peeking over the kitchen counter to watch my grandmother masterfully blend these ingredients. The kitchen would fill with laughter and stories, as my grandfather shared tales of his childhood in Germany, where knockwurst was a staple on their dinner table. This dish was more than just a meal; it was a celebration of our heritage and a reminder of the love that binds us.


Difficulty Rating: 5/10


This recipe is perfect for those looking to explore traditional flavors without feeling overwhelmed. Its straightforward steps make it accessible to both novice and experienced cooks alike.


Classification: Main Dish


Knockwurst with Sauerkraut is a classic main dish, ideal for family gatherings or a comforting weeknight dinner. Serve it with crusty bread or mashed potatoes to soak up the delicious sauce.


---


Food has a unique way of connecting us to our past, and with each bite of this Knockwurst with Sauerkraut, you too can share in a piece of my family's story. Whether you’re seeking comfort, tradition, or simply a new culinary adventure, this recipe promises to deliver all that and more. Enjoy!

Read more about Appetizers

Read more about Main Dishes

Read more about Desserts

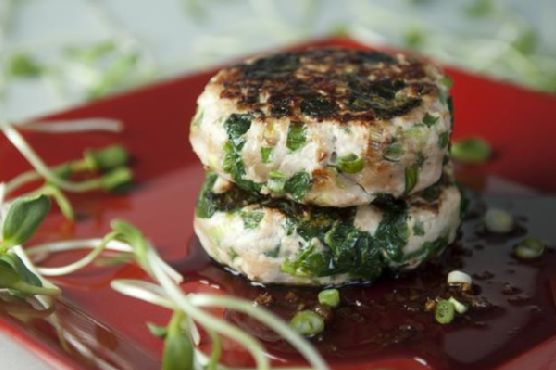
Turkey-Spinach Burgers With Sweet Soy-Ginger Sauce | Made by Meaghan Moineau

Turkey-Spinach Burgers With Sweet Soy-Ginger Sauce | Made by Meaghan Moineau

# Turkey-Spinach Burgers With Sweet Soy-Ginger Sauce: A Fusion of Flavors and Family Memories


## Description


Discover the culinary magic of Turkey-Spinach Burgers with Sweet Soy-Ginger Sauce. This delightful fusion dish combines the wholesome goodness of ground turkey and fresh spinach with a tantalizing Asian-inspired sauce. Perfect as a main dish, these burgers are not just a treat for the taste buds but also a stroll down memory lane, wrapped in a nostalgic family story.


## A Taste of Nostalgia


Cooking has always been a family affair in my household. Every Sunday, my mom and I would gather in the kitchen, aprons tied and ready for adventure. One particular Sunday, we stumbled upon a recipe that would become a staple in our family: Turkey-Spinach Burgers with Sweet Soy-Ginger Sauce.


The aroma of soy sauce and fresh ginger simmering on the stove would fill the kitchen, mingling with the laughter and stories we shared. My mom would recount tales of her childhood, and in those moments, I felt connected to generations past. The sizzling sound of turkey patties on the skillet was the soundtrack to our conversations, and the vibrant green of the spinach reminded us of the garden my grandmother used to tend with love and care.


Every bite of those burgers was a bite of history, flavored with love and memories. It's a recipe that transcends taste; it’s a testament to family bonds and culinary heritage.


## Recipe: Turkey-Spinach Burgers With Sweet Soy-Ginger Sauce


### Ingredients


- Fresh baby spinach


- Black pepper


- Canola oil


- Dark brown sugar


- Fresh ginger


- Ground turkey


- Mirin


- Salt


- Scallions


- Sesame oil


- Soy sauce


### Instructions


1. **Prepare the Sauce**: In a small saucepan, combine soy sauce, mirin, dark brown sugar, and fresh ginger. Bring to a boil over medium-high heat, whisking to dissolve the sugar. Reduce until slightly syrupy, about 3 minutes. Adjust the heat if necessary to prevent boil-over. Remove from heat and allow to cool completely. (Sauce may be prepared up to 2 days in advance and refrigerated in a covered container.)


2. **Prepare the Spinach**: Bring a large pot of water to a boil. Cook the spinach for 1 minute. Drain and transfer to a cold water bath to stop the cooking process. Drain again and dry thoroughly between layers of paper towels. (Spinach may be prepared up to 2 days in advance and refrigerated in a covered container.)


3. **Make the Patties**: In a large bowl, combine ground turkey, scallions, sesame oil, reserved spinach, and 1 tablespoon of the reserved sauce. Season with salt and black pepper and blend well without overworking the mixture. Form the turkey-spinach mixture into 4 patties, about 3 inches across and 1 inch thick.


4. **Cook the Burgers**: Heat canola oil in a large nonstick skillet over medium-high heat. When hot, add the patties and cook for about 5 minutes per side, until nicely browned and cooked through. Lower heat if necessary to prevent burning.


5. **Serve**: Serve the burgers with some of the sauce spooned over. Garnish with sliced scallions if desired.


### Difficulty Rating


Rated 5 out of 10 for difficulty, this dish is approachable for home cooks and offers a rewarding culinary experience.


### Classification


Main Dish


## Conclusion


These Turkey-Spinach Burgers with Sweet Soy-Ginger Sauce are more than just a meal; they are a bridge between past and present, a recipe that brings families together. Whether you're a seasoned chef or a kitchen novice, this dish invites you to create your own memories, one delicious bite at a time. Enjoy the fusion of flavors and the warmth of family tradition in every burger.

Read more about Appetizers

Read more about Main Dishes

Read more about Desserts

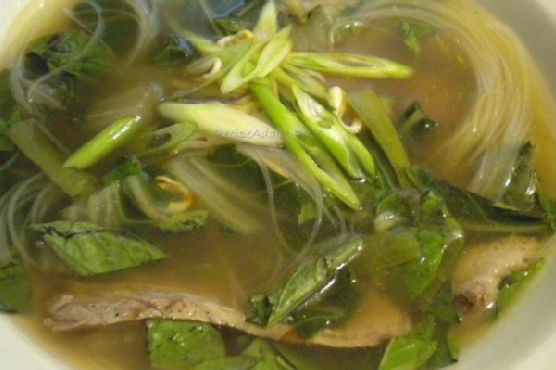
Vietnamese Beef-Noodle Soup With Asian Greens, Okay Vietnamese/japanese | Made by Meaghan Moineau

Vietnamese Beef-Noodle Soup With Asian Greens, Okay Vietnamese/japanese | Made by Meaghan Moineau

**Title: Savory Whispers of Home: Vietnamese Beef-Noodle Soup with Asian Greens**


**Description:** Dive into the aromatic embrace of Vietnamese Beef-Noodle Soup with Asian Greens, a dish that marries the rich flavors of Vietnam and Japan. This culinary journey not only tantalizes the taste buds but also weaves a tapestry of familial memories, evoking the warmth and love of home. Perfect as a hearty main dish, this recipe is rated 6 out of 10 on the difficulty scale, making it an accessible yet satisfying challenge for any home cook.


---


### A Taste of Tradition: Vietnamese Beef-Noodle Soup with Asian Greens


The gentle simmering of spices, the vibrant green of baby bok choy, and the fragrant dance of fresh herbs—these are not just ingredients to a dish but the whispers of a memory, a nostalgic journey back to my grandmother’s kitchen. Vietnamese Beef-Noodle Soup with Asian Greens, a recipe that seamlessly combines Vietnamese and Japanese culinary traditions, is more than just a meal; it’s a cherished family heirloom.


#### Ingredients


- 2 baby bok choy leaves


- 1 tablespoon brown sugar


- 3 cardamom pods


- 2 tablespoons fish sauce


- 1/4 cup fresh basil leaves


- 1/4 cup fresh bean sprouts


- 1 tablespoon grated fresh ginger


- 1/4 cup fresh mint leaves


- 3 garlic cloves, minced


- 6 cups fat-free less-sodium beef broth


- Lime wedges for serving


- 2 tablespoons less-sodium soy sauce


- 2 tablespoons light miso


- 8 oz wide rice stick noodles


- 1 teaspoon sesame oil


- 1 pound sirloin steak, partially frozen, sliced thin


- 1 cup trimmed snow peas


- 2 star anise pods


- 1 fresh Thai chile, thinly sliced


- 2 cups water


- 1 yellow onion, thinly sliced


#### Instructions


1. **Prepare the Beef and Noodles:**


- Freeze the beef for 10 minutes to make slicing easier. Cut across the grain into 1/8-inch-thick slices.


- Cook noodles according to package directions. Drain, rinse with cold water, and set aside.


2. **Create the Broth:**


- In a large saucepan, combine onion, ginger, garlic, cardamom, and star anise. Cook over medium-high heat for 5 minutes, stirring frequently to release the aromas.


- Add beef broth and 2 cups water (or dashi) to the saucepan. Bring it to a boil, then strain the mixture through a fine sieve into a bowl, discarding the solids.


3. **Flavor the Broth:**


- Return the strained broth to the pan. Stir in soy sauce, sugar, fish sauce, and sesame oil. Bring it to a boil once more.


- Add bok choy and snow peas, simmering for 4 minutes until the peas are crisp-tender and the bok choy is wilted. Stir in the miso at the last minute for a touch of umami.


4. **Assemble the Bowls:**


- Arrange 1/2 cup of noodles into each of 4 large bowls.


- Evenly divide the raw beef and chile slices among the bowls.


5. **Serve:**


- Ladle about 1 2/3 cups of hot soup over each serving. The broth will gently cook the beef to perfection.


- Top each bowl with 1/4 cup of bean sprouts, 1 tablespoon of basil, and 1 tablespoon of mint.


- Serve with lime wedges for a zesty finish.


#### A Family Memory


I remember the first time I watched my grandmother prepare this dish. It was a rainy afternoon, the kind that invites you to gather around a warm hearth. The kitchen was alive with the sound of sizzling and the aromatic symphony of spices. As a child, I was fascinated by the meticulous way she sliced the beef, her hands steady and sure, her eyes twinkling with a blend of concentration and joy. The final touch was always the fresh herbs, a nod to our Vietnamese roots, and the lime wedges, a hint of my grandfather’s Japanese influence.


Sharing this soup was more than sharing a meal; it was sharing our heritage, our stories, and our love. Every spoonful was a step back in time, a reminder of the simple yet profound comfort of family.


Whether you’re a seasoned cook or a culinary novice, this Vietnamese Beef-Noodle Soup with Asian Greens offers a deliciously fulfilling challenge. Rated 6 out of 10 in difficulty, it’s the perfect main dish to bring warmth to your table and a slice of nostalgia to your heart.

Read more about Appetizers

Read more about Main Dishes

Read more about Desserts

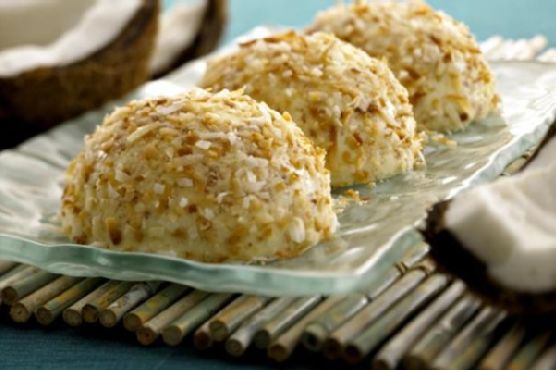
Crème Fraiche Coconut Bavarians | Made by Meaghan Moineau

Crème Fraiche Coconut Bavarians | Made by Meaghan Moineau

**Title: Indulge in Nostalgia with Crème Fraiche Coconut Bavarians: A Dessert That Transcends Time**


**Description: Dive into the rich, creamy world of Crème Fraiche Coconut Bavarians—a dessert that perfectly blends tradition and modern culinary artistry. Infused with the tropical allure of coconut and the luxurious texture of crème fraiche, this dessert is not just a treat for the palate but also a journey down memory lane. Discover how this delectable creation became a cherished family tradition and learn how to create it yourself with our step-by-step guide.**


**Crème Fraiche Coconut Bavarians: A Sweet Taste of Memory**


The gentle hum of our family kitchen was always punctuated by the rhythmic clattering of dishes and the soft laughter of loved ones. Among the many desserts that graced our dining table, one stood out for its sumptuous texture and evocative flavor—Crème Fraiche Coconut Bavarians. It wasn't just a dessert; it was the embodiment of family gatherings, a sweet testament to our shared history.


**Ingredients:**


- 1 packet gelatin


- 1 can coconut milk, divided


- 1 can sweetened condensed milk


- 1/2 cup sugar


- 4 egg yolks


- 1 cup Alouette Cuisine Crème Fraiche


- 1/2 cup shredded coconut


**Instructions:**


1. **Bloom the Gelatin:** In a small bowl, combine the gelatin with 4 tablespoons of coconut milk. Let it sit to bloom while you prepare the rest of the ingredients.


2. **Simmer the Milks:** In a medium saucepan, bring the sweetened condensed milk and remaining coconut milk to a gentle simmer over medium-high heat. Stir occasionally to ensure it doesn't stick to the bottom.


3. **Temper the Egg Yolks:** Meanwhile, whisk together the sugar and egg yolks in a separate bowl until well combined. Slowly add a small amount of the heated milk mixture to the egg yolks, whisking continuously to temper them without cooking the eggs.


4. **Combine and Thicken:** Gradually pour the tempered egg yolk mixture back into the saucepan. Stir constantly and heat until the mixture thickens enough to coat the back of a spoon, about 5 to 7 minutes. Remove from heat and stir in the bloomed gelatin until fully dissolved.


5. **Chill and Whip:** Transfer the mixture to a bowl and refrigerate until it begins to gel. While waiting, whip the Alouette Cuisine Crème Fraiche in a separate bowl until soft peaks form.


6. **Fold and Mold:** Once the gelatin mixture has slightly set, gently fold it together with the whipped crème fraiche. Pour the combined mixture into your chosen molds immediately.


7. **Refrigerate Overnight:** Allow the Bavarians to set in the refrigerator overnight.


8. **Serve with Nostalgia:** Unmold the Bavarians just before serving and generously sprinkle with shredded coconut. Enjoy the dessert that has become a beloved part of our family's culinary heritage.


**A Nostalgic Family Memory**


I remember the first time my grandmother made Crème Fraiche Coconut Bavarians. The kitchen was filled with the enticing aroma of coconut, a scent that still evokes memories of those bustling family gatherings. As children, we watched in awe as she carefully folded the whipped crème fraiche into the gelling mixture, her hands moving with the grace of years of practice. Each bite was a reminder of her warmth and the love she poured into every dish. Even today, making this dessert feels like a sweet conversation with her, a way to keep her spirit alive in our hearts and taste buds.


**Difficulty Rating:** 6/10


**Classification:** Dessert


Creating Crème Fraiche Coconut Bavarians is not just about following a recipe—it's about connecting with the past, savoring the present, and crafting memories for the future. Whether you're a seasoned chef or a culinary novice, this dessert promises a rewarding experience that goes beyond taste. So, gather your ingredients, embrace the process, and indulge in a dessert that truly transcends time.

Read more about Appetizers

Read more about Main Dishes

Read more about Desserts

Chicken Adobo & Coconut Ginger Rice | Made by Meaghan Moineau

Chicken Adobo & Coconut Ginger Rice | Made by Meaghan Moineau

# Savoring Memories: Chicken Adobo & Coconut Ginger Rice


## A Culinary Journey Through Time and Flavor


**Description:** Dive into a world where tangy meets savory, and a hint of sweetness dances on your palate. This Chicken Adobo & Coconut Ginger Rice recipe not only promises a symphony of flavors but also brings forth a nostalgic story of family, love, and tradition. Perfect for any dinner occasion, this dish is a main course masterpiece, rated at a moderate difficulty level of 5 out of 10.


---


### A Dish Steeped in Tradition


Whenever I think of Chicken Adobo & Coconut Ginger Rice, I am transported back to my grandmother's cozy kitchen, where the aroma of garlic sizzling in oil melded with the tangy scent of vinegar, creating a comforting embrace. This dish was more than just a meal; it was a ritual that brought our family together every Sunday afternoon.


#### Ingredients:


- 1/2 cup low sodium soy sauce


- 1/2 cup apple cider vinegar


- 4 cloves garlic, minced


- 1 tablespoon peppercorns


- 2 tablespoons brown sugar


- 3 bay leaves


- 6 bone-in chicken thighs


- 2 tablespoons grapeseed oil


- 1 cup chicken broth


- 1 tablespoon cornstarch


- 1/4 cup water


- Kosher salt to taste


- 3 cups water


- 1 1/2 cups rice


- 2 tablespoons fresh ginger, grated


- 1/2 cup sweetened shredded coconut


- 2 scallions, thinly sliced


- 2 tablespoons parsley, chopped


#### Instructions:


1. **Marinate the Chicken:** In a large bowl or flat dish, combine soy sauce, vinegar, garlic, peppercorns, brown sugar, and bay leaves. Add the chicken thighs, ensuring they are well-coated. Marinate for at least an hour, or for a deeper flavor, let them soak overnight.


2. **Brown the Chicken:** Heat grapeseed oil in a pan over medium heat. Once hot, remove the chicken from the marinade and brown each side for 2-3 minutes. Set the chicken aside.


3. **Cook the Sauce:** Pour the marinade into the pan along with chicken broth. Bring to a boil, then add the chicken back in. Cover and cook for 10 minutes.


4. **Thicken the Sauce:** Mix cornstarch with 1/4 cup water. Add this slurry to the pan, turning the chicken pieces over. Cover and cook until the chicken is fully cooked, about 6-9 minutes.


5. **Prepare the Rice:** In a separate pot, bring 3 cups of water to a boil with a pinch of salt. Add the rice and cook as per package instructions. Once cooked, fluff the rice and toss with scallions, parsley, ginger, and coconut.


6. **Serve:** Plate the rice, place the chicken on top, and drizzle with the rich adobo sauce.


### A Family Memory


As a child, I would often sit at the kitchen table, watching my grandmother move with grace and precision, her hands a blur of seasoned expertise. The kitchen was filled with laughter, stories, and the promise of something delicious. When the Chicken Adobo was finally ready, it was more than just food; it was a testament to the love and care my grandmother poured into every meal.


This dish was always the highlight of our gatherings, a symbol of unity and warmth. The blend of flavors in the adobo, with its savory garlic and vinegar base, complemented the subtle sweetness of the coconut-infused rice perfectly. Each bite was a reminder of home, family, and the simple joys of life.


### Conclusion


Chicken Adobo & Coconut Ginger Rice is more than just a meal; it is an experience, a journey into a world of rich, comforting flavors that tell a story of family and tradition. Whether you're looking to recreate a cherished memory or start a new one, this dish is sure to bring warmth and joy to your table.


---


Enjoy this nostalgic culinary adventure and let every bite transport you back to the heartwarming memories of family and togetherness.

Read more about Appetizers

Read more about Main Dishes

Read more about Desserts

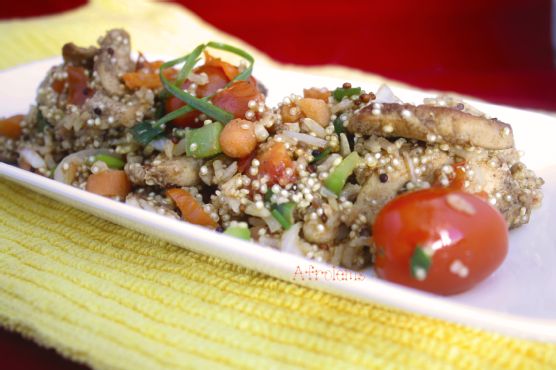
Stir Fried Quinoa, Brown Rice and Chicken Breast | Made by Meaghan Moineau

Stir Fried Quinoa, Brown Rice and Chicken Breast | Made by Meaghan Moineau

# A Taste of Home: Stir Fried Quinoa, Brown Rice, and Chicken Breast


## Bringing Back Memories with Every Bite


There's something magical about the aroma of a well-cooked dish wafting through your kitchen. It has the power to transport you back to cherished moments with loved ones, where laughter was abundant, and time seemed to stand still. Today, I invite you to embark on a culinary journey with a delightful recipe that encapsulates the essence of family, tradition, and the joy of sharing a meal together: Stir Fried Quinoa, Brown Rice, and Chicken Breast.


### A Family Tradition


Growing up, Sundays were a special day in our household. After returning from church, my family would gather in the kitchen, each of us playing a role in preparing the day's feast. My father, with his infectious enthusiasm, would take charge of marinating the chicken, infusing it with a generous sprinkle of suya spice and seasoning cubes. As a child, the vibrant colors of the spices and the tantalizing aroma never failed to captivate my senses.


My mother, the orchestrator of our culinary symphony, would oversee the boiling of the quinoa and brown rice mix—a task I eagerly volunteered for, feeling important as I watched the grains dance in the pot. It was during these moments that I learned the value of patience, as the grains slowly softened and absorbed the rich flavors.


### The Recipe


#### Ingredients:


- Suya spice


- 1 cup quinoa and brown rice mix


- 2 tablespoons butter


- 2 medium carrots, sliced


- 1 cup whole cherry tomatoes


- 2 chicken breasts


- 3 cloves garlic, minced


- 2 seasoning cubes


- 1 green bell pepper, chopped


- 1 roma tomato, chopped


- 1 scotch bonnet pepper, finely chopped


- 2 spring onions, sliced


- 1 teaspoon vegetable oil


- 1 cup water


#### Instructions:


1. **Marinate the Chicken**: In a bowl, season the chicken breasts with seasoning cubes and suya spice. Allow to marinate for 2 hours, or use immediately if pressed for time.


2. **Prepare the Quinoa and Rice**: In a pot of boiling water (1 cup), add the quinoa and brown rice mix along with a teaspoon of vegetable oil. Allow to boil until soft, about 5-7 minutes. Pour into a bowl and set aside.


3. **Cook the Chicken**: In a pan, melt the butter over medium heat and pan fry the chicken breasts, flipping constantly to brown on both sides. Reduce the heat, cover the pan, and allow the chicken to cook thoroughly. If the pan becomes dry, add 2 tablespoons of water.


4. **Combine and Serve**: Stir in the chopped vegetables—carrots, cherry tomatoes, green bell pepper, roma tomato, scotch bonnet pepper, and spring onions—into the pan with the frying chicken. Finally, add the quinoa and brown rice mix. Serve hot!


### Nostalgia on a Plate


As we sat around the dining table, savoring the medley of flavors, stories from the past would surface—of my grandparents' tales of resilience, of my parents' adventurous youth, and of my own childhood escapades. This dish, a delightful amalgamation of textures and tastes, became more than just a meal; it was a bridge connecting generations, a testament to our shared history.


### Difficulty Level


This recipe is rated a 5 out of 10 in terms of difficulty. It strikes a perfect balance between simplicity and the exciting challenge of combining diverse flavors and textures. Classified as a Main Dish, it's hearty, nutritious, and destined to become a staple in your family meals.


### Conclusion


If you're looking to recreate a little magic in your kitchen and perhaps spark a walk down memory lane, this Stir Fried Quinoa, Brown Rice, and Chicken Breast recipe is your ticket. It embodies the warmth of home, the love of family, and the beauty of tradition. Enjoy the journey, one delicious bite at a time.

Read more about Appetizers

Read more about Main Dishes

Read more about Desserts

Rugelach | Made by Meaghan Moineau

Rugelach | Made by Meaghan Moineau

# Rugelach: A Sweet Taste of Tradition and Togetherness


## Description


Indulge in the delightful world of Rugelach, a classic pastry that brings warmth and nostalgia to any gathering. With a buttery, flaky dough filled with sweet fruit preserves and crunchy walnuts, these bite-sized treats are perfect for any occasion. This blog post not only walks you through the step-by-step process of making these delectable pastries but also shares a cherished family memory that makes Rugelach more than just a dessert—it's a slice of tradition. Whether you're a seasoned baker or a novice in the kitchen, this recipe is sure to become a family favorite.


---


### Ingredients


- 1 cup salted butter, softened


- 1 block of cream cheese, softened


- A pinch of salt


- 2.5 cups plain flour


- 2 large egg yolks


- 1 teaspoon vanilla extract


- 1/2 cup caster sugar (for dough)


- 1/2 cup fruit preserves (e.g., orange marmalade)


- 1/2 cup walnuts, finely chopped


- 50g butter, melted (for brushing)


- 1/4 cup caster sugar (for topping)


- 1 teaspoon ground cinnamon (for topping)


### Instructions


1. **Preparation**: Leave the butter and cream cheese in a warm place for a couple of hours to soften.


2. **Preheat Oven**: Set your oven to 180°C (350°F).


3. **Mix Dough**: In a large mixing bowl, beat the softened butter and cream cheese until light and fluffy. Add egg yolks, vanilla extract, 1/2 cup of caster sugar, salt, and plain flour. Mix until the dough comes together.


4. **Prepare Walnuts**: Finely chop the walnuts and set aside.


5. **Roll Dough**: Divide the dough into 4 equal pieces. Roll one piece into a thin circle and cut into 8 triangles.


6. **Fill and Roll**: Spread fruit preserves on each triangle, sprinkle with walnuts, and roll each piece into a crescent shape.


7. **Cinnamon-Sugar Coating**: Mix 1/4 cup caster sugar and cinnamon. Brush rugelachs with melted butter and coat with the cinnamon-sugar mixture.


8. **Bake**: Place rugelachs on a baking tray and bake for 35 minutes or until golden brown.


9. **Cool and Serve**: Allow to cool before storing or serving.


### A Taste of Nostalgia


Every holiday season, my grandmother would gather the family around her cozy kitchen to make Rugelach. The aroma of cinnamon and melting butter would fill the room, creating an atmosphere of warmth and love. As a child, I remember eagerly waiting for the moment when she would let me sprinkle the cinnamon sugar over the freshly rolled pastries, a simple task that felt monumental in my small hands. These moments of togetherness, laughter, and shared stories are etched in my memory, making Rugelach not just a dessert, but a symbol of family unity and joy.


### Difficulty Rating: 6/10


Rugelach is a moderately challenging recipe, perfect for those with some baking experience. The key is to ensure the dough is well-mixed and not overworked, allowing for a tender, flaky pastry.


### Classification: Dessert


With its sweet filling and delightful crunch, Rugelach is a perfect dessert to end any meal on a high note. Serve with a cup of tea or coffee for a truly satisfying treat.


---


Whether you’re baking for a special occasion or simply indulging in the joy of homemade pastries, Rugelach is a timeless classic that promises to delight. Embrace the tradition, share the love, and enjoy every sweet bite.

Read more about Appetizers

Read more about Main Dishes

Read more about Desserts

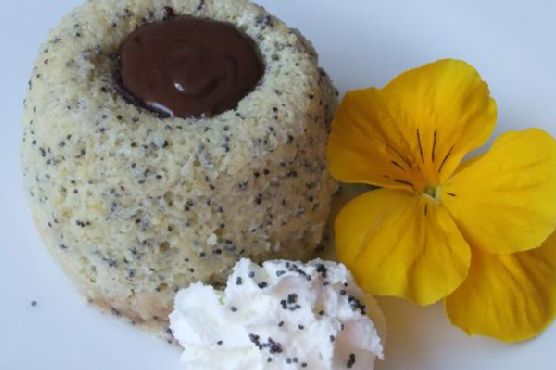
Warm Lemon Poppy Seed Cake With Chocolate Ganache Center | Made by Meaghan Moineau

Warm Lemon Poppy Seed Cake With Chocolate Ganache Center | Made by Meaghan Moineau

**Title: Dive Into Decadence: Warm Lemon Poppy Seed Cake with a Chocolate Surprise**


**Description:** Discover the perfect blend of zesty lemon and rich chocolate in our Warm Lemon Poppy Seed Cake with Chocolate Ganache Center. This delightful dessert will transport you back to cherished family gatherings, creating new memories with each heavenly bite.


---


### A Slice of Nostalgia: Warm Lemon Poppy Seed Cake with Chocolate Ganache Center


There's something magical about the aroma of freshly baked goods wafting through the kitchen. It evokes memories of family, laughter, and the joy of sharing a meal together. One such memory that stands out vividly in my mind is the first time my grandmother introduced me to her special Warm Lemon Poppy Seed Cake with Chocolate Ganache Center. This dessert quickly became a family favorite, making appearances at every holiday gathering and special occasion.


#### Ingredients:


- 1 cup flour


- 2 tablespoons finely grated lemon rind


- 1 tablespoon poppy seeds


- 4 large egg yolks


- 1/2 cup granulated sugar


- 4 tablespoons unsalted butter, melted


- 4 large egg whites


- 6 ounces bittersweet chocolate, divided into 6 pieces


#### Instructions:


1. **Preheat and Prepare:** Begin by positioning a rack in the center of your oven and preheating it to 400°F (200°C). Lightly butter six 6-ounce ramekins, dust them with sugar, and place them on a baking sheet.


2. **Mix Dry Ingredients:** In a small bowl, whisk together the flour, lemon rind, and poppy seeds. Set this mixture aside.


3. **Whip Yolks and Sugar:** Using a heavy-duty electric mixer with a wire whip attachment, whip the egg yolks and granulated sugar until the mixture is pale and forms a ribbon when the whip is lifted.


4. **Beat Egg Whites:** In a separate, grease-free bowl, use a hand-held electric mixer to whip the egg whites to soft peaks.


5. **Combine Ingredients:** Carefully fold the flour mixture into the yolk and sugar mixture. Add the melted butter and gently mix until combined. Next, fold in the whipped egg whites until the batter is well incorporated.


6. **Fill and Bake:** Fill each prepared ramekin three-quarters full with the batter. Place a 1-ounce piece of chocolate in the center of each ramekin. Bake for 15 minutes, or until the cakes are firm.


7. **Cool and Serve:** Cool the cakes on a wire rack for 5 minutes. Gently invert each cake onto a dessert plate and serve warm.


#### A Family Tradition:


I remember vividly the first time I helped my grandmother prepare this cake. The kitchen was a hive of activity, with my siblings and cousins eagerly watching. My grandmother, in her gentle and patient manner, guided us through each step. As we dusted the ramekins with sugar and folded in the egg whites, she shared stories of her own childhood, connecting us to generations past.


The best part, of course, was when we placed the chocolate pieces in the center of each ramekin, knowing that a rich, molten surprise awaited us. As we gathered around the table, the first bite of that warm, citrusy cake with its gooey chocolate center was nothing short of bliss. It was a moment of pure joy, one that tasted of home and love.


#### Difficulty Rating: 5/10


#### Classification: Dessert


This Warm Lemon Poppy Seed Cake with a Chocolate Ganache Center is not only a delightful dessert but also a testament to the power of food in creating lasting memories. Whether you're introducing it to your family for the first time or continuing a cherished tradition, this cake is sure to become a favorite. So, gather your loved ones, roll up your sleeves, and create a new memory with this delectable treat.

Read more about Appetizers

Read more about Main Dishes

Read more about Desserts