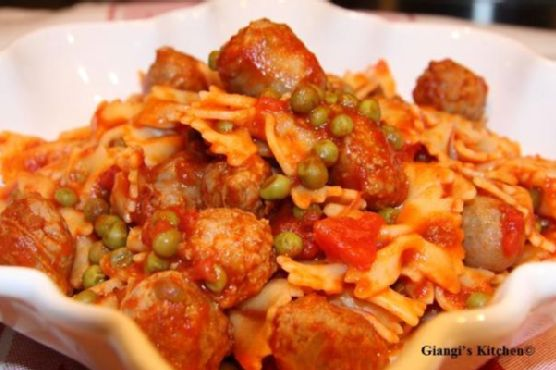
Pasta with Peas and Italian Sausage
Intro
There’s something incredibly comforting about a hearty pasta dish, especially one that brings back memories of family gatherings around a bustling kitchen. For me, Pasta with Peas and Italian Sausage is not just a recipe; it’s a treasured memory of Sunday dinners at my grandmother’s house, where the aroma of sizzling sausages and simmering tomatoes would fill the air, coaxing everyone to the table. This simple yet flavorful dish has always been a favorite, and I’m thrilled to share it with you. Whether you’re cooking for a large family dinner or a cozy night in, this pasta dish is sure to bring warmth and joy to your table.
Why You’ll Love It
This Pasta with Peas and Italian Sausage recipe is more than just a meal—it’s a celebration of flavors and textures. You’ll love how the sweetness of the peas perfectly complements the savory Italian sausage, while the farfalle pasta catches every bit of the rich tomato sauce. It’s a dish that comes together effortlessly, making it perfect for busy weeknights or leisurely weekends. With its vibrant colors and mouth-watering aroma, this pasta is sure to become a staple in your home.
Ingredients
- 1 tablespoon olive oil
- 4 Italian sweet sausages, casings removed
- 1 cup frozen peas
- 1 can (14 oz) canned tomatoes, chopped
- 1/2 cup Pomi strained tomato sauce
- 12 oz farfalle pasta
- 2 tablespoons butter
- Salt and pepper to taste
Instructions
- Begin by cooking the farfalle pasta according to the package directions until al dente. Drain and set aside.
- In a very large skillet, heat the olive oil over medium heat. Add the sausage meat and sauté until it is slightly browned all over.
- Add the frozen peas, canned tomatoes, and Pomi strained tomato sauce to the skillet. Stir well to combine.
- Season the mixture with salt and pepper to taste. Lower the heat to medium and let it cook for another 10 to 15 minutes, allowing the flavors to meld together.
- Once the sauce is ready, add the cooked pasta to the skillet along with the butter. Toss everything together until the pasta is well coated in the sauce.
- Serve hot, garnished with freshly grated parmesan cheese if desired.
Tips
For the best results, use high-quality Italian sausages, as they bring a rich flavor to the dish. If you prefer a spicier kick, you can use hot Italian sausages instead of sweet ones. Also, don’t be afraid to adjust the amount of peas to suit your taste; their sweetness balances the savory elements beautifully. Lastly, remember to reserve a bit of pasta water before draining, just in case you need to loosen the sauce a little when tossing it with the pasta.
Variations & Substitutions
This recipe is quite versatile, allowing for plenty of creative variations. If you’re looking for a vegetarian option, simply omit the sausage and add more peas or other vegetables like bell peppers or zucchini. You can also substitute the farfalle pasta with any other pasta shape you have on hand, such as penne or rigatoni. For a creamier sauce, consider adding a splash of heavy cream or a dollop of ricotta cheese just before serving.
Storage
Leftovers can be stored in an airtight container in the refrigerator for up to 3 days. To reheat, simply warm the pasta in a skillet over medium heat, adding a splash of water or broth to loosen the sauce if needed. This dish is also freezer-friendly; just be sure to let it cool completely before transferring it to a freezer-safe container. It can be frozen for up to 2 months. Thaw overnight in the refrigerator before reheating.
FAQ
Can I use fresh peas instead of frozen?
Absolutely! Fresh peas can be a delightful addition. Simply blanch them in boiling water for a few minutes before adding them to the sauce. This will ensure they remain tender and vibrant.
What can I use instead of Pomi strained tomato sauce?
If you don’t have Pomi strained tomato sauce, you can use any high-quality tomato puree or passata. The key is to ensure it’s a smooth, rich tomato sauce to complement the chunky canned tomatoes.
Is this dish spicy?
This recipe is not inherently spicy, as it uses sweet Italian sausage. However, you can adjust the spice level by using hot Italian sausage or adding a pinch of red pepper flakes to the sauce for an extra kick.
Nutrition
This hearty pasta dish is packed with protein from the sausages and peas, providing a satisfying and balanced meal. The tomatoes add a dose of vitamin C, while the pasta offers plenty of energy-boosting carbohydrates. As always, moderation is key, especially if you’re watching your calorie intake.
Conclusion
Pasta with Peas and Italian Sausage is a dish that embodies comfort and nostalgia, bringing together simple ingredients to create something truly special. Whether you’re reconnecting with family traditions or starting new ones, this recipe is sure to become a beloved favorite. I hope it brings as much joy and warmth to your home as it has to mine. Happy cooking!
Related update: Pasta with Peas and Italian Sausage