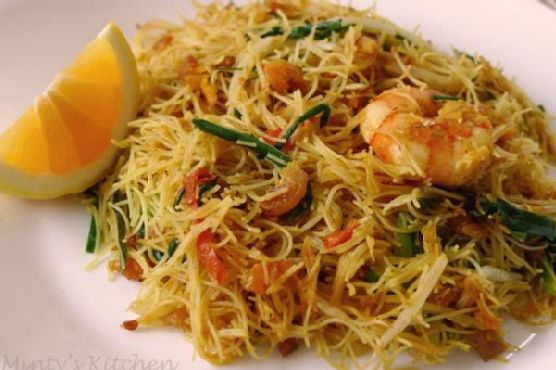
Siamese Fried Noodle (Mee Siam)
Intro
There’s a certain magic that happens in the kitchen when you recreate a beloved dish from your childhood. For me, Siamese Fried Noodle, or Mee Siam, is that recipe. I remember the aroma wafting from my grandmother’s kitchen as she effortlessly tossed the noodles in her well-seasoned wok, each ingredient dancing in harmony. The taste was a beautiful blend of tangy, sweet, and spicy, a symphony of flavors that I have tried to replicate ever since. Today, I want to share this treasured recipe with you, hoping it brings a piece of my cherished memories into your home.
Why You’ll Love It
- Authentic Flavor: Mee Siam offers a unique blend of Southeast Asian spices and flavors.
- Versatile: You can adjust the spice level and ingredients to suit your taste.
- Quick and Easy: Despite its complex flavors, this dish can be prepared in under an hour.
- Perfect for Any Occasion: Whether it’s a family meal or a friendly gathering, Mee Siam never fails to impress.
Ingredients
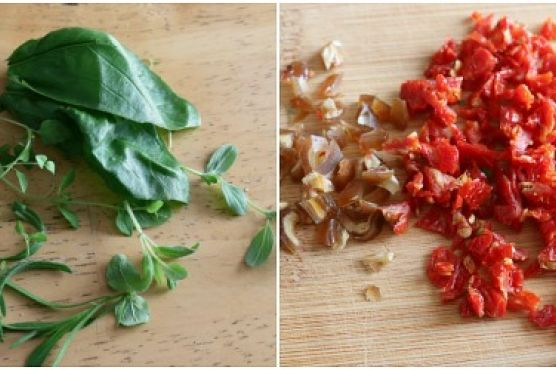
- Rice vermicelli – soaked in water
- Prawns
- Tofu
- Beansprouts
- Chives
- Dried shrimps
- Shredded kaffir lime leaves
- Oil
- Garlic
- Shallots
- Fresh turmeric
- Bird’s eye chillies
- Candlenuts
- Lemongrass
- Ginger flower
- Sugar
- Chicken stock granules
- Pepper
- Fish sauce
- Soy sauce
- Tamarind paste
- Water
Instructions
- Heat oil in a frying pan.
- Lightly fry the chopped dried shrimps and tofu separately. Dish out and leave aside.
- Stir fry the pounded ingredients and kaffir lime leaves until aromatic.
- Add prawns and fry until they are half-cooked. Dish out the prawns and set aside.
- Add in seasonings and bring to the boil.
- Add meehoon and stir fry.
- Mix in dried shrimps, tofu slices, prawns, chives, and beansprouts. Toss well.
- Serve hot with a drizzle of lime or lemon juice.
Tips
For the best results, ensure your rice vermicelli is well-soaked but not overly soft before cooking. The key to a good Mee Siam is in the balance of flavors, so taste as you go and adjust the seasonings to your preference. Also, prepare all the ingredients in advance to make the cooking process smoother and quicker.
Variations & Substitutions
Feel free to get creative with Mee Siam. If you’re not a fan of prawns, chicken or tofu can be excellent substitutes. For a vegetarian version, simply omit the seafood and use vegetable stock instead of chicken stock. You can also experiment with different vegetables like bell peppers or carrots for added color and nutrition.
Storage
Mee Siam can be stored in an airtight container in the refrigerator for up to 3 days. Reheat it gently on the stove or in the microwave, adding a splash of water to prevent it from drying out. However, it’s best enjoyed fresh to savor the full spectrum of flavors.
FAQ
Can I make Mee Siam less spicy?
Absolutely! If you prefer a milder dish, reduce the number of bird’s eye chillies or omit them entirely. You can also serve extra lime wedges on the side to add a refreshing tang without additional heat.
What can I serve with Mee Siam?
Mee Siam is quite satisfying on its own, but you can pair it with a side of fresh cucumber salad or a simple clear soup for a complete meal. It’s also delightful with some crispy prawn crackers for an added crunch.
Nutrition
This dish is a balanced meal with protein from the prawns and tofu, carbohydrates from the noodles, and a variety of vitamins and minerals from the fresh herbs and vegetables. For a healthier version, you can use less oil and more vegetables, and opt for low-sodium soy sauce.
Conclusion
Mee Siam is more than just a dish; it’s a culinary journey that captures the essence of Southeast Asian cuisine. With its vibrant flavors and simple preparation, it’s no wonder that it holds a special place in many hearts and homes. I hope this recipe brings as much joy and nostalgia to your table as it does to mine. Enjoy your cooking adventure, and remember, the best recipes are those you make your own. Happy cooking!
Related update: Siamese Fried Noodle (Mee Siam)
Related update: Salmon with roasted vegetables