Basic Hummus | Made by Meaghan Moineau

Basic Hummus: A Timeless Classic

Intro

Welcome to my warm and inviting kitchen, where today we’re diving into the luscious world of hummus. This basic hummus recipe is not just a dish; it’s a heartfelt connection to my childhood. I remember sitting in my grandmother’s cozy kitchen, a swirl of fragrant spices in the air, as she would blend her magic hummus. The ritual was always the same: a squeeze of lemon here, a dash of cumin there, and always, always a drizzle of the finest olive oil to finish. Those cherished memories inspire this recipe, and I’m thrilled to share it with you.

Why You’ll Love It

This hummus is the epitome of simplicity and flavor. It’s creamy, smooth, and rich with the earthy goodness of chickpeas and tahini. You’ll love how versatile it is—perfect as a spread, a dip, or even a side dish. It’s not just a healthy snack; it’s a culinary canvas for your creativity. Plus, it takes less than 10 minutes to whip up, making it perfect for last-minute gatherings or a quick snack.

Ingredients

  • 1 can of chickpeas
  • 3 tablespoons olive oil
  • Juice of 1 lemon
  • 2 cloves garlic
  • 1/4 cup tahini
  • 2-4 tablespoons water
  • 1 teaspoon cumin
  • Salt to taste

Instructions

  1. Puree the tahini in the food processor for about a minute until it becomes a smooth paste.
  2. Add the olive oil, garlic, lemon juice, cumin, and salt. Pulse until the ingredients are well incorporated.
  3. Add the chickpeas in two batches. Wait for the first batch to become completely smooth before adding the next.
  4. For a smoother hummus, add more lemon juice or water to reach your desired consistency.
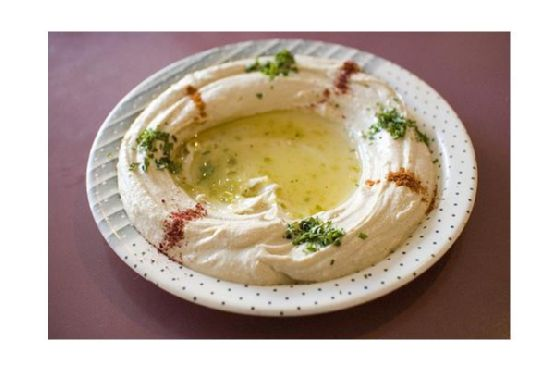
  5. Pour the hummus into a bowl. Garnish with extra chickpeas, a sprinkle of paprika, and a drizzle of extra virgin olive oil.
  6. Serve with warm whole wheat pita bread.

Tips

For the creamiest hummus, consider peeling the chickpeas. It’s a bit of extra work, but the velvety texture is worth it. Also, make sure to use fresh lemon juice and good quality tahini for the best flavor. If you like a little heat, add a dash of cayenne pepper or hot paprika.

Variations & Substitutions

Feel free to experiment with flavors! Try adding roasted red peppers for a smoky twist, or a handful of fresh herbs like parsley or cilantro for an herby kick. If tahini isn’t available, you can substitute with a mild nut butter, though the flavor will change slightly. For a lower-fat version, reduce the olive oil and add more water or non-dairy yogurt.

Storage

Store your hummus in an airtight container in the refrigerator for up to a week. If it thickens over time, simply stir in a little water or olive oil to revive its creamy texture. You can also freeze hummus for up to three months; just be sure to thaw it fully in the fridge and give it a good stir before serving.

FAQ

Can I use dried chickpeas instead of canned?

Absolutely! If you prefer cooking from scratch, soak dried chickpeas overnight and then cook until tender. They can then be used in place of canned chickpeas. This can enhance the flavor and texture of your hummus.

Why is my hummus not smooth?

If your hummus isn’t as smooth as you’d like, it might be that the chickpeas weren’t cooked enough. Cooking them longer can help, or try peeling the chickpeas before blending. Also, make sure your food processor is strong enough to handle the job.

What can I serve with hummus?

Hummus pairs beautifully with fresh vegetables, pita chips, crackers, or even as a spread on sandwiches and wraps. It also makes a great accompaniment to grilled meats or falafel.

Nutrition

This hummus is rich in protein and healthy fats, making it a heart-healthy choice. Chickpeas provide fiber and essential nutrients, while tahini and olive oil offer a dose of beneficial fats. Enjoy in moderation as part of a balanced diet.

Conclusion

There you have it—a simple and delicious hummus recipe that’s bound to become a staple in your home. Whether you’re hosting a gathering, preparing a snack, or simply indulging in a moment of nostalgia, this hummus will bring warmth and flavor to your table. I hope it becomes a cherished part of your culinary repertoire, just as it has been in mine. Happy blending!

Related update: Basic Hummus

Related update: How to Make Easy Cheesy Garlic Bread

Related update: Tzadziki

Crispy Italian Cauliflower Poppers Appetizer | Made by Meaghan Moineau

Crispy Italian Cauliflower Poppers Appetizer

Intro

There’s something truly magical about the aroma of Italian herbs wafting through the kitchen, reminiscent of cozy family gatherings and hearty laughter. When I was a child, Sunday afternoons were reserved for family feasts at my grandmother’s house. The kitchen was always bustling, filled with the clinking sounds of pots and pans, and the air heavy with the rich scent of garlic and basil. This Crispy Italian Cauliflower Poppers Appetizer recipe brings me back to those cherished times, offering a modern twist on my grandmother’s classic Italian flavors. It’s a dish that’s sure to bring warmth and joy to your table, just as it did to ours.

Why You’ll Love It

  • Delightfully Crispy: These poppers boast a perfectly crunchy exterior with a tender interior, making them an irresistible snack.
  • Easy to Make: Simple steps and ingredients make this dish accessible for cooks of all levels.
  • Versatile: Perfect for parties, game nights, or simply as a delicious side dish.
  • Healthy Twist: Packed with the goodness of cauliflower, these poppers are a nutritious alternative to other fried snacks.
  • Kid-Friendly: Even the pickiest eaters will love these cheesy, flavorful bites.

Ingredients

  • 1 can of diced tomatoes, undrained
  • 1 large head of cauliflower, cut into florets
  • 2 large eggs
  • 1 cup all-purpose flour
  • 1/4 cup fresh basil, chopped
  • 3 cloves garlic, minced
  • 1 teaspoon garlic powder
  • 1/2 teaspoon black fresh ground pepper
  • 4 tablespoons olive oil, divided
  • 1 cup panko bread crumbs
  • 1/2 cup fresh parmesan cheese, grated
  • 1/2 teaspoon crushed red pepper flakes
  • 1/2 teaspoon salt, or to taste
  • 1 tablespoon water

Instructions

  1. Preheat your oven to 400°F (200°C). Brush a large baking sheet with 1 tablespoon of olive oil.
  2. In a large, shallow dish, combine the breadcrumbs, Parmesan cheese, garlic powder, salt, black pepper, and 2 tablespoons of olive oil. Toss well with a fork until the oil is completely dispersed.
  3. In a medium bowl, whisk together the eggs and 1 tablespoon of water.
  4. Place the flour in a large resealable bag. Add half of the cauliflower florets, seal, and shake to coat well. Use a fine mesh strainer to remove excess flour, then place the floured cauliflower on a plate. Repeat with the remaining florets.
  5. Working in batches, dip the floured florets into the egg mixture, ensuring they are completely coated. Transfer to the breadcrumb mixture, pressing to help the breadcrumbs adhere.
  6. Arrange the breaded cauliflower on the prepared baking sheet, leaving space between each floret for optimal crispiness. Spray the tops lightly with cooking spray.
  7. Bake for 20 minutes, then flip the pieces and bake for an additional 15 minutes, or until crunchy on the outside and tender on the inside.
  8. While the cauliflower is baking, prepare the marinara sauce. Pulse the undrained tomatoes in a food processor until mostly broken down.
  9. In a medium saucepan, heat 1 tablespoon of olive oil with the minced garlic and crushed red pepper flakes over medium heat until just sizzling. Add the tomatoes and simmer for about 10 minutes, allowing the marinara to thicken slightly. Stir in 2 tablespoons of fresh basil and season with salt and pepper to taste.
  10. Once the cauliflower is done, transfer to a serving dish and sprinkle with the remaining basil. Serve hot with the prepared marinara sauce.

Tips

  • Fresh is Best: Use fresh, high-quality ingredients for the best flavor, especially when it comes to basil and garlic.
  • Even Coating: Ensure each cauliflower floret is evenly coated in flour, egg, and breadcrumbs for consistent crisps.
  • Don’t Crowd the Pan: Leave space between florets on the baking sheet to allow them to crisp up properly.
  • Flavor Boost: Add a pinch of Italian seasoning to the breadcrumb mixture for an extra flavor punch.

Variations & Substitutions

  • Spicy Version: Increase the crushed red pepper flakes for a spicier kick.
  • Gluten-Free: Substitute the flour and breadcrumbs with gluten-free alternatives.
  • Cheesy Twist: Add shredded mozzarella to the breadcrumb mixture for a gooey cheese pull effect.
  • Herb Swap: Use parsley or oregano in place of basil if preferred.

Storage

Store leftover cauliflower poppers in an airtight container in the refrigerator for up to 3 days. To reheat, place them in a preheated oven at 350°F (175°C) for about 10 minutes, or until warmed through and crispy.

FAQ

Can I make these cauliflower poppers in advance?

Yes, you can prepare the cauliflower poppers up to the baking step a day in advance. Store them, covered, in the refrigerator and bake just before serving for maximum freshness and crispiness.

Can I use frozen cauliflower for this recipe?

Fresh cauliflower is recommended for the best texture, but you can use frozen cauliflower in a pinch. Ensure it’s thoroughly thawed and patted dry to remove excess moisture before coating.

What can I serve with these poppers?

These poppers are delicious on their own with the marinara sauce, but you can also serve them alongside other appetizers like bruschetta, caprese salad, or a charcuterie board for a complete Italian-themed spread.

Nutrition

While specific nutritional values will vary based on exact ingredient brands and quantities used, this recipe is a healthier alternative to deep-fried snacks, packed with fiber from the cauliflower and offering essential nutrients from the fresh ingredients.

Conclusion

These Crispy Italian Cauliflower Poppers are a delightful fusion of tradition and modern culinary creativity. Whether you’re hosting a gathering or just enjoying a quiet evening at home, this dish is sure to satisfy both your taste buds and nostalgic cravings. So gather your loved ones, and let these poppers bring a touch of Italian magic to your table, creating new memories alongside cherished old ones.

Related update: Crispy Italian Cauliflower Poppers Appetizer

Related update: Basic Hummus

Gingerbread | Made by Meaghan Moineau

Delicious Gingerbread Recipe

Intro

There’s something utterly magical about the aroma of freshly baked gingerbread wafting through the house. It transports me back to my grandmother’s cozy kitchen, where the warm, spicy scent was a signal that the holiday season had truly begun. As a child, I would eagerly watch her work, the kitchen a flurry of flour and spices, waiting for the moment when I could lick the sweet, sticky batter from the spoon. This gingerbread recipe is a cherished tradition in my family, a recipe passed down through generations, and I’m thrilled to share it with you today. Whether it’s for a festive gathering or simply to enjoy with a cup of tea on a chilly afternoon, this gingerbread is sure to bring warmth and joy to your home.

Why You’ll Love It

This gingerbread recipe is a delightful blend of sweet and spicy, perfectly moist with just the right amount of chewiness. It’s incredibly versatile, making it perfect for breakfast, dessert, or a snack. The use of whole wheat pastry flour gives it a wholesome touch, while the combination of molasses and honey provides a deep, rich flavor profile. Plus, it’s easy to make, requiring just a few simple steps. Whether you’re an experienced baker or a novice in the kitchen, you’ll find this recipe both approachable and rewarding.

Ingredients

  • 1 cup whole wheat pastry flour
  • 1 cup sweet un-packed brown sugar
  • 1 teaspoon baking powder
  • 1 teaspoon baking soda
  • 1 teaspoon ground cinnamon
  • 1 teaspoon ground cloves
  • 1 teaspoon ground ginger
  • 1/2 cup canned pumpkin
  • 1/2 cup molasses
  • 2 eggs
  • 1/4 cup honey
  • 1/4 cup water
  • 1/4 cup butter, melted
  • 1 tablespoon turbinado sugar, for sprinkling

Instructions

  1. Preheat your oven to 350°F. Spray four mini loaf pans with non-stick cooking spray and set aside.
  2. In a large mixing bowl, stir together the flour, brown sugar, baking powder, cinnamon, ginger, cloves, and baking soda.
  3. Add the canned pumpkin, molasses, eggs, honey, water, and melted butter to the dry ingredients.
  4. Using an electric mixer, beat on low to medium speed until just combined, about 30 seconds.
  5. Increase the mixer speed to medium-high and continue beating for 2 minutes, occasionally scraping the sides of the bowl to ensure even mixing.
  6. Divide the batter evenly among the prepared mini loaf pans. Sprinkle the tops with turbinado sugar for a delightful crunch.
  7. Bake in the preheated oven for 25-30 minutes, or until a toothpick inserted into the center of the loaves comes out clean.
  8. Allow the loaves to cool in the pans for 10 minutes before transferring them to a wire rack to cool completely.

Tips

For the best results, ensure all your ingredients are at room temperature before you start mixing. This helps the batter come together smoothly and bake evenly. Also, don’t skip the turbinado sugar sprinkle on top; it adds a lovely texture and a hint of extra sweetness.

Variations & Substitutions

If you’re looking to switch things up, here are a few variations and substitutions you can try:

  • Flour: You can substitute the whole wheat pastry flour with all-purpose flour if preferred. The texture will be slightly different but still delicious.
  • Sweeteners: Swap out the brown sugar for coconut sugar for a slightly different flavor profile.
  • Spices: Feel free to adjust the spices to your liking. A pinch of nutmeg or allspice can add an extra layer of warmth.
  • Add-ins: Consider adding chopped nuts or raisins to the batter for added texture and flavor.

Storage

Store the cooled gingerbread loaves in an airtight container at room temperature for up to 4 days. For longer storage, wrap the loaves tightly in plastic wrap and aluminum foil, then freeze for up to 3 months. Thaw at room temperature before serving.

FAQ

Can I make this recipe as a single loaf instead of mini loaves?

Yes, you can! Simply pour the batter into a standard loaf pan and adjust the baking time to 45-55 minutes, or until a toothpick inserted into the center comes out clean.

Is it possible to make this gingerbread vegan?

Absolutely! Replace the eggs with flax eggs (1 tablespoon ground flaxseed mixed with 2.5 tablespoons water per egg) and use coconut oil or a vegan butter substitute in place of the butter.

Nutrition

Each mini loaf serves approximately 8 people. Nutritional values per serving: 220 calories, 7g fat, 38g carbohydrates, 3g protein, 2g fiber.

Conclusion

Whether you’re baking for the holidays or simply craving something sweet and spicy, this gingerbread recipe is a perfect choice. It’s not just a treat; it’s a heartwarming experience that brings back memories and creates new ones. I hope this recipe becomes a cherished part of your baking tradition, just as it has been in my family. Enjoy every delicious bite!

Related update: Gingerbread

Related update: Watching What I Eat: Peanut Butter Banana Oat Breakfast Cookies with Carob / Chocolate Chips

Lasagne Roll Ups | Made by Meaghan Moineau

Lasagne Roll Ups: A Comforting Twist on a Classic

Intro

There’s something truly magical about the aroma of lasagne baking in the oven, wafting through the house and drawing everyone to the kitchen. Growing up, Sunday afternoons at my grandmother’s were always marked by the warmth of her kitchen and the heartiness of her meals. Her lasagne was a staple, a dish that brought our family together, layered with love and tradition. Today, I’m excited to share my own twist on this beloved classic: Lasagne Roll Ups. They maintain all the comforting flavors of traditional lasagne but with a fun and modern presentation that’s perfect for family dinners or an impressive dish for guests.

Why You’ll Love It

Lasagne Roll Ups are not only delicious but offer a delightful experience in both cooking and eating. Here’s why you’ll love this recipe:

  • Easy to Serve: Each roll is a perfect, tidy portion, making serving a breeze.
  • Rich in Flavor: With fresh basil, nutmeg, and a hint of lemon, these roll-ups are bursting with layers of flavor.
  • Customizable: You can easily adapt the recipe to suit dietary needs or preferences.
  • Make-Ahead Friendly: Prepare them in advance and simply bake before serving.
  • Kid-Friendly: The fun roll-up style is sure to be a hit with the little ones.

Ingredients

  • Fresh finely-chopped basil leaves
  • Red thinly-sliced bell peppers
  • Black pepper
  • Chicken broth
  • Dried thyme
  • Garlic cloves
  • Fresh lemon juice
  • Nutmeg
  • Olive oil
  • Finely-chopped onion
  • Parmesan cheese
  • Dry lasagne pasta sheets
  • Red dried pepper flakes
  • Ricotta cheese
  • Salt
  • Shredded mozzarella cheese
  • Frozen packet spinach, thawed and drained
  • Unsalted butter

Instructions

  1. In a skillet, cook the garlic, onion, red pepper flakes, thyme, and salt and pepper to taste in the olive oil over moderately-low heat, stirring, until the onion is softened.
  2. Reserve 3 tablespoons of the onion mixture in a bowl. To the onions in the skillet, add the bell peppers and chicken broth, and simmer the mixture, covered, for 10 minutes, or until the peppers are very soft.
  3. In a blender, puree the mixture until smooth, return it to the skillet, and swirl in the unsalted butter. Stir in the basil and fresh lemon juice.
  4. Cook the lasagne noodles according to package directions, rinse with cold water, and drain.
  5. Preheat the oven to 375 degrees Fahrenheit.
  6. In a bowl with the reserved cooked onions, combine 1/4 cup Parmesan cheese, mozzarella, ricotta, freshly grated nutmeg to taste, spinach, and salt and pepper. Mix well.
  7. Spoon 1 cup of sauce into an ungreased 9- by 9- by 2-inch baking pan. Spread 3 tablespoons of filling on each noodle, roll up as for a jelly roll, and place seam-side down in the pan. Repeat until all the noodles are used.
  8. Top with remaining sauce, cover with foil, and bake for 25 minutes. Uncover, sprinkle with remaining Parmesan cheese, and bake uncovered until golden, about 5 more minutes.

Tips

For the best results, keep these tips in mind:

  • Ensure the spinach is thoroughly drained to prevent watery filling.
  • For ease of rolling, do not overfill the lasagne sheets.
  • Freshly grating nutmeg adds a depth of flavor that pre-ground can’t match.
  • Allow the roll-ups to rest for a few minutes before serving to help them set and enhance the flavors.

Variations & Substitutions

Lasagne Roll Ups are versatile, and you can easily tweak the recipe to fit your needs:

  • Vegetarian: Substitute chicken broth with vegetable broth.
  • Gluten-Free: Use gluten-free lasagne noodles.
  • Meat Lovers: Add cooked ground beef or sausage to the filling for a heartier dish.
  • Cheese Variations: Try using a blend of cheeses such as provolone or fontina for a different flavor profile.

Storage

Store any leftovers in an airtight container in the refrigerator for up to 3 days. To freeze, place the roll-ups in a single layer in a freezer-safe dish and cover tightly. They can be frozen for up to 3 months. To reheat, thaw in the refrigerator overnight and bake at 350 degrees Fahrenheit until heated through.

FAQ

Can I make Lasagne Roll Ups ahead of time?

Absolutely! You can assemble the roll-ups a day in advance and store them in the refrigerator. When ready to serve, simply bake them as per the instructions. They also freeze well, making them a great option for meal prep.

What can I serve with Lasagne Roll Ups?

Lasagne Roll Ups are quite filling on their own, but they pair beautifully with a simple green salad or garlic bread for a complete meal. For something lighter, consider serving them alongside steamed vegetables or a fresh tomato salad.

How can I prevent the noodles from sticking together?

After cooking the noodles, rinse them under cold water and toss them with a small amount of olive oil to prevent sticking. This will make handling and rolling them much easier.

Nutrition

While the exact nutritional content can vary based on specific ingredients and quantities used, each serving of Lasagne Roll Ups typically provides a balanced mix of carbohydrates, proteins, and fats, with plenty of calcium and vitamin-rich spinach. It’s a hearty meal that satisfies without being overly indulgent.

Conclusion

Lasagne Roll Ups are more than just a meal; they’re an experience that brings the nostalgia of family gatherings to your table with a fresh twist. Whether you’re serving them up for a busy weeknight dinner or a special occasion, these roll-ups are sure to impress and satisfy. I hope this recipe becomes a beloved addition to your culinary repertoire. Enjoy the warmth, flavor, and joy that each bite brings!

Related update: Lasagne Roll Ups

Related update: Steak with lemon and capers

Vegetarian Mushroom Shepherd’s Pie | Made by Meaghan Moineau

Vegetarian Mushroom Shepherd's Pie | Made by Meaghan Moineau

Title: Comfort on a Plate: The Heartwarming Magic of Vegetarian Mushroom Shepherd's Pie
Description: Dive into the comforting world of Vegetarian Mushroom Shepherd's Pie, a delightful twist on a timeless classic. With its rich tapestry of flavors and a nostalgic family memory to warm your heart, this recipe is more than just a meal—it's a journey back to cherished moments.

---


Vegetarian Mushroom Shepherd's Pie: A Nostalgic Culinary Journey


Shepherd's Pie has always been a dish that whispers comfort with every bite. Growing up, I remember the aroma wafting through my grandmother's kitchen, drawing everyone to the table. It was a time when family members gathered, stories were shared, and laughter filled the air. Although her version was traditional, my Vegetarian Mushroom Shepherd's Pie captures the same warmth and love, with a modern twist suited for today's plant-based palates.


Ingredients:


- Mashed Potato Layer:

- Red skin potatoes


- Sea salt


- Ground pepper


- Filling:

- Soy granules


- Mushrooms


- Carrot


- Red bell pepper


- Diced onions


- Dill


- Parsley


- Dry eggs (or egg substitute)


- Sweet paprika


- Dry thyme


- Unrefined sunflower oil


Instructions:


1. Prepare the Potatoes:

- Peel the red skin potatoes and place them in a large pot filled with water.


- Boil until tender, then mash and allow them to cool slightly.


2. Prepare the Filling:

- Chop the mushrooms, carrot, and red bell pepper. Add them to your food processor and pulse until well combined.


- Heat unrefined sunflower oil in a large skillet over medium heat.


- Add the blended vegetable mixture, diced onions, chopped dill, parsley, soy granules, dry eggs (or egg substitute), sea salt, ground pepper, sweet paprika, and dry thyme.


- Sauté for approximately 10 minutes. The soy granules will absorb the moisture from the mushrooms, creating a rich, hearty filling.


3. Assemble the Pie:

- Preheat your oven to 390°F (200°C).


- Line a casserole dish with parchment paper.


- Divide the mashed potatoes into two portions. Spread the first half evenly across the bottom of the dish.


- Add the vegetable filling, spreading it out evenly.


- Top with the remaining mashed potatoes, smoothing the surface with a spatula.


4. Bake:

- Place the casserole in the preheated oven and bake for 40 minutes.


- Allow the pie to cool for at least half an hour before serving. This cooling period helps the flavors meld beautifully.


A Walk Down Memory Lane


Every time I prepare this dish, I am transported back to my childhood. I recall sitting around my grandmother's large oak dining table, eagerly anticipating the moment when the pie would be served. My grandmother would regale us with stories of her youth, tales of resilience and joy, as we savored each bite of her lovingly crafted meal. Today, my Vegetarian Mushroom Shepherd's Pie stands as a tribute to those cherished memories, preserving the essence of family gatherings and the comfort of home-cooked meals.


Recipe Difficulty: 4/10


Classification: Main Dish


This Vegetarian Mushroom Shepherd's Pie is more than just an entree; it's a heartfelt nod to the past with a fresh, contemporary twist. Whether you're seeking a comforting family meal or a dish to impress at your next gathering, this recipe promises to deliver warmth and nostalgia with every serving.

Read more about Appetizers

Read more about Main Dishes

Read more about Desserts

Hot Artichoke Crab Dip | Made by Meaghan Moineau

Hot Artichoke Crab Dip | Made by Meaghan Moineau

Title: Unveiling the Secrets of a Family Favorite: Hot Artichoke Crab Dip
Description: Dive into the heartwarming nostalgia of family gatherings with our delectable Hot Artichoke Crab Dip. This appetizer is not only a crowd pleaser but also a treasure trove of cherished memories. Discover the simple steps to create this creamy, cheesy delight that's been a staple at our family table for generations.

---


A Taste of Nostalgia: Hot Artichoke Crab Dip


As the holiday season approaches, the aroma of savory dishes often stirs up memories of past family gatherings. For my family, one dish that has consistently graced our table, evoking a sense of warmth and togetherness, is the Hot Artichoke Crab Dip. This creamy, cheesy appetizer is more than just a dish; it's a comforting reminder of love, laughter, and shared stories.


Ingredients You'll Need:


- 1 cup mayonnaise – Adds a creamy base
- 1 cup sour cream – Enhances the tangy flavor
- 1 cup shredded fresh parmesan cheese – For that irresistible cheesy goodness
- 1 package (8 oz) cream cheese, softened – The foundation of our dip
- 2 cloves garlic, minced – A hint of aromatic zest
- 1 small onion, finely chopped – Adds texture and flavor depth
- 1 can (14 oz) artichoke hearts, drained and chopped – Heartiness and flavor combined
- 1 cup fresh imitation crab meat, flaked – The star of our dish

Simple Steps to Culinary Bliss:


1. Soften the Cream Cheese: Begin by softening the cream cheese in the microwave for about 30 seconds. This will make mixing a breeze.
2. Mix and Blend: In a large mixing bowl, combine the softened cream cheese with mayonnaise, sour cream, parmesan cheese, garlic, onion, artichoke hearts, and imitation crab meat. Mix well until all ingredients are thoroughly combined.
3. Bake to Perfection: Preheat your oven to 350°F (175°C). Transfer the mixture into a baking dish and spread evenly. Bake for 25-30 minutes, or until the top is golden and bubbling with cheesy goodness.
4. Serve with Love: Serve hot with sliced baguette. Watch as your guests gather around, eagerly dipping and savoring each bite.

A Family Tradition Comes Alive


Every family has its own traditions, and for us, making this Hot Artichoke Crab Dip was a cherished ritual. I remember my grandmother meticulously preparing this dish every Thanksgiving. Her kitchen would fill with the tantalizing aroma of garlic and cheese, creating an inviting atmosphere that drew everyone in.


As a child, I would sit by her side, sneaking tastes of the creamy mixture before it went into the oven. Grandma would always tell stories of her childhood, weaving tales of family and resilience, as she mixed the ingredients with care. Those moments, filled with laughter and learning, are etched in my heart forever.


Difficulty Rating and Classification


- Difficulty: 3/10 – Perfect for beginners and seasoned cooks alike.
- Classification: Appetizer – Set the tone for your meal with this delicious starter.

Now, as I prepare this dish for my own family, I carry forward the legacy of love and connection that my grandmother instilled in me. This Hot Artichoke Crab Dip is more than just a recipe; it's a bridge to the past and a promise for the future. Whether you're hosting a gathering or simply looking to enjoy a delicious treat, this dip is sure to become a beloved staple in your home, just as it has in mine.

Read more about Appetizers

Read more about Main Dishes

Read more about Desserts

Falafel Burger | Made by Meaghan Moineau

Falafel Burger | Made by Meaghan Moineau

Title: "Savory Nostalgia: Crafting the Perfect Falafel Burger"
Description: Dive into the flavors of the Mediterranean with this Falafel Burger recipe, a delightful fusion of tradition and innovation. With simple ingredients and straightforward instructions, this dish promises to be a crowd-pleaser at any gathering. Join us as we share not only the recipe but also a cherished family memory that makes this dish truly special.

---


Falafel Burger: A Taste of Tradition and Innovation


As the aroma of sizzling chickpea patties fills the kitchen, I am instantly transported back to a warm summer evening at my grandmother's house. Our family would gather in her garden, the air rich with laughter and the scent of blooming jasmine. It was on one such evening that I first experienced the magic of falafel, a dish that would become a cherished part of our family traditions.


Fast forward a few years, and I found myself yearning to recreate that memory in a modern twist with the Falafel Burger. A perfect blend of tradition and contemporary flavors, this dish is an homage to those unforgettable summer nights.


Ingredients


- 1 can of chickpeas, drained and patted dry


- 2 tablespoons tahini


- 1 tablespoon sriracha sauce


- 2 cloves garlic


- A handful of fresh parsley


- 1/2 red onion, diced


- Peanut oil, for frying


- 1 cucumber, sliced


- 1 tomato, sliced


- Hamburger buns


- Tzatziki sauce


Instructions


1. Prepare the Chickpeas: Begin by patting the chickpeas dry with a paper towel. This step is crucial for achieving the perfect texture in your patties.
2. Puree the Base: Place the chickpeas and garlic into a food processor. Puree until smooth, ensuring no chunks remain for a consistent patty.
3. Incorporate the Flavors: Using your clean hands, mix in the tahini, sriracha, fresh parsley, and diced red onion into the chickpea mixture. The combination of these ingredients brings a balance of spice, freshness, and creamy texture.
4. Shape the Patties: Form the mixture into four equal patties. Set aside while you prepare your skillet.
5. Cook to Perfection: Heat peanut oil in a large skillet over medium heat. Once the oil begins to shimmer, carefully add the patties. Cook for three minutes on each side, or until they achieve a golden-brown crust.
6. Assemble the Burger: Remove the patties from the skillet and place each one in a hamburger bun. Top with two slices of tomato, two slices of cucumber, and a generous dollop of tzatziki sauce.
7. Serve Immediately: For the best texture and flavor, serve the burgers immediately while they’re hot and crisp.

A Family Memory


Every bite of this Falafel Burger takes me back to my grandmother's garden, where the simple joy of sharing food brought our family closer. The recipe has evolved, yet the essence remains the same—a celebration of flavor and family.


Difficulty: 4/10


Classification: Main Dish


This Falafel Burger is more than just a meal; it's a connection to the past and a promise of new memories to come. Whether you’re an experienced cook or a beginner, this recipe is both accessible and rewarding. Enjoy crafting these flavorful patties and perhaps, like me, you'll find yourself cherishing the memories they create.


---


Ready to bring a slice of Mediterranean tradition to your table? Try this Falafel Burger recipe today and let it become part of your family's culinary story.

Read more about Appetizers

Read more about Main Dishes

Read more about Desserts

Noodle Kugel with Pineapple-Gluten free, Dairy Free | Made by Meaghan Moineau

Noodle Kugel with Pineapple-Gluten free, Dairy Free | Made by Meaghan Moineau

A Delightful Twist on Tradition: Gluten-Free, Dairy-Free Noodle Kugel with Pineapple


Description

Discover the warm embrace of nostalgia wrapped in the delightful layers of our Gluten-Free, Dairy-Free Noodle Kugel with Pineapple. This modern twist on a classic dish promises to tantalize your taste buds while being kind to your dietary needs. Perfect as a unique dessert or a sweet side dish, this kugel is a symphony of flavors and textures that comes together effortlessly.

---


A Family Tradition Reimagined


Growing up, noodle kugel was a staple at every family gathering, a dish that brought us together around the table, filled with laughter and love. I remember my grandmother bustling around the kitchen, her apron dusted with flour as she prepared her famous kugel. The aroma of cinnamon and sugar wafting through the house was the signal that something magical was about to happen. As kids, we would eagerly await the moment we could dig into the sweet, creamy delight after dinner.


Years later, when my dietary needs shifted, I sought to recreate that cherished memory with ingredients that fit my lifestyle. This Gluten-Free, Dairy-Free Noodle Kugel with Pineapple was born out of my desire to keep the tradition alive while embracing a new way of eating. Every bite takes me back to those cherished family moments, now shared with my own children around the table.


Ingredients


- Gluten-Free Spiral Rice Pasta
- Canned Pineapple Chunks
- Unsweetened Vanilla Coconut Milk or Coconut Creamer
- Sunflower Oil
- Egg Yolks
- Xylitol (or sugar if unavailable)
- Evaporated Cane Sugar
- Ground Cinnamon
- Ground Nutmeg
- Kosher Salt
- Cupcake Liners
- Earth Balance Soy-Free Margarine
- Red Brown Rice Flour

Instructions


1. Preheat the Oven: Set your oven to 350°F (175°C).
2. Cook the Pasta: Fill a medium stockpot with water and place over high heat. Once boiling, add 2 tablespoons of kosher salt, then the pasta. Stir well to prevent sticking, and cook for 8-10 minutes. Let it sit in the water briefly before transferring to a large glass or heatproof bowl.
3. Prepare the Mixture: While the pasta cools, combine coconut milk, coconut creamer, pineapple chunks, sugar, xylitol, cinnamon, nutmeg, and sunflower oil in a bowl. Mix well. Add egg yolks and stir to combine thoroughly.
4. Assemble the Kugel: Line 2 cupcake pans with cupcake liners. Use a dry 1/4 cup measuring spoon to fill each liner with the noodle mixture, topping over the rim. Add any remaining liquid to the kugels that appear dry.
5. Add the Crumble: Prepare a crumble with margarine and rice flour. Sprinkle about 1/2 teaspoon over each kugel.
6. Bake: Place in the oven and bake for 40-45 minutes. Allow to cool for 10 minutes before removing from pans. Remove liners before serving if preferred. Serve hot or warm.

Difficulty Level


Difficulty: 5/10
Classification: Dessert

This Noodle Kugel with Pineapple is an easy-to-follow recipe that delivers big on taste and nostalgia. It's a delightful dessert that bridges the gap between tradition and dietary innovation, perfect for family gatherings or a cozy night in. Enjoy this sweet, creamy kugel, and let it transport you to a place of warmth and cherished memories.

Read more about Appetizers

Read more about Main Dishes

Read more about Desserts

Tuna and Tofu Cold Dish | Made by Meaghan Moineau

Tuna and Tofu Cold Dish | Made by Meaghan Moineau

Title: Refreshing Memories: The Tuna and Tofu Cold Dish That Warms the Heart


Description:

Discover a delightful Tuna and Tofu Cold Dish that not only tantalizes your taste buds but also evokes cherished family memories. This easy-to-make recipe combines the smooth texture of silken tofu with the savory flavors of tuna, tomatoes, and a splash of aromatic sauce, creating the perfect appetizer for any occasion.

---


The Tuna and Tofu Cold Dish: A Taste of Nostalgia


There's something magical about recipes that transport us back in time, evoking cherished family memories with every bite. For me, the Tuna and Tofu Cold Dish does just that. It’s a dish that graced our family table during the hottest summer days, a time when laughter echoed throughout the house and the aroma of delicious meals wafted from the kitchen.


Ingredients:

- 1 block silken tofu


- 1 can tuna in water, drained


- 6-8 white cherry tomatoes, diced


- Dash of white pepper


- Pinch of salt


- 2 tablespoons extra virgin olive oil


- 1 tablespoon vinegar


- 2 tablespoons light Kikkoman soy sauce


- 1 clove garlic, minced


- Black pepper to taste


- Toasted sesame seeds, for garnish


- Diced spring onion, for garnish


Instructions:
1. Prepare the Tofu: Cut the silken tofu into small, bite-sized blocks and carefully place them on a serving plate to create a smooth base for the dish.
2. Tuna Mixture: Drain the water from the canned tuna and gently squash it with a fork to break it into smaller pieces. Mix in a dash of white pepper and a pinch of salt to enhance its flavor.
3. Tomato Slices: Thinly slice the diced white cherry tomatoes and scatter them over the tofu, adding a burst of color and freshness.
4. Assemble the Dish: Place the seasoned tuna on top of the tofu and tomatoes, arranging it evenly for a balanced taste in every bite.
5. Sauce Drizzle: In a small bowl, whisk together the extra virgin olive oil, vinegar, light soy sauce, and minced garlic. Drizzle this aromatic sauce over the assembled dish, allowing it to infuse the ingredients with its savory essence.
6. Final Touches: Sprinkle the top with toasted sesame seeds and a handful of diced spring onion for a touch of crunch and vibrant flavor.
7. Serve Immediately: This dish is best served fresh and chilled, capturing the essence of summer with every forkful.
Difficulty: 3/10
Classification: Appetizer

---


A Nostalgic Story


The first time I tasted this dish was during a family reunion at my grandmother’s house. It was the peak of summer, and the air was warm and thick with humidity. The adults gathered around the dining table, discussing everything from recent travels to childhood anecdotes, while we kids played in the garden, blissfully unaware of the passage of time.


My grandmother, a woman of few words but abundant love, served the Tuna and Tofu Cold Dish with a proud smile. She had learned the recipe from her mother, who had passed it down through generations. With each serving, she shared not just food but a piece of our family’s history. The cool, silky tofu paired with the savory tuna and tangy sauce was a revelation, providing a refreshing contrast to the summer heat.


Even now, whenever I prepare this dish, I am transported back to that day, surrounded by family and laughter. It reminds me that food is not just sustenance but a vessel for memories, carrying with it the power to unite and comfort.


---


Whether you're looking to create new memories or revisit old ones, this Tuna and Tofu Cold Dish is sure to become a beloved staple in your culinary repertoire. Enjoy this simple yet flavorful appetizer that’s rich in nostalgia and taste.

Read more about Appetizers

Read more about Main Dishes

Read more about Desserts

Steaks with pesto, tomatoes and feta cheese | Made by Meaghan Moineau

Steaks with pesto, tomatoes and feta cheese | Made by Meaghan Moineau

Title: “Savoring Memories: Steaks with Pesto, Tomatoes, and Feta Delight”
Description:

Dive into a culinary journey with our delectable Steaks with Pesto, Tomatoes, and Feta Cheese recipe. This dish, brimming with Mediterranean flavors, will become a beloved favorite at your dinner table. Discover how this delightful main dish, rated 6 out of 10 in difficulty, brings back cherished family memories, all while being a satisfying centerpiece for any occasion.

A Taste of Nostalgia: Steaks with Pesto, Tomatoes, and Feta Cheese

There’s something magical about the way food can transport us back in time, evoking fond memories and cherished moments. Growing up, Sunday dinners were a sacred ritual in our family. The kitchen buzzed with activity, the aromatic symphony of sizzling ingredients filling the air, and the anticipation of a hearty meal drew us all together. Among the array of delightful dishes, one stood out as a family favorite: Steaks with Pesto, Tomatoes, and Feta Cheese.

Ingredients You’ll Need:

Cherry Tomatoes
Feta Cheese (crumbled)
Capers
Whole Garlic Cloves
Black Cracked Pepper
Olive Oil
Fresh Basil
Lean Pork Steaks
Red Pesto Rosso
Cornflour
Dried Basil
Sea Salt
Black Pepper

Cooking Instructions:

1. Prepare the Tomato and Feta Bake:

– Preheat your oven to 200°C (392°F). Line a baking tray with baking paper.

– Place cherry tomatoes on the tray, scattering capers and whole garlic cloves among them.

– Sprinkle crumbled feta cheese over the mix, and drizzle with olive oil and a generous pinch of cracked black pepper.

– Roast in the oven for about 30 minutes or until the tomatoes are soft and bursting with flavor.

– Remove from oven, set aside, and garnish with fresh basil.

2. Prepare the Pork Steaks:

– While the tomatoes are roasting, use a meat mallet to flatten each pork steak.

– Spread a tablespoon of red pesto rosso on one side of each steak.

– Roll the steaks with the pesto on the inside and secure each roll with a toothpick.

3. Coat and Cook the Steaks:

– In a shallow plate, combine cornflour, dried basil, sea salt, and black pepper.

– Dredge the steak rolls in the flour mixture, ensuring they are lightly coated.

– Heat olive oil in a large skillet over medium-high heat.

– Brown the rolls, turning constantly for about 5-6 minutes until golden all around.

4. Serve:

– Remove the toothpicks from the steak rolls before serving.

– Plate the steaks alongside the roasted tomato, capers, garlic, and feta bake.

A Family Memory

This recipe takes me back to the cozy warmth of my grandmother’s kitchen. I remember the laughter and stories shared as we gathered around the table, the comforting aroma of roasted tomatoes mingling with the savory scent of pesto. Each bite was a celebration of flavors, a reminder of the love and effort poured into every meal. Her kitchen was a place where time stood still, and family bonds were strengthened over delicious food.

Difficulty Rating: 6/10

This dish is not overly complex, making it accessible for home cooks looking to create an impressive main dish. With a bit of preparation and attention, you’ll find yourself crafting a meal that not only pleases the palate but also creates lasting memories around the dinner table.

Indulge in the flavors of this cherished family recipe and let it become a staple in your home. With its rich textures and delightful taste, Steaks with Pesto, Tomatoes, and Feta Cheese are sure to transport you to your own treasured moments, creating new memories with each bite.

Read more about Appetizers

Read more about Main Dishes

Read more about Desserts

Also try: Blast Of Color Mexican Stuffed Bell Peppers

Also try: Beans With Smoked Pork Hock

Potato Soup With Peppers and Olives | Made by Meaghan Moineau

Potato Soup With Peppers and Olives | Made by Meaghan Moineau

Title: "A Hearty Embrace: Potato Soup with Peppers and Olives"


Description:

Dive into the comforting warmth of our Potato Soup with Peppers and Olives—a dish that's both soul-soothing and flavor-packed. Infused with the zesty kick of red roasted peppers and the savory depth of black olives, this soup is a tribute to family gatherings and cherished memories around the dinner table.

---


Potato Soup with Peppers and Olives: A Nostalgic Bowl of Comfort
Difficulty Level: 4/10 | Main Dish

In the whirlwind of modern life, there are few things as grounding as a simple, homemade meal. Our Potato Soup with Peppers and Olives is more than just a dish—it's a heartfelt journey back to the comforting embrace of family and the warmth of shared memories. This recipe, with its rich blend of flavors, is perfect not only for a cozy night in but also as a centerpiece for family gatherings.


Ingredients:

- Potatoes


- Garlic


- Olive oil


- Red roasted and marinated peppers


- Black olives


- Dried oregano


- Salt and pepper


Instructions:

1. In a saucepan, fry garlic in olive oil until tender.


2. Add potatoes, oregano, and a pinch of salt. Cover with 300-400 ml of water.


3. Cook for 30 minutes, or until potatoes are soft. For a quicker method, microwave the potatoes with some water for 15 minutes on MAX.


4. Puree the potatoes, peppers or pepper sauce, and 4 olives in a blender.


5. Adjust the consistency by adding water if too thick, and season with pepper and salt.


6. Serve warm or hot, garnished with the remaining olives.


The Story Behind the Soup:

As a child, weekends meant visits to Grandma's house—a place where the air was always thick with the aroma of home-cooked meals. One crisp autumn afternoon, while the leaves danced in hues of amber and gold, I remember sitting in her cozy kitchen, watching her deft hands work magic over the stovetop.


The kitchen was a symphony of sizzling garlic and the earthy scent of potatoes mingling with the sweet, smoky tang of roasted peppers. Grandma would hum a tune, her voice as warm and inviting as the soup she prepared. She’d always let me sneak a taste from the wooden spoon, the rich flavors instantly wrapping me in comfort.


This Potato Soup with Peppers and Olives was her signature dish, a staple that brought the family together, evoking laughter and stories shared around the table. Each bite was a spoonful of nostalgia, a reminder of those cherished moments. Now, as I prepare this dish in my own kitchen, I am transported back to those golden days, and the tradition lives on.


---


Whether you're seeking a taste of nostalgia or a new family favorite, this Potato Soup with Peppers and Olives is a dish that promises comfort and connection. It's a testament to the power of food in weaving together the tapestry of our most treasured memories. Enjoy it as a main dish, and let it be the warm hug you didn’t know you needed.

Read more about Appetizers

Read more about Main Dishes

Read more about Desserts

Classic Mint Julep | Made by Meaghan Moineau

Classic Mint Julep | Made by Meaghan Moineau

Title: Sipping on Nostalgia: The Timeless Charm of a Classic Mint Julep
Description: Dive into the refreshing world of the Classic Mint Julep, a cocktail that perfectly marries the boldness of bourbon with the invigorating essence of fresh mint. This blog post not only walks you through crafting this iconic drink but also weaves in a heartwarming tale from a family summer tradition. Perfect for a relaxing afternoon on the porch, this recipe is rated at a difficulty level of 3/10 and is classified under “Appetizer” as a delightful prelude to any gathering.

The Timeless Charm of a Classic Mint Julep

There’s something undeniably enchanting about sipping on a Mint Julep. The clinking of ice against the julep cup, the aromatic burst of fresh mint, and the smooth warmth of bourbon create an experience that’s more than just a drink—it’s a moment. Today, I want to take you on a journey through my cherished family memories and guide you in crafting this timeless cocktail.

Ingredients:

– Fresh mint

– Simple syrup

– Ice

– Bourbon

Instructions:

1. Minty Fresh Start: Begin by adding fresh mint leaves and simple syrup to a tall glass. With the handle of a spoon, gently crush and mash the mint leaves to release their essential oils and aromas, creating the foundation of this classic cocktail.
2. Creating the Chill: Fill the glass with crushed ice, then pour in the bourbon. Using a teaspoon, jiggle the contents to ensure a thorough mix while chilling the concoction.
3. The Grand Finish: Strain the mixture into a julep cup brimming with crushed ice. Garnish with a sprig of fresh mint for that perfect aromatic touch.

A Nostalgic Family Memory

Growing up, summers were synonymous with family gatherings on my grandparents’ porch. As kids, we were always fascinated by the ritualistic preparation of the Mint Julep, a tradition my grandfather upheld with pride. The adults would gather around, their laughter mingling with the evening breeze, as my grandfather meticulously mashed mint leaves with his cherished wooden spoon—an heirloom passed down through generations.

The clinking of ice and the rich aroma of bourbon signaled the start of stories and conversations that would weave our family closer. My grandmother would tell tales of our ancestors, each story as refreshing and invigorating as the drinks in their hands. The Mint Julep wasn’t just a cocktail; it was a vessel of connection, a way to keep our family history alive with each sip.

Difficulty Level: 3/10

Creating a Classic Mint Julep is simple yet satisfying, making it a perfect choice for both novice and seasoned cocktail enthusiasts. With a few ingredients and steps, you can craft a drink that resonates with tradition and taste.

Classification: Appetizer

This drink sets the stage for any social gathering, offering a refreshing start to an evening of camaraderie and delight.

Indulge in the nostalgia and serenity of a Classic Mint Julep, where every sip is a tribute to the past and a toast to the memories yet to be made. Whether you’re entertaining guests or enjoying a quiet moment alone, this cocktail is an invitation to savor the simple joys of life.

Read more about Appetizers

Read more about Main Dishes

Read more about Desserts

Also try: Banana Smoothie Boost

Pumpkin soup with wine | Made by Meaghan Moineau

Pumpkin soup with wine | Made by Meaghan Moineau

Title: Cozy Autumn Evenings: A Nostalgic Bowl of Pumpkin Soup with Wine
Description: Dive into the warmth of autumn with our delightful Pumpkin Soup with Wine. This creamy, aromatic soup captures the essence of fall and adds a touch of sophistication with a splash of red wine. Perfect as a comforting main dish, this recipe brings together the sweetness of roasted muscat pumpkin, the richness of cream, and the earthiness of fresh sage. Join me as I share the story behind this cherished family recipe, a nostalgic tribute to cozy evenings and cherished moments.

---


As the leaves begin to change color and the air turns crisp, there's nothing quite like the comforting embrace of a warm bowl of soup. Our Pumpkin Soup with Wine is more than just a dish; it's a family tradition, a symbol of togetherness during the cozy autumn months.


I remember, as a child, the anticipation that filled our home as we prepared for our annual family harvest celebration. My grandmother, the heart of our family, would always be at the center of the kitchen, orchestrating a symphony of flavors and aromas. Among her many culinary masterpieces, her pumpkin soup with wine was always the star of the show.


The preparation of the soup was an event in itself. We would gather together, my brothers and I, to help cut the muscat pumpkin into large, rustic chunks. The vibrant orange of the pumpkin, a visual testament to the season, brought a sense of joy and anticipation. Lined on a baking sheet and drizzled with oil, the pumpkin was roasted to perfection, filling the house with an inviting, sweet aroma.


Once the pumpkin was fork-tender and golden, it was time for the magic to happen. My grandmother would blend the roasted chunks into a smooth, velvety puree, a task she entrusted to me once I was old enough to handle the blender. This was my favorite part, watching the transformation of the humble pumpkin into a luxurious base for our soup.


Into the pot went the pumpkin puree, followed by a generous splash of cream and sour cream, creating a rich and creamy texture. The addition of vegetable stock, made conveniently from a cube, added depth to the flavor, while a splash of red wine introduced a touch of elegance and complexity.


As the soup simmered gently, filling the house with its irresistible fragrance, my grandmother would add the final touch: freshly chopped sage leaves, their earthy aroma a perfect complement to the sweet pumpkin and wine. Served with homemade croutons, the soup was a bowl of pure comfort, each spoonful a warm hug on a chilly evening.


This pumpkin soup with wine is more than just a recipe; it's a beloved family tradition, a reminder of those cherished evenings spent together, laughing and sharing stories around the table. It's a dish that brings us back to the simple joys of life, to the warmth of family and the beauty of autumn.


Difficulty: 4/10
Classification: Main Dish

So, as you savor this delightful pumpkin soup, may it bring warmth to your home and create new memories for you and your loved ones. Enjoy the flavors, embrace the nostalgia, and let this dish be a part of your family's autumn tradition.

Read more about Appetizers

Read more about Main Dishes

Read more about Desserts

Spinach pie with home made dough | Made by Meaghan Moineau

Spinach pie with home made dough | Made by Meaghan Moineau

Title: A Taste of Comfort: Crafting the Perfect Spinach Pie with Homemade Dough
Description: Dive into the heartwarming world of homemade comfort food with our Spinach Pie recipe, complete with a rich, flaky crust and a savory filling. This delightful dish, bursting with fresh ingredients and rich flavors, is more than just a meal—it's a nostalgic journey back to family gatherings and cherished memories. Whether you're a seasoned chef or a kitchen novice, this recipe will guide you effortlessly through creating a dish that’s sure to become a family favorite.

---


A Nostalgic Journey: The Spinach Pie That Binds Generations

There's something magical about the aroma of a spinach pie baking in the oven. For me, it evokes memories of Sunday afternoons at my grandmother’s house. The kitchen was always a flurry of activity, with laughter mingling with the clatter of pots and pans. My grandmother, with her flour-dusted apron and twinkling eyes, would orchestrate the chaos with the grace of a maestro, her hands deftly crafting the dough that would soon envelop a savory filling.


This spinach pie was a staple at every family gathering. Its rich, flaky crust and creamy, cheesy filling were constants amidst the ever-changing landscape of our family meals. I remember sitting at the kitchen table, my feet barely touching the floor, watching in awe as she transformed a few simple ingredients into something extraordinary. The secret, she would say with a wink, was in the dough—a buttery, tender crust that she made from scratch, just as her mother had taught her.


The Recipe: Spinach Pie with Homemade Dough
Ingredients:

- 2 cups all-purpose flour


- 1/2 cup butter, softened


- 1 carrot, shredded finely


- 4 eggs (3 for filling, 1 yolk for glazing)


- 1/2 pound feta cheese (or 4.5 oz feta and 3.5 oz cheddar)


- 1 tablespoon fresh dill, chopped


- 1 package frozen spinach, defrosted and drained


- 1 cup milk


- 1 large onion, chopped


- 1 bell pepper, chopped


- Salt and pepper to taste


- 1/2 cup sour cream


- 1/4 cup water


Instructions:
1. Prepare the Dough: In a large bowl, mix the softened butter with the flour until the mixture resembles coarse crumbs. Add the slightly beaten egg, water, and a pinch of salt. Knead until the dough is smooth and no longer sticky. Wrap in plastic and chill in the fridge while you prepare the filling.
2. Make the Filling: In another bowl, combine the drained spinach, shredded feta (and cheddar if using), sour cream, dill, onion, and carrot. Beat the eggs, reserving one yolk for later, and stir into the mixture. Season with salt and pepper to taste.
3. Assemble the Pie: Preheat your oven to 356°F (180°C). Divide the chilled dough into two portions, with one piece slightly larger for the base. Roll out the larger piece on a floured surface and line an oiled baking tray, ensuring the dough covers the sides. Add the filling evenly.
4. Create the Lattice Top: Roll out the remaining dough, cut into strips, and weave them over the filling to create a lattice pattern. Mix the reserved egg yolk with 3 tablespoons of milk and brush over the dough.
5. Bake: Place the pie in the oven and bake until the crust is golden brown and the filling is set, approximately 40-45 minutes. Allow to cool slightly before serving.
Difficulty: 6/10
Classification: Main Dish
Conclusion:

This spinach pie is more than just a culinary delight; it's a bridge to the past, a reminder of the warmth and love found in family gatherings. As you prepare this dish, I hope you feel the same sense of connection and nostalgia that I do. Enjoy every bite, and may it bring joy to your table and your heart.

Read more about Appetizers

Read more about Main Dishes

Read more about Desserts

Mango Guacamole | Made by Meaghan Moineau

Mango Guacamole | Made by Meaghan Moineau

Title: Mango Guacamole: A Zesty Twist on a Family Favorite
Description: Dive into the tropical allure of Mango Guacamole, a vibrant twist on the classic dip that promises to elevate your appetizer game. Bursting with flavors of ripe mango, creamy avocados, and zesty lime, this dish is not only a feast for the taste buds but also a nostalgic journey back to cherished family gatherings. Rated 3/10 in difficulty, this delightful appetizer is easy enough for any home cook to master.

---


Mango Guacamole: A Zesty Twist on a Family Favorite

There's something timeless about gathering around the family table, sharing laughter, stories, and delicious food that bridges generations. In my family, guacamole was always a staple at our summer barbecues. But it wasn't until one particular gathering that the humble guacamole was transformed into something truly unforgettable.


The Story Behind the Mango Twist

It was a balmy summer afternoon, and my family was celebrating my grandmother's 70th birthday. As the grill sizzled with an array of delicious meats, my aunt appeared with a bowl of what we thought was the usual guacamole. But as soon as she set it on the table, a sweet and tropical aroma filled the air, piquing everyone's curiosity.


My aunt, known for her adventurous culinary experiments, decided to add a unexpected ingredient: mango. At first, the combination seemed unusual, but as we all gathered around for a taste, the tangy sweetness of the mango perfectly complemented the creamy avocados and spicy serrano chiles. It was an instant hit, and from that day on, Mango Guacamole became a beloved family recipe, a tribute to the creativity that can arise from the simplest of ingredients.


The Perfect Summer Appetizer
Creating this dish at home is as easy as it is rewarding, with a difficulty rating of just 3 out of 10. Here's how you can bring this vibrant appetizer to your own table:
Ingredients:

- 3 ripe Hass avocados


- 1 ripe mango, peeled and chopped


- 1 small red onion, finely chopped


- 2 serrano chiles, seeded and finely chopped


- 2 cloves fresh garlic, minced


- 2 limes, juiced (reserve zest)


Instructions:
1. Prepare the Ingredients: Start by chopping the mango, red onion, and garlic. Seed and finely chop the serrano chiles.
2. Mash the Avocados: Chop the avocados and place them into a medium-sized bowl. Zest the limes and set the zest aside. Roll the limes on your countertop to activate the juice, then cut them in half and squeeze all of the juice into the bowl with the avocados. Give the mixture a good stir to combine.
3. Mix it All Together: Add the chopped mango, red onion, garlic, and serrano chiles to the avocado mixture. Sprinkle in the reserved lime zest and stir everything together until you reach your desired consistency.

And there you have it, a refreshing Mango Guacamole that's perfect for dipping tortilla chips or as a topping for grilled chicken or fish. This appetizer not only brings a vibrant splash of color to your spread but also serves as a delightful reminder of those cherished family moments gathered around the table.


As you enjoy this tropical twist on a classic favorite, consider creating new memories with your loved ones—after all, it's the stories and laughter shared over delicious food that truly make a family recipe special.

Read more about Appetizers

Read more about Main Dishes

Read more about Desserts

Chavrie Caramelized Red Onion Tarts | Made by Meaghan Moineau

Chavrie Caramelized Red Onion Tarts | Made by Meaghan Moineau

Title: Savoring Memories: Chavrie Caramelized Red Onion Tarts
Description: Dive into the rich flavors of Chavrie Caramelized Red Onion Tarts, where sweet meets tangy in a symphony of taste. This appetizer, rated 5 out of 10 in difficulty, brings together goat cheese, red grape jelly, and red onions to create an unforgettable bite-sized delight. Join me as I share not just a recipe, but a cherished family memory that this dish evokes.

---


Savoring Memories: Chavrie Caramelized Red Onion Tarts

In the symphony of culinary delights, there are few recipes that strike a perfect chord of nostalgia and flavor. One such recipe that finds a special place in my heart—and on my palate—is the Chavrie Caramelized Red Onion Tart. This dish is an embodiment of sweet, tangy, and creamy notes, coming together in a deliciously flaky tart shell.


A Family Affair


The memory is as vivid as it was years ago—my family gathered around the kitchen island, laughter and stories filling the air as we prepared for our annual summer picnic. These tarts were always a staple in our picnic basket. The process of making them became a cherished tradition, with each family member contributing their own touch to the final masterpiece.


I remember my grandmother, her hands deftly chopping the red onions while regaling us with tales of her childhood. My mother would gently remind me to stir the onions slowly, letting them turn translucent and soft in the warm embrace of butter and oil. It was a beautiful chaos of chatter, clinking utensils, and the intoxicating aroma of onions caramelizing.


Creating the Magic


Ingredients:

- 1 cup goat cheese


- 2 tablespoons red grape jelly


- 2 large red onions, minced


- 2 tablespoons red wine vinegar


- 1 tablespoon sugar


- 1 tablespoon unsalted butter


- 1 tablespoon vegetable oil


Instructions:
1. Heat the Base: In a heavy gauge skillet, combine the vegetable oil and unsalted butter over medium heat. Allow the mixture to melt and meld together, creating the perfect base for sautéing.
2. Caramelize the Onions: Add the minced red onions to the skillet. Cook them slowly, stirring occasionally, until they turn translucent and soft—about 10 minutes. This step always reminds me of the patience my grandmother taught me; good things take time.
3. Sweet and Tangy Symphony: Introduce the sugar, red grape jelly, and red wine vinegar to the onions. Stir the mixture occasionally and let it cook for about 15 minutes until it reaches a syrupy consistency. The transformation of the ingredients into a rich, aromatic blend is simply magical.
4. Cool Down: Once the mixture is perfectly caramelized, remove it from the heat and let it cool to room temperature. This waiting period was always spent sharing stories, sipping lemonade, and catching up with each other.
5. Assemble the Tarts: Place the tart shells on a baking tray. Spoon a generous tablespoon of the caramelized onion mixture into each shell. Top with crumbled goat cheese for that delightful creamy finish.

A Delightful Appetizer


These Chavrie Caramelized Red Onion Tarts are rated a 5 out of 10 in difficulty, making them an approachable yet impressive dish for any occasion. Classified as an appetizer, they are perfect for setting the stage for a memorable meal, or simply as a delectable snack to enjoy with loved ones.


As I take a bite of these tarts today, I am transported back to those sunny picnics. The flavors are a comforting reminder of family, love, and the simple joys of life. I hope this recipe brings as much joy to your table as it has to mine. Enjoy the journey of making and savoring these little pockets of nostalgia.

Read more about Appetizers

Read more about Main Dishes

Read more about Desserts

Sweet and Spicy Nuts | Made by Meaghan Moineau

Sweet and Spicy Nuts | Made by Meaghan Moineau

Title: "Sweet and Spicy Nuts: A Nostalgic Twist on a Classic Treat"
Description: Discover the delightful blend of flavors with our Sweet and Spicy Nuts recipe—an easy-to-make treat that perfectly balances sweetness with a hint of heat. This appetizer is more than just a snack; it's a journey down memory lane infused with family love and warmth. Ideal for any occasion, this recipe is sure to become a favorite in your household.

---


There's something magical about the aroma of spices wafting through a bustling kitchen. For me, it brings back cherished memories of my grandmother's cozy home during the holiday season. The Sweet and Spicy Nuts recipe is more than just a delectable treat; it's a nostalgic nod to those heartwarming times spent with family.


Ingredients:

- 2 tablespoons butter


- 1/2 teaspoon cayenne pepper


- 1/2 teaspoon ground cinnamon


- 1/2 teaspoon ground cumin


- 1/4 cup light brown sugar


- 2 cups mixed nuts (such as walnuts)


- 1/2 teaspoon salt


- 1 tablespoon water


Instructions:
1. Prepare the Spice Mix: In a small bowl, mix together the ground cumin, cayenne pepper, ground cinnamon, and salt. Set this aromatic blend aside for later.
2. Toast the Nuts: Heat a large dry skillet over medium heat. Add the mixed nuts and cook, stirring frequently, until they begin to toast, about 4 minutes. The nuts should be fragrant and just starting to brown. Transfer them to a small bowl and set aside.
3. Create the Glaze: In the same skillet, add the butter, light brown sugar, water, and the prepared spice mix. Cook, stirring constantly, until a rich glaze forms, about 1 minute.
4. Combine and Cook: Return the toasted nuts to the skillet. Toss them with the glaze until fully coated. Cook for an additional 1 to 2 minutes until the nuts are beautifully glazed and golden brown.
5. Cool and Store: Remove the nuts from the heat and transfer them to a baking sheet lined with aluminum foil. Use a fork to separate the nuts, ensuring they don't clump together. Let them cool for about 10 minutes until the sugar hardens. Store the nuts in an airtight container to maintain their irresistible crunch.
Nostalgic Family Memory:

Growing up, the holiday season at Grandma's house was always a highlight. Her kitchen was the heart of the home, where laughter blended seamlessly with the sounds of sizzling pans and clinking utensils. One of my fondest memories is sitting at the counter, eyes wide and eager, as she prepared her special Sweet and Spicy Nuts. She would let me help with mixing the spices—a task I took very seriously as a child.


Once the nuts were done, we'd sit together by the fireplace, sharing stories and snacking on the warm, freshly glazed nuts. The combination of sweet, spicy, and earthy flavors was, and still is, a testament to her culinary magic. This recipe, passed down through generations, continues to be a staple in our family gatherings, ensuring that Grandma's spirit lives on in every bite.


Difficulty Rating: 3 out of 10
Classification: Appetizer

Whether you're looking to add a little spice to your next gathering or simply want to indulge in a tasty treat, these Sweet and Spicy Nuts are a must-try. Perfect for sharing or savoring alone with a cherished memory, they bring a touch of warmth and nostalgia to any moment.

Read more about Appetizers

Read more about Main Dishes

Read more about Desserts

Game Day Jerk Wings | Made by Meaghan Moineau

Game Day Jerk Wings | Made by Meaghan Moineau

Game Day Jerk Wings: A Spicy Kickoff to Flavorful Memories


Description:

Elevate your game day experience with our mouthwatering Game Day Jerk Wings! Infused with an aromatic blend of spices and a zesty jerk sauce, these wings promise to be the highlight of your gathering. Perfect for those who love a little heat and a lot of flavor, these wings are sure to score a touchdown with your taste buds. As an added bonus, serve them with crunchy carrot and celery sticks along with creamy blue cheese dressing for the ultimate game day snack.

Difficulty: 6/10

Classification: Appetizer


---


Ingredients:


- Split chicken wings


- 2 tbsp pasilla chile powder


- 1 tbsp kosher salt


- 1 tbsp black ground pepper


- 1 tsp ground cayenne pepper


- 1 tbsp Jamaican ground allspice


- 1 cup Pickapeppa sauce


- 1/2 cup unsalted butter


- 1/4 cup honey


- 2 tbsp Tabasco sauce


- 1 tsp red pepper flakes


- Carrot and celery sticks


- Blue cheese dressing


Instructions:


1. Prepare the Wings:

- Split wings apart into 2 sections and slash a slit in the flat part of each wing for quicker cooking.


2. Create the Dry Rub:

- In a bowl, combine the pasilla chile powder, kosher salt, black ground pepper, ground cayenne pepper, and Jamaican ground allspice.


- Sprinkle the mixture liberally over the wings (you don't need to use all of it). Refrigerate for at least 1 hour to let the flavors meld.


3. Make the Jerk Sauce:

- In a medium saucepan over low heat, combine Pickapeppa sauce, unsalted butter, honey, Tabasco sauce, and red pepper flakes. Stir until well incorporated.


4. Grill the Wings:

- Allow the wings to come to room temperature before grilling.


- Prepare your grill for medium-high direct heat. Grill the dry-rubbed wings for 20-25 minutes, turning constantly to achieve good grill marks without over-charring.


- Check the doneness by biting into the largest wing; if the juices run clear, they're ready.


5. Serve:

- Place the grilled wings in a large bowl and toss them with the jerk sauce.


- Serve hot with blue cheese dressing and a side of carrot and celery sticks.


---


A Nostalgic Flavor Journey


Growing up, game days were a family tradition in our house. It wasn’t just about the match on TV; it was an event filled with laughter, cheers, and of course, food that brought everyone together. The aroma of these jerk wings sizzling on the grill takes me back to those vibrant afternoons in my childhood home. My dad, the culinary mastermind, would meticulously prepare these wings, insisting that the secret lay in the perfect balance of spices.


I remember one particular Sunday when I was tasked with being his sous-chef. As we mixed the spices and prepared the grill, he shared stories of his own childhood — of how his father would make similar spicy wings for family gatherings. It was a ritual passed down through generations, each iteration adding its own unique twist.


The wings were always the star of the show, their spicy aroma drawing friends and neighbors alike. We’d gather around the table, each bite a delightful explosion of flavor, accompanied by the creamy cooling effect of blue cheese dressing. These wings weren't just a dish; they were a symbol of family unity and cherished memories.


As I prepare these wings today, I feel a sense of nostalgia, a connection to those joyous moments of togetherness. Whether you're a fan of the game or just a lover of good food, these Game Day Jerk Wings are sure to create lasting memories for your family, just as they have for mine.


---


Indulge in the perfect combination of spicy, sweet, and savory with our Game Day Jerk Wings — a must-have appetizer for any game day celebration!

Read more about Appetizers

Read more about Main Dishes

Read more about Desserts

Falafels With Tahini Sauce | Made by Meaghan Moineau

Falafels With Tahini Sauce | Made by Meaghan Moineau

Title: Savor the Flavors of Tradition: Falafels with Tahini Sauce
Description: Discover the heartwarming essence of homemade falafels with tahini sauce, a dish woven with family memories and vibrant flavors. Perfect as an appetizer or main dish, this recipe offers a delightful blend of Middle Eastern spices and nostalgia.

---


Falafels with Tahini Sauce: A Recipe Steeped in Family Tradition


There's something incredibly comforting about recreating a dish that has been a staple in family gatherings for generations. Falafels with tahini sauce is one such recipe that holds a special place in my heart, evoking memories of bustling kitchens, laughter, and the delightful aroma of spices. This Middle Eastern classic is not just a meal; it's a connection to my roots and a celebration of the rich tapestry of flavors that define my family heritage.


Ingredients:


For the Falafels:

- 1 cup garbanzo beans, soaked overnight and drained


- 1 onion, chopped


- 3 cloves garlic


- 1/4 cup fresh cilantro


- 1/4 cup fresh parsley


- 2 teaspoons ground cumin


- 1 teaspoon sea salt


- 1/2 teaspoon red dried pepper flakes


- 1 teaspoon baking powder


- Flour, as needed


For the Tahini Sauce:

- 1/2 cup tahini paste


- 1/4 cup water (more if needed)


- Juice of 2 lemons


- 2 cloves garlic


- 1/2 teaspoon sea salt


Instructions:


1. Prepare the Falafel Mixture:

- In a food processor, combine onion, garlic, cilantro, parsley, cumin, sea salt, red pepper flakes, and baking powder. Process until the mixture is crumbly.


- Transfer the mixture to a large bowl, adding flour a tablespoon at a time. Mix well until the mixture can be easily formed into balls or patties without falling apart.


- Refrigerate the mixture while preparing the tahini sauce.


2. Make the Tahini Sauce:

- In a food processor, combine tahini paste, water, lemon juice, garlic, and sea salt. Process until smooth. Adjust consistency by adding more water or lemon juice as desired.


3. Cooking the Falafels:

- Shape the chilled falafel mixture into balls or patties.


- Fry in a skillet over medium heat until golden brown on each side, or bake in a preheated oven at 375°F (190°C) for 20-25 minutes.


A Nostalgic Tale:


Every year, on the first Sunday of spring, my family would gather at my grandmother's house for a feast that marked the changing seasons. Among the plethora of dishes, the falafels with tahini sauce always took center stage. I remember watching my grandmother with awe as she skillfully shaped each falafel, her hands moving with an ease that only years of practice could bring. The kitchen would fill with a medley of scents—fresh herbs mingling with the earthy aroma of cumin and the subtle heat of the red pepper flakes.


As we sat around the table, my grandmother would share stories of her childhood, tales of bustling markets and sunlit kitchens. With each bite of falafel, we weren't just savoring a delicious dish; we were partaking in a tradition, a slice of our family's history that had been passed down through generations.


Difficulty Rating: 5/10


Classification: Appetizer/Main Dish

Creating falafels with tahini sauce is a culinary adventure that's both rewarding and nostalgic. With each step, from soaking the garbanzo beans to blending the perfect tahini sauce, you're not just making a meal; you're crafting a story, one that's rich in flavor and family legacy. Whether served as an appetizer or a main dish, this recipe is sure to become a cherished part of your own family traditions. Enjoy!

Read more about Appetizers

Read more about Main Dishes

Read more about Desserts

Zucchini & Basil Frittata | Made by Meaghan Moineau

Zucchini & Basil Frittata | Made by Meaghan Moineau

Title: Zucchini & Basil Frittata: A Taste of Home and Heart
Description: Dive into the warmth of family memories with our Zucchini & Basil Frittata recipe. Perfect for brunch or a light dinner, this dish brings together the fresh flavors of zucchini, basil, and cheddar cheese, combined effortlessly with eggs. Discover the joy of cooking this simple yet flavorful frittata that’s sure to become a family favorite.

---


A Family Tradition: The Zucchini & Basil Frittata


There’s something magical about Saturday mornings in my family home. As the sun peeks through the kitchen windows, casting a golden glow over the countertops, the familiar sizzle of a frittata begins to fill the air.


Years ago, on a particularly sunny morning, my grandmother taught me the art of making her famous Zucchini & Basil Frittata. I remember standing on a stool beside her, eyes barely reaching the countertop, watching in awe as she skillfully shredded zucchini with her trusty box grater, the faint scent of fresh basil wafting through the kitchen. The recipe was simple, she assured me, but it was the love and care we put into it that made it special.


Ingredients


- Fresh basil leaves


- 1 cup cheddar cheese, shredded


- 6 large eggs


- 1-2 tablespoons grapeseed oil (or olive oil)


- 3 green onions, finely chopped


- Salt, to taste


- 2 medium zucchinis


Instructions


1. Prepare the Zucchini: Start by shredding the zucchini using a box grater or a food processor. Place the shredded zucchini in a colander over a large bowl. Sprinkle with a little salt and let it sit for about 20 minutes to allow excess water to drain. If you're in a hurry, gently squeeze out the water with your hands. This step can be done ahead of time, and the zucchini can be stored in the refrigerator overnight if needed.
2. Mix Ingredients: In a large mixing bowl, combine the shredded zucchini, chopped green onions, basil leaves, cheddar cheese, and a pinch of salt. Stir well to mix all ingredients thoroughly.
3. Prepare the Eggs: In a separate bowl, crack the eggs and beat them until smooth. Pour the beaten eggs into the bowl with the other ingredients, stirring to ensure everything is well combined.
4. Preheat and Cook: Preheat your oven to 350 degrees F. In a 10-inch cast iron skillet, heat 1 to 2 tablespoons of grapeseed oil over medium heat, ensuring the sides are well coated. Add the egg and zucchini mixture to the skillet, spreading it evenly. Cook for 3 to 5 minutes, until the edges start to set.
5. Bake: Carefully transfer the skillet to the preheated oven. Bake for 12 to 15 minutes, or until the center is set and a toothpick inserted comes out clean.

A Nostalgic Note


As the frittata bakes, the house fills with a comforting aroma that transports me back to those cherished mornings with my grandmother. The joy of sharing this dish with my family, from my grandmother’s time to now, remains a treasured tradition. The Zucchini & Basil Frittata is more than just a meal; it's a reminder of love, legacy, and the simple pleasures of life.


Difficulty


Rating: 3/10
Classification: Main Dish

This delightful Zucchini & Basil Frittata is not only a testament to family traditions but also a celebration of fresh, wholesome ingredients. Whether you’re making it for a cozy brunch or a light dinner, it's destined to become a staple in your culinary repertoire. Enjoy every bite, and perhaps, create a new memory of your own.

Read more about Appetizers

Read more about Main Dishes

Read more about Desserts