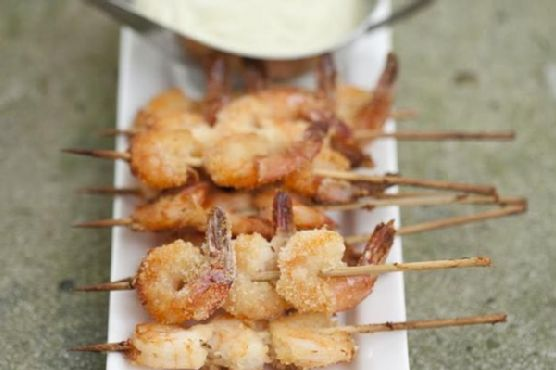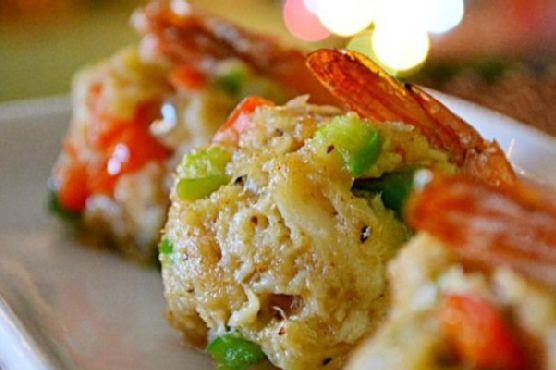
Crab Cake Stuffed Shrimp
Intro
There’s something truly magical about the combination of crab cakes and shrimp. It takes me back to summer evenings spent by the coastline, where the air was tinged with the saltiness of the sea and the gentle hum of waves provided the perfect backdrop to our family gatherings. My grandmother, ever the culinary wizard, would whip up this dish that was both an indulgence and a comfort. Her Crab Cake Stuffed Shrimp was the star of many a festive table, and today, I am thrilled to share her recipe with you. This delightful appetizer is sure to impress your guests, bringing a touch of the ocean’s bounty to your dining table.
Why You’ll Love It
This Crab Cake Stuffed Shrimp recipe is the perfect blend of elegance and comfort, making it ideal for both special occasions and casual gatherings. Here’s why you’ll fall in love with it:
- Flavor-Packed: Each bite is a burst of rich, savory flavors with a hint of spice.
- Textural Delight: The tender shrimp combined with the crispy crab cake offers a satisfying texture contrast.
- Impressive Presentation: This dish looks as good as it tastes, making it a show-stopper on any table.
- Make Ahead: The crab mixture can be prepared in advance, allowing you more time to enjoy with guests.
- Customizable: Easily adjust the spice level or add your personal touch with various substitutions.
Ingredients
- 10 tablespoons unsalted butter, divided
- 1 onion, finely chopped
- 1 green bell pepper, finely chopped
- 1 red bell pepper, finely chopped
- 1/4 cup dry white wine
- 2 cloves garlic, minced
- 1 pound crab meat
- 1/2 cup round buttery crackers, crushed
- 1/2 cup panko bread crumbs
- 1/2 teaspoon red ground pepper
- 1 teaspoon Old Bay seasoning
- Salt and black ground pepper to taste
- 16 large shrimp, peeled and deveined
- Optional: Lemon wedges for serving
Instructions
- Line a baking sheet with parchment paper.
- In a skillet, melt 5 tablespoons of butter over medium heat. Add the onion and sauté until translucent.
- Add the green and red bell peppers, remaining 5 tablespoons of butter, white wine, and garlic. Cook until the vegetables are tender, about 4 minutes.
- In a large bowl, combine the crab meat, onion mixture, crushed crackers, panko bread crumbs, red pepper, Old Bay seasoning, salt, and black pepper. Stir to combine.
- Cover the crab mixture and refrigerate for at least 1 hour, or up to 24 hours for enhanced flavor.
- Preheat your oven to 350 degrees Fahrenheit.
- Using a sharp knife, butterfly each shrimp starting at the tail end, and place them on the prepared baking sheet, pressing gently to flatten.
- Form about 3 tablespoons of the crab mixture into a ball and place it on top of each shrimp, pressing the shrimp tail over the crab.
- Repeat with the remaining shrimp and crab mixture.
- Bake in the preheated oven for 10 to 15 minutes until the shrimp are cooked through and the tops are lightly golden.
- Optional: Squeeze fresh lemon juice over the cooked appetizers for a zesty finish.
- Serve immediately to enjoy the best taste and texture.
Tips
- Choose Fresh Ingredients: Use the freshest crab meat and shrimp for the best flavor.
- Chill the Mixture: Refrigerating the crab mixture helps it hold together better when forming the balls.
- Don’t Overstuff: Be gentle when wrapping the shrimp around the crab mixture to prevent tearing.
Variations & Substitutions
Feel free to make this recipe your own by experimenting with these variations and substitutions:
- Spicy Twist: Add more red pepper or a dash of cayenne for extra heat.
- Herbal Infusion: Mix in some fresh herbs like parsley or chives for an aromatic touch.
- Cheesy Delight: Fold in some grated Parmesan cheese into the crab mixture for a rich flavor.
- Alternative Meats: Swap crab meat for chopped lobster or scallops for a different take.
Storage
If you have leftovers (which is rare because they’re so delicious!), store them in an airtight container in the refrigerator for up to 2 days. Reheat in a preheated oven at 350 degrees Fahrenheit until warmed through for best results. Avoid microwaving as it may make the shrimp rubbery.
FAQ
Can I use frozen shrimp?
Yes, you can use frozen shrimp, but make sure to thaw them completely and pat them dry before using to prevent excess moisture from affecting the texture of the dish.
What can I serve with Crab Cake Stuffed Shrimp?
This dish pairs beautifully with a fresh green salad, roasted vegetables, or a light pasta dish. You can also serve it as an appetizer with a dipping sauce like aioli or cocktail sauce.
How do I know when the shrimp are cooked?
The shrimp are done when they turn opaque and pink, and the crab mixture on top is lightly golden. Be careful not to overcook them to maintain a juicy texture.
Nutrition
This dish is a delightful indulgence, rich in protein from the crab and shrimp. While exact nutritional information will vary based on specific ingredients used, it is a good source of omega-3 fatty acids, vitamins, and minerals. For those watching their sodium intake, consider adjusting the amount of Old Bay seasoning and salt.
Conclusion
Crab Cake Stuffed Shrimp is more than just a recipe; it’s a celebration of flavors that brings happiness to the table. Whether you’re recreating cherished family memories or starting new traditions, this dish is bound to be a hit. Share it with loved ones, and let the taste of the sea make your culinary experience unforgettable. Happy cooking!
Related update: Crab Cake Stuffed Shrimp
Related update: Tuna Mexi Melts