Sweet and Spicy Nuts | Made by Meaghan Moineau

Sweet and Spicy Nuts | Made by Meaghan Moineau

Title: Sweet and Spicy Nuts: A Family Tradition with a Fiery Twist
Description: Discover the delightful balance of sweet and spicy flavors in this easy-to-make Sweet and Spicy Nuts recipe. Perfect as an appetizer or a snack, this dish is sure to add a kick to your family gatherings. Reminisce with me as I share a cherished family memory tied to these delectable nuts. Difficulty: 3/10.

---


When I think of Sweet and Spicy Nuts, my mind drifts back to those delightful family gatherings at my grandmother's house. Tucked away in her cozy kitchen, the air was always filled with the comforting aroma of buttery spices, a scent that wrapped around us like a warm hug.


The recipe I'm about to share has become a staple in our family—a perfect blend of sweet and spicy that echoes the warmth of those cherished memories. It's a dish that brings smiles and a bit of nostalgia, as it reminds us of those lively conversations and laughter shared over a bowl of these flavorful nuts.


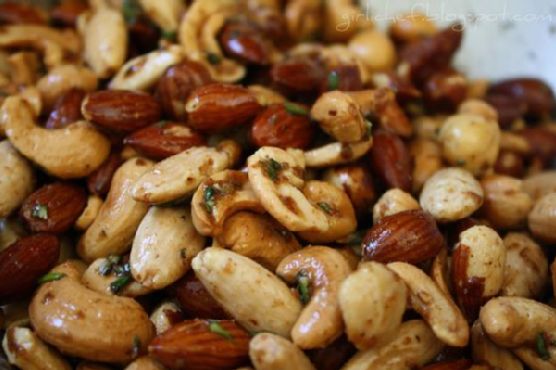
Sweet and Spicy Nuts Recipe
Ingredients:

- 2 tablespoons butter


- 1/2 teaspoon cayenne pepper


- 1/2 teaspoon ground cinnamon


- 1/2 teaspoon ground cumin


- 1/4 cup light brown sugar


- 2 cups mixed nuts (such as walnuts)


- 1 teaspoon salt


- 1 tablespoon water


Instructions:
1. Mix the Spices: In a small bowl, combine the ground cumin, cayenne pepper, ground cinnamon, and salt. Set aside for later use.
2. Toast the Nuts: Heat a dry skillet over medium heat. Add the mixed nuts and cook, stirring frequently, until they begin to toast, about 4 minutes. Transfer the nuts to a small bowl and set aside.
3. Create the Glaze: In the same hot skillet, add the butter, light brown sugar, water, and the spice mixture. Cook, stirring, until a smooth glaze forms, about 1 minute.
4. Coat the Nuts: Return the toasted nuts to the skillet. Toss them in the glaze, ensuring they are well-coated. Cook for an additional 1 to 2 minutes, or until the nuts are glazed and golden brown.
5. Cool and Store: Remove the skillet from the heat and transfer the glazed nuts to a baking sheet lined with aluminum foil. Use a fork to separate them. Allow the nuts to cool until the sugar hardens, about 10 minutes. Store in an airtight container.
A Nostalgic Note:

The tradition of making Sweet and Spicy Nuts started with my grandmother. She had a knack for turning simple ingredients into something magical. As kids, we would gather around her, eyes wide with anticipation, as she tossed the nuts in the sizzling glaze. The aroma was irresistible, and we eagerly waited for them to cool, often sneaking a few warm morsels when she wasn't looking.


These nuts have now become a symbol of our family's togetherness, a dish that travels with us through generations. Whether it's a holiday party or a casual Sunday afternoon, a bowl of Sweet and Spicy Nuts always makes its way to the table, sparking conversations and creating new memories.


Difficulty: 3/10
Category: Appetizer

---


Next time you're looking for a delightful appetizer to impress your guests or just a snack to enjoy on a cozy afternoon, give these Sweet and Spicy Nuts a try. They are sure to add a fiery twist to your gatherings and maybe even inspire a family tradition of your own.

Read more about Appetizers

Read more about Main Dishes

Read more about Desserts

Pink Grapefruit Slaw | Made by Meaghan Moineau

Pink Grapefruit Slaw | Made by Meaghan Moineau

Title: Refreshing Memories: The Joy of Pink Grapefruit Slaw
Description: Discover the vibrant flavors of Pink Grapefruit Slaw, a delightful mix of tangy and sweet that will transport you back to cherished family gatherings. This easy-to-make appetizer is perfect for adding a splash of color and nostalgia to your dining table.

---


A Nostalgic Journey with Pink Grapefruit Slaw

There’s something undeniably soothing about the familiar aroma of a dish that takes you back to simpler times—like the Pink Grapefruit Slaw my grandmother used to make during those long, sun-drenched summer afternoons. As a child, I remember eagerly watching her in the kitchen, marveling at how effortlessly she combined ingredients to create something magical.


The recipe was always a highlight at our family picnics, a beacon of freshness amidst the array of hearty dishes. My grandmother had a knack for infusing love into her cooking, and her Pink Grapefruit Slaw was no exception. The tangy sweetness of the grapefruit paired with the crunch of fresh cabbage and the subtle bite of red onion created a symphony of flavors that danced on our taste buds.


As the adults chatted and the children played, I would sneak into the kitchen to watch her skillfully zest the grapefruit, her hands moving with practiced precision. She would smile at me, her eyes twinkling with a secret only we shared—the joy of creating something beautiful together.


Recipe: Pink Grapefruit Slaw
Ingredients:

- Black pepper


- 1 pink grapefruit


- 2 cups green shredded cabbage


- 2 tablespoons light mayonnaise


- 1 small red onion, thinly sliced


- Salt


- 1-2 teaspoons sugar (to taste)


Instructions:

1. In a small bowl or measuring cup, combine 2 tablespoons of light mayonnaise, 3 tablespoons of fresh grapefruit juice (from just a segment or two), 1-2 teaspoons of sugar, 1 teaspoon of grapefruit zest, salt, and black pepper. Whisk the mixture until it's well blended.


2. In a large bowl, combine 2 cups of shredded green cabbage, the remaining sections of the pink grapefruit, and the thinly sliced red onion.


3. Pour the dressing over the cabbage mixture and toss everything together until it’s well coated.


4. Garnish with parsley if desired, and serve immediately to enjoy the flavors at their peak freshness.


Difficulty: 3/10
Classification: Appetizer

This Pink Grapefruit Slaw is a testament to the beauty of simple, fresh ingredients coming together to create a dish that’s both delicious and nostalgic. Whether you’re preparing it for a family gathering or a solo lunch, this slaw is sure to evoke fond memories and perhaps inspire new traditions for years to come.

Read more about Appetizers

Read more about Main Dishes

Read more about Desserts

Classic French Mussels | Made by Meaghan Moineau

Classic French Mussels | Made by Meaghan Moineau

Title: Unveiling the Elegance of Classic French Mussels: A Taste of Nostalgia
Description: Dive into the heart of French culinary tradition with our Classic French Mussels recipe. Perfectly blending delicate flavors and cultural richness, this dish offers a taste of nostalgia, transporting you to cherished family gatherings. With simple ingredients like dry white wine, fresh parsley, and garlic, this mussel recipe is a delightful appetizer rated 4 out of 10 in difficulty. Relish the harmony of taste and memory as you savor each bite.

---


There’s something inherently comforting about the ritual of preparing a beloved family dish. For me, Classic French Mussels brings back vivid memories of summer evenings spent at my grandmother’s quaint seaside cottage in Brittany, France. The air was always filled with the briny scent of the ocean, mingling with the aroma of garlic and shallots sizzling in olive oil—a sensory symphony that signaled the beginning of a cherished meal.


Ingredients:

- 2 lbs mussels


- 2 tablespoons olive oil


- 2 shallots, finely chopped


- 4 garlic cloves, minced


- 1 cup dry white wine


- 1/2 cup low-fat buttermilk


- 2 tablespoons unsalted light butter


- 1/4 cup fresh parsley, chopped


- Kosher salt to taste


Instructions:
1. Prepare the Mussels: Begin by scrubbing the mussels under cold water with a stiff brush. Discard any mussels that remain open or have broken shells. Soak them in cool, clean water for at least an hour to allow them to expel any sand.
2. Remove the Beards: Locate the small fibrous "beard" on each mussel and pull it out toward the hinge of the shell to avoid injuring the mussel.
3. Cook the Aromatics: In a large pot, heat the olive oil over medium-high heat. Add the shallots and garlic, cooking until soft and fragrant, approximately 5 minutes.
4. Combine Ingredients: Add the mussels to the pot, followed by the wine, buttermilk, butter, and parsley. Season generously with kosher salt. Stir well to combine all ingredients.
5. Steam the Mussels: Cover the pot and allow the mussels to cook for 10 to 15 minutes, or until they have opened and are cooked through.
6. Serve: Divide the mussels and the flavorful juices between two bowls. Serve immediately with crusty whole-grain bread to soak up the delectable sauce.

This dish, a testament to the simplicity and elegance of French cuisine, is the perfect appetizer for any occasion. It’s rated a 4 out of 10 in difficulty, making it accessible even for those new to cooking mussels.


As I watch the mussels gently open in the pot, I’m reminded of those magical evenings in Brittany, where laughter echoed around the dinner table, and the warmth of family togetherness was as nourishing as the meal itself. Today, I carry on this tradition, serving Classic French Mussels to my own family, creating new memories while honoring the old.


Savor the rich flavors and let this dish transport you to a place of warmth, love, and tradition. Bon appétit!

Read more about Appetizers

Read more about Main Dishes

Read more about Desserts

Corn Avocado Salsa | Made by Meaghan Moineau

Corn Avocado Salsa | Made by Meaghan Moineau

Title: A Taste of Summer: Corn Avocado Salsa with a Nostalgic Twist
Description: Dive into a vibrant blend of flavors with our Corn Avocado Salsa recipe. This appetizer is not only a feast for the senses but also a trip down memory lane, filled with family gatherings and summer nostalgia.

---


As the summer sun casts its golden glow over lush gardens and bustling farmers' markets, there's one dish that never fails to capture the essence of the season for me: Corn Avocado Salsa. This vibrant, flavorful appetizer is more than just a recipe; it's a cherished family tradition that brings back fond memories of sun-drenched days and laughter-filled evenings.


Ingredients:

- 1 ripe avocado


- 1 tablespoon balsamic vinegar


- 1 teaspoon cumin


- 1 can of frozen corn, drained


- 1 clove garlic, finely chopped


- 1 red bell pepper, finely chopped


- Olive oil spray


Instructions:

1. Preheat your oven to 375 degrees Fahrenheit.


2. Spread the drained corn evenly on a baking sheet and lightly spray with olive oil.


3. Roast the corn in the oven for about 8-10 minutes, ensuring it doesn't brown too much or burn. Once done, remove from heat and allow it to cool.


4. In a large bowl, combine the finely chopped red pepper and garlic.


5. Peel, coarsely chop the avocado, and add it to the bowl along with the cooled corn.


6. Sprinkle in the cumin and drizzle the balsamic vinegar over the mixture, blending well to ensure all ingredients are evenly coated.


Difficulty Rating: 3/10
Classification: Appetizer

---


The true magic of Corn Avocado Salsa lies not only in its exquisite taste but also in the memories it evokes. Every time I prepare this dish, I'm transported back to my grandmother's kitchen, where the aroma of roasting corn mingled with the laughter of cousins gathered around the table. Grandma always insisted on using the freshest ingredients, and her secret was roasting the corn just to the right point where it retained its sweetness without losing its crispness.


Our family would often gather in the backyard, surrounded by towering sunflowers and the melodious chirping of crickets. Grandma would bring out a large bowl of her famous salsa, and we'd snack on it with tortilla chips, savoring each bite as the sun dipped below the horizon. It was during these moments that I learned the importance of good food and even better company.


Today, I continue this tradition with my own family, and with every bite of Corn Avocado Salsa, I'm reminded of those warm, joyful gatherings. This recipe is more than just a culinary delight; it's an invitation to pause, savor, and create lasting memories with loved ones. So, as you prepare this dish, I hope it brings as much warmth and happiness to your table as it has to mine.


Whether you're hosting a summer barbecue or simply looking to indulge in a refreshing appetizer, Corn Avocado Salsa is sure to impress. Enjoy the blend of creamy avocado, sweet roasted corn, and the subtle kick of cumin, and let it transport you to your own cherished memories.

Read more about Appetizers

Read more about Main Dishes

Read more about Desserts

Focaccia with Tomato, Green Onion and Garlic | Made by Meaghan Moineau

Focaccia with Tomato, Green Onion and Garlic | Made by Meaghan Moineau

Title: Aromatic Bliss: Crafting Focaccia with Tomato, Green Onion, and Garlic
Description: Dive into the heartwarming world of homemade focaccia with this delightful recipe featuring tomatoes, green onions, and garlic. Perfect for a cozy family gathering, this dish is a blend of simplicity and flavor, evoking cherished memories while elevating your culinary skills. Whether you're a seasoned chef or a kitchen novice, this guide will walk you through each aromatic step, ensuring a perfect bake every time. Difficulty: 6/10. Category: Appetizer.

---


The Aroma of Tradition: Focaccia with Tomato, Green Onion, and Garlic


There’s something inherently nostalgic about the wafting aroma of freshly baked focaccia. For me, it conjures up memories of Sunday afternoons in my grandmother's sunlit kitchen, where the comforting scent of bread mingled with laughter and stories.


Ingredients:

- Coarse salt

- Flour


- 1 garlic clove, minced


- 1 green onion, chopped


- Olive oil


- Dried oregano


- Grated Parmesan cheese


- 1 tablespoon sugar


- 1 cup diced tomatoes


- 1 cup warm water


- 2 teaspoons quick-rising yeast


Instructions:


1. Proof the Yeast:

Begin by awakening the yeast. In a small bowl, combine the quick-rising yeast with warm water and sugar. Gently stir to dissolve the ingredients and let it stand for about 3 minutes until it turns foamy—a sign that your yeast is ready to work its magic.


2. Form the Dough:

In a large bowl, create a well in the center of the flour. Dissolve the salt in a few tablespoons of water in a separate small bowl, then add it to the flour alongside the yeast mixture. Pour in the olive oil. Using your hands and a spatula, mix everything together until you form a dough. Knead diligently for 10 minutes, adding a bit of flour as needed, until the dough is smooth and pliable.


3. Let It Rise:

Shape the dough into a round ball. Lightly coat it with olive oil, cover with a thick towel, and let it rest in a warm spot. Allow it to rise until it doubles in size, approximately 45 minutes to an hour.


4. Prepare the Baking Sheet:

Coat a baking sheet with olive oil and generously sprinkle cornmeal over the entire pan. Once the dough has risen, place it on a floured surface, punch it down 3-4 times, and let it stand for a few minutes.


5. Shape and Rest:

Roll and stretch the dough into an oblong shape about 1/2 inch thick. Transfer it to the prepared baking sheet, cover with plastic wrap, and let it rest for 15 minutes.


6. Preheat and Prepare Toppings:

Preheat your oven to 400°F. Once the dough has rested, use your fingers to poke small wells all over its surface. Brush with olive oil, then evenly sprinkle on dried oregano, chopped green onion, diced tomatoes, and minced garlic. Top with coarse salt and a generous layer of grated Parmesan cheese.


7. Bake to Perfection:

Place the focaccia on the bottom rack of your oven and bake for 20 minutes, keeping a close eye as the baking time comes to an end, to achieve a golden, crispy crust.


---


A Slice of Memory

Baking this focaccia is more than just a culinary endeavor; it’s a journey back to my childhood. I remember my grandmother, her hands dusted with flour, guiding me through the steps while sharing tales of her own mother’s kitchen adventures. The kitchen was our sanctuary, where time seemed to pause, and the simple act of kneading dough became a bridge between generations.


Every bite of this focaccia is a reminder of those cherished Sundays. The tang of tomatoes, the sharpness of green onions, and the warmth of garlic all blend into a melody of flavors that never fails to bring a smile.


Difficulty: 6/10
Category: Appetizer

This focaccia recipe is perfect for those seeking to explore the art of bread-making while indulging in a flavorful appetizer that resonates with nostalgia and warmth. Whether you're recreating family memories or crafting new ones, this dish is sure to become a beloved staple at your table.

Read more about Appetizers

Read more about Main Dishes

Read more about Desserts

Fig, Apple, and Arugula Salad | Made by Meaghan Moineau

Fig, Apple, and Arugula Salad | Made by Meaghan Moineau

Title: A Taste of Nostalgia: Fig, Apple, and Arugula Salad
Description: Dive into the nostalgic flavors of a Fig, Apple, and Arugula Salad, a dish that combines the natural sweetness of figs and apples with the peppery bite of arugula. This recipe is not just a treat for the taste buds but also a journey down memory lane, bringing back cherished family moments. Discover how the blend of simple ingredients can create a symphony of flavors in your mouth. Perfect as an appetizer, this salad rates a 3 out of 10 in difficulty, making it accessible to chefs of all levels.

---


Growing up, Sunday afternoons at my grandmother's house were a cherished family tradition. The kitchen was always abuzz with the sounds of laughter, clinking pots, and the aromatic promise of delicious meals. One of my favorite dishes from those days was a simple yet unforgettable Fig, Apple, and Arugula Salad. It was a dish that my grandmother always prepared with a twinkle in her eye, knowing it was a family favorite.


The magic of this salad lies in its harmonious balance of flavors. The peppery bite of arugula, also known as roquette lettuce, forms the base of the dish, offering a fresh and slightly bitter contrast to the sweetness of ripe figs and crisp apples. My grandmother always insisted on using the juiciest apples and perfectly ripe figs, ensuring each bite was a burst of natural sweetness.


To add a touch of vibrant color and a hint of spice, she would include slices of red and green peppers, their crunch adding another layer of texture to the salad. The dressing was a simple yet elegant concoction of olive oil, maple syrup, fresh rosemary, and a pinch of sumac powder. This combination brought a delightful zesty tang, enhancing the flavors without overpowering the natural taste of the fruits and vegetables.


The process was straightforward: chop the fruits and vegetables into bite-sized morsels and combine them in a large bowl. The dressing, a masterpiece of simplicity, was reserved until the very moment we were ready to eat, ensuring the salad remained crisp and fresh.


As I recreate this dish today, the memories come flooding back—sitting around the table, sharing stories, and relishing the taste of a salad that was much more than just a dish; it was a symbol of family, love, and tradition.


This Fig, Apple, and Arugula Salad is classified as an appetizer, perfect for whetting the appetite before a main course. With a difficulty rating of just 3 out of 10, it's an easy and delightful way to bring a touch of nostalgia to your table. Whether you're preparing it for a family gathering or a quiet dinner at home, this salad is sure to be a hit, just as it was in my grandmother's kitchen so many years ago.


For those interested in seeing the dish in all its vibrant glory, you can find a photo of the salad [here](http://rawgirlinmumbai.blogspot.com/2011/01/fig-apple-and-roquette-salad.html). Enjoy crafting this beautiful and flavorful dish that is as much a feast for the eyes as it is for the palate.

Read more about Appetizers

Read more about Main Dishes

Read more about Desserts

Vegetarian Christmas wreath | Made by Meaghan Moineau

Vegetarian Christmas wreath | Made by Meaghan Moineau

Title: A Festive Delight: Crafting a Vegetarian Christmas Wreath
Description: Embrace the holiday spirit with this delightful Vegetarian Christmas Wreath, a vibrant and healthy appetizer that elevates your festive table. Packed with fresh broccoli, juicy cherry tomatoes, and creamy cheese, this dish isn't just a feast for the eyes; it's a nostalgic journey back to cherished family gatherings. Discover the secrets to creating this culinary masterpiece and bring a touch of warmth and color to your Christmas celebrations.

---


As the holiday season approaches, many of us find ourselves reminiscing about the cherished memories and traditions that make this time of year so special. For me, one dish that encapsulates the joy of Christmas is the Vegetarian Christmas Wreath. Not only is it a visual masterpiece, but its fresh and savory flavors bring back memories of family gatherings filled with laughter and warmth.


A Nostalgic Journey

Every Christmas, my family would gather in my grandmother’s cozy kitchen, the heart of our home during the festive season. My grandmother, a culinary wizard in her own right, introduced us to the Vegetarian Christmas Wreath when I was a child. The dish became an instant favorite, not just for its vibrant colors and enticing flavors, but for the way it brought us all together. I recall the bustling kitchen, the aroma of fresh vegetables, and the joyous chatter as we eagerly awaited the unveiling of our family’s festive wreath.


Creating the Wreath:

To recreate this delightful appetizer, you'll need a handful of simple yet flavorful ingredients: fresh broccoli florets, juicy cherry tomatoes, creamy cheese, a crisp red bell pepper, tangy cream cheese, mayonnaise, dried dill, dried garlic, savory olives, and a fresh scallion for garnish.


1. Blanching the Broccoli: Start by washing the broccoli and cutting the florets into bite-sized pieces. Fill a large pan with water and bring it to a boil. Once boiling, add the broccoli florets. While they're cooking, prepare a bowl filled with ice water. After two minutes of boiling, swiftly transfer the broccoli to the ice water to preserve its vibrant green color.
2. Preparing the Dip: As the broccoli cools, combine the cream cheese, mayonnaise, dried dill, and dried garlic to create a creamy dip. Let it chill in the fridge for at least three hours to allow the flavors to meld beautifully.
3. Assembling the Wreath: On a large white plate, place a ramekin at the center for the dip. Arrange the broccoli florets around the ramekin to form the wreath, adding cherry tomatoes for bursts of color. Use star-shaped cookie cutters to slice the cheese into festive shapes, and strategically place them on the wreath. Finally, cut the red bell pepper into strips to craft a decorative ribbon, completing your edible masterpiece.
Buon Appetito!

Serving this dish is not merely about enjoying a delicious appetizer; it's about creating an experience that brings loved ones together, evoking fond memories and starting new traditions. Whether you're hosting a grand feast or a cozy family dinner, the Vegetarian Christmas Wreath is sure to impress and delight.


Difficulty Rating: 5/10
Classification: Appetizer

This dish requires a bit of preparation but is straightforward enough for cooks of all abilities. Its simplicity is part of its charm, allowing you to enjoy the creative process without stress.


As you gather with family and friends this holiday season, consider adding the Vegetarian Christmas Wreath to your menu. It's a dish that symbolizes togetherness, joy, and the spirit of Christmas, reminding us that the best ingredients in any recipe are love and laughter.

Read more about Appetizers

Read more about Main Dishes

Read more about Desserts

Creamy Tomato Soup | Made by Meaghan Moineau

Creamy Tomato Soup | Made by Meaghan Moineau

Warm Memories in a Bowl: Creamy Tomato Soup Recipe


Description:

Indulge in the comforting embrace of our Creamy Tomato Soup, a soul-warming recipe that marries the richness of tomatoes with a creamy smoothness, creating a symphony of flavors that dance on your taste buds. This delightful dish is perfect for cozy evenings and family gatherings, where stories and laughter are shared over steaming bowls of soup. This Appetizer, rated a 4 out of 10 for difficulty, is sure to become a staple in your culinary repertoire.

---


Ingredients:

- 1 tablespoon olive oil

- 1 diced onion


- 1 teaspoon fresh dried basil


- 1 teaspoon fresh dried thyme


- Salt to taste


- Black pepper to taste


- 2 cans diced tomatoes


- 2 tablespoons tomato paste


- 1/4 cup all-purpose flour


- 3 cups chicken broth, divided


- 1 tablespoon Splenda


- 1 cup evaporated milk


---


Instructions:

1. Sauté the Aromatics: In a large saucepan, heat the olive oil over medium heat. Add the diced onion, basil, thyme, salt, and black pepper. Cook, stirring occasionally, until the onion is tender and golden.
2. Simmer the Tomatoes: Add the diced tomatoes and tomato paste to the saucepan. Stir well and let the mixture simmer for about 10 minutes, allowing the flavors to meld together.
3. Thicken the Base: In a small bowl, whisk together the flour and 1/4 cup of chicken broth until smooth. Stir this mixture into the tomato mixture, ensuring it is well blended.
4. Create the Soup: Add the remaining chicken broth to the saucepan. Let the soup simmer for 30 minutes, stirring frequently to prevent sticking.
5. Blend to Perfection: Use an immersion blender to puree the soup until smooth.
6. Finish with Creaminess: Stir in the Splenda and evaporated milk. Heat through before serving.

---


A Nostalgic Family Memory:


Growing up, our family kitchen was the heart of our home, a place where the aroma of delicious meals would draw us together. I vividly recall a chilly autumn evening when my grandmother decided to make her famous Creamy Tomato Soup. The air outside was crisp, and the leaves painted the ground in hues of gold and red. Inside, the kitchen was warm with the smell of onions sautéing in olive oil, a scent that always signaled something special was brewing.


As we gathered around the table, bowls steaming with the rich, creamy soup, my grandmother regaled us with stories of her childhood. She spoke of simpler times, of a little kitchen in her hometown where tomato soup was a cherished tradition. With each spoonful, we were not just savoring a meal but also connecting with our roots and the love that spanned generations.


Even now, whenever I prepare this Creamy Tomato Soup, I am transported back to that evening, to the laughter and warmth of family. This recipe is more than just a dish; it's a vessel of memories, a reminder of the love that binds us all together.


---


Bring a taste of nostalgia and warmth to your table with this Creamy Tomato Soup. Perfect for nourishing both body and soul, it's a dish that invites you to create new memories while cherishing the old.

Read more about Appetizers

Read more about Main Dishes

Read more about Desserts

Shrimp and Lemongrass Soup | Made by Meaghan Moineau

Shrimp and Lemongrass Soup | Made by Meaghan Moineau

Title: A Taste of Home: Crafting the Perfect Shrimp and Lemongrass Soup
Description: Dive into a bowl of nostalgia with our Shrimp and Lemongrass Soup, a fragrant and flavorful dish that brings family memories to life. Learn how to make this delightful appetizer that combines the freshness of lemongrass with succulent shrimp, all in a soothing broth that’s sure to warm your soul.

---


There’s something inherently comforting about a bowl of soup that’s been simmered to perfection. For me, Shrimp and Lemongrass Soup is more than just a delicious appetizer; it’s a cherished family tradition that transports me back to my childhood kitchen, where the aromatic scent of lemongrass and the sound of gentle simmering were constants in our home.


Growing up, weekends meant family gatherings filled with laughter and the clinking of spoons against bowls. My grandmother, a culinary genius in her own right, would often whip up her signature Shrimp and Lemongrass Soup. The kitchen was her domain, and I vividly remember watching her expertly slice the lemongrass, her face a picture of concentration and love.


The process of crafting this soup is a labor of love, yet surprisingly simple. Here’s how you can recreate this heartwarming dish:

Ingredients:


- Raw shrimp (shells reserved)


- Lemongrass stems


- Scallion


- Bean sprouts


- Lime juice


- Carrot


- Daikon


- Chicken stock


- Fresh mint for garnish


Instructions:


1. Start by cutting off the white part of the lemongrass stems, saving the tops for later use. Slice the white part into inch-long pieces and gently flatten them with a knife to release their full flavor.


2. In a large stockpot, bring chicken stock to a boil. Add the flattened lemongrass stems and reserved shrimp shells, allowing them to simmer for 2 minutes. This step infuses the stock with a rich, aromatic base.


3. After simmering, set the stock aside to allow the flavors to meld. Strain the stock to remove the lemongrass and shrimp shells, then return the clear, aromatic liquid to the stockpot.


4. Slice the remaining lemongrass stem and finely chop it. Add this to the stock along with the raw shrimp, allowing it to simmer for 3-4 minutes until the shrimp turn a beautiful pink hue.


5. Stir in the lime juice, scallions, bean sprouts, sliced carrots, and daikon. Mix well, ensuring each ingredient is lovingly coated in the flavorful broth. Season to taste with salt and pepper.


6. Serve the soup hot, garnished with fresh mint leaves for an added burst of freshness.


A Trip Down Memory Lane


As a child, I would sit at the kitchen table, eagerly awaiting my bowl of soup. The first sip was always magical—a harmonious blend of tangy lime, aromatic lemongrass, and the subtle sweetness of shrimp. It was a dish that brought our family together, each spoonful a reminder of love and tradition.


This Shrimp and Lemongrass Soup is rated a 4 out of 10 on the difficulty scale, making it an approachable recipe for both novice and seasoned cooks. As an appetizer, it pairs beautifully with a variety of main courses, yet stands confidently on its own as a star dish at any dinner table.


So, gather your ingredients, put on your apron, and invite a little nostalgia into your kitchen. This Shrimp and Lemongrass Soup isn’t just about flavor—it’s about creating memories and sharing a piece of my family’s heritage with yours. Bon appétit!

Read more about Appetizers

Read more about Main Dishes

Read more about Desserts

Winter Kimchi | Made by Meaghan Moineau

Winter Kimchi | Made by Meaghan Moineau

Title: Embrace the Cold: Crafting Winter Kimchi to Warm Your Soul
Description: Discover the art of making Winter Kimchi, a cherished family recipe that combines tradition, flavor, and nostalgia. Dive into this step-by-step guide to creating a tangy, spicy delight that’s perfect for warming up those chilly winter days.

---


As the frost begins to lace the windows and winter's chill settles in, there’s nothing quite like the comforting embrace of a traditional dish that warms you from the inside out. For my family, that dish has always been Winter Kimchi. Its bold flavors and vibrant colors have long been a staple at our table, bringing both warmth and a touch of spice to our coldest months.


Ingredients:

- 1 large napa cabbage, quartered


- Brine solution (water with salt)


- 1 bowl of cooked rice


- 1 radish, julienned


- 2 spring onions, chopped


- 1 bulb of garlic, cloves separated


- 1 tablespoon of sugar


- 2 tablespoons of Korean gochujang paste


- 1 tablespoon of chili flakes


- 1 can of fermented baby shrimps or cincalok


- 2 tablespoons of fish sauce


Instructions:

1. Begin by soaking the quartered napa cabbage in a brine solution for 4 hours. To ensure even soaking, weigh the cabbage down with a heavy plate.


2. Once the cabbage is well-brined, remove it from the solution and drain thoroughly.


3. In a food processor, combine the garlic cloves, cooked rice, fermented shrimp, fish sauce, sugar, gochujang paste, and chili flakes. Blend until you achieve a smooth paste.


4. Stir in the chopped spring onions into the paste to add a fresh, vibrant note.


5. Carefully stuff the napa cabbage with the spicy paste, making sure to get in between the individual leaves and coating every inch of the cabbage thoroughly.


6. Place your stuffed cabbage into an airtight container. Allow the kimchi to sit at room temperature for a day, then transfer it to the fridge to ferment for at least a week. For the best flavor, I recommend waiting around three weeks before diving in.


A Taste of Nostalgia:

Every winter, as the first snowflakes began to fall, my grandmother would gather the family around the kitchen table for the annual kimchi-making ritual. The kitchen would be filled with the pungent aroma of garlic and spices, mingling with the laughter and chatter of loved ones. As a child, I would watch in awe as my grandmother's skilled hands expertly layered the fiery red paste between the cabbage leaves, transforming simple ingredients into a dish that was nothing short of magical.


For us, Winter Kimchi was more than just food—it was a connection to our heritage, a symbol of resilience against the winter cold, and a reminder of the warmth of family bonds. Each bite was a sensory journey, a dance of flavors that told stories of the past and hopes for the future.


Difficulty: 6/10
Classification: Appetizer

Creating Winter Kimchi is a delightful adventure that marries tradition with creativity. Whether you're new to kimchi-making or a seasoned pro, the experience is both rewarding and deeply satisfying. As you savor each spicy, tangy bite, may it bring you as much warmth and joy as it has brought my family over the years.

Read more about Appetizers

Read more about Main Dishes

Read more about Desserts

Nachos Grande | Made by Meaghan Moineau

Nachos Grande | Made by Meaghan Moineau

Title: Nachos Grande: A Flavorful Journey to Family Gatherings


Description:

Explore the vibrant, tantalizing flavors of Nachos Grande—a dish that not only brings a delightful burst of taste to your table but also serves as a nostalgic trip down memory lane. Perfect for gatherings, this crowd-pleaser is a sure way to impress your guests with its rich, spicy notes and mouth-watering cheese melt. Discover a beloved family recipe that's both heartwarming and satisfying.

---


Recipe: Nachos Grande


Ingredients:

- 1 can of tomatoes

- 1 cup of cheddar cheese, shredded


- 1 tablespoon chili powder


- 2 tablespoons corn oil


- 2 garlic cloves, minced


- 1 green bell pepper, chopped


- 1 green fresh chili, diced


- 1 teaspoon ground cumin


- 1 onion, chopped


- 1 teaspoon paprika, plus extra for garnish


- 1 can of refried beans


- 1 bag of tortilla chips


- 1/2 cup of water


Instructions:

1. Sauté the Veggies: Heat corn oil in a skillet over medium heat. Add chopped onion, green bell pepper, and minced garlic. Sauté gently, stirring occasionally for about 5 minutes, until the vegetables are softened but not browned.
2. Cook the Sauce: Add canned tomatoes and fresh green chili to the skillet. Continue to cook over medium heat for another 5 minutes, allowing most of the liquid to evaporate.
3. Spice it Up: Stir in chili powder and paprika, cooking for an additional 3 minutes to let the spices bloom.
4. Prepare the Beans: Add the refried beans, breaking them up with a fork. Pour in the water and cook, stirring occasionally, for 8-10 minutes until the mixture thickens.
5. Assemble and Bake: Spoon the bean mixture into the center of a baking dish. Arrange tortilla chips around the edge and sprinkle with ground cumin. Generously distribute the shredded cheddar cheese over the beans and chips.
6. Final Touch: Bake at 400°F (200°C) for 15-20 minutes, or until the cheese is irresistibly melted. Garnish with a lattice pattern of paprika for a splash of color and serve immediately.

---


A Nostalgic Family Memory:


Nachos Grande has always been more than just a dish in our family; it’s a cherished tradition. Every summer during our annual family reunion, the kitchen would come alive with the vibrant aroma of spices and sizzling vegetables. My grandmother, the heart of our family, would orchestrate this culinary symphony, inviting us to join her in the kitchen.


We would gather around the table in anticipation, as the tantalizing scent of melting cheddar wafted through the air. The Nachos Grande would emerge from the oven, cheese bubbling and edges crisp, a masterpiece of flavors waiting to be devoured. As we dug in, laughter and stories filled the room, and each bite seemed to carry a piece of our shared history. To this day, the taste of Nachos Grande brings me back to those joyful gatherings, a delicious reminder of the love and connection that binds us.


---


Difficulty Rating: 4/10

Classification: Appetizer


Creating Nachos Grande is both a simple and rewarding experience, making it an excellent choice for those looking to whip up a quick yet impressive appetizer. Its vibrant flavors and ease of preparation make it a staple for any get-together, ensuring your guests enjoy a meal that's as memorable as it is delicious.

Read more about Appetizers

Read more about Main Dishes

Read more about Desserts

Smashed Fried Lemon Potatoes | Made by Meaghan Moineau

Smashed Fried Lemon Potatoes | Made by Meaghan Moineau

Title: Savoring Tradition: Smashed Fried Lemon Potatoes for Every Occasion
Description: Dive into a culinary journey with our Smashed Fried Lemon Potatoes, a dish that blends simplicity with rich flavors, delivering a perfect bite every time. This appetizer is a delightful mix of golden-brown fingerling potatoes, infused with the freshness of lemon zest and herbs. With a difficulty rating of 4/10, it's an easy yet impressive addition to any meal.

---


Smashed Fried Lemon Potatoes: A Nostalgic Delight


The kitchen was always the heart of our home. I remember the clatter of pots and the fragrant wafts of herbs and spices that filled the air, forming an invisible tether to my family's culinary heritage. Among the myriad of recipes passed down through generations, there was one dish that stood out, not just for its vibrant flavors but for the memories it carried with it—Smashed Fried Lemon Potatoes.


Ingredients:

- Fingerling potatoes


- Italian fresh flat-leaf parsley


- Fresh rosemary


- Fresh thyme leaves


- Garlic cloves, end core removed


- Lemon juice


- Lemon zest


- Olive oil


- Red wine vinegar


- Sea salt


Instructions:
1. Prepare the Potatoes: Start by placing well-scrubbed fingerling potatoes in a large pot of salted water. Bring them to a boil and let them cook until tender, about 20 minutes. Once cooked, drain and rinse with cold water to stop the cooking process.
2. Smash and Fry: Using the palm of your hand or the back of a large spatula, gently press the potatoes until slightly smashed. In a large skillet, heat olive oil over medium-high heat. Add the garlic cloves and cook until they are slightly brown, infusing the oil with their robust flavor. Remove the garlic and set it aside. Introduce the potatoes to the skillet, allowing them to cook without stirring for about 5 to 10 minutes, until the bottoms achieve a golden-brown crust. Flip them using a spatula or tongs, and continue cooking for another 5 to 8 minutes.
3. Create the Dressing: In a bowl, whisk together lemon zest, lemon juice, olive oil, rosemary, parsley, thyme, red wine vinegar, and a pinch of sea salt.
4. Combine and Serve: Transfer the crispy potatoes to a plate and drizzle them with the lemon-herb dressing. Toss gently to coat, ensuring each potato is enveloped in the zesty mixture.
A Family Tradition:

Growing up, every Sunday afternoon was reserved for family gatherings. My grandmother, the matriarch of our family, would preside over her bustling kitchen, orchestrating meals that were both a feast for the palate and a balm for the soul. Smashed Fried Lemon Potatoes were a staple at these gatherings, their crispiness and citrusy aroma evoking a sense of warmth and togetherness.


I remember one particular Sunday when my cousins and I, tasked with the simple job of smashing the potatoes, turned it into a playful competition. Our laughter echoed through the kitchen as we took turns, trying to perfect the art of smashing without breaking the potatoes entirely. My grandmother watched us with a twinkle in her eye, knowing that these moments were about more than just cooking. They were about creating memories that would linger long after the last potato was devoured.


Conclusion:

Smashed Fried Lemon Potatoes is not just a dish; it's a testament to the power of food to bring people together, to forge connections, and to create lasting memories. With its easy preparation and delightful flavors, this appetizer is sure to become a cherished addition to your family’s culinary repertoire. Whether you're hosting a dinner party or simply looking to add a touch of nostalgia to your meal, this recipe promises to deliver a taste of tradition with every bite.

Read more about Appetizers

Read more about Main Dishes

Read more about Desserts

Rosemary Walnut Bread | Made by Meaghan Moineau

Rosemary Walnut Bread | Made by Meaghan Moineau

Title: Aromas of Nostalgia: A Family’s Journey with Rosemary Walnut Bread


Description:

Dive into the heartwarming story of how Rosemary Walnut Bread became a cherished family tradition. With its savory aroma, this delightful bread brings together the richness of walnuts and the earthy fragrance of rosemary. Perfect for both novice and seasoned bakers, this recipe will become a staple in your kitchen. Rated 6/10 in difficulty, this bread is a versatile addition to any meal, classified as an appetizer or a delightful side. Join us as we share the secret to creating this flavorful, memory-laden bread.

---


The Story Behind the Bread


There's something magical about the aroma of freshly baked bread wafting through a home. It's a scent that can transport you back in time, evoking fond memories and warming the heart. For my family, Rosemary Walnut Bread is not just a recipe; it's a cherished tradition that ties generations together.


I remember my grandmother's kitchen, a cozy haven where laughter and the scent of baking bread filled the air. Every Sunday, she would don her well-worn apron and begin the ritual of making Rosemary Walnut Bread. As a child, I would watch, fascinated as she combined cream cheese, dry yeast, and eggs with care, adding honey for a subtle sweetness and lemon zest for a hint of freshness. Her hands moved with a practiced grace, transforming simple ingredients into a masterpiece.


Once the dough was mixed, she'd cover it with a damp cloth and let it rest in a warm spot, allowing the yeast to weave its magic. The anticipation built as the dough rose, filling the kitchen with its comforting aroma. The real fun began when it was time to knead. Grandma would guide my small hands through the process, our laughter mingling with the rhythmic sound of dough hitting the floured surface.


The addition of aromatic rosemary and crunchy walnuts brought the bread to life, infusing it with a unique flavor that was both earthy and robust. Grandma would form the dough into two leaf-shaped loaves, a tradition passed down from her mother. As the bread baked, the irresistible scent filled the house, drawing family members to the kitchen like moths to a flame.


Once baked, the bread would rest for a tantalizing twenty minutes. Those moments felt like an eternity to my younger self, but the wait was always worth it. The first slice, still warm, was a revelation of flavors and textures, a perfect harmony of chewy, nutty, and fragrant notes.


The Recipe: Rosemary Walnut Bread


Ingredients:

- 4 oz cream cheese

- 2 1/4 tsp dry yeast


- 2 eggs, plus 1 for brushing


- 4 cups flour


- 2 tbsp honey


- 1 tsp lemon zest


- 1 cup milk


- 2 tbsp olive oil


- 1 tbsp chopped fresh rosemary


- 1 tsp salt


- 1 cup chopped walnuts


Instructions:


1. Combine Ingredients: In a large bowl, combine cream cheese, dry yeast, 2 eggs, flour, honey, lemon zest, and milk. Stir well to blend.
2. Activate Yeast: Add the yeast to the mixture and let it stand for about 5 minutes until it becomes frothy.
3. Initial Rise: Stir in two cups of flour, cover with plastic wrap, and place in a warm spot (approximately 85°F) for 15 minutes.
4. Knead Dough: Add remaining flour, walnuts, lemon zest, rosemary, and salt to the bowl. Mix until the dough begins to come together. Transfer to a floured surface and knead for about 10 minutes.
5. First Proof: Rub the top of the dough with olive oil and place it in an oiled bowl. Cover with a damp cloth and let it rise for 1 hour.
6. Shape Loaves: Return the dough to the floured surface and divide it into two portions. Shape each into a leaf form and place on a baking sheet.
7. Prepare for Baking: Make three diagonal slashes on each loaf, about 1/4 inch deep. Brush the tops with beaten egg.
8. Final Rise and Bake: Let the loaves rise for another 30 minutes. Preheat the oven to 375°F and bake for 40 minutes.
9. Cool and Enjoy: Allow the bread to stand for 20 minutes before slicing, or as long as you can resist the tempting aroma.

This Rosemary Walnut Bread is a beautiful way to bring tradition and flavor into your home. Whether served as an appetizer or alongside a main dish, it’s sure to become a family favorite. Enjoy the process, the scent, and most importantly, the memories you’ll create with this delightful bread.

Read more about Appetizers

Read more about Main Dishes

Read more about Desserts

Best Potato Cheese Soup in a bread bowl | Made by Meaghan Moineau

Best Potato Cheese Soup in a bread bowl | Made by Meaghan Moineau

Warm Comfort in a Bread Bowl: The Best Potato Cheese Soup Recipe


Description:

Dive into a bowl of pure comfort with our Best Potato Cheese Soup, served in a warm, crusty bread bowl. This hearty dish combines creamy textures and rich flavors, making it the ultimate comfort food for chilly days. Infused with the savory goodness of Velveeta and sharp cheddar, and topped with crispy bacon crumbles, this soup is a nostalgic nod to cozy family gatherings. Perfect for both a luxurious appetizer or a satisfying main dish.

Ingredients:

- 2 tablespoons olive oil

- 1 sweet diced onion


- 2 cloves garlic, minced


- 4 cups chicken stock


- 2 cups water


- 1 teaspoon salt


- 4 cups red potatoes, diced


- 2 cups carrots, diced


- 2 cups whole milk


- 1 cup heavy cream


- 2 tablespoons butter


- 1 block Velveeta cheese, cubed


- 2 cups shredded sharp cheddar cheese


- Salt and pepper to taste


- Garnishes: Bacon crumbles, chives, sour cream, shredded Parmesan cheese


Instructions:

1. Sauté Aromatics: In a large heavy stock pot, heat 2 tablespoons of olive oil over medium heat. Add the diced onion and cook until translucent, about 2-3 minutes. Add minced garlic and sauté for another minute until fragrant.
2. Create the Base: Pour in the chicken stock, water, and salt. Stir well, then add the diced red potatoes and carrots. Bring the mixture to a boil and cook until the potatoes are fork-tender.
3. Blend and Thicken: Turn off the heat and let the soup cool slightly. Remove about half of the potatoes with a slotted spoon and blend them into a smooth paste in a food processor or blender. Return the potato paste to the pot, mixing thoroughly.
4. Add Creaminess: Place the stock pot back on medium heat. Add the whole milk, heavy cream, butter, and Velveeta cheese. Stir continuously until the butter and cheese have melted, making sure the soup does not reach a boil. Reduce heat to low as it nears boiling.
5. Enhance with Cheese: Gradually add the shredded sharp cheddar, one handful at a time, stirring each time until melted. Stir in the Parmesan cheese. Season with additional salt and pepper to taste, keeping in mind the saltiness of the cheeses.
6. Serve with Style: Ladle the warm, creamy soup into bread bowls or regular bowls. Garnish with crispy bacon crumbles, fresh chives, a dollop of sour cream, and a sprinkle of shredded Parmesan cheese.

A Nostalgic Bite:

Every spoonful of this potato cheese soup brings back cherished memories of family dinners at my grandmother's house. On chilly winter evenings, her kitchen was a haven of warmth and savory aromas. I remember sitting at the old oak table, eagerly waiting as she ladled the velvety soup into bowls, the steam curling up like whispers of comfort. The first bite was always magical; the creamy blend of potatoes and cheese enveloped in the soft bread bowl reminded me of childhood and the love that went into every meal. It was a dish that brought us all together, a shared experience of laughter and stories over a simple yet soul-satisfying meal.

Difficulty Rating: 5/10

This recipe is moderately easy to prepare, making it accessible to cooks with some experience in the kitchen. The steps are straightforward, but ensuring the perfect creamy consistency requires attention and patience.

Classification: Main Dish

This potato cheese soup is hearty enough to stand alone as a main dish, especially when served in a bread bowl that soaks up the rich flavors. However, it can also shine as a decadent appetizer to start a cozy meal.

Enjoy the warmth and nostalgia of this delicious soup, perfect for creating new family memories around the table.

Read more about Appetizers

Read more about Main Dishes

Read more about Desserts

Roasted Cauliflower and Leek Soup | Made by Meaghan Moineau

Roasted Cauliflower and Leek Soup | Made by Meaghan Moineau

Title: Comfort in a Bowl: Roasted Cauliflower and Leek Soup Recipe
Description: Discover the warmth and nostalgia of our Roasted Cauliflower and Leek Soup, an easy-to-make recipe that brings families together. With its rich, savory flavors, this dish is perfect for cozy dinners or as a starter to any meal.

---


As the leaves turn golden and a crisp chill fills the air, there's nothing quite like the comforting embrace of a warm bowl of soup. Today, I'm excited to share a beloved family recipe that has warmed our hearts and filled our home with delightful aromas—Roasted Cauliflower and Leek Soup.


Ingredients:

- 1 head of cauliflower, chopped


- 3 green and white parts of leeks, cleaned and chopped


- 4 cloves of garlic, peeled


- 2 tablespoons olive oil


- 2 cans of chicken broth


- Kosher salt, to taste


- Freshly ground black pepper, to taste


Instructions:
1. Preheat Your Oven: Start by preheating your oven to 425°F (220°C).
2. Prepare the Vegetables: Spread the chopped cauliflower, leeks, and garlic evenly on a baking sheet. Drizzle with olive oil and toss the vegetables until they are thoroughly coated. Sprinkle with kosher salt.
3. Roast to Perfection: Place the baking sheet in the oven and roast for 40-45 minutes. You'll know they're ready when the vegetables are browned on the edges and slightly softened.
4. Create the Soup Base: Transfer the roasted vegetables into a saucepan. Add the chicken broth and season with freshly ground black pepper to taste.
5. Bring to a Bubble: Heat the mixture over medium-high heat until it begins to bubble gently.
6. Blend Until Smooth: Using an immersion blender, puree the soup until it reaches a smooth, creamy consistency. If you’re using a regular blender, be cautious with hot liquids—vent the lid slightly to avoid any kitchen mishaps.
Nostalgic Family Memory:

This soup has been a staple in our family for as long as I can remember. Every autumn, my mother would gather us around in the kitchen, teaching us the art of roasting vegetables. I vividly recall the way the kitchen would fill with the sweet, nutty aroma of cauliflower and leeks mingling in the oven. It was more than just a soup—it was an event. We would eagerly await that first creamy spoonful, knowing it signaled the start of cozy nights spent together, sharing stories and laughter. This dish, with its deep flavors and heartwarming memories, always reminds me of the love and warmth that comes with family.


Difficulty Rating: 3/10
Classification: Appetizer

This Roasted Cauliflower and Leek Soup is not only easy to prepare but also a delightful way to bring a touch of nostalgia and comfort to your table. Whether you serve it as an appetizer or enjoy it as a light meal, it's sure to become a cherished favorite in your culinary repertoire. So, gather your loved ones, and let this simple yet flavorful soup create new memories for you and your family. Enjoy!

Read more about Appetizers

Read more about Main Dishes

Read more about Desserts

Siew Mai | Made by Meaghan Moineau

Siew Mai | Made by Meaghan Moineau

Savoring Tradition: Unveiling the Art of Making Siew Mai


Description:

Dive into the heart of traditional Chinese cuisine with our delectable Siew Mai recipe. This comprehensive guide not only walks you through the step-by-step process of crafting these delightful dumplings but also shares a nostalgic family memory that makes this dish truly special. Classified as an appetizer, this recipe boasts a difficulty rating of 7/10, perfect for those looking to challenge themselves in the kitchen.

---


The Perfect Siew Mai Recipe: A Culinary Journey


In the world of dim sum, few dishes evoke as much joy and nostalgia as Siew Mai. These succulent dumplings, wrapped delicately in wonton wrappers, are a staple at any dim sum feast. With a rich filling of fatty pork, shrimp, and savory glutinous rice, each bite is a symphony of flavors that instantly transports you to the bustling streets of Hong Kong or a cherished family gathering. Today, I invite you to join me on this culinary journey, where tradition meets taste.


Ingredients:

- Wonton wrappers
- For Pork Filling:

- 700g fatty pork, minced


- 2 tablespoons corn starch


- 1 teaspoon salt


- 1 teaspoon white ground pepper


- 1/2 teaspoon sugar


- 1 teaspoon Worcestershire sauce


- 2 tablespoons Shaoxing Huatiao wine


- 2 tablespoons sesame oil


- 80g canned water chestnuts, finely chopped


- 4 large mushrooms, finely chopped


- 1 small carrot, finely diced


- Cooked whole shrimp for topping


- For Glutinous Rice Filling:

- Raw glutinous rice (prepared as per linked recipe)


- 2 lap cheongs (Chinese sausages), diced


- Dried shrimps and scallops, cooked


- 1 tablespoon cooking oil


- Shallots and ginger, finely chopped


- Light soy sauce, oyster sauce, salt, white ground pepper


Instructions:


1. Prepare the Pork Filling:

- In a large mixing bowl, combine the minced pork with corn starch, salt, white ground pepper, sugar, Worcestershire sauce, Shaoxing Huatiao wine, and sesame oil.


- Add the chopped water chestnuts and mushrooms to the pork mixture. Mix well to combine.


- Set aside the pork mixture and diced carrots until ready to wrap the dumplings.


2. Prepare the Glutinous Rice Filling:

- Soak the lap cheongs in boiling water until the skin separates. Remove the skin and dice.


- Pan fry the diced lap cheongs until golden. Set aside.


- Prepare the glutinous rice as per the linked recipe, incorporating the diced lap cheongs.


3. Wrap the Dumplings:

- Place a sheet of wonton wrapper on a flat surface. Add a teaspoon of filling in the center.


- Wet the edges of the wrapper, gather, and squeeze gently to wrap the filling tightly.


- Top each pork Siew Mai with a shrimp and garnish with diced carrots or your choice of toppings.


4. Steam and Serve:

- Arrange the dumplings in a steamer lined with baking paper. Cut holes in the paper for steam.


- Steam over boiling water for 14-15 minutes or until cooked. Serve hot.


---


A Nostalgic Memory


Growing up, Siew Mai was more than just a dish; it was a family ritual. Every Sunday, my grandmother would gather us in her cozy kitchen, the air filled with the aromas of spices and laughter. She would share stories of her childhood, teaching us the art of wrapping dumplings with the patience only a grandmother possesses. As we gathered around the table, savoring each delicious bite, I realized that Siew Mai was more than just food—it was a symbol of love and tradition, a legacy I now share with my own family.


Difficulty Rating: 7/10


Classification: Appetizer


Crafting Siew Mai is an art that demands attention to detail and a touch of patience. The result, however, is a dish that not only delights the palate but also warms the heart, making it a perfect appetizer for any occasion. Whether you're a novice or a seasoned chef, this recipe offers a rewarding challenge that celebrates the timeless joy of cooking and sharing.

Read more about Appetizers

Read more about Main Dishes

Read more about Desserts

Endive Appetizer With Blue Cheese, Dried Cranberries and Walnuts | Made by Meaghan Moineau

Endive Appetizer With Blue Cheese, Dried Cranberries and Walnuts | Made by Meaghan Moineau

Title: A Taste of Tradition: Endive Appetizer with Blue Cheese, Dried Cranberries, and Walnuts
Description: Discover the delicious blend of flavors in our Endive Appetizer with Blue Cheese, Dried Cranberries, and Walnuts. This elegant yet simple appetizer is perfect for any gathering and brings back cherished family memories. Learn how to create this delightful dish with our easy-to-follow recipe.

---


A Taste of Tradition: Endive Appetizer with Blue Cheese, Dried Cranberries, and Walnuts

There’s something magical about a dish that can transport you back in time, evoking memories of family gatherings and shared laughter. Our Endive Appetizer with Blue Cheese, Dried Cranberries, and Walnuts does just that. This delightful appetizer, with its perfect balance of flavors, has been a staple at our family reunions for as long as I can remember.


Ingredients:

- 2 apples, thinly sliced


- 1/4 cup light balsamic vinaigrette


- 3 heads of Belgian endive, leaves separated


- 1 cup crumbled blue cheese


- 1/2 cup dried cranberries


- 1/2 cup walnut pieces


Instructions:
1. Toast the Walnuts: Begin by toasting the walnut pieces in a dry skillet over medium heat for about two minutes, or until they become fragrant. Make sure to stir them occasionally to prevent burning. Once toasted, set them aside to cool.
2. Prepare the Platters: Arrange the apple slices on one platter, and the endive leaves on another. The contrast of colors from the apples and endive will make for an impressive presentation.
3. Mix the Toppings: In a medium bowl, combine the cooled walnuts, dried cranberries, and blue cheese. This mixture will serve as the flavorful topping for your endive leaves.
4. Assemble the Appetizer: Top each endive leaf with approximately one tablespoon of the cheese mixture. Add a drop or two of light balsamic vinaigrette to each leaf for a touch of acidity that complements the flavors.
5. Serve with Apples: Place the remaining cheese mixture in a bowl to serve alongside the apple slices. The crispness of the apples pairs wonderfully with the creamy blue cheese and the sweet-tart cranberries.
A Nostalgic Journey:

This dish is more than just a combination of flavors; it’s a journey back to summer picnics at my grandparents’ house. I can still picture the large oak tree in their backyard, under which we’d spread out a checkered blanket. My grandmother, with her gentle smile, would bring out a tray of these endive appetizers. The adults would savor them with a glass of wine, while we, the kids, would nibble on the apple slices, occasionally sneaking bites of the cheese mixture.


As the years have passed, this appetizer has become a symbol of those cherished moments. Whenever I make it, I’m reminded of the laughter, the stories, and the love that surrounded us. It’s a dish that not only delights the palate but also warms the heart.


Difficulty: 3/10
Classification: Appetizer

Whether you’re hosting a formal dinner or a casual get-together, this Endive Appetizer with Blue Cheese, Dried Cranberries, and Walnuts is sure to impress your guests. Its simplicity belies its elegance, making it the perfect choice for any occasion. Enjoy the delightful flavors and create your own treasured memories with this timeless recipe.

Read more about Appetizers

Read more about Main Dishes

Read more about Desserts

Minted Pea & Spinach Soup | Made by Meaghan Moineau

Minted Pea & Spinach Soup | Made by Meaghan Moineau

Title: A Taste of Nostalgia: Minted Pea & Spinach Soup
Description: Discover the heartwarming flavors of our Minted Pea & Spinach Soup, a dish that marries simplicity with elegance. Infused with the freshness of mint and the earthiness of spinach, this soup is not only a feast for the senses but also a journey down memory lane. Perfect as an appetizer, this recipe is rated a 4 out of 10 in difficulty, making it an accessible yet sophisticated addition to your culinary repertoire.

---


A Taste of Nostalgia: Minted Pea & Spinach Soup


There's something incredibly comforting about a warm bowl of soup, especially when it carries with it the whispers of cherished family memories. Our Minted Pea & Spinach Soup is a dish that does just that—bringing together flavors that are both familiar and refreshing, while evoking a sense of nostalgia for family gatherings and cozy evenings spent by the fire.


Ingredients:

- 1 cup chicken stock

- 1/2 cup cream


- 1 teaspoon canned dried mint


- 1/2 cup milk


- 2 cups frozen peas


- 2 diced potatoes


- Salt & pepper to taste


- 1 cup fresh spinach


- 1 teaspoon sugar


- 1/4 cup water


- 1/4 cup yoghurt


Instructions:


1. Prepare the Potatoes: In a medium-sized pot, place the diced potatoes with a little water and a dash of salt and pepper. Cover with a lid and let them cook for approximately 20 minutes until they are nearly soft.
2. Add the Peas: Introduce the frozen peas to the pot, allowing them to cook for an additional 5 minutes until both the peas and potatoes are tender.
3. Incorporate the Spinach: Gently stir in the fresh spinach and let it cook for 3-5 minutes until it is wilted. Remove the pot from heat and allow it to cool slightly.
4. Blend to Perfection: Use an immersion blender to puree the mixture until smooth. Return the pot to the stovetop.
5. Finish with Creamy Goodness: Add the cream, milk, water, and chicken stock to the pot. Reheat the mixture until it's piping hot.
6. Season and Serve: Stir in the yoghurt, mint, sugar, and adjust the salt and pepper to taste. Serve immediately, garnished with crispy croutons or bacon bits. For a delightful twist, try topping with thinly sliced cheesegrillers fried in sweet chili sauce.

A Family Memory


This soup always takes me back to my grandmother's kitchen, a place where the aromas of home-cooked meals danced through the air. I remember the way she would hum softly while preparing this very dish, her hands deftly working through the motions that seemed like second nature to her. On cold winter nights, my family would gather around the table, bowls of this minted pea and spinach soup steaming before us, warming our hands and hearts alike. The simplicity of the ingredients belied the complexity of flavors, each spoonful a reminder of those precious family moments.


As I prepare this soup today, I am transported back to those evenings, the warmth of the soup a comforting embrace, and the taste a gentle reminder of the love and care that went into every meal.


Difficulty Rating: 4/10


Category: Appetizer

Whether you're looking to create new memories or relive old ones, this Minted Pea & Spinach Soup is sure to become a beloved staple in your home. Its rich, velvety texture and vibrant flavors make it the perfect way to begin any meal, ensuring that every gathering is both delicious and memorable.

Read more about Appetizers

Read more about Main Dishes

Read more about Desserts

Crab Salad Stuffed Pita Pockets | Made by Meaghan Moineau

Crab Salad Stuffed Pita Pockets | Made by Meaghan Moineau

Title: A Taste of Summer: Crab Salad Stuffed Pita Pockets
Description: Dive into a delicious blend of fresh flavors with our Crab Salad Stuffed Pita Pockets. This light and refreshing dish combines the sweetness of apple, the tang of yellow bell pepper, and the savory taste of white crabmeat, all wrapped in a warm, toasted wholewheat pita. Perfect for a summer afternoon, this recipe is quick and easy to prepare, bringing back cherished family memories with every bite.

---


Summer at our family beach house was always a magical time. The sun-drenched days were filled with the laughter of children playing by the shore, the comforting sound of waves crashing, and the enticing aroma of delicious meals being prepared in the kitchen. One dish that always marked the highlight of these summer gatherings was my grandmother's Crab Salad Stuffed Pita Pockets.


I vividly remember the hustle and bustle in the kitchen, where the air was filled with the crisp scent of freshly chopped apples and the vibrant smell of coriander leaves. My grandmother would stand at the counter, her hands deftly mixing the canned white crabmeat with diced apple and yellow bell pepper. She had a way of creating magic with the simplest of ingredients.


As she worked, my siblings and I would eagerly gather around, occasionally sneaking a taste of the sweet, juicy apple or the tangy bell pepper. The anticipation would build as we watched her toast the wholewheat pita breads until they were perfectly puffed and golden brown.


Once the crab salad was seasoned to perfection with just the right amount of salt and pepper, and lovingly folded with light mayonnaise, the real fun began. We would help stuff the warm pita pockets with fresh, peppery watercress and the delicious crab mixture. Each bite was a symphony of flavors—sweet, savory, and herbaceous—all reminding us of those carefree, sunlit days.


Every time I prepare this dish, I am transported back to those cherished family summers, filled with love, laughter, and great food. It's a simple recipe, yet it holds a treasure trove of memories.


Crab Salad Stuffed Pita Pockets Recipe
Ingredients:

- 1 apple, diced


- 1 can white crabmeat, drained


- A handful of fresh coriander leaves, chopped


- 2 tablespoons light mayonnaise


- 4 wholewheat pita breads


- Salt and pepper to taste


- A bunch of fresh watercress


- 1 yellow bell pepper, diced


Instructions:

1. In a large bowl, combine the crabmeat, diced apple, and yellow bell pepper.


2. Season the mixture with salt and pepper to taste, then add the chopped coriander leaves.


3. Gently fold in the light mayonnaise until everything is well combined.


4. Toast the wholewheat pita breads until they are puffed up and golden brown.


5. Carefully cut open the pitas on one side and stuff them with a generous handful of fresh watercress, followed by the crab mixture.


6. Serve immediately and enjoy a taste of summer nostalgia.


Difficulty Rating: 3/10
Classification: Appetizer

This delightful appetizer is not only a breeze to make but also a wonderful way to bring a bit of summer into your home, no matter the season. Enjoy this family favorite and create your own cherished memories with each delicious bite.

Read more about Appetizers

Read more about Main Dishes

Read more about Desserts

Tuna Stuffed Hard-Boiled Eggs | Made by Meaghan Moineau

Tuna Stuffed Hard-Boiled Eggs | Made by Meaghan Moineau

Title: Delightful Nostalgia: Tuna Stuffed Hard-Boiled Eggs for Every Family Gathering
Description: Dive into a deliciously nostalgic journey with our Tuna Stuffed Hard-Boiled Eggs recipe. This simple, yet flavorful appetizer is perfect for every family gathering, evoking cherished memories with every bite. Discover how to create this dish that marries ease with elegance, leaving a lasting impression on your guests.

---


Every family has that one recipe that holds a special place in their hearts. For me, it's the Tuna Stuffed Hard-Boiled Eggs. This delightful appetizer was a staple at every family reunion, birthday party, and holiday gathering. The aroma of tuna mixed with fresh parsley and a hint of lemon would fill the kitchen, pulling us all together around the table, eager to dig in.


Ingredients:

- Hardboiled eggs


- 1 can of tuna


- 1 small onion, finely chopped


- 1 carrot, shredded


- Fresh parsley, chopped


- Lemon juice


- Corn kernels for garnish


Instructions:

1. Begin by cutting each hardboiled egg in half and carefully removing the yolks. Set the egg whites aside on a serving platter.


2. In a small bowl, combine the canned tuna with the finely chopped onion, shredded carrot, chopped parsley, and a generous squeeze of lemon juice. Mix well until the ingredients are thoroughly combined.


3. Spoon the tuna mixture into each egg white half, creating a small mound. Ensure each egg is generously filled for optimum flavor.


4. Garnish each stuffed egg with a few corn kernels, adding a touch of sweetness and color to the dish.


5. Serve immediately or refrigerate until ready to enjoy.


Difficulty Level: 3/10
Classification: Appetizer

---


A Walk Down Memory Lane

Growing up, my grandmother's kitchen was the heart of our home. It was a place filled with laughter, stories, and the comforting scent of home-cooked meals. Among the many dishes she prepared, her Tuna Stuffed Hard-Boiled Eggs stood out as a family favorite.


I remember one sunny Easter Sunday when I was about eight years old. We were gathered at my grandparents' house, eagerly participating in the annual egg hunt. Afterward, as everyone settled around the table, my grandmother brought out a platter of her signature stuffed eggs. The room fell silent, except for the clinking of forks and the occasional hum of delight as we savored each bite.


Those eggs were more than just an appetizer; they were a symbol of togetherness. Every time we tasted that familiar combination of creamy tuna and citrusy lemon, we were transported back to those joyful gatherings, surrounded by the warmth of family.


Recreating this dish today is like opening a time capsule. It's a simple recipe, yet it carries with it decades of love and tradition. Whether you're looking to create new memories with your loved ones or revisit old ones, Tuna Stuffed Hard-Boiled Eggs are a delightful way to bring everyone together. Enjoy this easy-to-make appetizer and let it become a cherished part of your family's culinary story.

Read more about Appetizers

Read more about Main Dishes

Read more about Desserts