Valentine Hearts | Made by Meaghan Moineau

Valentine Hearts: A Sweet Treat for Your Loved Ones

Intro

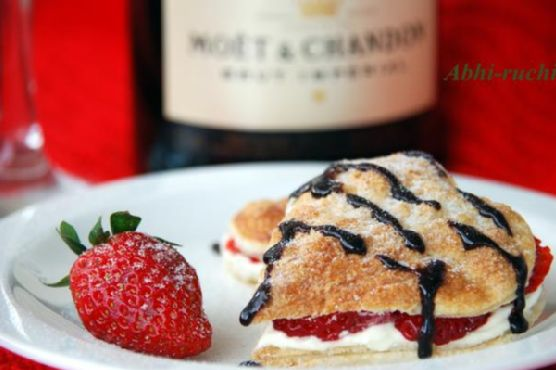
Every Valentine’s Day, my grandmother would bake a special treat that filled the house with the aroma of love and sweetness. As a child, I would watch her gracefully craft heart-shaped pastries, her hands moving with a rhythm that spoke of years of experience and love. Inspired by her legacy, I’ve created my own version of this beloved dessert: Valentine Hearts. These delightful puff pastries, filled with crème fraiche and fresh strawberries, are perfect for sharing with your loved ones. Join me as we bring a touch of nostalgia and romance to your kitchen with this simple yet elegant recipe.

Why You’ll Love It

Valentine Hearts are a beautiful and delicious way to show someone you care. Not only are they visually stunning, but they also combine the flaky, buttery goodness of puff pastry with the creamy richness of crème fraiche and the natural sweetness of strawberries. This dessert is perfect for any occasion where you want to impress with minimal effort. Plus, the aroma of these pastries baking in your oven will fill your home with warmth and love.

Ingredients

  • Puff pastry
  • 1 egg, beaten for glaze
  • Castor sugar
  • Canned crème fraiche
  • Fresh strawberries
  • Plain chocolate

Instructions

  1. Preheat your oven to 220 degrees C (425 F).
  2. Thaw the puff pastry sheet according to the instructions on the box.
  3. Unroll the pastry sheet and cut out around 8 hearts using a heart-shaped cookie cutter.
  4. Prick each heart with a fork, brush with beaten egg, and sprinkle lightly with some castor sugar.
  5. Place these hearts on a greased baking sheet and bake for about 10 minutes until they are risen and golden brown.
  6. Let the pastry hearts cool completely.
  7. Slice the strawberries and split the cooled hearts horizontally using a sharp knife.
  8. Sandwich the heart halves together with crème fraiche and sliced strawberries.
  9. Drizzle melted plain chocolate over the tops and dust with a bit more castor sugar.

Tips

For the best results, ensure the puff pastry is well-chilled before cutting and baking. This helps them puff up beautifully. When slicing the hearts, use a very sharp knife to prevent crumbling. If you’re preparing these ahead of time, keep the components separate and assemble just before serving to maintain the pastry’s crispness.

Variations & Substitutions

If crème fraiche isn’t available, you can substitute it with whipped cream or mascarpone cheese for a similar texture and taste. For a fruity twist, consider adding raspberries or blueberries to the strawberry filling. If you prefer a different kind of chocolate, white chocolate can be a delightful alternative for drizzling.

Storage

Valentine Hearts are best enjoyed fresh on the day they are made. However, if you have leftovers, store them in an airtight container in the refrigerator for up to two days. Keep the pastry and filling separate if possible, and assemble just before serving to preserve the texture.

FAQ

Can I make the pastry hearts in advance?

Yes, you can bake the pastry hearts a day in advance. Store them in an airtight container at room temperature and assemble them with the filling just before serving.

What if I don’t have a heart-shaped cookie cutter?

No worries! You can easily create a heart shape by cutting the pastry into squares and trimming the top corners to form a heart. Alternatively, you can use any other shape cutter you have on hand.

Can I use frozen strawberries instead of fresh ones?

While fresh strawberries are recommended for their texture and flavor, you can use thawed frozen strawberries in a pinch. Just be sure to drain any excess liquid to avoid soggy pastries.

Nutrition

This dessert is meant to be a treat, so indulge in moderation. The combination of puff pastry, crème fraiche, and chocolate provides a rich and satisfying flavor profile, while the strawberries add a fresh and nutritious element. Remember, the joy of sharing these with loved ones is as wholesome as the ingredients themselves.

Conclusion

Valentine Hearts are more than just a dessert; they are a symbol of love and thoughtfulness. Whether you’re sharing them with a romantic partner, family, or friends, these sweet treats are sure to make any occasion special. The simplicity of the recipe allows you to focus on the joy of baking and sharing, creating memories that will last long after the last crumb is gone. So preheat your oven, gather your ingredients, and let the love-filled aroma of Valentine Hearts fill your home. Happy Valentine’s Day!

Related update: Valentine Hearts

Related update: Vegan Strawberry Shortcake served with Vegan Whipped Cream

Chocolate Caramel Cupcakes | Made by Meaghan Moineau

Chocolate Caramel Cupcakes

Intro

Chocolate and caramel have always been a match made in heaven, and these Chocolate Caramel Cupcakes are a testament to that divine pairing. I remember the first time I baked these cupcakes was for a family gathering. The sweet aroma of chocolate and caramel wafting through the house brought everyone to the kitchen, eager for a taste. Watching my family enjoy these cupcakes was a moment of pure joy, and I’m thrilled to share this recipe with you, hoping it brings the same happiness to your table.

Why You’ll Love It

These Chocolate Caramel Cupcakes are the perfect combination of rich, moist chocolate cake and a creamy, dreamy caramel frosting. Whether you’re a seasoned baker or a novice, you’ll appreciate how straightforward this recipe is. The result is an impressive dessert that looks as stunning as it tastes. Every bite offers a beautiful balance of flavors and textures, with a touch of saltiness if you choose to add a sprinkle of sea salt. This recipe is sure to become a favorite in your baking repertoire!

Ingredients

  • 1 3/4 cups all-purpose flour
  • 3/4 cup unsweetened cocoa powder
  • 1 1/2 teaspoons baking soda
  • 1/2 teaspoon salt
  • 3/4 cup unsalted butter, softened
  • 1 3/4 cups sugar
  • 1 teaspoon vanilla extract
  • 2 large eggs
  • 4 ounces semi-sweet chocolate, melted and cooled
  • 1 cup milk
  • 1/2 cup unsalted butter (for frosting)
  • 1 cup brown sugar
  • 1/2 cup milk (for frosting)
  • 3 cups powdered confectioners’ sugar

Instructions

  1. Preheat your oven to 350 degrees Fahrenheit. Prepare the cupcake pans by greasing them or placing paper liners in each well.
  2. In a small bowl, whisk together the flour, cocoa powder, baking soda, and salt; set aside.
  3. In a large bowl, use an electric hand mixer on medium speed to beat the butter until creamy, about 2 minutes.
  4. Gradually add the sugar to the butter, beating until the mixture is light and fluffy, about 3 minutes. Be sure to scrape down the sides of the bowl occasionally.
  5. Beat in the vanilla extract, followed by the eggs, one at a time, ensuring each is fully incorporated before adding the next.
  6. Mix in the cooled, melted chocolate until well combined.
  7. Alternately add the flour mixture to the batter in four additions, beginning and ending with the flour mixture, and alternating with the milk. Beat briefly on low-medium speed until the batter is smooth.
  8. Fill each cupcake well 3/4 of the way full with batter.
  9. Bake for about 22 minutes or until a toothpick inserted into the center of a cupcake comes out with a few moist crumbs attached.
  10. Cool the cupcakes in the pan on a wire rack for 10 minutes, then remove them from the pan and let cool completely on the rack.
  11. To make the frosting, melt the butter in a 2-quart saucepan over medium heat. Stir in the brown sugar and bring to a boil, stirring constantly.
  12. Reduce the heat to low and continue to boil and stir for 2 minutes.
  13. Stir in 1/2 cup of milk and bring back to a boil, then remove from heat and allow to cool to lukewarm, about 30 minutes.
  14. Gradually stir the caramel mixture into a large mixing bowl with powdered sugar and milk. Beat with an electric hand mixer on low speed for about 6 minutes, or until the frosting is light and fluffy.
  15. If the frosting is too stiff, add milk a teaspoon at a time to reach the desired consistency. If too runny, add additional powdered sugar, beating on low until it thickens.
  16. Store the frosting in the refrigerator for 15 minutes before using it to frost the cupcakes to help it firm up.
  17. For a salted caramel twist, sprinkle sea salt on top of the frosting or mix in 1/2 teaspoon of sea salt towards the end of the frosting preparation.

Tips

Here are some helpful tips to ensure your Chocolate Caramel Cupcakes turn out perfectly every time:

  • Ensure all your ingredients are at room temperature before starting. This helps the batter mix more evenly.
  • If you don’t have semi-sweet chocolate on hand, you can use dark chocolate for a richer taste.
  • When melting the chocolate, do so gently in a microwave or double boiler to prevent it from burning.
  • Always allow the cupcakes to cool completely before frosting to prevent the frosting from melting.

Variations & Substitutions

Feel free to get creative with this recipe:

  • Flavor Variations: Add a teaspoon of espresso powder to the batter for a mocha twist.
  • Substitutions: For a dairy-free option, use coconut milk in place of regular milk and dairy-free butter substitutes.
  • Extra Add-ins: Consider folding in mini chocolate chips or chopped nuts into the batter before baking for added texture.

Storage

Store any leftover cupcakes in an airtight container at room temperature for up to 2 days. If you’d like to keep them longer, refrigerate them for up to a week. For longer storage, freeze the cupcakes (without frosting) for up to 3 months. Thaw them in the refrigerator overnight before frosting and serving.

FAQ

Can I make these cupcakes ahead of time?

Yes, you can! You can bake the cupcakes a day in advance and store them in an airtight container. Make the frosting on the day you plan to serve them for the best texture.

What if my frosting is too runny?

If your frosting is too runny, gradually add more powdered sugar, a few tablespoons at a time, while beating on low speed until it reaches your desired consistency.

Can I use store-bought caramel sauce for the frosting?

While homemade caramel provides the best flavor, you can use store-bought caramel sauce in a pinch. Just make sure to adjust the consistency with powdered sugar and milk as needed.

Nutrition

While desserts are meant to be a treat, it’s helpful to know what you’re enjoying. Each cupcake is approximately 320 calories, with the primary nutritional components being carbohydrates and fats. Remember, moderation is key!

Conclusion

These Chocolate Caramel Cupcakes are more than just a dessert; they’re a piece of happiness wrapped in a paper liner. Perfect for any celebration or simply to indulge your sweet tooth, this recipe is sure to become a cherished favorite. Whether you’re sharing them with family or savoring one with a cup of coffee, these cupcakes are a delightful treat that never fails to impress. Enjoy every bite and happy baking!

Related update: Chocolate Caramel Cupcakes

Related update: No-Bake Green Tea Tofu Cheesecake

Gluten-Free Tres Leches Cake | Made by Meaghan Moineau

Gluten-Free Tres Leches Cake

Intro

Tres Leches Cake has always been a staple at our family gatherings, a tradition passed down through generations. I remember as a child, watching my grandmother skillfully blend the ingredients with a touch of love and a sprinkle of nostalgia. When the cake was served, the room would fill with a chorus of ‘oohs’ and ‘aahs’ as we indulged in its rich, creamy delight. This gluten-free version of the classic Tres Leches Cake offers the same indulgent experience, ensuring that everyone, including those with gluten sensitivities, can partake in this delectable tradition.

Why You’ll Love It

This Gluten-Free Tres Leches Cake is a delightful twist on the traditional recipe, maintaining the rich, creamy texture and flavor while being accessible to those with gluten sensitivities. The combination of sweetened condensed milk, evaporated milk, and half-and-half creates a luscious, melt-in-your-mouth experience. Topped with freshly whipped cream, strawberries, and mint leaves, this cake is perfect for any celebration or as a special treat.

Ingredients

  • 1 teaspoon baking powder
  • 1/2 cup butter, softened
  • 1 teaspoon cinnamon
  • 1/4 teaspoon cream of tartar
  • 6 large eggs, separated
  • 1 can evaporated milk
  • 1 cup half-and-half
  • 1/2 cup masa harina
  • 1/4 cup milk
  • 1 cup strawberries, sliced
  • Mint leaves, for garnish
  • 1 teaspoon orange zest
  • 1/4 teaspoon salt
  • 1/2 cup sorghum flour
  • 1 cup sugar, divided
  • 1 can sweetened condensed milk
  • 1 tablespoon vanilla extract
  • 1 teaspoon vanilla
  • 1 cup whipping cream
  • 1/2 teaspoon xanthan gum

Instructions

  1. Preheat oven to 350 degrees Fahrenheit. Generously butter a 13×9 inch baking dish.
  2. In a large bowl, beat 1/2 cup sugar, egg yolks, and butter until light and fluffy, about 5 minutes.
  3. Fold in the vanilla extract, orange zest, cinnamon, sorghum flour, masa harina, baking powder, xanthan gum, and milk.
  4. In another large bowl, beat egg whites to soft peaks, adding cream of tartar after about 20 seconds.
  5. Gradually add the remaining 1/2 cup sugar and continue beating until egg whites are glossy and firm, but not dry.
  6. Gently fold the egg whites into the cake mixture.
  7. Pour this batter into the prepared baking dish, spreading out evenly.
  8. Bake until the cake is golden and a toothpick inserted in the center comes out clean, about 25 minutes.
  9. Pierce cake all over with a toothpick.
  10. Whisk together the evaporated milk, sweetened condensed milk, and half-and-half, and pour evenly over the cake.
  11. Allow to cool for a bit, then cover and place in refrigerator for 4 hours, up to overnight.
  12. Before serving, place the whipping cream, 2 tablespoons sugar, and 1 teaspoon vanilla in a mixer bowl and whisk to stiff peaks, until nice and thick.
  13. Spread the whipped cream over the cake and top with strawberries and mint leaves.
  14. Allow to chill in the refrigerator until ready to serve.

Tips

For the best results, ensure all your ingredients are at room temperature before you begin. This helps in achieving a smooth batter and evenly whipped egg whites. When folding the egg whites into the batter, be gentle to maintain the airy texture. Make sure to pierce the cake thoroughly with a toothpick to allow the milk mixture to seep in evenly, ensuring every bite is moist and flavorful.

Variations & Substitutions

If you want to add a citrusy twist, try adding a bit more orange zest or even some lemon zest to the cake batter. For a dairy-free version, substitute coconut milk for the half-and-half and use a dairy-free whipping cream alternative. You can also try topping the cake with other fruits like mangoes or peaches for a tropical flair.

Storage

This cake is best enjoyed fresh, but it can be stored in the refrigerator for up to three days. Cover it tightly with plastic wrap or store it in an airtight container to maintain its moisture. The flavors tend to deepen with time, making it even more delicious the next day!

FAQ

Can I make this cake in advance?

Absolutely! This Gluten-Free Tres Leches Cake can be made a day ahead. In fact, allowing it to sit overnight in the refrigerator helps the flavors meld together beautifully. Just be sure to add the whipped cream and toppings just before serving for maximum freshness.

How do I ensure the cake doesn’t get soggy?

The key to avoiding a soggy cake is to ensure it’s properly baked before adding the milk mixture. A toothpick inserted should come out clean, indicating it’s done. When pouring the milk mixture, do so gradually and evenly, allowing the cake to absorb it without becoming too saturated.

Nutrition

While this cake is a treat and not necessarily a health food, it’s made with wholesome ingredients. Each serving provides a good source of calcium from the milk and cream, and the gluten-free flours offer a unique texture and flavor. Remember to enjoy it in moderation as part of a balanced diet.

Conclusion

This Gluten-Free Tres Leches Cake is a labor of love, bringing together rich flavors and textures that delight the senses. Whether you’re enjoying it as part of a special celebration or simply as a treat for yourself, it promises to be a memorable experience. I hope this recipe brings as much joy to your table as it has to mine, creating cherished memories with each indulgent bite.

Related update: Gluten-Free Tres Leches Cake

Related update: Tropical Ice Pops

Peppermint Hot Chocolate Cupcakes | Made by Meaghan Moineau

Peppermint Hot Chocolate Cupcakes

Intro

There’s something utterly magical about the combination of chocolate and peppermint, especially when the weather turns chilly, and the air is filled with the scent of pine and fireplaces. These Peppermint Hot Chocolate Cupcakes are a delightful treat that transports me back to cozy winter evenings spent in my grandmother’s kitchen. I remember sitting at her wooden table, the room filled with the warm, sweet aroma of melting chocolate and peppermint candies. She would let me help stir the batter, my small hands barely able to grip the whisk. Those moments were filled with laughter, stories, and the kind of love that only a grandmother can give. Now, I carry on that tradition with these cupcakes, hoping to bring some of that warmth and nostalgia to your home.

Why You’ll Love It

These cupcakes are a perfect blend of rich, chocolatey goodness and refreshing peppermint. The luscious ganache filling adds a decadent surprise, while the marshmallow buttercream frosting with a hint of peppermint creates a festive touch. They’re not only delicious but also visually stunning, making them perfect for holiday gatherings or any winter celebration. Whether you’re serving them to family and friends or enjoying one with a cup of hot cocoa by the fire, these cupcakes are sure to be a hit.

Ingredients

  • 1 cup semisweet chocolate chips
  • 1 cup hot-brewed coffee
  • 2 cups sugar
  • 1 3/4 cups all-purpose flour
  • 3/4 cup unsweetened cocoa powder
  • 1 1/2 teaspoons baking soda
  • 1 1/2 teaspoons baking powder
  • 1 teaspoon salt
  • 2 large eggs
  • 1 cup buttermilk
  • 1/2 cup vegetable oil
  • 2 teaspoons vanilla extract
  • 1/2 cup heavy cream
  • 1/4 cup unsalted butter
  • 8 ounces semisweet chocolate, chopped
  • 1/2 cup unsalted butter, softened
  • 2 cups marshmallow creme
  • 1/2 teaspoon peppermint extract
  • 3-4 cups powdered sugar
  • 2 tablespoons milk
  • Crushed peppermint candies, for garnish

Instructions

  1. Preheat the oven to 350 degrees F. Line a cupcake or muffin pan with 24 regular-size cupcake liners.
  2. Combine the chocolate chips and hot coffee together, stirring occasionally until the chocolate is melted and the mixture is smooth.
  3. In a large bowl, sift together the sugar, flour, cocoa powder, baking soda, baking powder, and salt.
  4. In another bowl, beat the eggs with an electric mixer until thickened slightly. Slowly add the buttermilk, oil, and vanilla.
  5. Add the melted chocolate mixture to the eggs, and combine completely.
  6. Add the sugar mixture and beat on medium speed until well combined.
  7. Fill the prepared cupcake liners three-quarters full with the cupcake batter.
  8. Bake until a toothpick inserted in center comes out clean, 18 to 21 minutes. Cool the cupcakes completely.
  9. While the cupcakes are baking, prepare the Chocolate Ganache and the Peppermint Marshmallow Buttercream Frosting (directions below).
  10. To make the Chocolate Ganache, bring the heavy cream and butter to a simmer in a small saucepan. Turn off the heat and add in the chocolate. Stir the mixture until smooth. Set aside to cool.
  11. To make the Peppermint Marshmallow Buttercream Frosting, whip together the butter and marshmallow creme using an electric mixer fitted with a whisk attachment.
  12. Add the peppermint extract. Slowly add 2 cups of the powdered sugar and continue to mix on a slow speed.
  13. Add the milk and additional powdered sugar, up to 2 cups, until desired consistency is reached.
  14. To assemble cupcakes: Using an apple corer, remove the center of each cupcake. Fill each cupcake with a spoonful of the Chocolate Ganache.
  15. Using the frosting-filled pastry bag, frost the cupcakes and sprinkle with crushed peppermint candies.

Tips

For the best results, ensure all your ingredients are at room temperature before you begin. This helps everything blend together more smoothly. Also, when making the ganache, make sure not to let the cream and butter boil; just simmer them gently to avoid a grainy texture.

Variations & Substitutions

If you’re not a fan of peppermint, you can substitute the peppermint extract with almond or vanilla extract for a different twist. You can also use dark chocolate instead of semisweet for a richer flavor. For a dairy-free version, use coconut milk and a vegan butter substitute.

Storage

These cupcakes can be stored in an airtight container in the refrigerator for up to 5 days. Before serving, let them come to room temperature for the best taste and texture. You can also freeze them without frosting for up to 2 months. Just thaw them overnight in the refrigerator before frosting and serving.

FAQ

Can I make these cupcakes gluten-free?

Yes, you can substitute the all-purpose flour with a gluten-free flour blend. Just make sure it’s a 1:1 substitute for best results.

Do I have to use coffee in the recipe?

If you’re not a fan of coffee, you can substitute it with hot water or hot chocolate. The coffee enhances the chocolate flavor, but it’s not essential.

Nutrition

While these cupcakes are a treat and should be enjoyed in moderation, they do contain some nutritional benefits. The cocoa powder provides antioxidants, and using dark chocolate can add a boost of iron and magnesium. However, they are still high in sugar and fat, so enjoy them as an occasional indulgence.

Conclusion

These Peppermint Hot Chocolate Cupcakes are more than just a dessert; they’re a celebration of flavors and memories. Whether you’re making them for a holiday party or simply to indulge in a bit of winter nostalgia, they’re sure to bring joy and warmth to those who taste them. I hope this recipe becomes a cherished part of your holiday traditions, just as it has in my family. Enjoy every sweet, minty bite!

Related update: Peppermint Hot Chocolate Cupcakes

Related update: Grandma Inez's Pineapple Pie

Coconut Almond Cheesecake | Made by Meaghan Moineau

Coconut Almond Cheesecake

Intro

Every family has that one dessert that makes its way to the table at every special gathering. For my family, it’s the Coconut Almond Cheesecake. I remember my grandmother pulling out her worn, handwritten recipe card every time we had a celebration. The rich, creamy cheesecake with a hint of coconut and the crunch of almonds was always the highlight of the meal. Eventually, she passed the recipe down to me, and now, I’m thrilled to share it with you. This cheesecake is more than just a dessert; it’s a cherished family tradition.

Why You’ll Love It

This Coconut Almond Cheesecake is a delightful twist on the classic cheesecake. Here’s why you’ll adore it:

  • Rich and Creamy: The filling is smooth and decadent, with cream cheese and a hint of coconut extract blending perfectly.
  • Nutty Crunch: The addition of almonds in both the crust and filling provides a satisfying crunch that complements the creamy texture.
  • Perfect for Any Occasion: Whether it’s a holiday, birthday, or just because, this cheesecake is guaranteed to impress.
  • Make-Ahead Friendly: It can be prepared in advance, making it a stress-free dessert option.

Ingredients

  • Crust:
    • 1 1/2 cups graham cracker crumbs
    • 1/2 cup sweetened coconut
    • 1/2 cup almonds
    • 1/4 cup sugar
    • 1/4 cup (1/2 stick) unsalted butter, melted
  • Filling:
    • 4 (8-ounce) packages cream cheese, softened
    • 1 1/4 cups sugar
    • 4 large eggs
    • 1/2 cup sweetened coconut
    • 1 teaspoon coconut extract
    • 1/2 cup almonds, chopped
  • Glaze:
    • 1 cup semisweet chocolate chips
    • 1/2 cup whipping cream
    • 1 teaspoon vanilla extract

Instructions

  1. Prepare the Crust: Preheat your oven to 350°F (175°C). Wrap the outside of a 9-inch-diameter springform pan with 2 3/4-inch-high sides with foil.
  2. In a food processor, finely grind the graham cracker crumbs, sweetened coconut, almonds, and sugar. Add the melted butter and process until moist crumbs form.
  3. Press the crust mixture onto the bottom and 1 inch up the sides of the prepared pan. Bake until the crust is set and beginning to brown, about 12 minutes. Let it cool completely.
  4. Reduce the oven temperature to 325°F (160°C).
  5. Make the Filling: In a large bowl, use an electric mixer to beat the cream cheese and sugar until smooth.
  6. Add the eggs one at a time, beating just until blended after each addition.
  7. Mix in the sweetened coconut and coconut extract. Fold in the chopped almonds.
  8. Transfer the filling to the prepared crust. Bake until the cake is puffed and no longer moves when the pan is shaken, about 1 hour and 15 minutes. Cool completely on a rack.
  9. Prepare the Glaze: In a small saucepan, combine the semisweet chocolate chips and whipping cream. Stir over low heat until the chocolate is melted and the mixture is smooth. Remove from heat and stir in the vanilla extract.
  10. Once the cheesecake is completely cooled, pour the chocolate glaze over the top, spreading it evenly.
  11. Refrigerate the cheesecake for at least 4 hours, or overnight, before serving.

Tips

  • Room Temperature Ingredients: Ensure your cream cheese and eggs are at room temperature for a smoother filling.
  • Cooling is Key: Allow the cheesecake to cool gradually to prevent cracking. Let it cool in the oven with the door slightly ajar for about 1 hour before moving it to a wire rack.
  • Springform Pan Tip: Wrapping the pan with foil helps prevent water from the water bath from seeping into the cheesecake.

Variations & Substitutions

Feel free to make this cheesecake your own:

  • Nuts: Swap almonds for pecans or walnuts for a different nutty flavor.
  • Flavor Extracts: Experiment with almond extract or vanilla extract instead of coconut extract for a subtle flavor change.
  • Chocolate Glaze: Try using white chocolate for a different twist on the glaze.

Storage

To store leftovers, cover the cheesecake with plastic wrap or place it in an airtight container and refrigerate for up to 5 days. For longer storage, freeze individual slices by wrapping them tightly in plastic wrap and placing them in a resealable freezer bag. They can be frozen for up to 1 month.

FAQ

Can I make this cheesecake ahead of time?

Absolutely! This cheesecake is perfect for making ahead. Simply prepare it up to 2 days in advance and store it in the refrigerator. Add the chocolate glaze on the day you plan to serve it for the best presentation.

What if I don’t have a food processor?

No problem! You can crush the graham crackers, coconut, and almonds in a resealable bag using a rolling pin until they are finely ground. Then, mix them with the sugar and melted butter in a bowl.

Nutrition

While I don’t have the exact nutritional breakdown for this cheesecake, it’s important to note that it is a rich dessert and should be enjoyed in moderation. For those watching their calorie intake, consider serving smaller slices or saving it for special occasions.

Conclusion

The Coconut Almond Cheesecake is a delightful and indulgent dessert that’s sure to become a favorite in your household, just as it has been in mine. Its creamy texture, nutty flavor, and irresistible chocolate glaze make it a standout treat. Whether you’re making it for a family gathering or simply to satisfy your sweet tooth, this cheesecake is bound to impress. Enjoy every rich and delicious bite, and perhaps, start a new tradition of your own!

Related update: Coconut Almond Cheesecake

Related update: Peppermint Hot Chocolate Cupcakes

Beef Pot Pies with Irish Cheddar Crust | Made by Meaghan Moineau

Beef Pot Pies with Irish Cheddar Crust

Intro

There’s something incredibly heartwarming about the aroma of a savory pot pie wafting through the house, especially on a cool, crisp evening. The first time I made Beef Pot Pies with Irish Cheddar Crust, I was transported back to my grandmother’s kitchen, where the warmth from her oven seemed to envelop us in a comforting embrace. Her stories of growing up in Ireland, where cheddar cheese was a staple in many family dishes, always fascinated me. Now, I cherish the tradition of baking these pies, filling my home with both a sense of nostalgia and the promise of a delicious meal.

Why You’ll Love It

This recipe combines the hearty richness of beef stew with the indulgence of a buttery, cheesy crust. The Irish cheddar adds a sharp, tangy flavor to the dough, perfectly complementing the savory filling. You’ll love how the tender beef melts in your mouth, contrasted by the flaky, golden crust. Whether you’re preparing a cozy family dinner or impressing guests with a classic dish, these pot pies are sure to delight.

Ingredients

  • Unsalted butter
  • Shredded sharp cheddar cheese
  • Flour
  • Sugar
  • Salt
  • Dry mustard
  • Cayenne pepper
  • Ice water
  • Vegetable oil
  • Beef chuck meat
  • Salt & pepper
  • Onion
  • Carrots
  • Garlic
  • Fresh thyme
  • Fresh marjoram
  • Flour
  • Canned beef broth
  • Water
  • Dijon mustard
  • Fresh parsley
  • Egg

Instructions

  1. Place the cut-up butter pieces in the freezer for 15 minutes to chill.
  2. Meanwhile, in the work bowl of a food processor, combine flour, sugar, dry mustard, salt, and cayenne pepper. Pulse to combine.
  3. After the butter has chilled, scatter the pieces over the flour mixture (still in the food processor), along with the cheddar. Pulse about 10 times.
  4. Sprinkle half the ice water over the dough, pulse about 3 times, repeat with remaining water, pulsing 3 more times. Pinch the dough to check if it sticks together; if not, add a tablespoon or two more ice water, until it comes together.
  5. Dump the mix in a large bowl and press it together to form the dough. Divide dough in half, shaping each into a 4-inch disk. Wrap each piece in plastic wrap and refrigerate at least an hour.
  6. Begin the filling: Pat the meat dry with paper towels and season with salt & pepper.
  7. Heat 2 teaspoons of oil in a large skillet over medium-high heat until just smoking. Add the meat in a single layer and cook, without stirring, until the meat browns well on the underside, anywhere between 5-10 minutes.
  8. Stir the meat and cook another couple of minutes, until it loses the raw color. Remove to a plate and set aside.
  9. Reduce heat to medium, add the remaining 2 teaspoons of oil, and the onions and carrots. Sauté until softened and starting to brown, stirring occasionally, around 5 minutes.
  10. Add the garlic, thyme, and marjoram, and cook until very fragrant, about a minute. Stir in flour, cook and stir about a minute.
  11. Slowly add in the beef broth and water, then the meat, along with any juices left on the plate. Bring to a simmer, then reduce the heat to low, to med-low. Cover and cook, stirring occasionally, until the meat is just becoming tender, around 45 minutes.
  12. Remove from heat, add in the Dijon and parsley. Adjust seasoning with salt & pepper. Set aside to cool.

Tips

For the best results, ensure your butter is very cold before incorporating it into the dough. This helps create a flaky texture in the crust. When browning the meat, patience is key—avoid stirring too soon to allow a flavorful crust to form.

Variations & Substitutions

Feel free to experiment with different types of cheese in the crust—an aged Gouda or a sharp Swiss would provide a delightful twist. For a vegetarian version, substitute the beef with hearty mushrooms and swap the beef broth for vegetable stock. You can also add peas or potatoes to the filling for additional texture and flavor.

Storage

These pot pies can be made ahead and stored in the refrigerator for up to three days. To freeze, wrap the unbaked pies tightly in plastic wrap and aluminum foil, and store for up to two months. When ready to bake, simply add a few extra minutes to the baking time.

FAQ

Can I make the dough by hand if I don’t have a food processor?

Yes, you can make the dough by hand. Use a pastry cutter or your fingertips to work the butter and cheese into the flour mixture until it resembles coarse crumbs. Gradually add the ice water, mixing until the dough comes together.

What can I serve with these pot pies?

These pot pies are quite filling on their own, but a light side salad or some roasted vegetables can complement them beautifully. A glass of red wine or a robust ale pairs wonderfully with the rich flavors of the dish.

Can I use store-bought pie dough?

While homemade dough provides a unique flavor and texture, you can certainly use store-bought pie dough for convenience. Just be sure to add some shredded cheddar to the dough if you want to keep the cheesy crust element.

Nutrition

While I don’t have specific nutritional information for this recipe, it’s worth noting that these pot pies are an indulgence, combining buttery crusts and rich beef filling. Moderation is key, and you can always tailor the recipe to your dietary needs by adjusting the salt or using leaner cuts of beef.

Conclusion

Beef Pot Pies with Irish Cheddar Crust are more than just a meal; they’re a connection to cherished memories and a testament to the comforting power of homemade food. Whether you’re new to baking or a seasoned cook, this recipe invites you to enjoy the process and savor the results. Gather your loved ones, share a story or two, and enjoy the warmth and goodness these pot pies bring to your table.

Related update: Beef Pot Pies with Irish Cheddar Crust

Related update: Kung Po Chicken

Chocolate Nutella Walnut Cake | Made by Meaghan Moineau

Chocolate Nutella Walnut Cake

Intro

There’s nothing quite like the smell of a homemade cake wafting through the house. For me, it brings back fond memories of my childhood, sneaking into the kitchen to catch a whiff of whatever my grandmother was baking. One of my all-time favorites was her Chocolate Nutella Walnut Cake, a deliciously rich and nutty treat that always had the family gathered around, forks ready. This cake combines the deep, rich flavors of dark chocolate with the creamy, nutty goodness of Nutella and a satisfying crunch from walnuts. It’s a recipe passed down through generations, and I’m thrilled to share it with you today.

Why You’ll Love It

This Chocolate Nutella Walnut Cake is a dessert lover’s dream. Here are a few reasons why you’ll fall in love with it:

  • Rich and Decadent: The combination of dark chocolate and Nutella creates a luscious, melt-in-your-mouth experience.
  • Textural Delight: The walnuts add a crunchy texture that perfectly complements the soft, moist cake.
  • Simple to Make: With straightforward instructions and common ingredients, this cake is as easy to whip up as it is delicious.
  • Perfect for Any Occasion: Whether it’s a family gathering, a holiday, or a simple weekday treat, this cake is sure to please.

Ingredients

  • 3 large eggs
  • 1 cup sugar
  • 1 cup chopped walnuts
  • 1 cup Nutella
  • 100g dark chocolate, chopped
  • 1/2 cup butter
  • 1 cup all-purpose flour
  • 1 teaspoon baking powder
  • 1/4 teaspoon salt

Instructions

  1. Preheat your oven to 350°F (185°C).
  2. In a large mixing bowl, beat the eggs and sugar together until the mixture is light and fluffy.
  3. In a saucepan over low heat, melt the butter, dark chocolate, and Nutella, stirring constantly until smooth.
  4. Gradually add the melted chocolate mixture to the egg and sugar mixture, stirring continuously to combine.
  5. In a separate bowl, mix together the flour, baking powder, and salt. Gradually fold these dry ingredients into the wet mixture until well combined.
  6. Add the chopped walnuts to the batter and gently fold them in.
  7. Prepare a springform pan by greasing it with butter and lightly dusting it with flour.
  8. Pour the batter into the prepared pan, smoothing the top with a spatula.
  9. Bake in the preheated oven for 40 minutes, or until a toothpick inserted into the center of the cake comes out clean.
  10. Allow the cake to cool in the pan for 10 minutes before transferring it to a wire rack to cool completely.

Tips

To ensure your Chocolate Nutella Walnut Cake turns out perfectly every time, consider these helpful tips:

  • Room Temperature Ingredients: Make sure your eggs and butter are at room temperature before you begin. This helps achieve a smoother batter.
  • Don’t Overmix: When combining the dry ingredients with the wet, be careful not to overmix. This can lead to a dense cake.
  • Chop Walnuts Finely: For a more even distribution of walnuts throughout the cake, chop them finely.

Variations & Substitutions

Feel free to get creative with this recipe! Here are a few variations and substitutions you might like:

  • Nut-Free Option: If you’re not a fan of walnuts or have a nut allergy, you can omit them or substitute with chocolate chips for extra indulgence.
  • Different Nutella Flavors: Try using Nutella’s hazelnut spread with cocoa for a different flavor profile.
  • Gluten-Free Alternative: Substitute the all-purpose flour with a gluten-free flour blend for a celiac-friendly treat.

Storage

Store any leftover cake in an airtight container at room temperature for up to 3 days, or in the refrigerator for up to a week. For longer storage, wrap the cake tightly in plastic wrap and aluminum foil, then freeze for up to three months. Thaw it in the refrigerator overnight before serving.

FAQ

Can I use milk chocolate instead of dark chocolate?

Yes, you can substitute milk chocolate for dark chocolate if you prefer a sweeter taste. However, keep in mind that this will change the overall flavor profile of the cake.

What can I use instead of Nutella?

If you don’t have Nutella on hand, you can use any chocolate hazelnut spread or even a homemade version. Alternatively, peanut butter or almond butter can be used for a different twist.

How do I know when the cake is done?

The best way to check if the cake is done is to insert a toothpick into the center. If it comes out clean or with just a few crumbs, the cake is ready. Be careful not to overbake, as this can dry out the cake.

Nutrition

This cake is a decadent treat, so it’s best enjoyed in moderation. Each slice contains approximately:

  • Calories: 350
  • Fat: 20g
  • Saturated Fat: 9g
  • Cholesterol: 70mg
  • Sodium: 150mg
  • Carbohydrates: 38g
  • Sugar: 25g
  • Protein: 5g

Conclusion

Whether you’re a chocolate lover, a Nutella enthusiast, or simply someone who enjoys baking, this Chocolate Nutella Walnut Cake is sure to become a favorite in your dessert repertoire. It’s a perfect balance of rich flavors and delightful textures that will have you reaching for seconds. Bring a bit of nostalgia and warmth into your kitchen and share this delectable treat with your loved ones. Happy baking!

Related update: Chocolate Nutella Walnut Cake

Related update: Candy Cane Chocolate Marshmallows

Related update: Gluten-Free Tres Leches Cake

Thick, Fudgy, One Bowl Brownies | Made by Meaghan Moineau

Thick, Fudgy, One Bowl Brownies

Intro

There’s a certain magic in the smell of brownies baking that instantly transports me back to my grandmother’s kitchen. As a child, I would sit perched on a stool, eagerly watching her skillfully mix and pour, the sweet aroma enveloping the room. Those moments were pure bliss, punctuated by the heavenly taste of a freshly baked brownie, still warm and gooey from the oven. It’s this nostalgic memory that inspired me to create my own version of thick, fudgy, one bowl brownies—a recipe that’s as simple as it is delicious.

Why You’ll Love It

These brownies are everything a chocolate lover dreams of—rich, fudgy, and oh-so-chocolatey. Made in just one bowl, this recipe is perfect for those who crave indulgence without the fuss. Whether you’re a seasoned baker or a novice in the kitchen, these brownies will win you over with their simplicity and decadence. Plus, they’re versatile enough for any occasion, from a cozy night in to an elegant dinner party dessert. You’ll love how quickly they come together and the pure satisfaction they bring with every bite.

Ingredients

  • Semi-sweet chocolate
  • Unsweetened chocolate
  • Unsalted butter
  • Cocoa powder
  • Eggs
  • Vanilla extract
  • Table salt
  • Flour

Instructions

  1. Adjust an oven rack to the lower-middle position and heat the oven to 350°F.
  2. Line an 8-inch square baking pan with two pieces of foil and spray with vegetable oil spray.
  3. Melt the semi-sweet and unsweetened chocolate and butter in a large heatproof bowl set over a saucepan of barely simmering water, stirring occasionally with a spatula or wooden spoon until smooth.
  4. Remove the bowl from heat and stir in the cocoa powder until smooth. Set aside to cool.
  5. Once the mixture has cooled, stir in the eggs, sugar, vanilla, and salt until combined.
  6. Add flour, stirring until just combined.
  7. Transfer the batter to the prepared pan; spread the batter into the corners and smooth the surface using your spatula.
  8. Bake until slightly puffed and a toothpick or wooden skewer inserted into the center of the brownies comes out with a few moist crumbs attached, about 35-40 minutes.
  9. Cool the brownies on a wire rack to room temperature. If you’re impatient like me, even 5 minutes is enough to satisfy a chocolate craving!
  10. Loosen the edges with a paring knife and lift the brownies from the pan using the foil extensions. Cut the brownies into 1-inch squares and serve.

Tips

For the best results, use high-quality chocolate and cocoa powder. This will enhance the flavor and texture of your brownies. Make sure not to overmix the batter once the flour is added; this can result in a tougher brownie. Also, resist the temptation to cut the brownies too soon after baking; allowing them to cool helps them set properly, making them easier to slice.

Variations & Substitutions

Feel free to customize these brownies to suit your taste. You can add a handful of chopped nuts, such as walnuts or pecans, for some crunch. If you prefer a more intense chocolate flavor, sprinkle some chocolate chips into the batter. For a different twist, try adding a teaspoon of espresso powder to enhance the chocolate flavor. For those who need a gluten-free option, substitute the flour with a gluten-free baking mix.

Storage

Store your brownies in an airtight container at room temperature for up to 4 days. If you want to keep them longer, they can be frozen for up to 3 months. Simply wrap them tightly in plastic wrap and place them in a freezer-safe bag. Thaw at room temperature before serving.

FAQ

Can I double this recipe?

Yes, you can easily double the recipe and bake it in a 9×13-inch pan. Just be sure to adjust the baking time accordingly, checking for doneness around the 45-minute mark.

Can I use milk chocolate instead of semi-sweet?

While you can use milk chocolate, it will result in a sweeter brownie. If you prefer a balanced sweetness, stick with semi-sweet chocolate or adjust the sugar content to taste.

Nutrition

Each serving of these brownies (based on 16 servings) contains approximately:

  • Calories: 200
  • Fat: 12g
  • Saturated Fat: 7g
  • Carbohydrates: 24g
  • Sugar: 18g
  • Protein: 3g

Conclusion

Baking these thick, fudgy, one bowl brownies is not just about indulging in a sweet treat; it’s about creating memories and savoring the joys of homemade comfort food. Whether you’re sharing them with loved ones or enjoying a quiet moment alone, these brownies are sure to bring a smile to your face. So gather your ingredients, roll up your sleeves, and let the magic of baking bring a little warmth to your day.

Related update: Thick, Fudgy, One Bowl Brownies

Yorkshire Pudding | Made by Meaghan Moineau

Yorkshire Pudding: A Classic British Side Dish

Intro

There’s something magical about the aroma of Yorkshire pudding wafting through the house on a Sunday afternoon. This classic British side dish has been a staple in my family for generations, a recipe passed down from my grandmother who would make it every time we gathered around for our traditional Sunday roast. I still remember sitting in her cozy kitchen, eagerly watching her expertly whisk the batter, her movements so fluid and practiced. Now, I’m excited to share this beloved recipe with you, hoping it will become as cherished in your home as it is in ours.

Why You’ll Love It

Yorkshire pudding is the quintessential comfort food, a perfect companion to roast beef and gravy. Its golden-brown exterior and soft, airy interior make it a delightful addition to any meal. Not only is it delicious, but it’s also incredibly simple to make with just a few pantry staples. Whether you’re a seasoned cook or a beginner, you’ll find this recipe both accessible and rewarding. The best part? Watching your puddings rise to perfection in the oven, a sight that’s as satisfying as the taste.

Ingredients

  • 3 large eggs
  • 1 cup all-purpose flour
  • 1 cup milk
  • Pan drippings from roast beef (preferably)
  • 1/2 teaspoon salt

Instructions

  1. Preheat your oven to 400-450°F (200-230°C). The exact temperature can vary depending on your oven, so you may need to adjust slightly after making these a few times.
  2. Sift the flour and salt together, ensuring there are no lumps.
  3. In a separate bowl, beat the eggs and milk together until well combined.
  4. Slowly combine the wet ingredients with the dry ingredients, whisking until you have a smooth batter.
  5. Pour the beef drippings into a Yorkshire pudding tray or a muffin/cupcake tray, and place it in the oven to heat the oil until it’s sizzling hot.
  6. Carefully remove the tray from the oven and spoon a couple of tablespoons of the batter into each section of the pan.
  7. Return the tray to the oven and bake for about 20 minutes, or until the puddings are puffed and golden brown. Do not open the oven during baking, as this will cause your puddings to deflate.

Tips

For the best Yorkshire puddings, always ensure your ingredients are at room temperature before you start. This helps the batter to rise better. Additionally, using beef drippings adds a rich flavor, but if you’re in a pinch, vegetable oil is a suitable substitute. Just be sure that whatever fat you use is piping hot before adding the batter.

Variations & Substitutions

While traditional Yorkshire pudding is made with beef drippings, you can experiment with different fats like duck fat or even butter for varying flavors. For a vegetarian version, use a high-smoking point oil such as sunflower or canola. You can also add herbs like rosemary or thyme to the batter for an aromatic twist.

Storage

If you have leftovers, Yorkshire puddings can be stored in an airtight container in the fridge for up to two days. To reheat, simply pop them in a preheated oven at 350°F (175°C) for about 5-10 minutes until warmed through. Avoid using a microwave as it can make them soggy.

FAQ

Why aren’t my Yorkshire puddings rising?

There are a few reasons why Yorkshire puddings might not rise. Ensure your oven is properly preheated and that your batter is at room temperature. Also, make sure the oil in your pan is very hot before adding the batter. Opening the oven during cooking can also cause them to deflate.

Can I make the batter ahead of time?

Yes, you can prepare the batter a few hours in advance. Just cover it and leave it at room temperature. Giving the batter a bit of rest can actually help improve the texture of the puddings.

What should I serve with Yorkshire pudding?

Yorkshire pudding is traditionally served with roast beef and gravy, but it also pairs well with other roasted meats or even a rich vegetable stew. Some enjoy them with sweet toppings like jam for a unique twist!

Nutrition

Yorkshire pudding is relatively low in calories per serving, with about 150-200 calories per pudding depending on the size and ingredients used. It is a good source of protein from the eggs but should be enjoyed in moderation due to the fat content from the drippings.

Conclusion

Yorkshire pudding is not just a side dish; it’s a piece of culinary heritage that evokes warmth and nostalgia. By following this recipe, you’ll not only create a delicious addition to your roast dinners but also carry on a tradition that has delighted families for generations. I hope this recipe brings as much joy to your table as it does to ours. Happy cooking!

Related update: Yorkshire Pudding

10 Minute Brownies | Made by Meaghan Moineau

10 Minute Brownies

Intro

There’s something undeniably comforting about the aroma of freshly baked brownies wafting through the house. It takes me back to lazy Sunday afternoons at my grandmother’s home, where the kitchen was always a flurry of activity and the air was sweet with the scent of chocolate. These 10 Minute Brownies are my homage to those cherished childhood memories, offering a quick and delightful way to indulge in some homemade goodness without spending hours in the kitchen.

Why You’ll Love It

These brownies are a game-changer for dessert lovers. Not only are they incredibly easy to make, but they’re also deliciously rich and fudgy. Perfect for those moments when you’re craving something sweet but don’t have the time or energy to tackle a complex recipe. The combination of semisweet chocolate chips and finely-chopped walnuts provides a wonderful contrast of textures, while the unsweetened applesauce keeps them moist and slightly healthier. Whether you’re an experienced baker or a novice, this recipe is foolproof and sure to become a staple in your dessert repertoire.

Ingredients

  • 1 tablespoon baking powder
  • 1/3 cup canola oil
  • 1/4 cup finely-chopped walnuts
  • 1/2 cup semisweet chocolate chips
  • 1 cup sugar
  • 1 cup unbleached flour
  • 1/2 cup unsweetened applesauce
  • 1 teaspoon vanilla extract

Instructions

  1. Preheat your oven to 350 degrees F. Lightly oil a 6 x 9 inch baking pan and set it aside.
  2. In a small saucepan over low heat, combine the canola oil and semisweet chocolate chips, stirring occasionally until melted. Remove from heat and set aside.
  3. In a large mixing bowl, add the unsweetened applesauce, sugar, and vanilla extract. Blend well until smooth.
  4. Stir in the melted chocolate mixture into the applesauce mixture. Whip and blend until everything is well incorporated.
  5. Add the unbleached flour, baking powder, and finely-chopped walnuts to the mixture. Mix gently just until everything is combined. Be careful not to overmix.
  6. Spoon the brownie batter into the prepared baking pan, spreading it evenly.
  7. Bake in the preheated oven for 25 to 30 minutes, or until the top springs back when lightly touched. Be cautious not to overbake, as this will make the brownies dry.
  8. Let the brownies cool completely in the pan before cutting into squares. This ensures clean cut edges and helps them set properly.
  9. Store the brownies in a covered, airtight container in the refrigerator to maintain their freshness.

Tips

To ensure your brownies turn out perfectly every time, here are a few tips:

  • Always use fresh ingredients, especially the baking powder, for the best rise in your brownies.
  • If you prefer a more intense chocolate flavor, try using dark chocolate chips instead of semisweet.
  • Be patient and allow the brownies to cool completely before cutting. This helps them firm up, making them easier to slice.

Variations & Substitutions

Feel free to get creative with this recipe and make it your own!

  • Nut-Free: If you have a nut allergy, simply omit the walnuts. The brownies will still be deliciously chewy.
  • Vegan Option: Use a plant-based oil and ensure your chocolate chips are dairy-free.
  • Gluten-Free: Substitute unbleached flour with a 1:1 gluten-free flour blend for a celiac-friendly treat.
  • Extra Flavor: Add a teaspoon of instant coffee to enhance the chocolate flavor.

Storage

These brownies are best stored in an airtight container in the refrigerator, where they will stay fresh for up to a week. You can also freeze them for longer storage; just wrap each square in plastic wrap and place them in a freezer-safe bag. Thaw overnight in the refrigerator before eating.

FAQ

Can I use a different type of oil?

Yes, you can substitute canola oil with other neutral oils such as vegetable or sunflower oil. Coconut oil can be used for a slight coconut flavor, but keep in mind it will alter the taste slightly.

Can I make these brownies without sugar?

While sugar contributes to the texture and sweetness, you can experiment with natural sweeteners like honey or maple syrup. However, this will change the consistency of the batter, so adjustments may be needed.

How can I tell when the brownies are done baking?

The best way to check is by gently pressing the top of the brownies. If it springs back and looks set, they are likely done. You can also insert a toothpick; a few moist crumbs are fine, but it shouldn’t come out with wet batter.

Nutrition

While these brownies are a treat, they offer a slightly healthier twist with the use of unsweetened applesauce and walnuts. Each square (assuming 12 squares) contains approximately:

  • Calories: 150
  • Fat: 7g
  • Carbohydrates: 20g
  • Sugar: 12g
  • Protein: 2g

Please note that these values are estimates and can vary based on specific ingredients used.

Conclusion

These 10 Minute Brownies are a delightful, quick, and easy way to satisfy your chocolate cravings. Perfect for any occasion or just a simple weeknight treat, they bring the joy of baking to your kitchen without the hassle. Whether you stick to the classic recipe or decide to try one of the variations, you’re sure to fall in love with these rich, fudgy squares. So gather your ingredients, preheat your oven, and let the nostalgia of homemade brownies fill your home once again.

Related update: 10 Minute Brownies

Related update: Berry & Ricotta Danishes

Vegan Banana Nut Muffins | Made by Meaghan Moineau

Vegan Banana Nut Muffins

Intro

There’s something magical about the aroma of freshly baked banana nut muffins wafting through the house. It takes me back to Sunday mornings at my grandmother’s, where the kitchen was always bustling with warmth and sweetness. She had a knack for making everything feel special, and her banana nut muffins were no exception. Drawing inspiration from her, I’ve crafted a vegan version of this classic treat that retains all the comforting flavors without any animal products. Whether you’re a long-time vegan or just exploring plant-based baking, these muffins are sure to become a favorite in your home too.

Why You’ll Love It

This recipe is a delightful blend of nostalgia and modern dietary preferences. These Vegan Banana Nut Muffins are incredibly moist, thanks to the combination of mashed bananas and apple sauce. The addition of walnuts offers a satisfying crunch, while the agave nectar provides natural sweetness without the need for refined sugars. Perfect for breakfast, a snack, or even dessert, these muffins are versatile and delicious.

Ingredients

  • 1 tablespoon ground flaxseed
  • 3 tablespoons water
  • 1/2 cup agave nectar
  • 1/2 cup apple sauce
  • 3 ripe bananas, mashed
  • 1 teaspoon baking soda
  • 1/2 teaspoon salt
  • 1 cup flour
  • 1 cup whole-wheat flour
  • 1 teaspoon vanilla extract
  • 1/2 cup walnuts, chopped
  • Additional 1/3 cup walnuts for topping

Instructions

  1. Preheat your oven to 325°F (163°C) and position the rack in the middle.
  2. In a small bowl, mix the ground flaxseed with water and set it aside to thicken.
  3. If you’re using a loaf pan, grease and flour a 9x5x3 inch pan. For muffins, line the muffin pan with liners or grease and flour the pan.
  4. In a medium bowl, whisk together the all-purpose flour, whole-wheat flour, baking soda, and salt.
  5. In a large bowl, combine the thickened flaxseed mixture, agave nectar, and apple sauce until smooth.
  6. Add the flour mixture to the wet ingredients, stirring until just combined.
  7. Mix in the vanilla extract and mashed bananas until everything is well combined.
  8. Fold in 1/2 cup of the chopped walnuts.
  9. Pour the batter into the prepared loaf pan or muffin cups. Sprinkle the remaining 1/3 cup of walnuts on top.
  10. For the loaf, bake for 45 to 60 minutes. For muffins, bake for 25-30 minutes. The muffins are done when a thin knife inserted in the center comes out clean.
  11. Allow to cool for 10 minutes on a wire rack before removing from the pan.

Tips

For the best results, use overripe bananas with plenty of brown spots; they’re sweeter and mash easily. If you prefer a smoother texture, you can pulse the walnuts in a food processor before folding them into the batter. Always let your muffins cool completely before storing them to prevent them from becoming soggy.

Variations & Substitutions

If you don’t have agave nectar, maple syrup is a good substitute. For a gluten-free version, swap the flour with a 1:1 gluten-free baking blend. To add some extra flavor, consider incorporating a teaspoon of cinnamon or nutmeg to the dry ingredients. If you’re not a fan of walnuts, try pecans or almonds instead.

Storage

Once your muffins have cooled completely, store them in an airtight container at room temperature for up to 3 days. For longer storage, you can freeze them for up to 3 months. To reheat, simply thaw at room temperature or warm them in a 300°F (150°C) oven for about 10 minutes.

FAQ

Can I use frozen bananas for this recipe?

Yes, frozen bananas work well in this recipe. Make sure to thaw them completely and drain any excess liquid before mashing and adding them to the batter.

What can I use instead of apple sauce?

If you don’t have apple sauce on hand, you can substitute it with an equal amount of mashed sweet potato or pumpkin puree. Both options maintain the moisture level of the muffins beautifully.

Are these muffins suitable for a nut-free diet?

To make these muffins nut-free, simply omit the walnuts or replace them with sunflower seeds or pumpkin seeds for a similar texture.

Nutrition

Each muffin (assuming 12 muffins) contains approximately:

  • Calories: 180
  • Fat: 5g
  • Carbohydrates: 32g
  • Fiber: 3g
  • Sugar: 12g
  • Protein: 3g

Conclusion

These Vegan Banana Nut Muffins are a testament to how simple ingredients can come together to create something truly delightful. Whether you’re enjoying them with a cup of coffee in the morning or sharing them with friends over tea, they are bound to bring a smile to your face. Give this recipe a try, and let the comforting aroma fill your home, just like it did mine on those cherished Sunday mornings.

Related update: Vegan Banana Nut Muffins

Related update: Blueberry Almond Crescent Rolls

Hawaiian Cookie Tarts | Made by Meaghan Moineau

Hawaiian Cookie Tarts | Made by Meaghan Moineau

Title: A Sweet Escape to the Tropics: Hawaiian Cookie Tarts Recipe
Description: Dive into a world of tropical flavors with our Hawaiian Cookie Tarts. This delightful dessert, featuring the irresistible combination of coconut and pineapple, promises a taste of paradise. Perfect for family gatherings or a solo indulgence, these cookie tarts bring a touch of nostalgia and joy to any occasion. Follow our step-by-step guide to create these little bites of heaven in your kitchen.

Hawaiian Cookie Tarts: A Tropical Treat

As the oven warms up our cozy kitchen, the scent of sweet coconut and tangy pineapple transports me back to sun-drenched summer afternoons spent in my grandmother’s garden. There, among the fragrant blooms and the gentle hum of bees, we would gather as a family, sharing stories and laughter while eagerly awaiting the delightful treats she had whipped up for us. One such treat that always held a special place in my heart was her Hawaiian Cookie Tarts.

Ingredients:

– 1 cup all-purpose flour

– 1/2 cup powdered sugar

– 2 tablespoons cornstarch

– 1/4 cup apple sauce

– 1 teaspoon vanilla extract

– 1/4 cup granulated sugar

– 1 large egg

– 1/2 cup shredded coconut

– 1/2 cup pineapple preserves

– Butter (for greasing muffin pans)

– Confectioners’ sugar (for dusting)

Instructions:

1. Preheat and Prep: Start by preheating your oven to 350 degrees Fahrenheit. Lightly grease your muffin pans with a bit of butter to prevent sticking.
2. Make the Dough: In a large mixing bowl, combine 1 cup of all-purpose flour, 1/2 cup of powdered sugar, and 2 tablespoons of cornstarch. Stir these dry ingredients together. Gradually mix in 1/4 cup of apple sauce and 1 teaspoon of vanilla extract until a soft dough forms.
3. Shape and Bake: Roll the dough into 1-inch balls and place one in each muffin cup. Press the dough gently with your fingers to line the bottom and sides of each cup. Bake in the preheated oven for 8-10 minutes, just enough for the crusts to set without browning.
4. Add the Pineapple: Once the crusts are ready, remove the muffin pan from the oven and let them cool for a few minutes. Spoon 1 teaspoon of pineapple preserves into each muffin cup.
5. Coconut Topping: In a small bowl, whisk together 1/4 cup of granulated sugar, 1 large egg, and 1/2 cup of shredded coconut until you have a well-blended mixture. Spoon a teaspoon of this coconut mixture over the preserves in each cup.
6. Final Bake: Return the muffin pan to the oven and bake for another 23-33 minutes, or until the cookie crusts turn a lovely golden brown.
7. Cool and Serve: Allow the cookie tarts to cool in the pans on a cooling rack for about 30 minutes. Gently remove each tart, sprinkle with a dusting of confectioners’ sugar, and serve.

These Hawaiian Cookie Tarts are more than just a dessert; they are a vessel of cherished memories and a reminder of those blissful days spent with family. As you bite into the buttery crust and let the exotic flavors dance on your taste buds, I hope you too can feel the warmth and love that comes with each tart.

Difficulty Rating: 4/10 – These delightful treats are fairly easy to make, perfect for bakers of any skill level.
Classification: Dessert

Relive the nostalgia or create new memories by sharing these Hawaiian Cookie Tarts with your loved ones. Whether you’re hosting a gathering or savoring a quiet evening, these tarts are sure to bring a smile to everyone’s face. Enjoy your sweet escape to the tropics!

Read more about Appetizers

Read more about Main Dishes

Read more about Desserts

Related update: Vegan Banana Nut Muffins

Brownie Cupcakes | Made by Meaghan Moineau

Brownie Cupcakes | Made by Meaghan Moineau

Title: Brownie Cupcakes: A Sweet Journey through Time
Description: Dive into the rich, chocolatey world of Brownie Cupcakes, a dessert that blends the classic allure of brownies with the delightful form of cupcakes. With an easy-to-follow recipe, this treat is perfect for both beginner bakers and seasoned pros. Join us as we explore not only the steps to create these decadent delights but also the cherished family memories they evoke.

---


Brownie Cupcakes: A Sweet Journey through Time

Ah, the aroma of chocolate wafting through the house. It's a scent that instantly transports me back to my childhood kitchen, where the air was always filled with love and laughter. Brownie Cupcakes have been a staple in my family for as long as I can remember. A recipe passed down through generations, each bite carries with it a story, a memory, and a whole lot of love.


The Recipe *(Difficulty: 4/10 - Dessert)*
Ingredients:

- 4 oz unsweetened chocolate, chopped


- 1/2 cup unsalted butter


- 1 cup white granulated sugar


- 1 teaspoon vanilla extract


- 2 large eggs


- 3/4 cup all-purpose flour


- 1/4 teaspoon salt


Instructions:
1. Preheat and Prepare: Preheat your oven to 325 degrees F (170 degrees C). If using a turbo broiler, set it to 150 degrees. Line your muffin tin with cupcake liners.
2. Melt and Mix: In a stainless steel bowl placed over a saucepan of simmering water, melt the chopped chocolate and butter. Stir occasionally until the mixture is smooth. Remove from heat and let it cool slightly.
3. Combine Ingredients: Stir in the sugar until well blended. Add the vanilla extract. Then, incorporate the eggs one at a time, mixing well after each addition.
4. Finish the Batter: Gradually add the flour and salt, mixing until the batter is smooth and well-blended.
5. Bake: Evenly divide the batter among the prepared muffin cups. Bake in the preheated oven for about 20-25 minutes, or in the turbo broiler at 150 degrees for 13-15 minutes. The cupcakes are ready when a toothpick inserted into the center comes out with a few moist crumbs clinging to it.
6. Cool and Frost: Allow the cupcakes to cool in the pan for a few minutes before transferring them to a wire rack to cool completely. Once cooled, frost with your favorite icing.
A Nostalgic Bite

The first time I made these Brownie Cupcakes was with my grandmother. Her hands, though aged and worn, moved with the grace of a seasoned baker. She would hum a soft tune, a melody that seemed to make the chocolate melt smoother and the sugar sweeter. As a child, my job was to stir the batter, a task I took very seriously.


I remember the anticipation as we waited for the cupcakes to bake, my nose pressed against the oven door, watching them rise. When they were finally ready, we would let them cool just enough before slathering on a generous layer of homemade chocolate frosting.


Every bite was a burst of rich, chocolatey goodness, and every batch brought us closer together, sharing stories and laughter over cups of cocoa in the kitchen. To this day, every time I make Brownie Cupcakes, I feel her presence in each step, her love in each bite.


Conclusion

Brownie Cupcakes are more than just a dessert. They are a link to the past, a bridge to fond memories shared with loved ones. So, gather your ingredients, preheat your oven, and take a step back in time with this delightful recipe. Whether you're making them for a family gathering or a quiet night in, these cupcakes promise to fill your heart and home with warmth.


---


By blending cherished memories with a timeless recipe, Brownie Cupcakes are a testament to the simple joys of baking and the powerful connection between food and family.

Read more about Appetizers

Read more about Main Dishes

Read more about Desserts

Brownie Coffins | Made by Meaghan Moineau

Brownie Coffins | Made by Meaghan Moineau

Title: Crafting Sweet Memories with Brownie Coffins: A Spooky Delight for Every Occasion
Description: Dive into the world of deliciously spooky treats with our Brownie Coffins recipe. Perfect for Halloween or any time you want to add a touch of fun to your dessert table, these brownies are sure to delight both young and old. Discover how this simple yet whimsical recipe can bring back cherished family memories and create new ones. Rated 4/10 for difficulty, this dessert is accessible for bakers of all skill levels.

---


As the leaves turn golden and the air grows crisp, there’s a certain magic in the kitchen that only comes alive during the fall season. Halloween, with its promise of costumes, candies, and cozy gatherings, has always held a special place in my heart. And nothing encapsulates this time of year better than the deliciously eerie delight of Brownie Coffins.


Ingredients:

- 1/2 cup unsalted butter


- 1 cup sweet sugar


- 2 large eggs


- 1 teaspoon vanilla extract


- 1/3 cup dark chocolate cocoa powder


- 1/2 cup all-purpose flour


- 1/4 teaspoon baking powder


- 1/4 teaspoon salt


- White chocolate for decorating


- Candy pen and sprinkles for embellishment


Instructions:

1. Preheat your oven to 350 degrees F (175 degrees C). Prepare your Coffin Cake Pan by spraying it with baking spray to ensure easy removal.


2. In a microwave-safe bowl, melt 1/2 cup of unsalted butter until smooth.


3. In a large mixing bowl, combine the melted butter and 1 cup of sweet sugar. Stir until the mixture is smooth and creamy.


4. Add in the eggs and 1 teaspoon of vanilla extract, mixing well to incorporate a light, fluffy texture.


5. Gradually beat in 1/3 cup of dark chocolate cocoa powder until the mixture is rich and chocolatey.


6. Slowly add 1/2 cup of all-purpose flour, 1/4 teaspoon of baking powder, and 1/4 teaspoon of salt. Mix until all ingredients are fully integrated.


7. Pour the batter into your prepared coffin molds, filling each about 2/3 full to allow room for the brownies to rise.


8. Bake at 350 degrees F for 20 to 25 minutes. In my experience, 22 minutes yields a perfectly fudgy consistency.


9. Once baked, allow the brownies to cool completely before unleashing your creativity. Use melted white chocolate, a candy pen, and sprinkles to decorate each coffin, adding a spooky yet sweet touch.


Nostalgic Memory:

I vividly remember the first time we made these Brownie Coffins. It was a chilly October afternoon, and my grandmother had just unearthed a vintage coffin cake pan from her attic. The moment she placed it on the kitchen counter, my siblings and I were captivated. As we mixed the batter, the kitchen filled with the comforting aroma of chocolate and vanilla, evoking a warmth that only home baking can provide.


Decorating these brownies became a joyful family tradition. My grandmother would laugh as we competed to see who could create the most frightful yet adorable designs using white chocolate and sprinkles. Each bite was a sweet reminder of those cherished afternoons, where the laughter was as abundant as the sugar.


Difficulty Rating: 4/10
Classification: Dessert

This recipe, while simple, has the power to transport you back to those nostalgic moments, creating new memories with each delightful bite. Whether you’re crafting them for a Halloween party or a cozy family gathering, Brownie Coffins are sure to be a hit, bringing smiles and sweet nostalgia to your dessert table.

Read more about Appetizers

Read more about Main Dishes

Read more about Desserts

Whole Grain Pumpkin Bread | Made by Meaghan Moineau

Whole Grain Pumpkin Bread | Made by Meaghan Moineau

Title: Warm Memories and Wholesome Flavors: The Timeless Appeal of Whole Grain Pumpkin Bread
Description: Dive into the delightful world of Whole Grain Pumpkin Bread, a scrumptious treat that brings together the warmth of family memories and the heartiness of wholesome ingredients. Perfect for the fall season, this recipe combines the nostalgic aroma of spices with the nutritional benefits of whole grains, making it an irresistible addition to your baking repertoire. Join us as we explore how this beloved bread has become a cherished tradition in our family, offering comfort and joy with every slice.

---


As the leaves begin to turn and the air grows crisp, there’s one thing that always beckons me to the kitchen: the alluring promise of Whole Grain Pumpkin Bread. This delightful bread is more than just a seasonal treat; it is a tapestry of flavors and memories woven together into a timeless family tradition.


A Slice of Nostalgia

Every year, as autumn envelops our town in its golden embrace, my family gathers for our much-anticipated fall reunion. It’s a time for stories, laughter, and, of course, the comforting aroma of spices wafting from the kitchen. My grandmother, the matriarch and master baker of the family, would always be at the helm, orchestrating the creation of our beloved pumpkin bread.


I remember as a child standing on tiptoes, eagerly watching her blend the ingredients with practiced ease. There was magic in how she combined the light firmly packed brown sugar, aromatic cinnamon, and the rich sweetness of molasses to create a batter that promised so much more than just a loaf of bread. As the mixture transformed under her skilled hands, she would tell tales of her childhood, recounting how her mother had taught her the same recipe, passing down not just ingredients, but a legacy of love.


A Recipe Rooted in Tradition

Creating this Whole Grain Pumpkin Bread is a journey back to those cherished days. Start by preheating your oven to 375 degrees and greasing two loaf pans. In a large bowl, beat together the oil, brown sugar, and molasses until well blended, then mix in the eggs and canned pumpkin. The fragrance is sure to evoke memories of family gatherings, with cinnamon, ground cloves, and nutmeg adding their own nostalgic notes.


Next, stir in the whole wheat flour, baking soda, oat bran, wheat bran, and wheat germ, along with a pinch of salt, just until the mixture is moistened. As you fold in chopped pecans, imagine the laughter and chatter that filled the kitchen as my siblings and I waited impatiently for the bread to bake.


Pour the batter into the prepared loaf pans and bake for about an hour, or until a toothpick inserted in the center comes out clean. Let the loaves cool on a rack, though I must confess, the true magic happens when you let them rest overnight. The flavors deepen and meld, creating a bread that is not just food, but a heartfelt connection to those we hold dear.


A Wholesome Dessert for Any Occasion

While Whole Grain Pumpkin Bread is often considered a dessert, its nutritional profile makes it a versatile choice for any time of day. With the goodness of whole wheat flour, oat bran, and pecans, it offers a hearty, satisfying bite that pairs beautifully with a cup of coffee or a dollop of whipped cream.


Difficulty: 4/10

This recipe is delightfully simple, with a difficulty rating of 4 out of 10, making it accessible even to novice bakers. The ingredients are straightforward, and the process is forgiving, allowing you to focus on the joy of baking rather than the intricacies of technique.


Conclusion

Whole Grain Pumpkin Bread is more than just a recipe; it is a bridge between generations, a testament to the enduring power of family traditions. As you savor each slice, may it bring warmth to your heart and a smile to your face, just as it has for my family over the years. Whether you’re creating new memories or revisiting old ones, this bread is sure to become a cherished part of your own culinary story.

Read more about Appetizers

Read more about Main Dishes

Read more about Desserts

Brownie Cupcakes | Made by Meaghan Moineau

Brownie Cupcakes | Made by Meaghan Moineau

Title: Decadent Brownie Cupcakes: A Timeless Dessert with a Dash of Nostalgia

Description:

Indulge in the rich, chocolatey goodness of Brownie Cupcakes, a dessert that marries the classic allure of brownies with the delightful convenience of a cupcake. This recipe not only promises a sweet treat but also takes you on a nostalgic journey down memory lane. Rated a 3/10 on the difficulty scale, these cupcakes are simple enough for any baking enthusiast and perfect as a dessert for any occasion.

There’s something incredibly comforting about the smell of chocolate wafting through the house, a sensory delight that instantly transports me back to my grandmother’s cozy kitchen. Every Sunday, without fail, my family would gather at her place for dinner, and the highlight of our meal was always Grandma’s famous Brownie Cupcakes. The recipe, though simple, was a treasured family secret, passed down through generations, each batch carrying with it a sense of warmth and togetherness.

Ingredients:

– Unsweetened chocolate

– Unsalted butter

– White granulated sugar

– Vanilla extract

– Eggs

– All-purpose flour

– Salt

Instructions:

1. Preheat your oven to 325 degrees F (170 degrees C). If using a turbo broiler, set it to 150 degrees.
2. Melt the chopped chocolate and butter in a stainless steel bowl placed over a saucepan of simmering water. Stir until smooth, then remove from heat and let cool slightly.
3. Mix in the sugar using a hand mixer or a sturdy spoon. Add the vanilla extract, followed by the eggs, one at a time, ensuring each is well incorporated before adding the next.
4. Combine the flour and salt, then gently fold into the chocolate mixture until well blended.
5. Divide the batter evenly between the muffin cups, ensuring each is filled about three-quarters full.
6. Bake in the preheated oven for 20 – 25 minutes. If using a turbo broiler, bake for 13-15 minutes. Check for doneness with a toothpick; it should come out with a few moist crumbs.
7. Cool the cupcakes on a wire rack. Once cooled completely, frost with your favorite icing.

These Brownie Cupcakes are rated a 3/10 in difficulty, making them an accessible dessert option for bakers of all skill levels. The simplicity of the ingredients and the straightforward steps mean you can focus on enjoying the process and, of course, the mouthwatering results.

As you take a bite of these delectable treats, let the rich, chocolatey flavor remind you of cherished family moments. Whether you’re creating new memories or reliving old ones, these Brownie Cupcakes are more than just a dessert; they’re a piece of history, a sweet slice of nostalgia that continues to bring joy to every gathering.

Read more about Appetizers

Read more about Main Dishes

Read more about Desserts

Related update: Red Velvet Cupcake

Jam Tarts | Made by Meaghan Moineau

Jam Tarts | Made by Meaghan Moineau

Title: Sweet Nostalgia: Crafting Timeless Jam Tarts


Description:

Dive into the heartwarming world of homemade Jam Tarts—a delicious dessert that not only tantalizes your taste buds but also weaves a tapestry of cherished family memories. Discover how these delightful treats can transform a simple day into a celebration of love and tradition.

---


The Heartfelt Journey of Jam Tarts


There's something profoundly comforting about the aroma of Jam Tarts wafting through the kitchen. This classic dessert, with its golden, flaky crust and sweet, luscious jam center, has been a staple in my family for generations. It's more than just a recipe; it's a story, a tradition, a piece of home.


Ingredients:

- 1 cup butter, melted- 4 oz cream cheese, softened

- 2 tbsp maple syrup


- 1 tbsp lemon juice


- 2 cups unbleached flour


- Your favorite jam (strawberry, raspberry, or apricot work wonderfully)


Instructions:

1. Begin by melting the butter in a saucepan over low heat.2. Once melted, blend in the cream cheese, maple syrup, and lemon juice until the mixture is smooth and well combined.

3. Gradually add the unbleached flour, stirring continuously until the dough is smooth and pliable.


4. Chill the dough overnight to ensure a firm texture.


5. Preheat your oven to 450°F (232°C).


6. Roll the chilled dough out to a 1/4-inch thickness on a lightly floured surface.


7. Using a 3-inch round cutter, cut out circles from the dough.


8. Make a small indentation in the center of each round and spoon a dollop of your chosen jam into it.


9. Place the prepared rounds on oiled cookie sheets.


10. Bake for 15 minutes or until the crusts are golden brown and slightly flaking.


11. If the crusts are not perfectly golden, return them to the oven for a few additional minutes.


12. Allow the tarts to cool slightly before serving.


Memories in Every Bite

I remember the first time I made Jam Tarts with my grandmother. It was a rainy Saturday afternoon, the kind of day that calls for baking. As she guided me through the process, her kitchen filled with laughter and the sweet scent of tradition. I was just a child, thrilled at the prospect of creating something so delicious from scratch.

As we pulled the tarts from the oven, their golden crusts gleaming with promise, my grandmother shared stories of how this recipe was a favorite during her childhood. She spoke of summer picnics and holiday gatherings where these tarts took center stage. Each bite was a reminder of simpler times and the love that binds us across generations.


A Dessert for All Occasions

Jam Tarts are a delightful dessert, perfect for any occasion—from family gatherings to casual afternoon tea. They are simple to make yet impressive enough to charm your guests. With a difficulty rating of 4 out of 10, these tarts are an excellent choice for both novice and experienced bakers alike.

In the end, Jam Tarts are more than just a dessert. They are a symbol of continuity and connection, a sweet reminder that the best recipes are those shared with love. Whether you are creating new memories or honoring old ones, these tarts are sure to bring joy to your table.


So, next time you find yourself yearning for a taste of nostalgia, roll up your sleeves, gather your ingredients, and let the magic of Jam Tarts fill your home—and your heart.

Read more about Appetizers

Read more about Main Dishes

Read more about Desserts

Easy Turtle Pumpkin Pie | Made by Meaghan Moineau

Easy Turtle Pumpkin Pie | Made by Meaghan Moineau

Title: Indulge in Autumn Bliss: Easy Turtle Pumpkin Pie Recipe
Description: Dive into the comforting flavors of fall with our Easy Turtle Pumpkin Pie. This gluten-free dessert is a delightful blend of luscious pumpkin, velvety caramel, and crunchy pecans, all nestled in a rich chocolate cookie crust. Perfect for family gatherings or a cozy evening treat, this recipe promises to be a crowd-pleaser.

---


A Slice of Autumn: Easy Turtle Pumpkin Pie


There’s something about the crisp air of autumn that beckons for a cozy evening with family, wrapped in the warmth of shared stories and laughter. In my family, fall has always been synonymous with baking, particularly the sweet, lingering aroma of pumpkin pie wafting through the house. This tradition was lovingly passed down from my grandmother, whose kitchen was a haven of delectable treats and heartfelt memories.


One recipe that stands out in this cherished collection is the Easy Turtle Pumpkin Pie. It’s more than just a dessert; it’s a symbol of our family’s culinary lineage, adapted and refined over the years to suit our evolving tastes.


Ingredients:

- Crust:

- Gluten-free chocolate sandwich cookies


- Butter


- Filling:

- Heavy whipping cream


- Sugar


- Vanilla pudding mix


- Canned pumpkin puree


- Milk


- Cinnamon


- Toppings:

- Caramel sauce


- Pecans


Instructions:

1. Preheat your oven to 350°F (175°C). In a large mixing bowl or the bowl of a stand mixer, combine heavy whipping cream and sugar. Beat until stiff peaks form and set aside.
2. Crust Creation: In a food processor, pulse the gluten-free chocolate sandwich cookies and butter until finely ground. Press this mixture into a 9-inch pie plate and bake for 10 minutes. Once baked, set aside to cool.
3. Filling: In a large bowl, combine vanilla pudding mix, canned pumpkin puree, milk, and cinnamon. Stir until well combined. Gently fold in half of the whipped cream and pour the mixture into your prepared crust.
4. Toppings: Spread the remaining whipped cream over the pie. Drizzle with caramel sauce and sprinkle pecans generously on top.
5. Refrigerate for at least 1 hour, or prepare a day ahead and let it chill overnight for optimal flavor melding.

During our family gatherings, the unveiling of the Easy Turtle Pumpkin Pie was always a moment of excitement. The rich, chocolatey crust combined with the creamy pumpkin filling and the delightful crunch of pecans was a recipe for pure joy. My grandmother would often recount tales of her childhood, sharing anecdotes of how she first learned to make this pie, her stories intertwining with the sweet aroma of cinnamon and caramel.


The pie was a centerpiece, not just of our table, but of our conversations, sparking nostalgia and creating new memories simultaneously. Each bite was a reminder of the love and warmth that enveloped our family, especially during the cooler months.


Difficulty:

This recipe is straightforward and beginner-friendly, with a difficulty rating of 3 out of 10. Perfect for novice bakers or those short on time, it’s classified as a Dessert.

So, as the leaves turn and the days grow shorter, gather your loved ones, dust off your apron, and share in the magic of this Easy Turtle Pumpkin Pie. It’s more than just a dessert; it’s a tradition, a memory, and an invitation to savor the essence of fall.

Read more about Appetizers

Read more about Main Dishes

Read more about Desserts

Peach Pie | Made by Meaghan Moineau

Peach Pie | Made by Meaghan Moineau

Title: A Slice of Nostalgia: The Timeless Charm of Homemade Peach Pie


Description: Dive into the comforting embrace of a homemade Peach Pie, a dessert that weaves together family memories and the sweet taste of summer. With a rich almond twist and the golden allure of fresh peaches, this pie is more than just a treat—it's a heartfelt journey back to simpler times.


---


A Journey Through Time with Peach Pie


There’s something undeniably magical about the aroma of a peach pie wafting through the house. It’s a scent that instantly transports me back to sunny afternoons in my grandmother’s kitchen, where the world seemed to slow down just enough for us to savor every moment. Her kitchen was a haven of warmth and love, a place where the simplest ingredients transformed into stories and traditions.


One of my favorite memories is the summer we spent harvesting peaches from the orchard behind her house. I was no more than eight, and my tiny hands could barely grasp the weight of the ripe, juicy peaches. Yet, the thrill of plucking each fruit directly from the tree was unmatched. Those peaches, with their sun-kissed skins and sweet fragrance, would soon find their way into my grandmother’s legendary Peach Pie.


This pie was always the highlight of our family gatherings. The key to her unforgettable recipe lay in the unexpected addition of almond paste, which added a nutty depth that perfectly complemented the peaches’ natural sweetness. As she prepared the pie, I’d watch, entranced, as she expertly mixed the brown sugar and heavy cream, folding in the vanilla extract with a grace that only comes from years of practice.


---


Recipe: Peach Pie


Ingredients:

- Almond paste- 1 cup brown sugar

- 2 brown eggs


- 1 cup heavy cream


- 1 pastry crust


- 4 cups cut up peaches


- 1 teaspoon vanilla extract


Instructions:

1. Preheat the oven to 350°F (175°C).2. Place the pastry dough in a 9-inch round pie plate. Lightly poke the pastry with a fork and prebake for 8 minutes.

3. Remove from the oven and set aside to cool slightly.


4. In a large bowl, whisk together the eggs, almond paste, heavy cream, brown sugar, and vanilla extract until smooth.


5. Arrange the cut-up peaches evenly in the prebaked pastry shell.


6. Pour the egg mixture over the peaches, ensuring they are well-covered.


7. Bake in the oven for 45 minutes or until the middle is firm and set.


---


Difficulty: 4/10


Classification: Dessert


---


The first bite of this pie is always a revelation—a burst of juicy peaches enveloped in a creamy, nutty custard, all cradled within a flaky pastry crust. It’s a reminder that the best desserts are those that connect us to our past, evoking memories of laughter-filled kitchens and the love shared around a family table.


Every time I make this Peach Pie, I’m reminded of those cherished moments with my grandmother, her hands guiding mine as we rolled out dough and filled the house with laughter. It’s a tradition I now pass down to my own children, ensuring that our family’s love for this timeless dessert continues for generations to come.


So, gather your loved ones and embark on your own nostalgic journey with this delightful Peach Pie. It’s more than just a dessert; it’s a piece of history, a slice of love, and a lasting legacy.

Read more about Appetizers

Read more about Main Dishes

Read more about Desserts

Lemon Curd Cheesecake | Made by Meaghan Moineau

Lemon Curd Cheesecake | Made by Meaghan Moineau

Zesty Bliss: The Irresistible Lemon Curd Cheesecake


A Tangy Delight to Brighten Your Day


Description:

Dive into a world where creamy meets zesty with our Lemon Curd Cheesecake recipe. This delightful dessert combines the richness of cream cheese with the tang of fresh lemons, creating a symphony of flavors that dance on your palate. Perfect for any occasion, this cheesecake is both a feast for the eyes and the taste buds. Whether you're a seasoned baker or just starting out, this recipe will guide you to dessert perfection with ease.


Keywords: Lemon Curd Cheesecake, creamy dessert, lemon zest, cheesecake recipe, family dessert, zesty flavors

Ingredients:


- 200g digestive biscuit crumbs


- 100g unsalted butter, melted


- 600g cream cheese


- 200g sugar


- 3 eggs


- 2 tablespoons gelatin powder


- 1 cup lemon curd (reserve 1/2 cup for topping)


- 2 tablespoons lemon juice


- Zest of 2 lemons


- 1 cup whipping cream


Instructions:


Step 1: Prepare the Crust


1. In a bowl, mix the digestive biscuit crumbs with melted butter until well combined.


2. Press the crumb mixture firmly onto the base of a loose-bottom springform pan.


3. Refrigerate to set.


Step 2: Make the Lemon Curd


1. Using a double boiler, combine the lemon curd ingredients over gently simmering water.


2. Stir continuously until the mixture thickens and coats the back of a spoon.


3. Remove from heat and allow it to cool completely.


Step 3: Prepare the Filling


1. In a small bowl, combine water and gelatin powder. Allow the gelatin to swell, then dissolve over simmering water. Let it cool.


2. In a large bowl, beat cream cheese with an electric mixer until smooth.


3. Gradually add sugar, followed by lemon zest, lemon juice, and lemon curd (reserving 1/2 cup for topping).


4. Gently fold in the whipped cream with a spatula.


5. Add the dissolved gelatin to the cream cheese mixture and mix until well combined.


Step 4: Assemble and Chill


1. Pour the filling over the prepared crust.


2. Chill in the refrigerator for at least 3 hours or until set.


Step 5: Decorate and Serve


1. Decorate the cheesecake edges with whipped cream.


2. Spread the reserved lemon curd over the top.


3. To serve, cut the cheesecake with a hot knife for clean slices. Enjoy!


A Slice of Nostalgia


Growing up, every summer family gathering was punctuated by the tangy and sweet notes of my grandmother's Lemon Curd Cheesecake. Her kitchen was a haven of zesty aromas as she tirelessly perfected her signature dessert. I remember helping her zest lemons and sneak a taste of the tart lemon curd when she wasn't looking. It was more than just a dessert; it was a symbol of our family's love and togetherness.


Each bite brings back memories of laughter and stories shared around the dining table, the sunshine filtering through the kitchen window as we eagerly awaited dessert. This cheesecake is not just a treat; it's a cherished family tradition that I am thrilled to share with you.


Difficulty Rating: 6/10


Classification: Dessert

Embark on this delightful culinary journey and create your own cherished memories with this exquisite Lemon Curd Cheesecake. Happy baking!

Read more about Appetizers

Read more about Main Dishes

Read more about Desserts