Berry Fruit Crumble | Made by Meaghan Moineau

Berry Fruit Crumble | Made by Meaghan Moineau

Title: A Taste of Nostalgia: Indulging in a Classic Berry Fruit Crumble
Description: Dive into the warmth and comfort of a classic Berry Fruit Crumble, a dessert that not only delights the palate but also stirs cherished family memories. With its perfect blend of fresh berries and crunchy oatmeal topping, this recipe is an easy and delightful end to any meal.

---


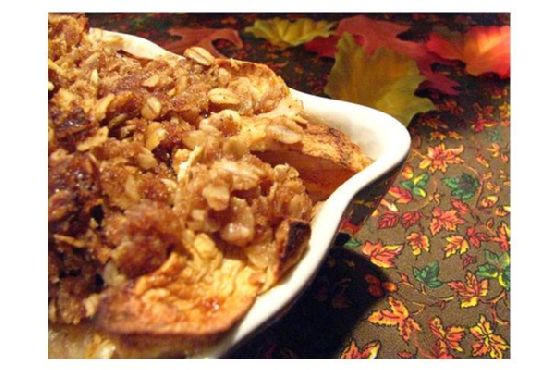
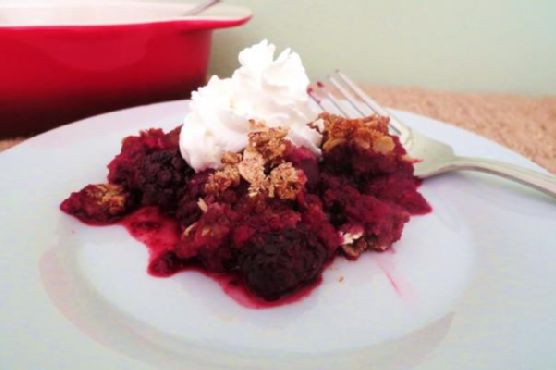
There's something inherently comforting about a dessert that combines the vibrant flavors of fresh berries with the warm, crunchy goodness of an oatmeal topping. Our Berry Fruit Crumble is a delightful dessert, easy to make yet rich in flavor—a perfect way to end any meal on a sweet note.


Ingredients:

- Fresh mixed berries


- Maple syrup


- Old-fashioned oatmeal


- Almond meal


- Brown sugar


- Ground cinnamon


- Light margarine


Instructions:

1. Preheat your oven to 350°F (175°C).


2. In a baking dish, combine the fresh mixed berries with a generous drizzle of maple syrup. Give it a light stir and set aside.


3. In a small bowl, mix together the oatmeal, almond meal, brown sugar, and ground cinnamon.


4. Add the light margarine and crumble the mixture together using a fork until it resembles coarse crumbs.


5. Evenly sprinkle the oatmeal topping over the berry mixture in the baking dish.


6. Place in the oven and bake for 30 minutes, or until the top is a light golden brown.


*Note: If you don't have almond meal, simply grind some almonds in a food processor until they are crumbly, but be cautious not to process them too long, or you’ll end up with almond butter! Alternatively, whole wheat flour can be used as a substitute.*


Nutritional Information (per serving):

- Calories: 165


- Fat: 6.2g


- Cholesterol: 0mg


- Sodium: 32mg


- Potassium: 35mg


- Carbs: 24g


- Fiber: 6.5g


- Sugar: 10g


- Protein: 4g


Difficulty Rating: 3/10
Classification: Dessert

---


A Nostalgic Family Memory:

I remember the first time I made this Berry Fruit Crumble, vividly etched in my memory during a summer family reunion at my grandmother's country home. The air was filled with laughter, the sun casting a golden hue over the fields, and the unmistakable aroma of freshly baked crumble wafting through the kitchen.


My grandmother, ever the culinary maestro, would enlist the help of all her grandchildren in the kitchen. I was tasked with picking the ripest berries from her sprawling garden, a task I took on with an eager heart and berry-stained fingers. As I watched her combine the ingredients with practiced ease, I realized that this dish was more than just food; it was a love letter to our family, a tradition that brought us together.


When the crumble finally emerged from the oven, its golden top crackling enticingly, we gathered around the table, spoons in hand, ready to dive into the delicious treat. Each bite was a burst of sweet and tangy flavors, a perfect harmony of textures that danced on our taste buds. It was a dish that transcended time, a dessert that, even years later, still evokes the warmth and love of those summer days.


Creating this Berry Fruit Crumble has become a cherished ritual in my own home, a way to share a piece of family history with my loved ones. It's more than just a dessert; it's a flavorful journey back to the days of laughter and togetherness, a reminder that some of life's sweetest moments are best shared over a warm crumble.

Read more about Appetizers

Read more about Main Dishes

Read more about Desserts

Shortbread Lemon Cookies | Made by Meaghan Moineau

Shortbread Lemon Cookies | Made by Meaghan Moineau

Zesty Delights: Nostalgic Shortbread Lemon Cookies


A Journey of Taste: The Sweet and Tangy Embrace of Lemon Cookies


Imagine the vibrant zest of lemon mingling with the buttery goodness of shortbread, creating a perfect symphony of flavors that dance on your taste buds. Shortbread Lemon Cookies are not just a treat; they are a journey back to cherished family memories and sunny afternoons filled with laughter. With a difficulty rating of 4 out of 10, these delightful cookies are an easy yet impressive dessert to share with loved ones.


The Ingredients of Joy


To embark on this flavorful journey, gather these simple yet transformative ingredients:

- 1 cup butter, softened


- 2 eggs


- 1 tablespoon lemon zest


- 1 cup almond flour


- 1/2 cup caster sugar


- 1 1/2 cups all-purpose flour


- 2 tablespoons lemon juice


- Whole dried lemons, sliced


- Powdered sugar (optional)


A Recipe Steeped in Family Tradition


Growing up, the aroma of lemon cookies wafting through my grandmother’s kitchen signaled the start of summer. These cookies were more than just a treat; they were a symbol of our family’s love for gathering and sharing stories. I remember sitting on the porch, a plate of freshly baked cookies in my lap, as my grandmother recounted tales from her childhood.


The tradition was simple yet profound: each summer, we would make these cookies together, measuring ingredients and sharing laughter. The tangy aroma of lemon zest would fill the air as we shaped the dough into perfect rolls. These moments taught me the joy of baking and the importance of family bonds.


Crafting Your Own Memories: Instructions


1. Prepare the Base: Beat the softened butter with one egg until creamy. Gradually add the almond flour, caster sugar, all-purpose flour, and lemon juice, mixing on the lowest setting until a smooth dough forms.
2. Chill the Dough: Divide and shape the dough into two rolls, each about 2 inches in diameter. Wrap them in parchment paper and refrigerate for at least 3 hours to firm up the dough.
3. Ready the Oven: Preheat your oven to 350°F (175°C). While waiting, revel in the anticipation of the deliciousness to come.
4. Slice and Arrange: Once chilled, slice each log into cookies about 1/8 inch thick. Place them on a lightly greased baking sheet, leaving space for them to expand slightly.
5. Add a Golden Touch: Beat the second egg and gently brush the top of each cookie. Crown each with a slice of dried lemon and sprinkle with a touch of sugar.
6. Bake to Perfection: Bake in the preheated oven for 12-15 minutes. For a beautifully browned top, place the cookies under the broiler for the last 5 minutes. Allow them to cool on a wire rack.
7. Optional Elegance: Dust with powdered sugar for an added touch of elegance and a hint of sweetness.

A Sweet Conclusion


Shortbread Lemon Cookies are more than just a dessert; they are a gateway to cherished memories and the creation of new ones. Whether enjoyed on a warm summer day or as a treat during a cozy gathering, these cookies bring joy and connection to any occasion. So, gather your loved ones, embrace the nostalgia, and let the magic of lemon and shortbread transport you to a place of warmth and happiness.


Enjoy the journey, and happy baking!

Read more about Appetizers

Read more about Main Dishes

Read more about Desserts

10 Minute Brownies | Made by Meaghan Moineau

10 Minute Brownies | Made by Meaghan Moineau

Title: Whip Up Delight: 10-Minute Brownies That Bring Back Family Memories
Description: Discover the joy of baking with our quick and easy 10-Minute Brownies recipe! This delightful dessert combines rich, chocolaty goodness with a touch of nostalgia. Perfect for any sweet tooth, these brownies are a breeze to make and promise to become a family favorite. Follow our simple steps, and let this dessert bring a smile to your face and warmth to your heart.

---


When it comes to desserts that offer comfort and joy in every bite, brownies often top the list. Our 10-Minute Brownies are not just about convenience; they are about creating memories and savoring the sweet moments that life has to offer. With simple ingredients like semisweet chocolate chips, unsweetened applesauce, and finely-chopped walnuts, these brownies are both delicious and reminiscent of cherished family gatherings.


Ingredients You'll Need


- Baking Powder
- Canola Oil
- Finely-Chopped Walnuts
- Semisweet Chocolate Chips
- Sugar
- Unbleached Flour
- Unsweetened Applesauce
- Vanilla Extract

Instructions


1. Preheat your oven to 350 degrees F. Lightly oil a 6 x 9-inch baking pan and set it aside.


2. In a small saucepan over low heat, combine the canola oil and semisweet chocolate chips. Stir occasionally until the chocolate is melted. Remove from heat and set aside.


3. In a large bowl, add the unsweetened applesauce, sugar, and vanilla extract. Blend well.


4. Stir in the melted chocolate mixture. Whip and blend thoroughly.


5. Add the unbleached flour, baking powder, and finely-chopped walnuts. Mix just until combined.


6. Spoon the batter into the prepared baking pan.


7. Bake for 25 to 30 minutes, or until the top springs back when lightly touched. Be cautious not to overbake, as this will make the brownies dry.


8. Let the brownies cool completely before cutting them into squares. Store in a covered, airtight container in the refrigerator.


A Sweet Family Memory


As I watch the chocolate melt and blend with the rich aroma of vanilla, I am transported back to my grandmother's cozy kitchen. Every Sunday, our family would gather at her house, and the highlight of the day was always her famous brownies. I remember sitting on the counter, my legs swinging as I eagerly waited to lick the batter off the spoon. Grandma would wink at me and say, "The secret ingredient is love." These brownies were more than just a treat; they were the sweet thread that wove our family together, creating a tapestry of laughter and love.


Difficulty Rating: 3/10


Classification: Dessert


These 10-Minute Brownies are a testament to the magic that happens when simple, wholesome ingredients are combined with a sprinkle of nostalgia. Whether you're baking for a family gathering or simply treating yourself, this recipe promises to deliver rich, chocolaty goodness in every bite. So, don your apron, and let these brownies bring a touch of sweetness to your day!

Read more about Appetizers

Read more about Main Dishes

Read more about Desserts

Apple Brown Betty | Made by Meaghan Moineau

Apple Brown Betty | Made by Meaghan Moineau

Title: "A Taste of Nostalgia: The Timeless Comfort of Apple Brown Betty"
Description: Dive into the heartwarming world of Apple Brown Betty, a classic dessert that has graced family tables for generations. With its simple yet flavorful ingredients, discover how this dish weaves together memories and tastes that are sure to delight both young and old. Rated 4/10 in difficulty, this dessert is perfect for any occasion that calls for a touch of sweetness and a sprinkle of nostalgia.

---


There’s something undeniably comforting about the aroma of apples and cinnamon wafting through the house, wrapping around you like a warm embrace on a chilly autumn evening. For many, including myself, this comforting aroma is synonymous with Apple Brown Betty, a dessert that has become a cherished family tradition.


The Magic of Apple Brown Betty


Apple Brown Betty is a dessert that celebrates simplicity while delivering robust flavors. The combination of diced apples, bread, and warm spices like cinnamon and nutmeg creates a delightful symphony of taste and texture. The addition of butter and a hint of lemon juice enhances the dish, while the golden-brown crust adds a satisfying crunch.


Ingredients:

- Diced apples


- Bread, cubed


- Butter


- Cinnamon


- Lemon juice


- Nutmeg


- White sugar


Instructions:

1. Preheat your oven to 375°F (190°C).


2. In a buttered 1-1/2 quart souffle dish, start with a layer of cubed bread.


3. Mix the diced apples with sugar, cinnamon, and nutmeg.


4. Cover the bread with a layer of the apple mixture.


5. Dot with butter and drizzle with a little lemon juice and rind.


6. Repeat the layering process, ending with a layer of bread cubes.


7. Cover and bake for 30 minutes.


8. Uncover and bake for an additional 30 minutes, until the apples are tender and the crust is golden brown.


A Journey Down Memory Lane


For me, Apple Brown Betty is more than just a dessert; it’s a portal to cherished memories. I recall the first time my grandmother and I made this delightful dish together. It was a crisp October afternoon, the kind when the leaves danced in the wind and painted the ground in hues of amber and gold. My grandmother, with her apron tied snugly around her waist, guided my small hands through the process of layering the bread and apples.


As the dish baked, we sat by the kitchen table, sipping hot cocoa and sharing stories. She spoke of her childhood, weaving tales of her own mother making the same dessert in a small country kitchen. The anticipation grew with every tick of the clock, and when the timer finally chimed, the kitchen was enveloped in an intoxicating scent that remains etched in my memory.


A Dessert for All Occasions


Rated at 4/10 in terms of difficulty, Apple Brown Betty is an ideal dessert for both novice and seasoned bakers. The straightforward preparation and familiar ingredients make it an accessible choice for any home cook. Whether it’s a cozy family dinner or a festive holiday gathering, this dessert is sure to be a beloved staple on your table.


The Apple Brown Betty is more than just a dish; it’s a treasured part of family history. With every bite, you’re not only savoring a delicious dessert but also indulging in a rich tapestry of memories and love. So why not gather your loved ones, roll up your sleeves, and create your own lasting memories with this timeless treat?

Read more about Appetizers

Read more about Main Dishes

Read more about Desserts

Cyndee’s Neiman Marcus Cake | Made by Meaghan Moineau

Cyndee's Neiman Marcus Cake | Made by Meaghan Moineau

Title: "Baking Memories: Crafting Cyndee's Neiman Marcus Cake in the Heart of the Family Kitchen"
Description: Discover the timeless joy of baking with Cyndee's Neiman Marcus Cake. This cherished family dessert, rich with flavors of lemon and vanilla, is the perfect blend of nostalgia and culinary delight. Join us as we delve into a heartfelt family story and guide you through this beloved recipe, rated at a moderate difficulty level of 6 out of 10.

---


There's something magical about the aroma of a cake baking in the oven. It has the power to transport you back in time, to a place where laughter echoes and cherished memories are etched in the heart. For our family, Cyndee's Neiman Marcus Cake holds such a place. This delightful dessert, bursting with the comforting flavors of lemon and vanilla, has become a symbol of love and togetherness in our home.


Ingredients:

- Baking soda


- Butter


- Cornstarch


- Cream cheese


- Eggs


- Flour


- Kosher salt


- Lemon zest


- Sour cream


- Sugar


- Vanilla extract


Instructions:
1. Preheat & Prep: Begin by preheating your oven to 350°F (175°C). Grease a 9 by 13-inch baking pan to ensure your cake releases smoothly once baked.
2. Cream & Blend: In the bowl of an electric mixer fitted with a paddle attachment, cream the butter and sugar on medium-high speed until light and fluffy, approximately 5 minutes. This step is crucial for creating that perfect cake texture.
3. Incorporate Wet Ingredients: On medium speed, add the eggs one at a time, followed by the sour cream, vanilla extract, and lemon zest. Be sure to scrape down the bowl as needed to ensure a well-combined mixture.
4. Combine Dry Ingredients: Sift together the flour, cornstarch, salt, and baking soda. With the mixer on low speed, gradually add this dry mixture to the butter mixture. Stir just until smooth, and finish mixing by hand to ensure everything is well incorporated.
5. Bake & Cool: Pour the batter evenly into the prepared baking pan. Mix the ingredients for the topping (cream cheese, sugar, perhaps a sprinkle of extra zest), and spread evenly on top of the batter. Bake for about 30-35 minutes. Once done, let the cake cool before removing it from the pan.
Nostalgic Family Memory:

Every family gathering was incomplete without Cyndee's Neiman Marcus Cake. I remember one particular summer afternoon when my grandmother, Cyndee, orchestrated a baking session with all her grandchildren. The kitchen was a whirlwind of activity, filled with giggles and flour-dusted faces. As the cake baked, she regaled us with stories of her childhood, weaving a tapestry of family history that seemed as rich and layered as the cake itself.


When the timer finally chimed, signaling the cake's completion, we gathered around the oven, anticipation palpable in the air. With a loving hand, Grandma sliced into the golden crust, revealing its soft, aromatic interior. That first bite was more than just a taste; it was a moment of pure joy, a connection to generations past and the promise of new memories to come.


Difficulty Rating: 6/10
Classification: Dessert

Cyndee's Neiman Marcus Cake is more than just a dessert; it's a journey through time, a delicious reminder of the power of food to bring people together. Whether you're recreating family memories or starting new traditions, this cake is sure to delight and impress. So gather your loved ones, roll up your sleeves, and experience the joy of baking this beloved family favorite.

Read more about Appetizers

Read more about Main Dishes

Read more about Desserts

Banana, Cranberry and Apple Bread | Made by Meaghan Moineau

Banana, Cranberry and Apple Bread | Made by Meaghan Moineau

Title: "Wholesome Nostalgia: Banana, Cranberry, and Apple Bread Recipe"
Description: Discover the heartwarming flavors of our Banana, Cranberry, and Apple Bread. This delightful dessert combines the sweetness of ripe bananas, the tartness of green apples, and the chewy texture of dried cranberries. Perfect for family gatherings or a cozy afternoon treat, this bread will surely evoke cherished memories.

---


There's something magical about stepping into a kitchen filled with the comforting aroma of freshly baked bread, especially when that bread is our Banana, Cranberry, and Apple Bread. This delightful dessert is not just a treat for the taste buds; it's a nostalgic journey back to the warm embrace of family traditions.


A Slice of Family History

Growing up, Sunday afternoons were a sacred time in my family. It was a day reserved for rest, laughter, and the comforting rituals that brought us together. My grandmother, the matriarch of our family, had a knack for creating delicious recipes that seemed to weave magic into our lives. One of her most beloved creations was her Banana, Cranberry, and Apple Bread.


I remember sitting on a stool in her cozy kitchen, watching her deftly combine ingredients, sharing stories of her childhood as she worked. Her voice was a melodic blend of wisdom and warmth, and her stories often revolved around her own mother, who had passed down this very recipe. It was a legacy, a thread of love that connected generations.


Ingredients

- 235g skinless bananas, mashed


- 125g dried cranberries


- 200g plain flour


- 140g sugar


- 1 green apple, grated


- 2 eggs


- 100g vegetable oil


- 1/2 cup milk


- 1 tsp vanilla extract


- 1 tsp baking powder


- 1/2 tsp baking soda


- 1/4 tsp salt


Instructions

1. Preheat your oven to 350°F (170°C). Line and grease a loaf pan with cooking spray to ensure easy removal.


2. In a large mixing bowl, combine the flour, baking powder, baking soda, salt, and sugar. Mix well and set aside.


3. In another mixing bowl, whisk together the eggs, milk, vegetable oil, and vanilla extract. Add the grated apple and mashed bananas to this mixture and stir until well combined.


4. Gradually add the dry ingredients to the wet mixture, stirring gently until just combined. Be careful not to overmix.


5. Fold in the dried cranberries, ensuring they are evenly distributed throughout the batter.


6. Pour the batter into the prepared loaf pan, smoothing the top with a spatula.


7. Bake for approximately 70 minutes, or until a skewer inserted into the bread comes out clean.


8. Allow the bread to cool in the pan for 10 minutes before transferring to a wire rack to cool completely.


A Timeless Treat

Every bite of this bread is a tribute to my grandmother's legacy. The sweetness of the bananas, the tartness of the apples, and the chewy texture of the cranberries create a harmonious blend of flavors that never fails to transport me back to those cherished Sunday afternoons.


Difficulty Rating: 4/10

This recipe is simple enough for beginners, yet it carries the elegance of a dessert that can grace any family gathering.


Classification: Dessert

Whether you're looking to recreate fond memories or start new traditions, this Banana, Cranberry, and Apple Bread is sure to delight. Gather your loved ones, share stories, and savor the sweet nostalgia baked into every slice.

Read more about Appetizers

Read more about Main Dishes

Read more about Desserts

Authentic Mexican Wedding Cookies | Made by Meaghan Moineau

Authentic Mexican Wedding Cookies | Made by Meaghan Moineau

Title: Savoring Tradition: Authentic Mexican Wedding Cookies
Description: Discover the sweet allure of Authentic Mexican Wedding Cookies with this easy-to-follow recipe that brings generations of tradition to your kitchen. Delve into the rich flavors of butter, pecans, and cinnamon, and be transported to cherished family gatherings where these delightful treats were always the star of the dessert table.

---


There’s something inherently magical about recipes that have stood the test of time, their aromas and flavors weaving through the tapestry of family memories. Authentic Mexican Wedding Cookies, with their delicate crumble and sugary coating, are one such timeless treat. These cookies, also known as polvorones, have been a beloved staple at celebrations in my family, their presence as comforting as a grandmother’s hug.


Ingredients:

- 1 cup butter, softened


- 2 cups powdered sugar, divided


- 2 teaspoons vanilla extract


- 2 cups all-purpose flour


- 1 cup pecans, finely chopped


- 1 teaspoon ground cinnamon


Instructions:

1. In a large bowl, use an electric mixer to beat the butter until light and fluffy.


2. Add 1/2 cup of powdered sugar and vanilla extract; continue beating until well blended.


3. Gradually beat in the flour, followed by the chopped pecans.


4. Divide the dough in half, forming each half into a ball. Wrap each ball in plastic wrap and chill for about 30 minutes.


5. Preheat your oven to 350°F (175°C).


6. In a pie dish, whisk together the remaining 1 1/2 cups of powdered sugar and the ground cinnamon. Set this cinnamon sugar mixture aside.


7. With half of the chilled dough, roll portions of dough (about 2 teaspoons each) between your palms to form balls. Place them on a large baking sheet, leaving about 1/2 inch between each ball.


8. Bake for 18 minutes, or until the cookies are golden brown on the bottom and just pale golden on top.


9. Allow the cookies to cool on the baking sheet for 5 minutes. While still warm, gently toss them in the cinnamon sugar to coat completely.


10. Transfer the coated cookies to a rack to cool completely. Repeat the process with the remaining dough.


11. Sift any remaining cinnamon sugar over the cooled cookies before serving.


A Family Memory:

These cookies always remind me of my grandmother's kitchen, bustling and warm during family gatherings. I remember one particular afternoon when I was about eight years old. The kitchen was filled with laughter and the rich scent of roasted pecans. My grandmother, with flour-dusted hands, showed me how to carefully roll the dough into perfect little balls. As the cookies baked, their aroma mingled with the cinnamon in the air, creating a scent that felt like home.


After they came out of the oven, she let me help coat them in the cinnamon sugar, warning me not to eat too many at once. Of course, I sneaked a few extra when she wasn't looking, savoring the sweet, nutty flavor. To this day, those cookies are more than just a dessert; they are a bridge to my heritage, a taste of love and tradition.


Difficulty: 4/10
Classification: Dessert

Embrace the simplicity and nostalgic charm of these Authentic Mexican Wedding Cookies. Whether you're a seasoned baker or new to the kitchen, this recipe promises to be a rewarding journey into culinary tradition. With each bite, you’ll find yourself part of a story that has been lovingly passed down through generations.

Read more about Appetizers

Read more about Main Dishes

Read more about Desserts

Brown sugar & Spice Sugar cookie frogs | Made by Meaghan Moineau

Brown sugar & Spice Sugar cookie frogs | Made by Meaghan Moineau

Title: "Jump Into Flavor: Nostalgic Brown Sugar & Spice Sugar Cookie Frogs"
Description: Dive into the world of nostalgic baking with our delightful Brown Sugar & Spice Sugar Cookie Frogs. With a rich blend of spices and a hint of sweetness, these cookies are not just a treat for your taste buds but a journey back to cherished family memories. Perfect for those cozy afternoons when you crave something comforting and delicious. Discover the magic of these charming cookies and learn how to make them at home with our easy-to-follow recipe.

---


Jump Into Flavor: Nostalgic Brown Sugar & Spice Sugar Cookie Frogs

There's something incredibly heartwarming about baking cookies that have a story behind them. The aroma that fills the kitchen, the anticipation of that first bite, and the cherished memories that come flooding back. Our Brown Sugar & Spice Sugar Cookie Frogs are more than just a delightful dessert—they are a portal to nostalgic family gatherings and joyful moments.


A Whisk of Nostalgia:

Growing up, the kitchen was always the heart of our home, especially during the holidays. I vividly remember the laughter and chatter that filled the air as my grandmother and I rolled out cookie dough on the old wooden table. She had a particular fondness for whimsical cookie shapes, and every year, without fail, we would bake her famous "frog" cookies. It wasn't just about baking; it was about the stories she shared of her own childhood, the old family recipes passed down, and the love that went into every batch.


These Brown Sugar & Spice Sugar Cookie Frogs are a tribute to those precious moments. The rich, warming spices of cinnamon, ginger, nutmeg, and allspice, combined with the sweetness of brown sugar, create a flavor profile that's both comforting and irresistible. The subtle crunch of the sugar cookie pairs perfectly with a glass of milk or a cup of tea, making it an ideal treat for any time of day.


Recipe: Brown Sugar & Spice Sugar Cookie Frogs
Ingredients:

- 2 ¾ cups unbleached flour


- 1 teaspoon baking powder


- 1 teaspoon cinnamon


- ½ teaspoon ginger


- ½ teaspoon nutmeg


- ¼ teaspoon allspice


- ¾ cup granulated sugar


- ¾ cup light brown sugar


- 1 cup (2 sticks) butter, softened


- 1 egg


- 1 teaspoon vanilla extract


Instructions:

1. Preheat your oven to 350°F (175°C) and line your baking sheets with parchment paper.


2. In a large bowl, whisk together the flour, baking powder, cinnamon, ginger, nutmeg, and allspice. Set aside.


3. In a separate bowl, cream the granulated sugar, brown sugar, and butter until light and fluffy.


4. Add the egg and vanilla extract to the sugar mixture and mix until well-blended.


5. Gradually add the flour mixture, beating just until combined. Remember to scrape down the bowl to incorporate all ingredients. The dough will be quite thick, so you may need to knead in stray bits of flour by hand.


6. Roll the dough on a floured surface and cut into frog shapes (or any shape you desire).


7. Place the cookies on the prepared baking sheets and bake for 9-12 minutes, depending on the size of your cutter.


8. Allow the cookies to sit for a few minutes on the sheet, then transfer to a cooling rack.


Difficulty Rating: 4/10
Classification: Dessert

These cookies are a delightful way to bring a piece of childhood magic into your home, perfect for sharing with family and friends or enjoying a moment of sweet nostalgia on your own. Whether you're a seasoned baker or a beginner, the simplicity and charm of these cookies make them a joy to create and savor.


So, gather your ingredients, preheat your oven, and let the enchanting aroma of Brown Sugar & Spice Sugar Cookie Frogs fill your kitchen. Relive those cherished memories or create new ones with every delicious bite.

Read more about Appetizers

Read more about Main Dishes

Read more about Desserts

Black Bean Brownies | Made by Meaghan Moineau

Black Bean Brownies | Made by Meaghan Moineau

Title: "Decadent Black Bean Brownies: A Sweet Twist on a Classic Treat"
Description:

Dive into the rich, chocolatey world of Black Bean Brownies—a delightful dessert that combines the wholesome goodness of black beans with the indulgent flavors of cocoa and chocolate. Perfect for health-conscious dessert lovers, these brownies are not only tasty but also packed with protein and fiber. Follow our simple recipe, enriched with a touch of nostalgia, to create a treat that will satisfy your sweet tooth and transport you back to cherished family moments.


---


The Magic of Black Bean Brownies: A Family Tradition

Growing up, weekends at Grandma's house were a treasure trove of aromas and laughter. Her kitchen was a sanctuary where culinary magic came alive with every dish she prepared. Among her beloved recipes, her unique twist on brownies stood out—a recipe that has since become a cherished family tradition. Grandma's Black Bean Brownies were a testament to her creativity and knack for infusing love into every bite.


I still vividly remember the first time I helped her make these brownies. The air was filled with the rich scent of cocoa and the faint hint of espresso, mingling with the warmth of family chatter. My little hands were eager to assist, and Grandma patiently guided me through every step. As I watched her skillfully blend the ingredients, she shared stories of her childhood and the origins of her secret recipe, which she discovered in an old cookbook long forgotten on a dusty shelf.


These brownies were more than a dessert; they were a symbol of family unity and the ingenuity that turned simple pantry staples into something extraordinary. The secret, Grandma revealed, was the black beans—an unexpected ingredient that added a creamy texture and a nutritious twist to the classic chocolate treat.


Recipe: Black Bean Brownies
Ingredients:

- 1 can (15 oz) black beans, drained and rinsed


- 2 tablespoons canola oil


- 1/4 cup unsweetened applesauce


- 2 large eggs


- 1 egg yolk


- 3/4 cup sugar


- 1/3 cup unsweetened cocoa powder


- 1 teaspoon espresso powder


- 1/2 cup semi-sweet chocolate, chopped


- 2 tablespoons unsalted butter


- 1 teaspoon vanilla extract


- 1/4 teaspoon salt


- 1/4 cup all-purpose flour


- 1/4 cup walnuts, chopped (optional)


Instructions:

1. Preheat your oven to 350°F (175°C). Line an 8x8-inch baking pan with foil and coat with nonstick cooking spray.


2. In a food processor, combine the black beans, canola oil, applesauce, eggs, egg yolk, sugar, cocoa powder, and espresso powder. Pulse for about 1 minute, or until the mixture is smooth.


3. In a microwave-safe bowl, combine the chopped chocolate and butter. Microwave for 1 minute, stirring halfway through. Continue stirring until smooth. Allow it to cool slightly.


4. Add the melted chocolate mixture, vanilla extract, and salt to the food processor and pulse to blend.


5. Transfer the batter to a large bowl and stir in the flour until fully incorporated.


6. Spread the batter evenly into the prepared baking pan. Smooth the top with a spatula and sprinkle with walnuts, if desired.


7. Bake for 25 to 30 minutes, or until a toothpick inserted into the center comes out clean. Allow the brownies to cool in the pan on a wire rack for 15 minutes before cutting them into squares.


Difficulty Rating: 4/10
Classification: Dessert

These Black Bean Brownies, enriched with memories and love, have become a staple dessert in our family gatherings, evoking nostalgia with every bite. Whether you're introducing them to your loved ones or savoring them alone, may they bring joy and a touch of that familial warmth to your table. Enjoy!

Read more about Appetizers

Read more about Main Dishes

Read more about Desserts

Peanut Butter Sriracha Cookies | Made by Meaghan Moineau

Peanut Butter Sriracha Cookies | Made by Meaghan Moineau

Spicy Sweet Nostalgia: Peanut Butter Sriracha Cookies


Description: Dive into a culinary adventure with our Peanut Butter Sriracha Cookies — where the classic comfort of peanut butter meets a fiery twist of sriracha. This unique dessert not only satisfies your sweet tooth but also tickles your taste buds with a subtle heat, making it the perfect conversation starter at any gathering. Rated a 4 out of 10 in difficulty, even novice bakers can tackle this recipe with ease. Join us as we blend flavors and memories, creating a treat that's as heartwarming as it is intriguing.

---


A Sweet and Spicy Family Tradition


Growing up, our family kitchen was always a bustling hub of activity. The scent of freshly baked cookies often filled the air, drawing us in like moths to a flame. My grandmother, the culinary maestro of the family, believed that every recipe told a story — and her Peanut Butter Sriracha Cookies were no exception.


It was the summer of my tenth birthday, and as a tradition, my grandmother let me choose the special treat for our annual family picnic. Having recently discovered the joys of spicy foods, I boldly requested a cookie that matched my newfound adventurous palate. With a twinkle in her eye, Grandma nodded and said, "Let's spice things up a little, shall we?"


The kitchen became our playground. As she expertly creamed together the unsalted butter, crunchy peanut butter, and sugars, I watched in awe, eagerly awaiting my turn to contribute. Slowly, she added the sriracha, its vibrant red swirling into the creamy mixture like a secret waiting to be uncovered. I was entrusted with the task of cracking eggs and measuring out vanilla extract — a responsibility I took very seriously.


In another bowl, we mixed the flour, baking powder, baking soda, and salt, the dry ingredients resembling the sands of a distant desert, waiting to be united with our spicy concoction. I held my breath as we combined the two mixtures, the batter rich with promise.


After an hour of chilling, the dough was ready. I gleefully rolled it into balls, dipping each top in granulated sugar before placing them on the cookie sheet. Grandma guided my hands as we pressed a criss-cross pattern into each one, the fork leaving its indelible mark.


As the cookies baked, the sweet and spicy aroma wafted through the house, drawing curious family members into the kitchen. When they finally emerged from the oven, we placed a Hershey's chocolate kiss atop each one, the final touch of sweetness to balance the heat.


The picnic was a resounding success, and the cookies were the star of the show. Family members marveled at the unexpected yet delightful combination of peanut butter and sriracha, each bite evoking laughter and joy. To this day, whenever I bake these cookies, I'm transported back to that sunlit kitchen, the warmth of my grandmother's love, and the magic of flavors coming together to create something truly special.


The Recipe: Peanut Butter Sriracha Cookies


Ingredients:

- Unsalted butter


- Crunchy peanut butter


- Sugar


- Brown sugar


- Sriracha


- Eggs


- Vanilla extract


- Flour


- Baking powder


- Salt


- Baking soda


- Granulated sugar


- Hershey's chocolate kiss (for topping)


Instructions:

1. Cream together butter, peanut butter, and sugars in a large mixing bowl.


2. Gradually add sriracha, eggs, and vanilla extract. Beat until well combined.


3. In a separate bowl, mix flour, baking powder, baking soda, and salt.


4. Gently combine the dry mixture with the peanut butter mixture until well incorporated.


5. Refrigerate the dough for 1 hour.


6. Preheat your oven to 375°F (190°C).


7. Roll dough into 1-inch balls or use a medium-sized cookie scoop.


8. Dip the top of each dough ball into granulated sugar and place on a cookie sheet.


9. Flatten each ball with a fork, creating a criss-cross pattern.


10. Bake for 8-10 minutes, ensuring not to over-bake.


11. Cool on wire racks and top each with a Hershey's chocolate kiss. Enjoy!


Conclusion


Our Peanut Butter Sriracha Cookies are more than just a treat; they are a testament to the joy of culinary experimentation and the power of family traditions. Whether you're a seasoned baker or a newcomer to the kitchen, this recipe offers a delightful challenge with a rewarding payoff. Happy baking!

Read more about Appetizers

Read more about Main Dishes

Read more about Desserts

Brown sugar & Spice Sugar cookie frogs | Made by Meaghan Moineau

Brown sugar & Spice Sugar cookie frogs | Made by Meaghan Moineau

Title: Sweet Memories in Every Bite: Brown Sugar & Spice Sugar Cookie Frogs
Description: Dive into the enchanting world of baking with our Brown Sugar & Spice Sugar Cookie Frogs. These delightful treats are more than just cookies; they’re a nostalgic journey back to cherished family gatherings. With a perfect blend of warm spices and a touch of sweetness, these cookies promise to bring warmth and joy to your kitchen. Whether you're a seasoned baker or a beginner, this recipe is sure to captivate your taste buds and your heart.

---


Brown Sugar & Spice Sugar Cookie Frogs: A Recipe Steeped in Family Tradition


Ingredients:


- Unbleached flour


- Baking powder


- Cinnamon


- Ginger


- Nutmeg


- Allspice


- Granulated sugar


- Light brown sugar


- Butter


- Egg


- Vanilla extract


Instructions:


1. Prepare Your Dry Ingredients: Begin by whisking together the flour, baking powder, cinnamon, ginger, nutmeg, and allspice. Set this aromatic mixture aside, letting the spices mingle and infuse their warmth.
2. Creaming Magic: In a separate bowl, cream the granulated sugar and light brown sugar with the butter until light and fluffy. The blend of sugars gives the cookies their distinct, rich flavor.
3. Incorporate Wet Ingredients: Add the egg and vanilla extract to the creamed mixture, mixing until well-blended. The vanilla adds a hint of sweet aroma that perfectly complements the spices.
4. Combine and Conquer: Gradually incorporate the flour mixture into the wet ingredients. Beat just until combined, ensuring to scrape down the bowl, especially the bottom. The dough will be thick; don't hesitate to knead in any stray bits of flour by hand.
5. Shaping Your Frogs: Roll the dough on a floured surface and cut into whimsical frog shapes. Place these playful figures on parchment-lined baking sheets, ready to hop into the oven.
6. Baking to Perfection: Bake in a preheated oven for 9-12 minutes, adjusting the time depending on the size of your cookie cutter. Let them sit on the sheet for a few minutes before transferring them to a cooling rack.

---


A Sweet Nostalgia: The Memory Behind the Recipe


Every time I bake these Brown Sugar & Spice Sugar Cookie Frogs, I am transported back to my grandmother's cozy kitchen. As a child, I’d watch in awe as she effortlessly transformed simple ingredients into magical treats. The aroma of spices wafting through the air was always the first sign that something special was underway.


Grandma had a particular fondness for frogs, often saying they brought good luck. She’d let me help cut out the frog shapes, my small hands struggling to keep the dough intact. We’d laugh at the misshapen ones, claiming they had extra character. Those afternoons filled with laughter and love are some of my most cherished memories.


These cookies were a staple at every family gathering, each bite a reminder of the warmth and joy that surrounded us. Even now, as I bake them for my own family, I feel a connection to those happy days, hoping to create similar memories for my little ones.


---


Difficulty: 3/10


Classification: Dessert


---


Whether you’re creating new memories or reliving old ones, these Brown Sugar & Spice Sugar Cookie Frogs are sure to bring smiles and sweetness to your home. Enjoy the process, savor the flavors, and let the nostalgia wash over you. Happy baking!

Read more about Appetizers

Read more about Main Dishes

Read more about Desserts

Apple Pie Honey Wheat Scones | Made by Meaghan Moineau

Apple Pie Honey Wheat Scones | Made by Meaghan Moineau

Title: "Warm Memories & Sweet Aromas: Crafting Apple Pie Honey Wheat Scones"


Description:

Dive into the heartwarming world of Apple Pie Honey Wheat Scones, a delightful dessert that combines rustic charm and nostalgic flavors. Explore the easy-to-follow recipe, enriched with a family memory that makes these scones more than just a treat—they're a cherished tradition. Rated for its simplicity and soul, this dish is perfect for any baking enthusiast looking to create something truly special.

---


A Whiff of Nostalgia: Apple Pie Honey Wheat Scones


There's something inherently comforting about the aroma of apple pie mingling with the cozy warmth of freshly baked scones. For me, these Apple Pie Honey Wheat Scones are more than just a dessert; they are a portal back to cherished family gatherings, where love was the main ingredient and laughter was the background music.


The Essence of Home


Growing up, autumn was a magical time in our household. The trees donned their vibrant golden hues, and the air was crisp with the promise of impending festivities. My grandmother, the heart of our family, would gather us in her spacious, sunlit kitchen to create culinary wonders. Among her specialties were these delightful Apple Pie Honey Wheat Scones.


With her apron tied snugly around her, she would expertly blend whole wheat flour and all-purpose flour, setting the stage for what was to come. The warm, spicy aroma of cinnamon and freshly grated ginger would fill the air, a prelude to the sweet symphony of flavors about to unfold.


The Recipe


Here's how you can recreate this beloved family recipe:
Ingredients:

- Whole wheat flour


- All-purpose flour plus 1 rounded tablespoon


- Dark brown sugar


- Cinnamon


- Baking powder


- Salt


- Fresh ginger


- Unsalted butter


- Heavy cream


- Egg


- Honey


- Vanilla extract


- Brandy


- Diced apple


- Turbinado sugar


Instructions:

1. Preheat your oven to 400°F (200°C) and line a baking sheet with parchment paper.


2. In a large mixing bowl, whisk together the first seven ingredients.


3. Add fresh ginger and butter. Work everything together with your fingers until the mixture resembles coarse crumbles. Keep the butter cool and in pieces.


4. Mix in the cream, egg, honey, vanilla, and brandy, kneading until the dough comes together.


5. Incorporate the diced apples, pressing them into the dough until evenly distributed.


6. On a floured surface, flatten the dough into a one-inch-thick disc. Cut into eight equal sections.


7. Place the scones on the baking sheet and sprinkle with turbinado sugar.


8. Bake for 15-18 minutes or until golden brown.


9. Melt butter and drizzle over a warm scone for an extra touch of indulgence.


10. Transfer the remaining scones to a wire rack to cool. Store in a sealed container or freeze for up to 3-4 months.


A Legacy of Love


Every bite of these scones transports us back to those treasured moments in my grandmother's kitchen, where the hustle and bustle of daily life paused, allowing us to savor the simple joys of togetherness. These scones are rated a 4 out of 10 for difficulty, making them accessible even to novice bakers, yet rewarding enough for seasoned pros.


As a dessert, Apple Pie Honey Wheat Scones are a delightful way to end any meal, offering a perfect balance of sweetness and spice. Whether enjoyed with a cup of tea or shared with loved ones around the table, they are more than just a treat—they are a slice of family history, lovingly baked into each scrumptious morsel.


So go ahead, gather your ingredients, and create your own warm memories with this timeless recipe. As my grandmother used to say, "A kitchen full of laughter and love is the recipe for happiness."


---


Nostalgia, warmth, and a touch of sweetness—these scones are sure to become a staple in your own family traditions. Enjoy baking and savor every moment, just as we did in those golden autumn days.

Read more about Appetizers

Read more about Main Dishes

Read more about Desserts

Lemon square bars | Made by Meaghan Moineau

Lemon square bars | Made by Meaghan Moineau

Title: Zesty Lemon Square Bars: A Nostalgic Dessert to Brighten Your Day
Description: Dive into the refreshing world of lemon square bars, a classic dessert that's both delightful and timeless. This blog post will guide you through crafting these tangy treats with ease, while sharing a heartwarming family memory that makes them even more special. Rated a 4 out of 10 for difficulty, these lemon bars are perfect for dessert lovers seeking a simple yet satisfying bake.

---


Zesty Lemon Square Bars: A Nostalgic Dessert to Brighten Your Day

If there's one dessert that has the magical ability to transport me back to my childhood, it's lemon square bars. The tangy zest of lemon combined with a buttery crust and a sweet, chewy topping was a staple in my grandmother's kitchen, and each bite was like a time capsule filled with love and laughter. Today, I'm sharing not just a recipe, but a piece of my family's history that I hope will bring joy to your home as well.


Ingredients You'll Need:

- 2 cups all-purpose flour


- ½ cup confectioners' sugar


- 1 cup unsalted butter, melted


- 1 teaspoon vanilla essence


- 2 cups granulated sugar


- 4 large eggs


- 1 teaspoon baking powder


- ½ cup fresh lemon juice


- 2 tablespoons grated lemon rind


- A pinch of nostalgia (optional, but highly recommended!)


Instructions:
1. Craft the Crust:

Begin by preheating your oven to 170°C (340°F). In a medium-sized bowl, combine 2 cups of flour with the confectioners' sugar. Blend in the melted butter and vanilla essence, stirring until the mixture forms a soft dough. Press this dough evenly into the bottom of a greased 9x13 inch pan. Bake for 15 minutes or until the crust is golden and firm to the touch.


2. Prepare the Filling:

While the crust bakes, whip up the lemony filling. In a large bowl, beat the eggs until they are light and frothy. In a separate bowl, mix together the granulated sugar, baking powder, and ½ cup of flour, ensuring there are no lumps. Gradually stir this sugar mixture into the beaten eggs. Add the lemon juice and lemon rind, mixing until well combined.


3. Assemble and Bake:

Pour the lemon mixture over the pre-baked crust, spreading it evenly. Return the pan to the oven and bake for an additional 30 minutes, or until the lemon topping is set and slightly golden. Allow the bars to cool completely before slicing them into perfectly tangy squares.


A Slice of Family Memory:

Every summer, my family would gather at my grandmother's house for our annual reunion. The highlight was always her legendary lemon square bars, which she would bake in abundance to satisfy our eager appetites. We would sit on her porch, the scent of fresh lemons wafting through the air, as we shared stories and laughter. Those sun-drenched afternoons, filled with the sound of cicadas and the taste of these sweet treats, are memories I cherish deeply. Each bite now reminds me of those precious moments and the warmth of family.


Difficulty Rating: 4/10
Classification: Dessert

These lemon square bars are a testament that sometimes the simplest recipes bring the most joy. With their vibrant citrus flavor and buttery goodness, they are sure to become a beloved addition to your dessert repertoire. Whether you're hosting a family gathering or simply craving a sweet treat, these bars promise a burst of sunshine in every bite. Enjoy baking, and may your kitchen be filled with the same happiness and warmth that my grandmother's once was.

Read more about Appetizers

Read more about Main Dishes

Read more about Desserts

Thick, Fudgy, One Bowl Brownies | Made by Meaghan Moineau

Thick, Fudgy, One Bowl Brownies | Made by Meaghan Moineau

Title: A Journey Back in Time with Thick, Fudgy, One Bowl Brownies
Description: Dive into the comforting embrace of these Thick, Fudgy, One Bowl Brownies, a timeless dessert that promises both simplicity and indulgence. With a rich blend of semi-sweet and unsweetened chocolate, these brownies are as delightful to make as they are to eat. Join me as I share a cherished family memory that makes this recipe truly special.

---


There's something undeniably magical about the aroma of chocolate wafting through the house. It's the kind of scent that transports you back in time, evoking a swirl of cherished memories. For me, that memory is Saturday afternoons in my grandmother's kitchen, where the world seemed to slow down as we baked her famous brownies.


A Sweet Family Tradition

Growing up, weekends were synonymous with family gatherings, and no gathering was complete without Grandma's brownies. Her secret? A recipe that was as straightforward as it was delicious. Thick, fudgy, and requiring just one bowl, these brownies are a testament to the idea that simplicity is often the key to perfection.


As a child, I would perch on a stool, eyes wide with anticipation, watching Grandma melt chocolate in a large, heatproof bowl set over simmering water. The semi-sweet and unsweetened chocolate, combined with unsalted butter, would slowly transform into a smooth, glossy mixture. This was my favorite part—the moment when the kitchen filled with the rich, intoxicating scent of chocolate.


Once cooled, Grandma would let me stir in the cocoa powder, eggs, sugar, vanilla, and salt. Her gentle guidance made the process feel like a grand adventure. The final step was my sacred duty—carefully adding the flour and ensuring it was just combined. Grandma always said that overmixing was the enemy of a perfect brownie.


The Magic of Baking

After spreading the batter into a foil-lined baking pan, we'd slide it into the oven. Those 35 to 40 minutes felt like an eternity to a chocolate-loving child. But the wait was worth it. The brownies emerged slightly puffed, with a toothpick inserted into the center revealing the perfect balance between gooey and set.


Though the recipe suggested cooling them to room temperature, patience was never my strong suit. Five minutes was usually all I could manage before cutting into them. To this day, the first bite of those warm, fudgy brownies takes me back to those precious afternoons.


A Dessert to Cherish

Rated a 3 out of 10 for difficulty, this dessert is not only easy to make but also a delightful way to create lasting memories with loved ones. Whether you're a seasoned baker or a novice, these Thick, Fudgy, One Bowl Brownies are a must-try.


So, gather your ingredients—semi-sweet chocolate, unsweetened chocolate, unsalted butter, cocoa powder, eggs, vanilla extract, table salt, and flour—and embark on a nostalgic baking journey. This simple, yet indulgent treat is perfect for any occasion, but most importantly, it's a reminder that the best recipes are those that bring people together.


Conclusion

In a world that often feels hurried and complex, these brownies offer a moment of pause, a chance to savor the simple joys of life. Whether you're sharing them with family, indulging alone, or gifting them to a friend, these thick, fudgy brownies are sure to warm hearts and create sweet memories.

Read more about Appetizers

Read more about Main Dishes

Read more about Desserts

Lemon square bars | Made by Meaghan Moineau

Lemon square bars | Made by Meaghan Moineau

Title: Nostalgic Lemon Square Bars: A Zesty Slice of Family Memories
Description: Dive into the world of tangy decadence with our Lemon Square Bars recipe. This delightful dessert, rated a 4 out of 10 on the difficulty scale, blends the perfect balance of tart and sweet with a touch of nostalgia that will warm your heart and tantalize your taste buds. Whether you're a seasoned baker or a novice in the kitchen, these bars promise to deliver joy with every bite.

---


As the golden rays of summer began to wane and the crisp embrace of autumn gently took over, my family had a beloved tradition of gathering in the kitchen to bake Lemon Square Bars. The scent of freshly zested lemon rind and the warmth of the oven filled the air, transforming our home into a haven of shared stories and laughter.


Ingredients:

- 2 cups flour


- 1/2 cup confectioners' sugar


- 1 cup unsalted butter, melted


- 1 teaspoon vanilla essence


- 4 eggs


- 2 cups sugar


- 1 teaspoon baking powder


- 1/4 cup flour


- 2/3 cup lemon juice


- Lemon rind from 2 lemons


Instructions:
1. Prepare the Base:

In a medium bowl, stir together 2 cups of flour and 1/2 cup of confectioners' sugar. Blend in the melted butter and vanilla essence. With the palm of your hand, press the soft dough into the bottom of a greased 9x13 inch pan. Bake in a preheated oven at 170°C (338°F) for 15 minutes, or until golden brown.


2. Create the Filling:

While the crust bakes, beat the eggs in a large bowl until light and frothy. In a separate bowl, combine 2 cups of sugar, baking powder, and 1/4 cup of flour to ensure there are no lumps. Gradually stir the sugar mixture into the eggs. Add the lemon juice and freshly grated lemon rind, mixing until well combined.


3. Bake to Perfection:

Pour the lemon mixture over the prepared crust and return to the oven. Bake for an additional 30 minutes or until the bars are set. Allow to cool completely before cutting into squares.


A Slice of Nostalgia:

Every year, as the first leaves began to fall, my grandmother would pull out her treasured, slightly worn recipe card. It was a ritual that marked the transition of seasons—a time when family gathered around the kitchen table, each member assigned a task, from zesting lemons to stirring the batter.


I vividly remember my grandmother's stories, shared as we worked side by side. She spoke of her childhood summers spent in her grandmother's garden, where lemon trees stood tall, their branches heavy with fruit. Those stories, full of warmth and love, were as much an ingredient in our Lemon Square Bars as the lemons themselves.


These bars were more than just a dessert; they were a bridge between generations, a connection to our past, and a sweet promise of future gatherings. Each bite brought with it a flood of cherished memories, a reminder of the enduring power of family traditions.


Conclusion:

These Lemon Square Bars, with their tangy sweetness and buttery crust, are a testament to the joy of baking with loved ones. As you savor each bite, may you find your own slice of nostalgia, a moment of connection, and a delightful escape into the warmth of family memories. Whether you enjoy them as a dessert for a special occasion or a simple treat on a Sunday afternoon, these bars are sure to become a beloved staple in your culinary repertoire.

Read more about Appetizers

Read more about Main Dishes

Read more about Desserts

Almond Rainbow Cake | Made by Meaghan Moineau

Almond Rainbow Cake | Made by Meaghan Moineau

Title: Almond Rainbow Cake: A Sweet Slice of Nostalgia
Description: Dive into the delightful world of baking with our Almond Rainbow Cake recipe. This visually stunning and delicious dessert is more than just a treat; it's a canvas for cherished family memories. Discover the simple joys of creating a masterpiece that appeals to both the eyes and the palate.

---


Almond Rainbow Cake: A Sweet Slice of Nostalgia


In the world of desserts, few things capture the imagination quite like a beautifully layered cake. The Almond Rainbow Cake is a vibrant testament to the joys of baking, combining the delicate flavor of almond with the visual allure of rainbow hues. This cake isn't just a feast for the eyes and taste buds; it's a portal to cherished family memories that are as sweet as the cake itself.


Ingredients:


- 1 box of white cake mix


- 1 cup of all-purpose flour


- 1 cup of granulated sugar


- ¼ teaspoon of salt


- 1 ⅓ cups of water


- 2 tablespoons of vegetable oil


- 1 teaspoon of real vanilla extract


- 1 teaspoon of almond extract


- 1 cup of sour cream


- 4 large egg whites


Instructions:


1. Prepare the Dry Mix: In a large mixing bowl, combine the white cake mix, flour, granulated sugar, and salt. Stir these dry ingredients together using a wire whisk to ensure even distribution.
2. Blend the Batter: Add water, vegetable oil, vanilla extract, almond extract, sour cream, and egg whites to the dry mixture. Beat the batter for two minutes until smooth and well-combined.
3. Pour and Tap: Grease and flour your chosen cake pans. Pour the batter into the pans, filling each a little over half full. Lightly tap the pans on the counter to release any trapped air bubbles.
4. Bake to Perfection: Preheat your oven to 325°F. Bake the cakes until they are done, testing with a toothpick. The baking time will vary based on the size and depth of your pans, whether you're making cupcakes or a grand 14-inch round cake.

Rating and Classification:


- Difficulty: 5/10
- Classification: Dessert

A Slice of Family History


The Almond Rainbow Cake holds a special place in my heart, closely tied to the vibrant tapestry of my family’s culinary history. Every spring, my grandmother would gather us in her cozy kitchen, the air filled with the sweet aroma of almond and vanilla. As a child, I watched her deftly layer batter in pans of different sizes, her hands moving with the confidence that comes from years of practice.


She would recount stories of her own childhood while teaching us the art of baking. Each layer of the cake represented a family member, a splash of color and flavor that came together to create something beautiful and whole. The rainbow hues weren't just for show; they were a celebration of diversity and unity within our family.


As the cake baked, we would gather around the kitchen table, giggling and sharing stories. The anticipation was almost as delightful as the first bite. When the cake was finally ready, we’d all sit together, savoring each slice as if it were a slice of our shared history.


Conclusion


Baking the Almond Rainbow Cake is more than a culinary endeavor; it's an opportunity to create and relive memories with loved ones. Whether you're an experienced baker or a novice in the kitchen, this cake offers a delightful challenge that's as rewarding to make as it is to eat. Gather your ingredients, preheat your oven, and let the magic of the Almond Rainbow Cake transport you to moments of joy and togetherness.

Read more about Appetizers

Read more about Main Dishes

Read more about Desserts

Cinnamon Eggless Coffee Cake | Made by Meaghan Moineau

Cinnamon Eggless Coffee Cake | Made by Meaghan Moineau

Title: A Nostalgic Brew: Eggless Cinnamon Coffee Cake
Description: Discover the comforting embrace of our Cinnamon Eggless Coffee Cake, a delightful dessert that brings back cherished family memories with every bite. This easy-to-make, aromatic cake is perfect for sharing with loved ones over a cup of tea or coffee. Follow our simple recipe and relive the warmth of home.

---


There's something truly magical about the aroma of cinnamon wafting through the kitchen, mingling with the rich scent of freshly brewed coffee. It instantly transports me back to cozy Sunday afternoons at my grandmother's house, where the air was always filled with warmth, laughter, and the promise of a delicious treat. The Cinnamon Eggless Coffee Cake was a staple in our family, a dessert that held the power to unite us all at the table, sharing stories and creating memories.


Ingredients for Nostalgia:

- 1 cup all-purpose flour


- 1 cup wholewheat flour


- 1 cup powdered sugar (plus 1 tsp. for sprinkling)


- 1/2 cup vegetable oil


- 1 tbsp vinegar


- 1 tbsp coffee powder


- 1 tsp cinnamon powder


- 1 tsp baking soda


- 1/2 tsp salt


- 1 tsp vanilla essence


- 1 cup curd


- 1/2 cup strong coffee decoction


Instructions to Create Magic:
1. Preheat & Prepare: Preheat your oven to 180°C (350°F) for 10 minutes. Grease a rectangular baking tin and set it aside.
2. Sift Dry Ingredients: In a large bowl, sift together the all-purpose flour, wholewheat flour, coffee powder, cinnamon powder, baking soda, and salt. Repeat the sifting process three times to ensure a smooth texture.
3. Mix Sugar & Oil: In another bowl, beat the powdered sugar and vegetable oil until light and fluffy, approximately 10 minutes of mixing.
4. Combine Wet Ingredients: Add the curd, strong coffee decoction, vanilla essence, and vinegar to the sugar and oil mixture, stirring thoroughly.
5. Blend Together: Gently fold the wet mixture into the dry ingredients, mixing lightly until the batter resembles a uniform paste. Avoid over-mixing; 10-12 gentle strokes should suffice.
6. Prepare to Bake: Pour the prepared batter into the greased baking tin. Sprinkle the reserved teaspoon of sugar over the top for a subtle sweet crust.
7. Bake: Place the tin in the preheated oven and bake for 25-30 minutes. Check for doneness by inserting a clean knife; if it comes out clean, your cake is ready. If not, bake for a few more minutes.
8. Cool & Serve: Once baked, remove the cake from the oven and allow it to cool on a wire rack. Cut into desired shapes and serve with tea or coffee. This cake remains fresh for a week, allowing you to enjoy its comforting taste over several days.

In our family, this cake wasn't just a dessert; it was a tradition. I remember my grandmother's gentle hands guiding mine as we mixed the ingredients, her stories blending with the sweet aroma filling the room. Each slice of cake was a slice of our family history, rich with love and laughter.


Difficulty Level: 4/10
Classification: Dessert
Conclusion:

This Cinnamon Eggless Coffee Cake is more than just a treat—it's a vessel for nostalgia, a bridge to the past that you can bake in your own kitchen today. Gather your loved ones, brew a pot of coffee, and let this delightful dessert bring warmth and joy to your home, just as it did for our family.

Read more about Appetizers

Read more about Main Dishes

Read more about Desserts

Fresh Strawberry Yogurt Cake | Made by Meaghan Moineau

Fresh Strawberry Yogurt Cake | Made by Meaghan Moineau

Title: "Sweet Memories: The Timeless Delight of Fresh Strawberry Yogurt Cake"
Description: Dive into the heartwarming flavors of our Fresh Strawberry Yogurt Cake, a dessert that effortlessly marries the sweetness of strawberries with the tangy zest of lemon. This delightful treat not only tantalizes your taste buds but also evokes cherished family memories. With a difficulty rating of 6 out of 10, it's the perfect dessert to impress your loved ones.

---


A Taste of Nostalgia: Fresh Strawberry Yogurt Cake

There's something inherently special about a recipe that transcends generations, weaving itself into the tapestry of family memories. For me, the Fresh Strawberry Yogurt Cake is not just a dessert—it's a portal to cherished times spent in my grandmother's cozy kitchen.


Ingredients:

- 2 cups flour, plus an additional ¼ cup


- 1 teaspoon baking soda


- ½ teaspoon salt


- Zest of 1 lemon


- ¾ cup butter, softened


- 1 ½ cups sugar


- 3 large eggs


- 1 tablespoon lemon juice, plus 2 tablespoons for the glaze


- 1 cup plain vanilla yogurt


- 1 ½ cups diced fresh strawberries


- 1 cup powdered sugar


Instructions:

1. Preheat your oven to 325°F (163°C) and prepare a 10-inch Bundt pan by greasing and flouring it.


2. Sift together 2 cups of flour, baking soda, and salt. Add the lemon zest to this mixture and set aside.


3. In a separate bowl, use an electric mixer to cream together the butter and sugar until the mixture is light and fluffy.


4. Beat in the eggs one at a time, ensuring each is well incorporated before adding the next. Stir in 1 tablespoon of lemon juice.


5. Gradually mix in the flour mixture and the yogurt, alternating between the two until just incorporated.


6. Toss the diced strawberries with the remaining ¼ cup of flour and gently fold them into the batter.


7. Pour the batter into the prepared Bundt pan and bake for 60 minutes, or until a toothpick inserted into the center comes out clean.


8. Allow the cake to cool in the pan for 10 minutes before transferring it to a wire rack to cool completely.


9. Once cooled, whisk together the remaining 2 tablespoons of lemon juice with the powdered sugar, and drizzle this glaze over the top of the cake.


A Journey Back in Time:

As a child, summers meant endless days at my grandparents' farmhouse. Nestled amidst lush strawberry fields, it was a haven of laughter and love. My grandmother, a wizard in the kitchen, would often invite me to help her bake. The Fresh Strawberry Yogurt Cake was her signature dessert, always made with strawberries freshly plucked from the backyard.


I remember the excitement of picking strawberries with my little hands, my grandmother’s gentle guidance ensuring I chose only the ripest ones. The kitchen would soon be filled with the comforting aroma of the cake as it baked, mingling with the sweet, tangy scent of lemon and vanilla.


Once the cake was ready, the whole family would gather around the table. Each slice was a reminder of the love and warmth that my grandmother infused into her cooking. Today, as I prepare this cake for my own family, I am transported back to those idyllic summer days. It’s a recipe I treasure, not only for its deliciousness but for the cherished memories it brings back.


Conclusion:

The Fresh Strawberry Yogurt Cake is more than a delightful dessert; it’s a tribute to family traditions and the joy of shared experiences. With a difficulty rating of 6 out of 10, this dessert is accessible yet impressive, perfect for family gatherings or a sweet treat to end a meal. Whether you're making it for the first time or the hundredth, this cake promises to be a delightful journey through flavors and memories.

Read more about Appetizers

Read more about Main Dishes

Read more about Desserts

Gluten Free Yellow Cake And Cupcakes | Made by Meaghan Moineau

Gluten Free Yellow Cake And Cupcakes | Made by Meaghan Moineau

Title: Celebrating Family Traditions with a Scrumptious Gluten-Free Yellow Cake and Cupcakes
Description: Dive into a heartwarming recipe for a Gluten-Free Yellow Cake and Cupcakes that promises to excite your taste buds while keeping dietary restrictions in mind. Perfect for family gatherings or a simple treat, this dessert boasts a delightful blend of coconut and tapioca flour with a rich vanilla essence. Indulge in a nostalgic journey as we share a cherished family memory tied to this delectable dessert. Rate difficulty: 5/10. Classified as Dessert.

---


There's something magical about the aroma of a cake baking in the oven. It evokes cherished memories and brings people together, serving as a centerpiece for celebrations and simple family moments alike. This Gluten-Free Yellow Cake and Cupcakes recipe is no exception—it's a testament to the power of food in creating lasting memories.


Growing up, Sunday afternoons at my grandmother's house were always a special occasion. The entire family would gather around her cozy kitchen, eagerly awaiting the treats she had lovingly prepared. Her signature yellow cake was always a highlight, and it became a family tradition to bake it together.


When my younger sister was diagnosed with gluten intolerance, my grandmother was determined to adapt her beloved recipe so everyone could enjoy it. After some trial and error, she created this delightful Gluten-Free Yellow Cake and Cupcakes recipe, using coconut flour and tapioca flour to achieve the perfect texture.


Ingredients:

- 1 cup coconut flour


- 1 cup tapioca flour


- 1/2 teaspoon salt


- 1 teaspoon baking soda


- 1 teaspoon baking powder


- 1 teaspoon xanthan gum


- 6 whole eggs


- 1 1/2 cups sugar


- 1 cup veganaise


- 3/4 cup milk alternative (just under)


- 1 tablespoon vanilla extract


- 1/2 cup Earth Balance butter, melted


- 1 cup dairy-free chocolate chips


- Pinch of salt


- 2 cups powdered sugar


Instructions:

1. Preheat your oven to 350 degrees Fahrenheit. If making a layer cake, grease two 8 or 9-inch round cake pans and dust with tapioca flour. Alternatively, line a muffin tin with baking cups for cupcakes.


2. In a bowl, combine the coconut flour, tapioca flour, salt, xanthan gum, baking soda, and baking powder. Set aside.


3. In a separate large bowl, beat the eggs, sugar, and veganaise until the mixture is light and fluffy.


4. Gradually add the vanilla extract, flour mixture, and milk alternative to the egg mixture, alternating between the dry ingredients and milk. This helps achieve a fluffy cake texture.


5. Pour the batter into the prepared cake pans or fill the baking cups 3/4 full. This recipe yields approximately 24 cupcakes.


6. Bake for 20-25 minutes for the cakes or 12-15 minutes for the cupcakes. The cakes are ready when they are nicely browned, spring back when lightly touched, or when a toothpick inserted in the center comes out clean.


7. Let the cakes or cupcakes cool completely before icing.


This recipe holds a special place in my heart, not just for its delightful taste but also for the memories it brings back. Every bite reminds me of those joyful Sunday afternoons, filled with laughter and the warmth of family. Baking this cake has become a way for us to honor my grandmother's legacy and continue creating new memories around the table.


Whether you're celebrating a birthday, a holiday, or simply the joy of being together, this Gluten-Free Yellow Cake and Cupcakes recipe is sure to become a cherished part of your family traditions. Enjoy the process, savor the taste, and create your own nostalgic moments with loved ones.

Read more about Appetizers

Read more about Main Dishes

Read more about Desserts

Baked Alaska | Made by Meaghan Moineau

Baked Alaska | Made by Meaghan Moineau

**Title: Nostalgic Elegance: Crafting the Perfect Baked Alaska**


**Description:** Discover the timeless allure of Baked Alaska, a classic dessert that combines the richness of cake, the chill of ice cream, and the ethereal beauty of meringue. This blog post offers a step-by-step guide to creating this show-stopping dessert while sharing a heartfelt family memory that adds a touch of nostalgia to every bite. Perfect for those looking to impress at their next dinner party or simply indulge in a sweet trip down memory lane.


---


### The Art of Baked Alaska: A Dessert with a Story


Baked Alaska is more than just a dessert; it's an experience—a theatrical finale to any meal that leaves your guests in awe. This classic dessert combines the simplicity of a round cake, the delight of creamy ice cream, and the elegance of golden meringue peaks. With its captivating contrast of hot and cold, Baked Alaska is a sweet symphony that dances on your taste buds.


#### Ingredients You'll Need:


- Round cake


- 1/2 gallon ice cream


- 4 egg whites


- 1/4 teaspoon cream of tartar


- 1 cup powdered sugar


#### Step-by-Step Instructions:


1. **Prepare the Ice Cream Layer**:


Grease a 7-inch bowl with flavorless oil or unsalted butter. Allow the ice cream to soften until it's workable. Pack it tightly into the bowl, smoothing the top. Freeze until it hardens completely.


2. **Make the Meringue**:


Beat the egg whites until foamy. Add the cream of tartar and continue whipping until stiff peaks form. Gradually fold in the powdered sugar, ensuring the meringue is smooth and glossy.


3. **Assemble the Baked Alaska**:


Place the frozen cake on a plate slightly larger than the cake. Unmold the ice cream onto the center of the cake. If the ice cream is stubborn, dip the bowl briefly in warm water to release it.


4. **Decorate with Meringue**:


"Frost" the cake and ice cream with the meringue, covering it completely. Use a spoon or spatula to create decorative peaks.


5. **Bake to Perfection**:


Preheat your oven to 450°F. Bake the assembled Baked Alaska for 6-7 minutes until the meringue peaks are golden brown. Store in the freezer until you're ready to serve.


#### A Family Memory: The Sweetness of Tradition


Every year, my family gathers for a cherished tradition—Grandma's birthday. Amongst the laughter and shared stories, Baked Alaska takes center stage. I remember one year when I was young, standing on a chair to get a better view as my mother carefully crafted the dessert. The kitchen was filled with the sweet aroma of cake and sugary meringue. As we all gathered around the table, eyes wide with anticipation, Grandma's eyes sparkled with joy. The Baked Alaska was more than a dessert; it was our family's love, layered with memories of the past and hopes for the future. Even now, every bite transports me back to that warm kitchen, surrounded by love and laughter.


#### Difficulty Rating: 6/10


Creating Baked Alaska requires some skills, especially with the meringue and timing. However, with patience and practice, this dessert can become a beautiful centerpiece for any occasion.


#### Classification: Dessert


This spectacular creation is the quintessential dessert—a perfect blend of textures and temperatures that will leave a lasting impression on your guests.


---


Embrace the nostalgia and the sweet challenge of making Baked Alaska. Whether it's for a special occasion or simply to relive fond memories, this dessert promises to be a delightful journey for both the baker and those fortunate enough to enjoy it.

Read more about Appetizers

Read more about Main Dishes

Read more about Desserts