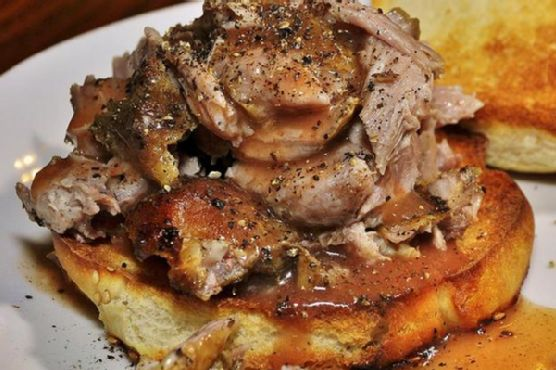
North Carolina-Style BBQ Pulled Pork
Intro
Welcome to a delightful culinary journey to the heart of North Carolina with our authentic BBQ Pulled Pork recipe. I remember summer afternoons at my grandmother’s house, where the aroma of slow-cooked pork would waft through the air as we played outside. This dish was the centerpiece of our family gatherings, bringing everyone together with its rich flavors and tender texture. Now, I’m thrilled to share this cherished recipe with you, so you can create your own memories around the table.
Why You’ll Love It
This North Carolina-Style BBQ Pulled Pork is a true crowd-pleaser. It’s a perfect blend of tangy, savory, and sweet flavors, with a hint of smokiness that takes it over the top. Whether you’re hosting a backyard barbecue, a family dinner, or just craving something comforting, this dish is incredibly versatile and sure to satisfy. Plus, it’s easy to make, allowing you to enjoy the company of your loved ones while the oven does most of the work.
Ingredients
- 8 cups apple cider vinegar
- 1 boneless pork shoulder (about 5 pounds)
- 1/4 cup dark firmly-packed brown sugar
- 1/4 cup butter, melted
- 1 tablespoon celery salt
- 1 tablespoon dry mustard
- 1 tablespoon garlic salt
- 1 tablespoon black ground pepper
- 1 cup ketchup
- 1/4 cup light brown sugar
- 2 tablespoons liquid hickory smoke
- 1 tablespoon onion powder
- 1 tablespoon crushed red pepper flakes
- 2 tablespoons salt
- 1 cup water
Instructions
- In a small bowl, mix together paprika, light brown sugar, celery salt, garlic salt, dry mustard, black pepper, onion powder, and salt.
- Season the entire pork roast with the spice mixture and cover it. Let it rest overnight in the refrigerator to absorb the flavors.
- Preheat your oven to 325°F (165°C).
- Place the seasoned pork roast in a large, disposable aluminum roasting pan.
- In a small bowl, combine the melted butter and liquid hickory smoke to create the basting marinade.
- Pour the basting marinade over the pork and cover the pan with aluminum foil.
- Cook the pork for approximately 4 1/2 hours or until the meat becomes tender enough to pull apart. Turn the pork every hour and baste it every 30 minutes. Alternatively, cook the pork over white hot coals, covered, for 3-3 1/2 hours, basting and turning frequently with the marinade.
- Transfer the pork roast to a cutting board and drain the excess juices from the pan.
- Slice the pork roast and pull apart the meat, trimming any fat. Place the shredded pork back into the roasting pan.
- Prepare the BBQ sauce by mixing together the cider vinegar, water, ketchup, dark brown sugar, salt, and red pepper flakes in a large bowl.
- Pour the BBQ sauce over the pulled pork, stirring to ensure all the meat is covered. Cover with aluminum foil.
- Place the pulled pork back into the oven (still at 325°F) or grill and cook for 1 1/2 hours, stirring the pork and sauce every 30 minutes.
Tips
For best results, make sure to let the pork marinate overnight. This allows the spices to penetrate deeply, enhancing the flavor of the meat. When pulling the pork, be patient and gentle to ensure it remains juicy and tender. If you’re cooking on a grill, maintain a consistent temperature to avoid overcooking.
Variations & Substitutions
Feel free to get creative with this recipe! You can substitute the pork shoulder with a pork butt if preferred. For a spicier kick, add more red pepper flakes or a dash of hot sauce to the BBQ sauce. If you don’t have apple cider vinegar on hand, white vinegar can be used as a substitute. For a smoky flavor without liquid smoke, try grilling the pork over wood chips.
Storage
Store any leftover pulled pork in an airtight container in the refrigerator for up to 4 days. It can also be frozen for up to 3 months. To reheat, gently warm it in the oven or on the stovetop, adding a splash of water or extra BBQ sauce to keep it moist.
FAQ
Can I make this recipe in a slow cooker?
Absolutely! To adapt this recipe for a slow cooker, follow the same steps for seasoning the pork and making the sauce. Place the seasoned pork in the slow cooker, pour the sauce over it, and cook on low for 8-10 hours or until the pork is tender and falls apart easily.
How do I know when the pork is fully cooked?
The pork is done when it reaches an internal temperature of 195°F to 205°F and easily pulls apart with a fork. If using a meat thermometer, insert it into the thickest part of the pork for an accurate reading.
What should I serve with BBQ pulled pork?
BBQ pulled pork pairs wonderfully with classic sides like coleslaw, cornbread, baked beans, or potato salad. For a lighter option, serve it with a fresh green salad or roasted vegetables.
Nutrition
This North Carolina-Style BBQ Pulled Pork is high in protein and provides a satisfying meal. Keep in mind that portion sizes and sides will affect the overall nutritional value. For specific dietary concerns, consider using leaner cuts of pork or modifying the sugar content in the sauce.
Conclusion
Our North Carolina-Style BBQ Pulled Pork is a must-try for anyone who loves a good barbecue. With its rich flavors and tender texture, it’s a dish that brings people together, creating lasting memories around the table. Whether you’re a seasoned cook or a beginner, this recipe is straightforward and rewarding. So gather your loved ones, fire up the oven or grill, and enjoy this delicious taste of North Carolina tradition.
Related update: North Carolina-Style BBQ Pulled Pork
Related update: Easy Pork Chops on Stuffing