Banana Creme Brulee | Made by Meaghan Moineau

Banana Creme Brulee | Made by Meaghan Moineau

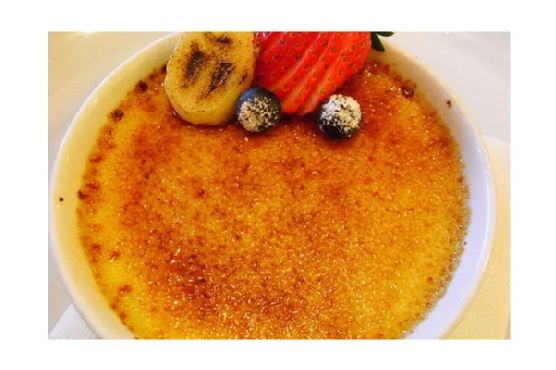
Banana Creme Brulee: A Sweet Dance of Nostalgia and Decadence


Description


Dive into a world where creamy custard meets caramelized perfection. Our Banana Creme Brulee is not only a delightful dessert but a gateway to cherished family memories. Discover the rich flavors of bananas and vanilla bean, topped with a golden sugar crust that cracks with a satisfying tap. Ideal for those seeking a touch of elegance, this dessert is a symphony of flavors and textures. Rated 6/10 in difficulty, it's a rewarding challenge for any home cook.


---


A Family Legacy in a Spoonful


Every time I whip up a batch of Banana Creme Brulee, I'm transported back to the cozy kitchen of my grandmother's house. The aroma of vanilla and caramelized sugar would envelop the room, a sweet prelude to Sunday dinners with the family. My grandmother, an avid cook, had a knack for turning simple ingredients into magical creations. Her Banana Creme Brulee was legendary, not just for its taste, but for the love and warmth it symbolized.


As a child, I would watch in awe as she carefully sliced the bananas, her hands moving with practiced grace. The way she split the vanilla bean pod and scraped out the seeds was like witnessing a maestro at work. Her secret, she would say with a wink, was in the gentle simmering of the cream, coaxing out every bit of flavor from the vanilla.


The highlight, of course, was the caramelization. My cousins and I would gather around the kitchen island, eyes wide with anticipation, as she expertly wielded the blowtorch, transforming the demerara sugar into a glistening, amber crust. That first crack of the spoon against the hardened top was music to our ears, signaling the start of another sweet memory.


Recipe: Banana Creme Brulee


Ingredients:

- Bananas


- Little demerara sugar


- Egg yolks


- Heavy cream


- Sugar


- Vanilla bean pod


Instructions:
1. Infuse the Cream: In a medium saucepan, combine the cream and vanilla bean pod. Bring slowly to a boil, then remove from heat just before it reaches boiling.
2. Prepare the Bananas: Slice bananas thickly and divide them between 8 small ramekins.
3. Mix the Custard: In a mixing bowl, beat egg yolks, caster sugar, and vanilla seeds until thick and creamy. Pour the hot cream over the egg mixture, stirring continuously.
4. Thicken the Custard: Rinse and dry the saucepan, then pour in the custard mixture. Heat gently, stirring constantly, until the mixture thickens. Be sure to stir right into the corners to prevent curdling. Do not let it boil.
5. Assemble and Chill: Pour the custard through a sieve into the ramekins, filling them to the top. Set aside to cool, then refrigerate overnight.
6. Caramelize the Tops: Dust each custard with a thin layer of demerara sugar. Place under a very hot grill for a few seconds until the sugar melts into a shiny caramel. Leave to cool and harden.
Serves: 8
Difficulty: 6/10
Category: Dessert

Conclusion


In every spoonful of Banana Creme Brulee, there's a story waiting to be told—a tale of family gatherings, shared laughter, and the comforting embrace of a beloved recipe. Whether you're recreating this dessert for the first time or the hundredth, may it bring a touch of nostalgia and sweetness to your table.
Read more about Appetizers

Read more about Main Dishes

Read more about Desserts

Cranberry Orange Biscotti | Made by Meaghan Moineau

Cranberry Orange Biscotti | Made by Meaghan Moineau

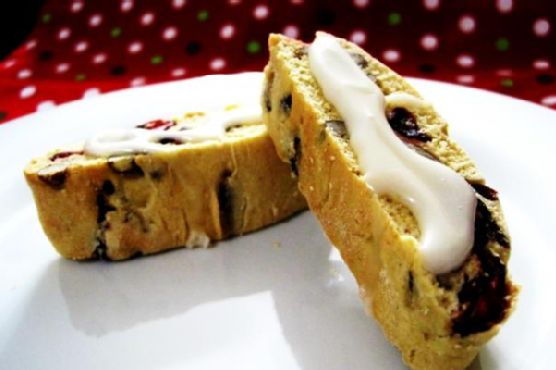
Title: "Cranberry Orange Biscotti: A Taste of Nostalgia and Citrus Delight"
Description: Dive into the delightful world of Cranberry Orange Biscotti, a perfect fusion of tart cranberries and zesty orange. This dessert not only serves as a delicious treat but also carries a nostalgic family memory, making it a cherished addition to any holiday gathering.

---


There's something magical about the aroma of freshly baked biscotti wafting through the house, especially when the flavors of cranberry and orange meld together in perfect harmony. This Cranberry Orange Biscotti recipe is more than just a delightful dessert; it's a journey back to cherished family memories and festive gatherings.


A Nostalgic Journey

Growing up, my grandmother's kitchen was the heart of every holiday season. The warmth of the oven and the vibrant scents of citrus and spices created an inviting atmosphere that drew everyone in. Every year, as the first cold snap of winter hinted at the approaching holidays, my grandmother would pull out her well-worn recipe card for Cranberry Orange Biscotti.


I remember sitting at the kitchen table, watching her expertly mix the ingredients—unsalted butter, sugar, and the zest of fresh oranges—while recounting stories of her childhood. She'd tell us how her mother, my great-grandmother, would bake these very biscotti during the festive season, using them as a means to bring the family together over laughter, stories, and the occasional cup of hot cocoa.


As a child, I was fascinated by the process. The transformation of simple ingredients like flour, whole wheat pastry flour, and baking powder into golden, slightly cracked logs seemed like magic. When she added the dried cranberries and pecans, I could hardly wait for the first taste. The tartness of the cranberries paired with the citrusy sweetness of the orange glaze was a combination that danced on the palate.


The Recipe

*Ingredients:*


- 1 tablespoon baking powder


- 1 cup confectioners' sugar


- 1 cup dried cranberries


- 3 large eggs


- 2 cups all-purpose flour


- 1/2 cup fresh orange juice


- 2 tablespoons orange zest


- 1 cup pecans, chopped


- 1/4 teaspoon salt


- 1 cup sugar


- 1/2 cup unsalted butter, softened


- 1 teaspoon vanilla extract


- 1 cup whole wheat pastry flour


*Instructions:*


1. Preheat the oven to 350°F (175°C), positioning racks in the upper and lower thirds. Line two baking sheets with parchment paper.


2. In a mixer, beat the butter and sugar until light. Add eggs one at a time, mixing well between each. Stir in orange zest and vanilla.


3. In a separate bowl, whisk together the flours, baking powder, and salt. Gradually add to the wet mixture, mixing until just combined. Fold in cranberries and pecans.


4. Transfer dough to a floured surface, divide into three pieces, and shape into 12-inch logs. Place on baking sheets.


5. Bake for 15-18 minutes, switching sheet positions halfway through. Let rest for 10 minutes. Reduce oven to 300°F (150°C).


6. Slice logs diagonally into 3/4-inch pieces. Lay slices on their sides and bake for 10-15 minutes until golden.


7. For the glaze, mix confectioners' sugar with orange juice to desired consistency. Drizzle over warm biscotti.


Difficulty: 6/10
Classification: Dessert

This biscotti is not just a treat but a tradition, a way to connect with loved ones both past and present. As I bake these biscotti today, I'm reminded of those cherished moments in my grandmother's kitchen, the stories shared, and the love that went into each batch. Every bite is a taste of nostalgia, bringing family and friends together, just as it always has.

Read more about Appetizers

Read more about Main Dishes

Read more about Desserts

Berry & Ricotta Danishes | Made by Meaghan Moineau

Berry & Ricotta Danishes | Made by Meaghan Moineau

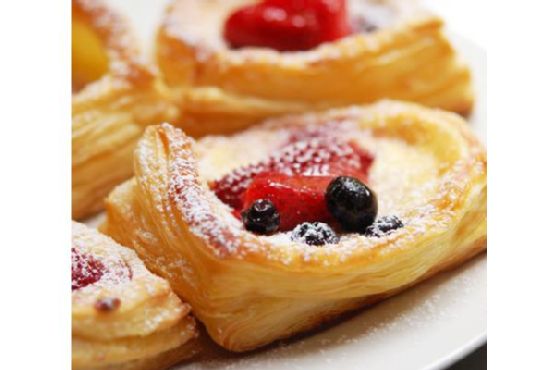
Sweet Nostalgia: Crafting Perfect Berry & Ricotta Danishes


A Delicious Journey Down Memory Lane


*Discover the magic of homemade Berry & Ricotta Danishes with this easy-to-follow recipe that brings a touch of nostalgia to your table. Perfect for dessert lovers and food enthusiasts alike, these delightful pastries are sure to become a family favorite.*


---


Ingredients


- Poached Berries: Blueberries, strawberries, and other berries of choice
- Glaze: Icing sugar, fresh lemon juice
- Ricotta Filling: Ricotta cheese, egg yolk, castor sugar, vanilla extract, lemon zest
- Pastry: Puff pastry, flour, water
- Optional Decorations: Additional poached berries, icing sugar
Difficulty: 4/10
Classification: Dessert

---


Instructions


1. Poach the Berries: Place a mix of your favorite berries in a saucepan over medium-low heat. Sprinkle with castor sugar and add a splash of water. Cover with a lid and gently shake to coat the berries. Poach for about 5 minutes until they soften but still hold their shape. Set aside to cool.
2. Preheat the Oven: Set your oven to 180°C (350°F) to prepare for baking.
3. Make the Ricotta Filling: In a mixing bowl, combine ricotta cheese, egg yolk, castor sugar, vanilla extract, and lemon zest. Mix well with a wooden spoon until thoroughly combined. Set aside.
4. Prepare the Glaze: In a small bowl, mix icing sugar and fresh lemon juice. Stir until smooth and set aside.
5. Prepare the Pastry: Remove puff pastry from the refrigerator. Cut into 10 rectangles, each measuring 8cm x 6cm (3" x 2.5"). Place 5 rectangles on a lined baking sheet, leaving space between them. Brush edges lightly with water.
6. Assemble the Danishes: Cut smaller rectangles from the remaining 5 pieces, leaving frames about 1.5cm (1/2") wide. Place these frames on top of the pastry bases. Fill the centers with 3-4 tablespoons of ricotta mixture and top with poached berries.
7. Bake: Bake in the preheated oven for 15 to 18 minutes, until the pastry puffs up and turns golden brown. Remove and cool on a wire rack.
8. Finish and Serve: Top with remaining poached berries and sprinkle with icing sugar just before serving.

---


A Sweet Family Memory


Growing up, Sunday afternoons at my grandmother's house were a cherished tradition, where the aroma of freshly baked pastries filled the air. Her kitchen was a haven of warmth and love, and her berry danishes were the highlight of our visits. I remember peeking into the oven, eagerly anticipating that first bite.


Grandma would let me help with the simpler tasks – arranging the berries and dusting the pastries with icing sugar. It was in those moments that I learned the power of food to bring people together, to create memories that last a lifetime. The sweet, tangy taste of the ricotta filling, combined with the juiciness of the berries, was something magical. Every time I bake these danishes, I’m transported back to those sunny afternoons, surrounded by family, laughter, and the smell of home.


---


Whether you're a seasoned baker or just starting out, these Berry & Ricotta Danishes offer a delightful experience. With their flaky puff pastry, creamy ricotta filling, and juicy berries, they are sure to enchant your taste buds and evoke the warmth of cherished family memories. Enjoy making them and, most importantly, enjoy sharing them with those you love.

Read more about Appetizers

Read more about Main Dishes

Read more about Desserts

Green Tea Fruit Medley Smoothie | Made by Meaghan Moineau

Green Tea Fruit Medley Smoothie | Made by Meaghan Moineau

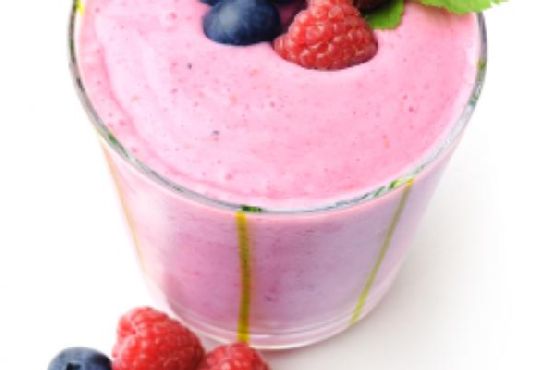
A Sip of Nostalgia: Green Tea Fruit Medley Smoothie


Description: Dive into the refreshing world of our Green Tea Fruit Medley Smoothie, a vibrant concoction that seamlessly blends the health benefits of green tea with the sweetness of fresh berries and pineapple juice. This easy-to-make smoothie is perfect for those who crave a flavorful, nutrient-packed drink that evokes cherished family memories. Ideal as a light appetizer or an energizing dessert, our smoothie recipe will transport you back to simpler times with just one sip.

---


Ingredients


- 1 cup boiling water


- 3 Bigelow Green tea bags


- 1 cup fresh berries (such as strawberries, blueberries, or raspberries)


- 1 cup pineapple juice


- 1 cup vanilla yogurt


- 1 cup ice cubes


Instructions


1. Prepare the green tea by steeping 3 Bigelow Green tea bags in 1 cup of boiling water for 5 minutes.


2. Carefully squeeze out the tea bags to extract all the flavor, then discard the bags.


3. In a blender, combine the prepared tea, fresh berries, pineapple juice, vanilla yogurt, and ice cubes.


4. Blend the mixture until smooth and creamy.


5. Pour into glasses and enjoy immediately for the freshest taste.


A Nostalgic Family Memory


Growing up, summers at my grandparents' house were nothing short of magical. Nestled in the heart of the countryside, their home was surrounded by lush berry bushes that seemed to stretch for miles. As kids, my siblings and I spent our days picking berries under the warm sun, competing to see who could fill their basket the fastest.


One particularly hot afternoon, we returned to the house, our faces and fingers stained with berry juice. Grandma greeted us with a smile and a new treat in mind—a cooling smoothie made from our freshly picked berries. She added her own special twist with a splash of pineapple juice and the aromatic touch of green tea, which she swore by for its health benefits. The blend was finished with a dollop of creamy vanilla yogurt and a handful of ice cubes, creating a smoothie that was both refreshing and revitalizing.


Every sip of that vibrant Green Tea Fruit Medley Smoothie was a burst of flavor, capturing the essence of summer in a glass. It became a cherished tradition, a symbol of our summers together, and a treasured memory that I carry with me to this day. Now, I recreate this smoothie to transport myself back to those carefree days, sharing it with my own family and keeping the legacy alive.


Difficulty Rating


Difficulty: 2/10


Classification: Appetizer/Dessert

This Green Tea Fruit Medley Smoothie is simple to prepare, making it a great option for both beginners and seasoned cooks looking for a quick, healthy treat. Whether enjoyed as a light appetizer or a refreshing dessert, it promises to be a hit with family and friends alike.

Read more about Appetizers

Read more about Main Dishes

Read more about Desserts

Apple-Cheesecake Tart with Salted Caramel Glaze | Made by Meaghan Moineau

Apple-Cheesecake Tart with Salted Caramel Glaze | Made by Meaghan Moineau

Title: "Decadence Unveiled: Apple-Cheesecake Tart with Salted Caramel Glaze"
Description:

Dive into a world of flavors with our Apple-Cheesecake Tart, crowned with a luscious Salted Caramel Glaze. This dessert is a symphony of textures and tastes, perfect for impressing guests or simply indulging in a personal treat. With a difficulty rating of 7 out of 10, this recipe is an exciting culinary adventure for home bakers. Read on for a step-by-step guide and a heartwarming family story that brings this dish to life.


---


A Sweet Journey Down Memory Lane


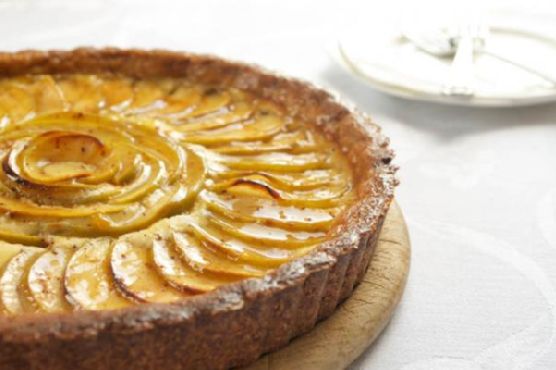
There's something inherently magical about the aroma of apples and cinnamon wafting through the house. It takes me back to a quaint autumn afternoon at my grandmother's kitchen. Her house was always the gathering place for family celebrations, and the kitchen was its beating heart. I remember sitting on a high stool, eyes wide with anticipation, as she meticulously layered apple slices over her famous cheesecake tart.


Her hands moved with a practiced rhythm, each slice overlapping the last, creating a mesmerizing spiral. She would smile at me, her eyes twinkling with warmth, and hand me a bowl of freshly sliced apples to snack on. That day, she told me stories of her childhood, of apple orchards and family picnics, weaving a rich tapestry of memories that flavored each bite of her tart.


Years later, I find myself in my own kitchen, recreating my grandmother's masterpiece. As the tart bakes, my home fills with that same comforting aroma, and I am transported back to those cherished afternoons. This Apple-Cheesecake Tart with Salted Caramel Glaze is more than just a dessert; it's a tribute to family, love, and the timeless joy of sharing food and stories.


Recipe: Apple-Cheesecake Tart with Salted Caramel Glaze


Ingredients:

- Butter

- Double cream


- Egg


- Flour


- Granny Smith apples


- Ground almonds


- Ground cinnamon


- Lemon (juice)


- Plain full-fat cream cheese


- Raw sugar


- Sea salt


- Sugar


- Vanilla extract


Instructions:


Crust:

1. In a stand mixer or using a handheld electric whisk, cream together the butter, sugar, and vanilla extract until light and fluffy.


2. Gently fold in the flour and ground almonds by hand until combined into a crumbly mixture.


3. Press the mixture into a 25cm loose-bottomed tin or into smaller tins for individual servings.


Custard:

1. Cream together the cream cheese and sugar using your mixer.


2. Add the egg and vanilla extract, mixing until fully combined.


3. Pour the custard into the prepared, uncooked crust.


Apples:

1. Thinly slice the Granny Smith apples, ideally using a mandoline.


2. Toss the apple slices with sugar, ground cinnamon, and lemon juice, allowing them to soften for about 10 minutes.


3. Arrange the slices over the custard in overlapping layers, creating a spiral 'rose' pattern.


4. Cover with tin foil and bake at 190°C for 30 minutes to soften the apples.


5. Remove the foil and bake for an additional 15-25 minutes until the custard is puffed and the apple edges are lightly browned.


Glaze:

1. As the tart bakes, melt sugar in a saucepan over medium-high heat until golden.


2. Stir in butter and sea salt, then add the cream, stirring constantly until smooth.


3. Brush the glaze over the nearly finished tart and return to the oven for a few minutes until it bubbles gently.


4. Allow the tart to cool to room temperature before serving. It can be refrigerated for several days; store in the baking tin and wrap well.


Difficulty Rating: 7/10
Classification: Dessert

---


Whether you're creating new family traditions or reminiscing about cherished memories, this Apple-Cheesecake Tart with Salted Caramel Glaze is sure to become a beloved favorite. Enjoy every bite of this decadent treat, and may it bring warmth and joy to your kitchen.

Read more about Appetizers

Read more about Main Dishes

Read more about Desserts

{No Bake} Cinnamon Butterscotch Energy Bites | Made by Meaghan Moineau

{No Bake} Cinnamon Butterscotch Energy Bites | Made by Meaghan Moineau

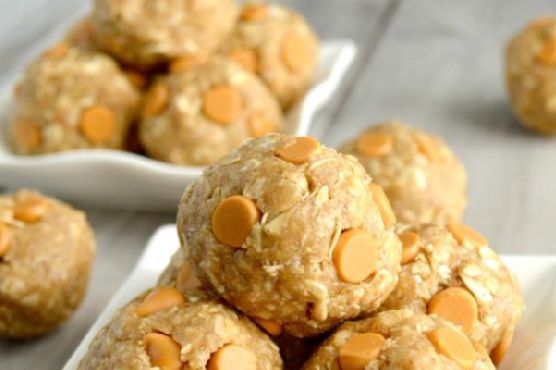
# Sweet Simplicity: {No Bake} Cinnamon Butterscotch Energy Bites


**Description:** Dive into the symphony of flavors with our {No Bake} Cinnamon Butterscotch Energy Bites. A perfect blend of nostalgia and nutrition, these bites are a breeze to whip up and are sure to become a family favorite. Whether you're looking for a quick snack or a delightful treat, these energy bites promise to fuel your day with a touch of sweetness and a lot of love.


## Introduction


There’s something incredibly comforting about the aroma of cinnamon and butterscotch wafting through the kitchen. It instantly transports me back to those cozy afternoons at my grandmother’s house, where the kitchen was a sanctuary of warmth and love. I remember sitting on the counter, watching her mix ingredients with a practiced hand, always sneaking in a taste when she wasn’t looking. The memory of her laughter and the delightful treats she created still linger with me today.


One of my favorite recipes, inspired by those cherished moments, is the {No Bake} Cinnamon Butterscotch Energy Bites. Quick to prepare and packed with flavor, these bites are a tribute to those sweet, nostalgic days.


## The Ingredients


To recreate this heartwarming delicacy, you will need:


- 1 cup oats (ground into a fine powder)


- 1 cup rice cereal


- 1/2 cup whole oats


- 1/4 cup ground flax seed


- 1/4 cup protein powder


- 1/4 cup brown sugar


- 1/2 cup peanut butter


- 1/4 cup honey


- 1/2 cup butterscotch chips


## Instructions


1. **Prepare the Oats:** Begin by grinding 1 cup of oats in a blender until they reach a fine, flour-like consistency.


2. **Mix the Dry Ingredients:** In a large bowl, combine the rice cereal, whole oats, ground oats, protein powder, and ground flax seed. This dry mixture is the foundation of your energy bites.


3. **Melt the Sweetness:** In a microwave-safe bowl, mix together the brown sugar, peanut butter, and honey. Heat in the microwave in 15-second intervals, stirring between each interval until the mixture is completely melted and smooth.


4. **Combine and Chill:** Pour the melted mixture over the dry ingredients and stir until everything is evenly combined. Place the bowl in the refrigerator for about 30 minutes to let the mixture firm up.


5. **Shape Your Bites:** Once the mixture has chilled, remove it from the fridge and roll into small balls. Press a few butterscotch chips into each ball for that extra burst of sweetness.


6. **Enjoy!** These energy bites are ready to serve as soon as you finish rolling and pressing the butterscotch chips.


## A Bite of Nostalgia


Creating these energy bites always brings me back to those treasured afternoons with my grandmother. Her kitchen was a place where stories were shared, laughter was abundant, and love was evident in every bite. While my version of the cinnamon butterscotch treat might be a tad different, the essence remains the same – a simple, sweet reminder of home.


## Difficulty Rating


I would rate this recipe a 3 out of 10 in terms of difficulty. It’s straightforward and requires no baking, making it a perfect project for kids or for anyone looking to indulge in a quick, satisfying treat.


## Classification


These {No Bake} Cinnamon Butterscotch Energy Bites can be classified as a **Dessert**. However, they also make for a delightful snack that can be enjoyed any time of the day.


Whether you're reminiscing about your own family traditions or creating new ones, this recipe is sure to add a touch of sweetness to your day. Enjoy the simplicity and the deliciousness of these energy bites, and let them bring a little bit of joy into your home.

Read more about Appetizers

Read more about Main Dishes

Read more about Desserts

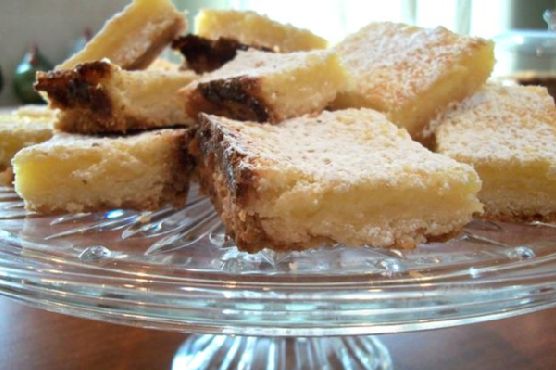
Luscious Lemon Bars | Made by Meaghan Moineau

Luscious Lemon Bars | Made by Meaghan Moineau

# Zesty Bliss: Mastering the Art of Luscious Lemon Bars


**Description:** Dive into the tangy world of Luscious Lemon Bars—a delightful dessert that captures the essence of sunny afternoons and cherished family traditions. With a perfect balance of tart lemon and sweet sugar, this recipe is a must-try for anyone looking to add a zesty twist to their dessert repertoire. Follow our step-by-step guide and discover the nostalgic tale behind this refreshing treat.


---


### Introduction


There’s something undeniably charming about a dessert that can transport you back in time. For me, Luscious Lemon Bars do just that. Every bite is reminiscent of warm summer days spent in my grandmother’s kitchen, where the sweet aroma of lemon would fill the air. These bars, with their vibrant citrus flavor, have become a family staple, cherished across generations. Today, I’m thrilled to share not only the recipe but also a slice of my family’s history with you.


### Ingredients


- **Crust:**


- 1 cup butter, softened


- 2 cups all-purpose flour


- 1/2 cup powdered sugar


- **Filling:**


- 4 large eggs


- 1 1/2 cups white sugar


- 1/4 cup all-purpose flour


- 1/2 teaspoon baking powder


- 1/2 cup fresh lemon juice (approximately 2-3 lemons)


- 1 tablespoon lemon zest


- **Topping:**


- Powdered sugar for dusting


### Instructions


1. **Preheat and Prepare:**


- Preheat your oven to 350°F (175°C).


- Grease a 9x13 inch rectangular cake pan to prevent sticking.


2. **Create the Crust:**


- In a mixing bowl, combine the butter, 2 cups of flour, and 1/2 cup of powdered sugar.


- Mix until crumbly, then press the mixture evenly into the bottom of the prepared pan using your fingertips.


- Bake in the preheated oven for 20 minutes or until the edges are lightly golden.


3. **Prepare the Filling:**


- While the crust is baking, whisk together the eggs, white sugar, 1/4 cup flour, and baking powder in a medium bowl.


- Add the lemon juice and zest, whisking until well combined.


4. **Combine and Bake:**


- Once the crust is done, remove it from the oven and pour the lemon filling over the hot crust.


- Return the pan to the oven and bake for an additional 23-25 minutes. Keep an eye on the top to prevent overbrowning.


5. **Cool and Serve:**


- Remove from the oven and place the pan on a wire rack, allowing it to cool for about 30 minutes.


- To remove from the pan, cut the bars in half and use a large flexible spatula to lift each half out. Then, cut into squares.


- Dust the bars with sifted icing sugar before serving.


### A Slice of Nostalgia


Growing up, my grandmother’s kitchen was the heart of our family gatherings. Every Sunday, after a hearty meal, she would unveil her famous Luscious Lemon Bars. I vividly remember the joy of helping her zest lemons, the anticipation building as the bars baked, and the satisfaction of that first tangy bite. These bars were more than just a dessert; they were a symbol of love and togetherness, connecting us through shared moments and cherished memories.


### Conclusion


Luscious Lemon Bars are more than a sweet treat—they’re a journey back to simpler times, filled with love and laughter. With a difficulty rating of 4/10, this dessert is accessible for bakers of all skill levels, making it a delightful addition to any gathering. Whether you’re enjoying them with a cup of tea or sharing them with loved ones, these lemon bars are sure to bring a smile to your face.


For more recipes and photos, visit my blog at [Lemon Drops Foodie](http://lemondropsfoodie.blogspot.com/2011/02/luscious-lemon-bars.html).


---


Rediscover the joy of baking and the power of family traditions with this refreshing and timeless dessert. Happy baking!

Read more about Appetizers

Read more about Main Dishes

Read more about Desserts

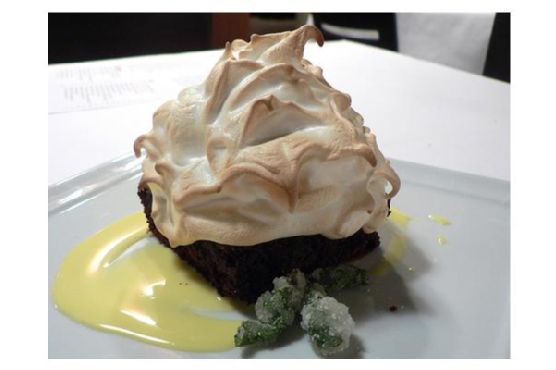
Baked Alaska | Made by Meaghan Moineau

Baked Alaska | Made by Meaghan Moineau

**Title: Nostalgic Elegance: Crafting the Perfect Baked Alaska**


**Description:** Discover the timeless allure of Baked Alaska, a classic dessert that combines the richness of cake, the chill of ice cream, and the ethereal beauty of meringue. This blog post offers a step-by-step guide to creating this show-stopping dessert while sharing a heartfelt family memory that adds a touch of nostalgia to every bite. Perfect for those looking to impress at their next dinner party or simply indulge in a sweet trip down memory lane.


---


### The Art of Baked Alaska: A Dessert with a Story


Baked Alaska is more than just a dessert; it's an experience—a theatrical finale to any meal that leaves your guests in awe. This classic dessert combines the simplicity of a round cake, the delight of creamy ice cream, and the elegance of golden meringue peaks. With its captivating contrast of hot and cold, Baked Alaska is a sweet symphony that dances on your taste buds.


#### Ingredients You'll Need:


- Round cake


- 1/2 gallon ice cream


- 4 egg whites


- 1/4 teaspoon cream of tartar


- 1 cup powdered sugar


#### Step-by-Step Instructions:


1. **Prepare the Ice Cream Layer**:


Grease a 7-inch bowl with flavorless oil or unsalted butter. Allow the ice cream to soften until it's workable. Pack it tightly into the bowl, smoothing the top. Freeze until it hardens completely.


2. **Make the Meringue**:


Beat the egg whites until foamy. Add the cream of tartar and continue whipping until stiff peaks form. Gradually fold in the powdered sugar, ensuring the meringue is smooth and glossy.


3. **Assemble the Baked Alaska**:


Place the frozen cake on a plate slightly larger than the cake. Unmold the ice cream onto the center of the cake. If the ice cream is stubborn, dip the bowl briefly in warm water to release it.


4. **Decorate with Meringue**:


"Frost" the cake and ice cream with the meringue, covering it completely. Use a spoon or spatula to create decorative peaks.


5. **Bake to Perfection**:


Preheat your oven to 450°F. Bake the assembled Baked Alaska for 6-7 minutes until the meringue peaks are golden brown. Store in the freezer until you're ready to serve.


#### A Family Memory: The Sweetness of Tradition


Every year, my family gathers for a cherished tradition—Grandma's birthday. Amongst the laughter and shared stories, Baked Alaska takes center stage. I remember one year when I was young, standing on a chair to get a better view as my mother carefully crafted the dessert. The kitchen was filled with the sweet aroma of cake and sugary meringue. As we all gathered around the table, eyes wide with anticipation, Grandma's eyes sparkled with joy. The Baked Alaska was more than a dessert; it was our family's love, layered with memories of the past and hopes for the future. Even now, every bite transports me back to that warm kitchen, surrounded by love and laughter.


#### Difficulty Rating: 6/10


Creating Baked Alaska requires some skills, especially with the meringue and timing. However, with patience and practice, this dessert can become a beautiful centerpiece for any occasion.


#### Classification: Dessert


This spectacular creation is the quintessential dessert—a perfect blend of textures and temperatures that will leave a lasting impression on your guests.


---


Embrace the nostalgia and the sweet challenge of making Baked Alaska. Whether it's for a special occasion or simply to relive fond memories, this dessert promises to be a delightful journey for both the baker and those fortunate enough to enjoy it.

Read more about Appetizers

Read more about Main Dishes

Read more about Desserts

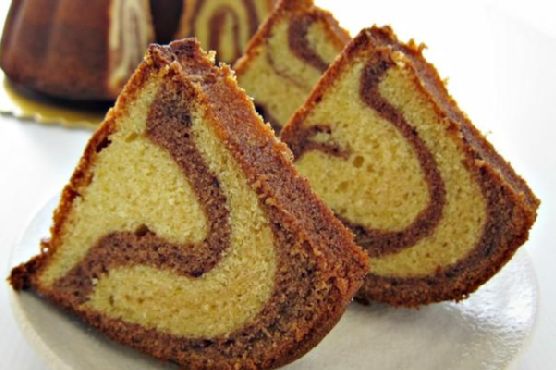
Orange Chocolate Cake | Made by Meaghan Moineau

Orange Chocolate Cake | Made by Meaghan Moineau

**Title: Zesty Indulgence: How to Make a Decadent Orange Chocolate Cake**


**Description:** Dive into the rich, citrusy world of Orange Chocolate Cake, a heavenly dessert that marries the tangy zest of oranges with the luscious depth of chocolate. This post not only provides a step-by-step guide to crafting this delightful treat but also shares a heartwarming family memory that makes this cake truly unforgettable.


---


**Orange Chocolate Cake Recipe: A Nostalgic Slice of Heaven**


When it comes to desserts, few combinations are as invigorating and indulgent as orange and chocolate. This Orange Chocolate Cake is a perfect balance of citrusy freshness and creamy, chocolatey goodness. As you embark on this culinary journey, prepare to be carried away by the luscious aroma that fills your kitchen and the heartwarming memories that bubble up with each bite.


**Ingredients:**


- 1 teaspoon baking powder


- 1 teaspoon baking soda


- 1 cup butter, softened


- 4 large eggs


- 2 1/2 cups all-purpose flour


- 1 cup sour plain natural yogurt


- 1/2 cup freshly squeezed orange juice


- 1 tablespoon orange rind, finely grated


- 1/4 teaspoon salt


- 1 cup semi-sweet chocolate, melted


- 2 cups caster sugar


- 1 teaspoon vanilla extract


**Instructions:**


1. Preheat your oven to 175°C (347°F). Grease a 9-inch bundt pan, then dust it with flour or coat it with a non-stick spray.


2. In a large mixing bowl, beat the butter until creamy. Gradually add the caster sugar, continuing to beat the mixture until it becomes light and fluffy.


3. Incorporate the eggs one at a time, ensuring each is well mixed before adding the next.


4. Stir in the orange rind, orange juice, and vanilla extract, beating at a low speed until the mixture is well combined.


5. Divide the flour, baking powder, and baking soda (Ingredient B) into four equal portions. Similarly, divide the sour cream into three portions. Alternately add the flour mixture and sour cream to the batter, beginning and ending with the flour. Beat well after each addition.


6. Separate half of the batter and gently fold it with the melted semi-sweet chocolate, being careful not to overmix.


7. Alternately spoon the plain and chocolate batters into the prepared bundt pan. Once all the batter is in the pan, gently shake it to settle any air pockets.


8. Bake in the preheated oven for 50-60 minutes, or until a skewer inserted into the center comes out clean.


9. Allow the cake to cool in the pan for 20 minutes before unmolding it onto a wire rack to cool completely.


**A Slice of Family Tradition**


Every time I bake this Orange Chocolate Cake, I'm transported back to my grandmother's kitchen, where the scent of oranges and chocolate was synonymous with family gatherings and joyous occasions. Grandma would lovingly prepare this cake for every holiday, its vibrant flavors and rich aroma a testament to her culinary prowess.


I remember one particular summer when the whole family gathered at Grandma's for a reunion. The kitchen was bustling with activity, laughter, and stories shared over cups of tea and warm slices of this cake. The mingling flavors of orange and chocolate symbolized not just a dessert, but a bond shared across generations. Grandma's Orange Chocolate Cake was more than a treat; it was a family heirloom passed down through the years.


**Difficulty Rating:** 6/10


**Classification:** Dessert


This cake, with its nostalgic roots and delightful flavor combination, is sure to be a hit at your next family gathering or special occasion. Whether you're a seasoned baker or a novice in the kitchen, the Orange Chocolate Cake promises a rewarding experience filled with cherished memories and irresistible flavors. Enjoy this journey of taste and tradition!

Read more about Appetizers

Read more about Main Dishes

Read more about Desserts

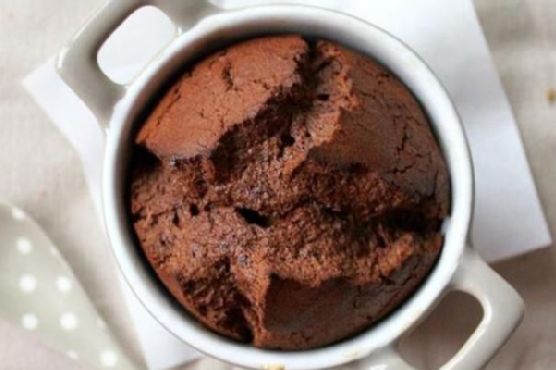
Soufflé au chocolat | Made by Meaghan Moineau

Soufflé au chocolat | Made by Meaghan Moineau

**Title: Fluffy Decadence: Mastering the Soufflé au Chocolat**


**Description: Dive into the art of creating the perfect Soufflé au Chocolat with this step-by-step guide. Discover a cherished family memory that brings this delightful dessert to life, and learn the secrets to achieving a dessert that will leave everyone in awe.**


---


### Introduction


There’s something undeniably magical about a soufflé—its delicate rise, the way it teases your senses with its rich aroma, and the blissful moment when you dig into its airy depths. Today, we're focusing on a timeless classic, the Soufflé au Chocolat, a dessert that's as much a treat for the eyes as it is for the palate. Rated at a difficulty of 7 out of 10, this dessert is sure to impress and delight.


### Ingredients


- 6 ounces of high-quality chocolate


- 4 large egg whites


- 3 large egg yolks


- 1/3 cup of heavy cream


- 1/4 teaspoon of salt


- 2 tablespoons of sugar


- Butter for greasing the soufflé dishes


- Additional sugar for coating the dishes


### Instructions


1. **Preparation:**


Begin by buttering eight 3/4-cup soufflé dishes. Generously sprinkle sugar inside each dish, tilting to ensure an even coat, and tap out any excess. Arrange these prepared dishes on a large baking sheet.


2. **Chocolate Mixture:**


In a large metal bowl, combine the chocolate and heavy cream. Set the bowl over a saucepan of barely simmering water. Stir continuously until the chocolate is melted and the mixture is smooth. Remove the bowl from heat and stir in the egg yolks and salt.


3. **Egg Whites:**


Using an electric mixer, beat the egg whites in another large bowl until soft peaks form. Gradually add 2 tablespoons of sugar, beating until semi-firm peaks form.


4. **Combine:**


Using a rubber spatula, fold one-quarter of the beaten egg whites into the chocolate mixture to lighten it. Gently fold in the remaining egg whites in two additions.


5. **Fill and Bake:**


Divide the chocolate mixture among the prepared soufflé dishes, filling them completely. Position the oven rack in the center and preheat to 204°C (400°F). Bake the soufflés on the baking sheet until they are puffed and the tops feel firm—approximately 16 minutes for room temperature batter or 18 minutes if chilled.


### A Nostalgic Family Memory


Growing up, the Soufflé au Chocolat was a staple at our family gatherings. My grandmother, a culinary maestro, would orchestrate a symphony of flavors that left every guest in awe. I vividly remember one snowy winter evening when she decided to teach me her secrets. The kitchen was filled with warmth and the rich scent of chocolate. Her gentle guidance and patient hands taught me the art of folding egg whites, an essential technique for this delicate dessert. That night, as we sat around the table, the soufflés rose beautifully, much like the laughter and joy that filled the room. It was in those moments that I learned that cooking is not just about food—it's about creating memories that last a lifetime.


### Conclusion


The Soufflé au Chocolat is more than just a dessert; it’s a celebration of culinary artistry and a testament to the love and care poured into every dish. Whether you’re crafting this for a special occasion or a cozy night in, this recipe promises to transport you and your loved ones to a place of indulgence and nostalgia. So, preheat your oven, gather your ingredients, and prepare to delight in a chocolate cloud that is sure to make hearts flutter.


### Classification


- **Difficulty:** 7/10


- **Type:** Dessert


---


Embrace the challenge, enjoy the process, and savor the sweet rewards of this timeless classic. Bon appétit!

Read more about Appetizers

Read more about Main Dishes

Read more about Desserts

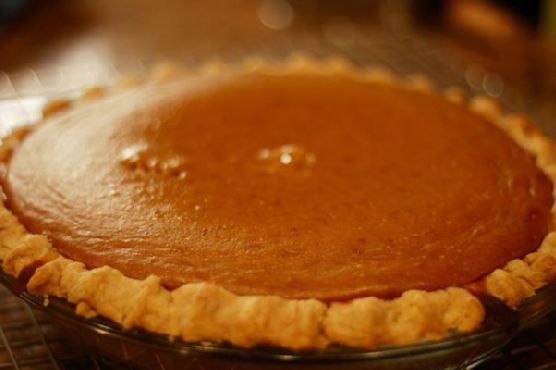
Classic Pumpkin Pie | Made by Meaghan Moineau

Classic Pumpkin Pie | Made by Meaghan Moineau

Title: "A Slice of Nostalgia: The Timeless Allure of Classic Pumpkin Pie"


Description: Dive into the comforting embrace of fall with a Classic Pumpkin Pie recipe that not only tantalizes your taste buds but also warms your heart with a sprinkle of nostalgia.


---


As the crisp autumn air begins to weave its way through the trees, painting the landscape with hues of amber and gold, there's one classic dessert that captures the essence of the season like no other: Classic Pumpkin Pie. This timeless recipe combines the rich flavors of canned pumpkin, the warm spices of cinnamon, ginger, and nutmeg, and the creamy sweetness of condensed milk, all nestled within a tender, flaky pie crust. It's more than just a dessert; it's a culinary tradition that brings family and friends together around the table, year after year.


### Ingredients:


- 1 can of pumpkin


- 2 large eggs


- 1 teaspoon ground cinnamon


- 1/2 teaspoon ground ginger


- 1/4 teaspoon ground nutmeg


- 1/2 teaspoon salt


- 1 can sweetened condensed milk


- 1 unbaked pie crust


- Whipped cream for garnish


### Instructions:


1. **Preheat the Oven**: Begin by preheating your oven to 425 degrees F. This initial high temperature helps set the crust, ensuring it remains crisp and flaky.


2. **Mix the Filling**: In a medium bowl, whisk together the canned pumpkin, sweetened condensed milk, eggs, ground cinnamon, ginger, nutmeg, and salt. Stir until the mixture is smooth and well combined.


3. **Assemble the Pie**: Pour the pumpkin mixture into the unbaked pie crust, spreading it evenly with a spatula.


4. **Bake**: Place the pie in the oven and bake for 15 minutes. Then, reduce the oven temperature to 350 degrees F and continue baking for an additional 35 to 40 minutes. The pie is done when a knife inserted 1 inch from the crust comes out clean.


5. **Cool and Serve**: Allow the pie to cool completely before serving. Garnish with a generous dollop of whipped cream for the perfect finishing touch.


### Difficulty Rating: 4/10


### Classification: Dessert


**A Nostalgic Family Memory:**


Every Thanksgiving, as the fragrant aroma of pumpkin pie wafted through the house, it signaled the beginning of the holiday season for our family. I vividly remember my grandmother standing in her cozy kitchen, wearing her favorite apron, which was always dusted with a faint layer of flour. She would hum softly to herself as she whisked the pumpkin filling, a melody that echoed the warmth and love she poured into every dish she made.


Gathered around the dining table, with the pie taking center stage, we would share stories of the past and dreams for the future, laughter punctuating our conversations. As dessert was served, my grandmother would always insist on adding an extra swirl of whipped cream to each slice, a gesture that made every piece feel special.


This Classic Pumpkin Pie recipe is not just a dessert; it's a cherished tradition, a slice of nostalgia that connects us to our roots and reminds us of the simple joys of life. Whether you're a seasoned baker or a novice in the kitchen, this recipe offers a delightful journey back to those heartwarming moments that define the spirit of family gatherings.


As you take your first bite, may it transport you to a place of warmth, love, and cherished memories. Happy baking!

Read more about Appetizers

Read more about Main Dishes

Read more about Desserts

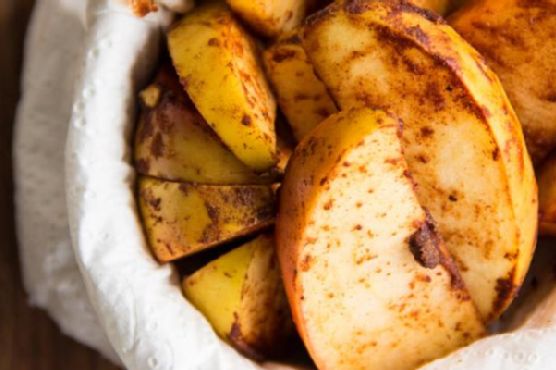
Baked Cinnamon Apple Wedges | Made by Meaghan Moineau

Baked Cinnamon Apple Wedges | Made by Meaghan Moineau

**Title: A Warm Hug in Every Bite: Baked Cinnamon Apple Wedges**


**Description:** Dive into the nostalgic flavors of fall with our Baked Cinnamon Apple Wedges. This simple yet flavorful dessert is perfect for cozy gatherings or a comforting treat at home. With just four ingredients, this easy-to-make dish brings back cherished family memories while delighting your taste buds.


---


As autumn leaves begin to fall and a crisp breeze fills the air, my thoughts often drift back to cozy family gatherings. One of my fondest memories is of my grandmother bustling around her warm kitchen, the welcoming scent of cinnamon and nutmeg weaving through the house like a comforting embrace. She had a knack for turning the simplest ingredients into something magical, and her Baked Cinnamon Apple Wedges were no exception.


Every autumn, she would gather the freshest apples from the local orchard, their skins glistening in shades of red and green. I remember sitting at the kitchen table, my feet barely touching the floor, as she meticulously cut each apple into perfect wedges. She would then drizzle them with rich maple syrup, sprinkle them with aromatic cinnamon and nutmeg, and slide them into the oven. The anticipation was almost too much to bear, as the sweet and spicy aroma filled the room, wrapping us in its warmth.


Just ten minutes later, the apples emerged from the oven, golden brown and tender, ready to be savored. Each bite was like a warm hug, the flavors perfectly balanced and reminiscent of everything wonderful about the season. We would gather around the table, sharing stories and laughter, the simple act of enjoying these baked apple wedges creating memories that would last a lifetime.


Now, as I prepare this dish for my own family, I am reminded not only of my grandmother's love but also of the joy found in sharing these timeless recipes. The Baked Cinnamon Apple Wedges are more than just a dessert; they are a connection to the past, a celebration of the present, and a tradition I hope to pass on.


**Recipe: Baked Cinnamon Apple Wedges**


**Ingredients:**


- 1 apple


- 1 tablespoon maple syrup


- 1 teaspoon ground cinnamon


- 1/4 teaspoon ground nutmeg


**Instructions:**


1. Preheat your oven to 180 degrees Celsius (356 degrees Fahrenheit).


2. Cut the apple into approximately 10-12 wedges.


3. In a bowl, mix the apple wedges with maple syrup, cinnamon, and nutmeg until evenly coated.


4. Arrange the apple wedges in a single layer in a small baking dish or on a baking tray.


5. Bake in the preheated oven for 10 minutes, or until the apples are golden brown and cooked through.


6. Serve warm and enjoy the comforting flavors.


**Difficulty Rating:** 2/10


**Classification:** Dessert


Whether you're looking to recreate cherished family memories or simply indulge in a deliciously easy dessert, these Baked Cinnamon Apple Wedges are sure to delight. With their enticing aroma and comforting taste, they capture the essence of fall in every bite. So gather your loved ones, share a story or two, and enjoy this warm hug from the oven.

Read more about Appetizers

Read more about Main Dishes

Read more about Desserts

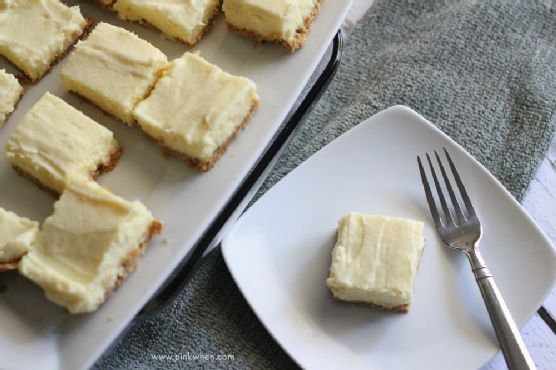
Creamy Lime Pie Square Bites | Made by Meaghan Moineau

Creamy Lime Pie Square Bites | Made by Meaghan Moineau

**Title: A Zesty Twist on Tradition: Creamy Lime Pie Square Bites**


**Description:** Dive into a world of tangy sweetness with our Creamy Lime Pie Square Bites. Perfect for dessert lovers, these luscious bites are a modern twist on a family classic. Discover the perfect blend of graham cracker crust and creamy lime filling, and indulge in a nostalgic journey that will tantalize your taste buds and warm your heart.


---


### A Nostalgic Bite of Lime Heaven


Growing up, my family had a tradition of gathering every Sunday afternoon at my grandmother's house for a potluck feast. Each member would bring their signature dish, but the highlight was always my grandmother's famous key lime pie. The tartness of the lime combined with the sweetness of the creamy filling was a taste that lingered in our memories long after the last bite was savored.


Fast forward to today, and I've taken her beloved recipe and transformed it into Creamy Lime Pie Square Bites—a delightful, bite-sized version that pays homage to those cherished family gatherings. These squares are perfect for sharing, just like the memories of those sunny Sundays in Grandma's kitchen.


### Ingredients:


- All-purpose flour


- Graham cracker crumbs


- Lime zest


- Sugar


- Unsalted butter


### Instructions:


1. **Preheat and Prepare:** Begin by preheating your oven to 350°F (175°C). Cover an 8x8 glass square dish with foil, ensuring the foil extends beyond the edges for easy removal later.


2. **Crust Creation:** In a medium bowl, whisk together all-purpose flour, graham cracker crumbs, lime zest, and sugar until they reach a grainy consistency. Melt unsalted butter and incorporate it into the mixture.


3. **Press and Bake:** Using a spoon or your fingers, press the graham crust mixture firmly into the prepared dish, making sure all edges and the bottom are well covered. Place in the oven and bake for 10-15 minutes until the crust is golden brown. Set aside to cool for about an hour.


4. **Filling the Flavor:** For the filling, combine all your ingredients in a medium bowl. Mix well for about 30 minutes, ensuring a smooth, creamy texture, then continue mixing on low speed for an additional 3 minutes.


5. **Assemble and Bake Again:** Pour the filling into the graham cracker crust, smoothing out the top and ensuring the edges are filled. Bake in the oven for another 5-10 minutes before removing the dish to a cooling rack for 15 minutes.


6. **Chill and Serve:** Finally, transfer the dish to the refrigerator for about 45 minutes to set. Once chilled, carefully lift the foil to remove the dessert from the dish. Slice into bite-sized squares and serve.


### A Tangy Twist on Tradition


These Creamy Lime Pie Square Bites are more than just a dessert. They're a testament to the power of family traditions and the joy of sharing a lovingly prepared meal. Whether you're a seasoned baker or a novice in the kitchen, these squares are a breeze to make and sure to impress.


**Difficulty:** 4/10


**Category:** Dessert


### Explore More Lime-Infused Delights


If you're as captivated by lime's zesty charm as we are, explore these delightful recipes:


- Coconut Lime Spritzer


- Blackberry Lime Margaritas


- Strawberry Limeade


- Cherry Lime Chia Energy Bars


- Strawberry Margarita Cheesecake


### A Note on Essential Oils


While adding a drop of high-quality lime essential oil can enhance the flavor, it's crucial to ensure the oil is edible. Look for therapeutic-grade oils with a Supplement Facts box. Always prioritize purity and safety in your culinary adventures.


Join our community of over 500,000 subscribers at Pink When and get exclusive recipes and tips delivered straight to your inbox. Sign up now and receive our FREE Simple Fit Dinners Ebook. Don’t miss out on the culinary fun!

Read more about Appetizers

Read more about Main Dishes

Read more about Desserts

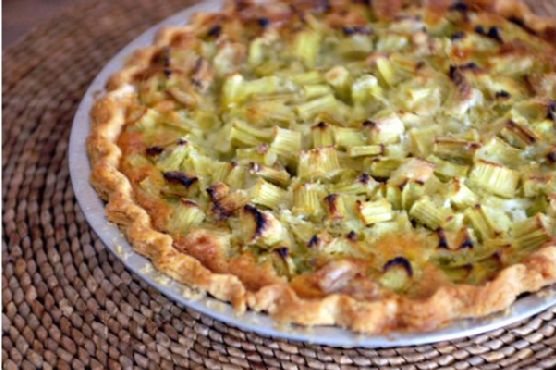
Delicious Rhubarb Custard Pie | Made by Meaghan Moineau

Delicious Rhubarb Custard Pie | Made by Meaghan Moineau

**Title: A Slice of Nostalgia: Crafting the Perfect Rhubarb Custard Pie**


**Description:** Dive into the world of baking with a timeless recipe that blends tradition and taste. Our Delicious Rhubarb Custard Pie combines tangy rhubarb with a creamy custard filling, all nestled in a perfectly baked crust. This dessert not only tantalizes your taste buds but also offers a slice of cherished family memories. Rated 5/10 in difficulty, this dessert is perfect for both novice and seasoned bakers alike.


---


### The Delightful Dance of Rhubarb and Custard


There's something magical about the combination of tangy rhubarb and creamy custard, a pairing that perfectly encapsulates both balance and indulgence. This Delicious Rhubarb Custard Pie is a testament to that harmony. With a hint of nutmeg and the buttery goodness enveloping each bite, it’s a dessert that promises satisfaction and nostalgia.


#### Ingredients:


- Butter


- Eggs


- Flour


- Nutmeg


- Prebaked pie crust


- Raw rhubarb


- Salt


#### Instructions:


1. **Prepare the Filling:** In a large bowl, combine flour, nutmeg, salt, and raw rhubarb. This mixture will become the heart of your pie, infusing every bite with a delightful tartness.


2. **Assemble the Pie:** Pour the rhubarb mixture into a pre-baked pie crust, ensuring it's evenly distributed.


3. **Add the Custard:** Beat the eggs and pour them over the rhubarb mixture, letting the custard seep through the vibrant reds and greens of the rhubarb.


4. **Drizzle with Butter:** Melt the butter and drizzle it over the top of the pie. This final touch ensures a rich, velvety texture.


5. **Baking:** Preheat your oven to 400°F (220°C). Place the pie in the center rack and bake for 50 minutes. To prevent the crust edges from over-browning, tent them with aluminum foil.


#### A Slice of Family Memory


Every time I bake this pie, I’m whisked back to my grandmother’s quaint kitchen. The aroma of rhubarb custard pie wafting through her house was a signal that something special was about to happen. It was a Sunday tradition, a staple at our family gatherings. We’d gather around the table, the pie still warm from the oven, and share stories of the week gone by.


My grandmother, with her kind eyes and gentle smile, always insisted on using fresh rhubarb from her garden. She said it was the secret ingredient, though I suspect it was her love that made each pie so memorable. As kids, my siblings and I would sneak into the garden, plucking rhubarb stalks, pretending to be little chefs. Those moments are etched in my heart, a testament to the power of food in bringing families together.


#### Dessert Rating: 5/10


This recipe, while not overly complicated, requires careful attention to detail to achieve the perfect balance of flavors. It's an intermediate-level dessert, ideal for those ready to expand their baking repertoire.


---


Embrace the tradition, savor the flavors, and let this Delicious Rhubarb Custard Pie become a cherished part of your family gatherings. As you bake, remember the stories that have brought this recipe to life, and perhaps, create new ones of your own.

Read more about Appetizers

Read more about Main Dishes

Read more about Desserts

Chewy Gingersnaps | Made by Meaghan Moineau

Chewy Gingersnaps | Made by Meaghan Moineau

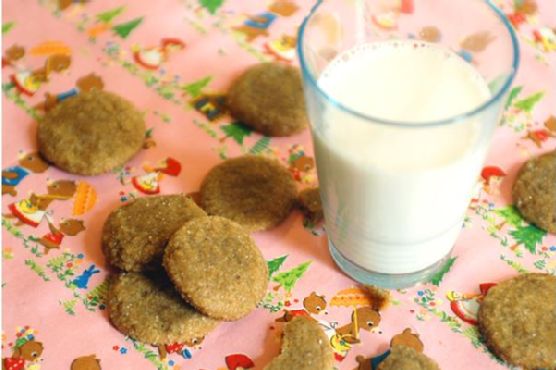
**Title: "Chewy Gingersnaps: A Heartwarming Holiday Tradition"**


**Description:** Dive into the cozy nostalgia of the holiday season with these irresistibly chewy gingersnaps. Infused with the warm spices of ginger and cinnamon, this classic dessert offers a delightful balance of sweet and spicy flavors. Ideal for family gatherings or a quiet night by the fire, these cookies are sure to become a cherished part of your seasonal traditions. With a difficulty rating of 4 out of 10, they're accessible for bakers of all skill levels.


---


As the crisp air of fall deepens into the chill of winter, my kitchen becomes a haven of warmth and spice. The scent of gingersnaps baking in the oven is more than just a delightful aroma; it’s a passport to cherished family memories. These chewy gingersnaps, with their perfect blend of ginger, cinnamon, and molasses, have been a staple at our holiday gatherings for as long as I can remember.


Growing up, the holidays meant a bustling kitchen, filled with the laughter of family and the clatter of pots and pans. My grandmother would always take the lead, orchestrating the preparation of a feast while simultaneously baking batch after batch of her famous gingersnaps. These cookies were more than just a treat; they were a tradition, a symbol of the season, and a testament to the love that bound our family together.


The process of making gingersnaps was a family affair. My siblings and I would gather around the kitchen counter, eager to help in any way we could. Our roles were simple yet crucial: stirring the flour, baking soda, salt, and spices in one bowl while watching my grandmother cream the butter, oil, and sugars in another. The anticipation built as she beat in the eggs, one at a time, followed by the rich, dark molasses that gave the cookies their distinctive flavor.


Once the dough was mixed, it was time for our favorite part: shaping the dough into small balls and rolling them in a generous coating of sugar. As we placed them onto parchment-lined baking trays, my grandmother would remind us that the secret to their perfect chewiness was to bake them for precisely eight minutes. They would still seem a bit underdone when first taken out, but that was exactly how they were supposed to be.


The first bite of a freshly baked gingersnap was always magical. The outside was crisp with a sugar coating, while the inside was soft, chewy, and bursting with flavor. These cookies were often enjoyed with a cup of hot cocoa or mulled cider, completing the cozy holiday experience.


Today, I carry on the tradition with my own family, baking these chewy gingersnaps each year as the holidays approach. Each batch is a tribute to my grandmother and the loving memories she created. I hope that as you try this recipe, it brings warmth, joy, and a touch of nostalgia to your home as well.


**Difficulty: 4/10**


**Classification: Dessert**


**Ingredients:**


- 2 teaspoons baking soda


- 1 cup brown sugar


- 1 cup (2 sticks) butter, softened


- 2 teaspoons ground cinnamon


- 2 large eggs


- 2 cups all-purpose flour


- 2 teaspoons ground ginger


- 1/2 teaspoon kosher salt


- 1/4 cup molasses


- 1/4 cup vegetable oil


- 1/4 teaspoon ground white pepper


- 1/2 cup white sugar (plus extra for rolling)


**Instructions:**


1. Preheat oven to 325°F (160°C).


2. In a large bowl, stir together the flour, baking soda, salt, ginger, cinnamon, and white pepper.


3. In another bowl, cream the butter, oil, brown sugar, and white sugar together until light and fluffy.


4. Beat in the eggs, one at a time, until fully incorporated.


5. Stir in the molasses.


6. Gradually add the dry ingredients to the wet ingredients, stirring until well combined.


7. Shape the dough into small balls and roll them in additional white sugar.


8. Place the dough balls on a baking tray lined with parchment paper.


9. Bake for 8 minutes. The cookies will appear slightly underdone when removed from the oven.


10. Allow to cool on the baking tray for a few minutes before transferring to a wire rack to cool completely.


Enjoy these delightful chewy gingersnaps, and may they fill your home with warmth and joy this holiday season!

Read more about Appetizers

Read more about Main Dishes

Read more about Desserts

Divine Christmas Candy Cane Cookies | Made by Meaghan Moineau

Divine Christmas Candy Cane Cookies | Made by Meaghan Moineau

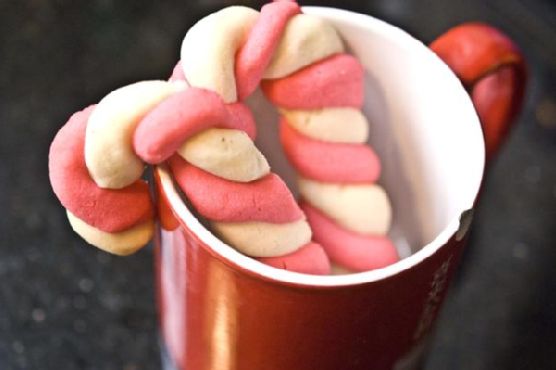
**Title: Celebrate the Holidays with Divine Christmas Candy Cane Cookies**


**Description:** Embrace the holiday spirit with our delightful Candy Cane Cookies, a heavenly treat that combines the minty freshness of peppermint with the sweetness of a buttery cookie. Perfect for sharing, these cookies will bring joy to every festive gathering. Follow our detailed guide to create these charming confections and discover the heartwarming family story behind this treasured recipe.


---


**A Sweet Holiday Tradition: Divine Christmas Candy Cane Cookies**


As the holiday season approaches, the aroma of freshly baked cookies fills the air, evoking cherished memories of family gatherings and festive celebrations. One such nostalgic treat that has become a staple in our household is the delightful Candy Cane Cookie. With its vibrant colors and refreshing peppermint flavor, this cookie is not just a dessert, but a symbol of holiday joy and togetherness.


**Recipe Overview**


**Ingredients:**


- 2 cups all-purpose flour


- 1 egg yolk


- Red food coloring


- 1 teaspoon peppermint extract


- 1/2 cup powdered sugar


- 1 cup unsalted butter, softened


- 1 teaspoon vanilla extract


**Instructions:**


1. **Creaming the Butter**: Begin by creaming the unsalted butter until it achieves a smooth, fluffy texture. Gradually add the powdered sugar, continuing to beat until the mixture is light and airy.


2. **Mixing the Wet Ingredients**: Incorporate the egg yolk, vanilla extract, and peppermint extract into the butter and sugar mixture, stirring until well combined.


3. **Incorporating the Dry Ingredients**: Add the all-purpose flour in two additions. First, add half of the flour, stirring until fully incorporated, then add the remaining flour. Mix until you attain a firm, smooth dough.


4. **Coloring the Dough**: Divide the dough into two equal portions. Add a few drops of red food coloring to one half, kneading until the color is evenly distributed.


5. **Chilling the Dough**: Wrap both dough balls in plastic wrap and refrigerate for about 30 minutes, allowing the dough to firm up.


6. **Shaping the Cookies**: Preheat your oven to 180°C (356°F). On a lightly floured surface, take a walnut-sized piece of red dough and a walnut-sized piece of white dough. Roll each into a 10-12 cm long rope. Place the ropes side by side and gently twist them together, pressing slightly to form a spiral. Shape by bending one end into a hook, creating the iconic candy cane shape.


7. **Baking**: Line the cookies on baking paper about 2 cm apart. Bake for approximately 10 minutes or until the edges start to brown. Once baked, let the cookies cool completely on a wire rack.


**A Cherished Family Memory**


Every Christmas, my grandmother would gather the family in her cozy kitchen, the heart of her home. With flour dusting the countertops and laughter echoing off the walls, we would embark on our annual cookie-baking adventure. The Candy Cane Cookies were always my favorite part. My siblings and I would compete to see who could create the most perfect twist, our hands sticky with dough and faces smeared with flour. As the cookies baked, the kitchen would be filled with the sweet scent of peppermint, wrapping us in a warm, festive embrace. To this day, the taste of these cookies transports me back to those precious moments, a reminder of the simple joys and loving bonds that define the holiday season.


**Difficulty Level: 5/10**


**Classification: Dessert**


Whether you’re continuing a family tradition or starting a new one, these Candy Cane Cookies are sure to bring a smile to everyone’s face. With their delightful appearance and delicious taste, they’re the perfect addition to your holiday dessert table. Happy baking, and may your holidays be filled with warmth and cheer!

Read more about Appetizers

Read more about Main Dishes

Read more about Desserts

Crème Fraiche Coconut Bavarians | Made by Meaghan Moineau

Crème Fraiche Coconut Bavarians | Made by Meaghan Moineau

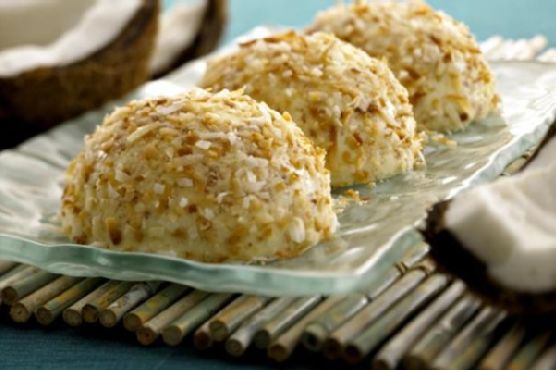
**Title: Indulge in Nostalgia with Crème Fraiche Coconut Bavarians: A Dessert That Transcends Time**


**Description: Dive into the rich, creamy world of Crème Fraiche Coconut Bavarians—a dessert that perfectly blends tradition and modern culinary artistry. Infused with the tropical allure of coconut and the luxurious texture of crème fraiche, this dessert is not just a treat for the palate but also a journey down memory lane. Discover how this delectable creation became a cherished family tradition and learn how to create it yourself with our step-by-step guide.**


**Crème Fraiche Coconut Bavarians: A Sweet Taste of Memory**


The gentle hum of our family kitchen was always punctuated by the rhythmic clattering of dishes and the soft laughter of loved ones. Among the many desserts that graced our dining table, one stood out for its sumptuous texture and evocative flavor—Crème Fraiche Coconut Bavarians. It wasn't just a dessert; it was the embodiment of family gatherings, a sweet testament to our shared history.


**Ingredients:**


- 1 packet gelatin


- 1 can coconut milk, divided


- 1 can sweetened condensed milk


- 1/2 cup sugar


- 4 egg yolks


- 1 cup Alouette Cuisine Crème Fraiche


- 1/2 cup shredded coconut


**Instructions:**


1. **Bloom the Gelatin:** In a small bowl, combine the gelatin with 4 tablespoons of coconut milk. Let it sit to bloom while you prepare the rest of the ingredients.


2. **Simmer the Milks:** In a medium saucepan, bring the sweetened condensed milk and remaining coconut milk to a gentle simmer over medium-high heat. Stir occasionally to ensure it doesn't stick to the bottom.


3. **Temper the Egg Yolks:** Meanwhile, whisk together the sugar and egg yolks in a separate bowl until well combined. Slowly add a small amount of the heated milk mixture to the egg yolks, whisking continuously to temper them without cooking the eggs.


4. **Combine and Thicken:** Gradually pour the tempered egg yolk mixture back into the saucepan. Stir constantly and heat until the mixture thickens enough to coat the back of a spoon, about 5 to 7 minutes. Remove from heat and stir in the bloomed gelatin until fully dissolved.


5. **Chill and Whip:** Transfer the mixture to a bowl and refrigerate until it begins to gel. While waiting, whip the Alouette Cuisine Crème Fraiche in a separate bowl until soft peaks form.


6. **Fold and Mold:** Once the gelatin mixture has slightly set, gently fold it together with the whipped crème fraiche. Pour the combined mixture into your chosen molds immediately.


7. **Refrigerate Overnight:** Allow the Bavarians to set in the refrigerator overnight.


8. **Serve with Nostalgia:** Unmold the Bavarians just before serving and generously sprinkle with shredded coconut. Enjoy the dessert that has become a beloved part of our family's culinary heritage.


**A Nostalgic Family Memory**


I remember the first time my grandmother made Crème Fraiche Coconut Bavarians. The kitchen was filled with the enticing aroma of coconut, a scent that still evokes memories of those bustling family gatherings. As children, we watched in awe as she carefully folded the whipped crème fraiche into the gelling mixture, her hands moving with the grace of years of practice. Each bite was a reminder of her warmth and the love she poured into every dish. Even today, making this dessert feels like a sweet conversation with her, a way to keep her spirit alive in our hearts and taste buds.


**Difficulty Rating:** 6/10


**Classification:** Dessert


Creating Crème Fraiche Coconut Bavarians is not just about following a recipe—it's about connecting with the past, savoring the present, and crafting memories for the future. Whether you're a seasoned chef or a culinary novice, this dessert promises a rewarding experience that goes beyond taste. So, gather your ingredients, embrace the process, and indulge in a dessert that truly transcends time.

Read more about Appetizers

Read more about Main Dishes

Read more about Desserts

Captain America Shield Cookies | Made by Meaghan Moineau

Captain America Shield Cookies | Made by Meaghan Moineau

# Shielding Sweetness: Captain America Shield Cookies


**Description:** Unleash your inner superhero with these delightful and iconic Captain America Shield Cookies. Perfect for comic book fans and dessert lovers alike, these cookies not only capture the essence of a beloved superhero but also serve as a nostalgic treat that brings families together. With layers of vibrant fondant and a creamy buttercream finish, these cookies are bound to be the star of your next gathering.


---


## A Sweet Nostalgia: A Family Memory


Growing up, superhero movies were a staple in our household. Every summer, my siblings and I would gather around the TV, popcorn in hand, eagerly watching the latest superhero saga unfold. Captain America, with his unwavering sense of justice and iconic shield, was always a favorite. It wasn't just his strength or bravery that captivated us; it was the idea of protection and unity that resonated deeply.


One rainy afternoon, with no new comics to dive into, my mom came up with a brilliant idea to keep us entertained - baking Captain America Shield Cookies. As the aroma of freshly baked sugar cookies wafted through the air, our kitchen transformed into a workshop of creativity and laughter. My siblings and I took turns dipping the cookies in red candy melts, giggling as we tried to perfect the fondant stars.


The joy of creating these cookies was matched only by the delight of sharing them with family and friends. Each bite was a reminder of those cherished days, where superhero adventures and family bonds were seamlessly intertwined.


## Recipe


### Ingredients:


- Red candy melts


- Coconut oil


- Circular cookie cutters (various sizes)


- Star cookie cutter


- Cornstarch


- Blue cake fondant


- White cake fondant


- Pre-made sugar cookies


- Vanilla buttercream


### Instructions:


1. Line a baking sheet with wax paper.


2. Microwave the candy melts and coconut oil in 30-second intervals until completely melted, mixing thoroughly.


3. Using a fork, dip each sugar cookie into the melted candy and set it carefully on the lined baking sheet.


4. Allow to set in the refrigerator for about one hour.


5. Dust a clean working surface with cornstarch and roll out your fondant.


6. Cut your white fondant with the largest cookie cutter, then using the 1.5-inch cookie cutter, cut a hole in the middle.


7. Using the smallest circular cookie cutter, cut out blue fondant circles.


8. Cut star shapes from the white fondant and use buttercream to glue them onto your blue fondant circles.


9. Once the coated cookies are set, remove them from the fridge and start assembling. Using buttercream as the glue, place your large white circle, then the blue one (with the star).


10. Enjoy your superhero creation!


### Difficulty Rating:


**4/10** - This recipe is beginner-friendly and perfect for a fun family activity.


### Classification:


**Dessert**


---


Whether you're celebrating a superhero-themed party or simply indulging your sweet tooth, these Captain America Shield Cookies are more than just a treat. They're a delicious way to bring a slice of nostalgia and the spirit of heroism into your home. Assemble your team, don your aprons, and let the baking adventure begin!

Read more about Appetizers

Read more about Main Dishes

Read more about Desserts

PB Cup Stuffed Brownie Bites | Made by Meaghan Moineau

PB Cup Stuffed Brownie Bites | Made by Meaghan Moineau

**Title: Sweet Nostalgia: Indulge in PB Cup Stuffed Brownie Bites**


**Description: Discover the joy of baking with our delightful PB Cup Stuffed Brownie Bites! This easy-to-follow, mouthwatering dessert blends rich cocoa and creamy peanut butter for an irresistible treat that evokes cherished family memories.**


---


There's something about the aroma of freshly baked brownies that instantly transports me back to my grandmother's cozy kitchen. As a child, I remember spending countless weekends at her house, where the air was always thick with the scent of sugar and cocoa. My grandmother, with her flour-dusted apron and warm smile, had a knack for turning simple ingredients into extraordinary treats. One of my fondest memories was the day she introduced me to her unique twist on a classic brownie – the PB Cup Stuffed Brownie Bites.


**A Perfect Blend of Flavors**


These decadent bites are the epitome of comfort food, combining the rich, fudgy texture of a brownie with the creamy, nutty goodness of Reese's peanut butter cups. The secret lies in the simplicity of the ingredients, each playing a crucial role in creating a symphony of flavors:


- **Granulated Sugar**: Adds sweetness and enhances the cocoa flavor.


- **Flour**: Provides structure and stability.


- **Eggs**: Bind the ingredients, creating a moist, chewy texture.


- **Salt**: Balances the sweetness and enhances the chocolatey notes.


- **Vegetable Oil**: Keeps the brownies moist and tender.


- **Vanilla Extract**: Adds depth and warmth to the flavor profile.


- **Cocoa Powder**: The star of the show, imparting a rich, chocolatey essence.


- **Semi-Sweet Chocolate Chips**: Offer bursts of chocolate in every bite.


- **Reese's Peanut Butter Cups**: The pièce de résistance, adding a delightful surprise in the center.


**Step-by-Step Guide to Culinary Bliss**


1. **Mixing the Magic**: Begin by whisking together the granulated sugar, flour, eggs, salt, vegetable oil, vanilla, and cocoa powder until well combined. The transformation starts here, as these humble ingredients meld together to create a rich, chocolatey batter.


2. **Stir in the Surprise**: Gently fold in the semi-sweet chocolate chips, taking care not to overmix. This step ensures that each bite is studded with pockets of melted chocolate.


3. **Prepare and Preheat**: Lightly spray a mini muffin pan with cooking spray and preheat your oven to 350°F. This sets the stage for the magic to happen.


4. **Fill and Bake**: Scoop the batter into the prepared pan, filling each slot about three-quarters of the way up. This allows room for the brownie bites to rise and accommodate the peanut butter cup. Bake for 8-10 minutes, or until a toothpick inserted comes out almost clean. Remember, it's okay if they're slightly underdone – this is what makes them gooey and irresistible.


5. **The Grand Finale**: Once the brownies are baked, gently push a Reese's peanut butter cup into the center of each. The warmth of the brownie will slightly melt the peanut butter cup, creating a creamy center. Allow them to set in the pan for a couple of minutes before transferring them to a cooling rack.


**A Sweet Symphony of Memories**


Every time I take a bite of these PB Cup Stuffed Brownie Bites, I'm reminded of those cherished afternoons in my grandmother's kitchen. The laughter, the stories shared, and the sheer joy of creating something delicious together. These little treats are more than just a dessert; they are a testament to the power of food to connect us with our past and create new memories with our loved ones.


**Difficulty Rating: 3/10**


**Classification: Dessert**


Whether you're an experienced baker or a novice in the kitchen, this recipe is a delightful way to indulge in a bit of nostalgia while creating new moments of joy. So, preheat that oven, gather your ingredients, and let the sweet symphony of PB Cup Stuffed Brownie Bites fill your home with warmth and happiness.

Read more about Appetizers

Read more about Main Dishes

Read more about Desserts

Homemade Animal Crackers | Made by Meaghan Moineau

Homemade Animal Crackers | Made by Meaghan Moineau

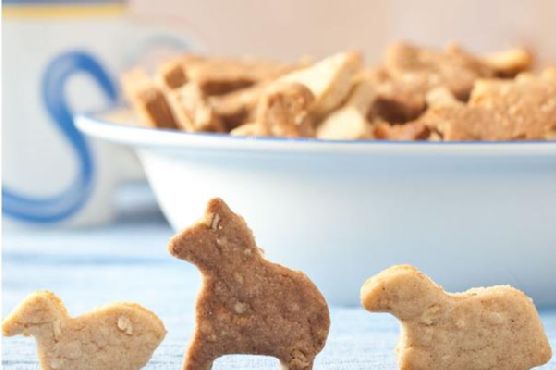
**Title: "Nostalgia in Every Bite: The Delightful Joy of Homemade Animal Crackers"**


**Description: Discover the charm of baking your own animal crackers with this easy-to-follow recipe. Infused with warm spices like cinnamon and allspice, and a hint of cocoa, these crackers are a delightful treat that bring back fond family memories. Perfect for a nostalgic dessert or a whimsical snack, this recipe will transport you back to simpler times.**


---


**The Allure of Homemade Animal Crackers: A Journey Through Time**


As the aroma of cinnamon and allspice wafts through the kitchen, I'm instantly transported back to my grandmother's cozy farmhouse, where the scent of freshly baked treats was as much a part of the home as the laughter that filled the air. Among her many specialties, her homemade animal crackers were a beloved treat that turned ordinary afternoons into magical adventures.


These charming crackers, with their whimsical shapes and delightful flavors, were more than just a dessert; they were a gateway to cherished memories. As a child, I would eagerly watch my grandmother expertly roll out the dough, her hands deftly crafting each animal with a cookie cutter. It was a ritual that promised both deliciousness and delight, a tradition I now carry on in my own kitchen.


**A Recipe for Nostalgia: Homemade Animal Crackers**


**Ingredients:**


- 1 cup butter


- 1 cup brown sugar


- 1 egg


- 1 teaspoon vanilla extract


- 1 teaspoon cinnamon


- 1/2 teaspoon allspice


- 1/2 teaspoon salt


- 1 teaspoon baking powder


- 1/2 cup oats


- 2 cups flour (substitute cocoa powder for a portion to taste)


**Instructions:**


1. Begin by creaming together the butter and brown sugar until light and fluffy.


2. Add in the egg and vanilla, mixing well to combine.


3. Incorporate the cinnamon, allspice, and salt, blending the spices thoroughly.


4. Mix in the baking powder, oats, and flour. If using cocoa powder, substitute a portion of the flour with it, adjusting to your preference for a touch of chocolatey goodness.


5. Form the dough into a ball, wrap it, and store it in the fridge for at least one hour, or overnight, to let the flavors meld.


6. When ready to bake, preheat your oven to 350 degrees. Roll out the dough to 1/4" thickness, cut out animal shapes, and place them on a parchment-lined baking sheet.


7. Bake for 5-7 minutes, or until the edges are lightly golden. Let cool before enjoying.


**A Taste of Simplicity and Joy**


Making these animal crackers is a delightful experience that brings a sense of calm and joy, much like revisiting a cherished storybook from childhood. As I carefully cut out the animal shapes, I am reminded of the afternoons spent in my grandmother’s kitchen, the warmth of her smile, and the comforting sweetness of those homemade treats.


**Difficulty Rating: 4/10**


These animal crackers are simple to make, perfect for bakers of all skill levels, and can be classified as a **Dessert**. Whether you’re baking as a family activity or indulging in a solo culinary adventure, these crackers promise both deliciousness and a nostalgic trip down memory lane.


---


**Conclusion:**


Homemade animal crackers are more than just a delightful treat; they are a bridge to the past, a recipe that carries with it the warmth of family traditions and the simplicity of childhood joys. So, roll up your sleeves, gather your ingredients, and embark on a baking journey that promises not only a scrumptious outcome but also a heart filled with fond memories.

Read more about Appetizers

Read more about Main Dishes

Read more about Desserts