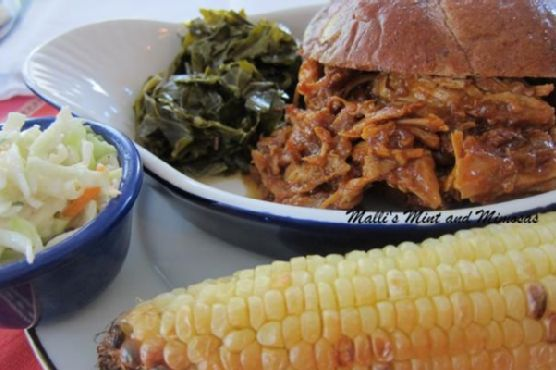
Pulled Pork Sandwich with Mango BBQ Sauce
Intro
Welcome to a culinary journey that blends the rich, smoky essence of pulled pork with the luscious sweetness of mango BBQ sauce. This dish is not just a meal; it’s an experience that evokes memories of backyard barbecues and sunlit afternoons. I remember the first time I tasted a pulled pork sandwich; it was at a family reunion where my uncle, the family grill master, introduced us to this delightful creation. The aroma filled the air, and I couldn’t resist sneaking a taste before dinner. That first bite left a lasting impression, and I knew I had to recreate it in my kitchen.
Why You’ll Love It
This pulled pork sandwich is a crowd-pleaser, perfect for gathering with friends and family. The combination of tender, slow-cooked pork and the unique twist of mango-infused BBQ sauce makes it unforgettable. The spices create a depth of flavor that balances the sweetness of the mango, while the brioche rolls add a buttery finish. Whether you’re hosting a party or looking for a comforting meal, this sandwich will leave everyone asking for seconds.
Ingredients
- 1 tablespoon apple cider vinegar
- 2 pounds lean boneless pork shoulder
- 4 split brioche rolls
- 1 teaspoon cumin seeds
- 2 tablespoons dark brown sugar
- 1 teaspoon fennel seeds
- 1 tablespoon ginger, finely chopped
- 1 teaspoon kosher salt
- 2 tablespoons fresh lime juice
- 1 cup mango puree
- 2 tablespoons molasses
- 1 small onion, finely chopped
- 1 tablespoon paprika
- 1 serrano pepper, minced
- 2 tablespoons vegetable oil
- 2 tablespoons Worcestershire sauce
Instructions
- Combine the rub ingredients, in a small bowl and massage it into the pork shoulder until well coated. Set aside while you make the BBQ sauce. You could do this a day ahead and keep refrigerated until ready to use.
- In a large saucepan, warm the oil over low heat until hot and shimmering. Add the cumin and fennel; they should splutter upon contact – be careful!
- Once the spluttering subsides, add the onions, ginger, serrano pepper, and a little salt, to taste. Sauté until they soften but don’t let them get any color.
- Add the rest of the sauce ingredients: apple cider vinegar, brown sugar, lime juice, mango puree, molasses, paprika, and Worcestershire sauce.
- Simmer for about 5 minutes. Taste and season as needed.
- Add the pork shoulder to the saucepan, coating it with the sauce. Cover, and gently simmer until the pork falls apart easily, stirring and turning often, about 3 hours.
- Remove the pork from the saucepan and shred it using 2 forks. Return it to the sauce and stir to coat with the sauce.
- Put a generous spoonful of the pork inside a brioche bun, top with a few slices of pickle, and serve.
- Enjoy the swoons from your loved ones!
Tips
For the best results, use a meat thermometer to ensure your pork is cooked to perfection. Letting the pork shoulder rest in the fridge with the rub overnight enhances the flavors. If you’re short on time, you can use a pressure cooker to speed up the cooking process without sacrificing tenderness.
Variations & Substitutions
If you’re looking to switch things up, try substituting the mango puree with pineapple for a tropical twist. For a spicier kick, add more serrano peppers or a dash of hot sauce. Vegetarian? Substitute the pork with jackfruit for a plant-based alternative that still satisfies.
Storage
Leftover pulled pork can be stored in an airtight container in the refrigerator for up to 3 days. To freeze, portion the pork into freezer-safe bags or containers, leaving some room for expansion, and store for up to 3 months. Reheat gently on the stovetop or in the microwave with a splash of water to keep it moist.
FAQ
Can I make this recipe in advance?
Absolutely! The flavors deepen when the pork is allowed to sit in the fridge overnight, making it a great make-ahead dish for parties or busy weeknights.
What can I serve with these sandwiches?
These sandwiches pair perfectly with classic coleslaw, sweet potato fries, or a simple green salad. The tangy coleslaw adds a refreshing crunch that complements the rich flavors of the pork.
Can I use a different type of bun?
Definitely! While brioche rolls add a buttery richness, you can use any type of bun you prefer, such as ciabatta or whole wheat, to suit your taste and dietary preferences.
Nutrition
Each serving of Pulled Pork Sandwich with Mango BBQ Sauce provides approximately:
- Calories: 510
- Protein: 32g
- Carbohydrates: 56g
- Fat: 18g
- Sodium: 780mg
- Fiber: 2g
Conclusion
Creating a Pulled Pork Sandwich with Mango BBQ Sauce is not just about cooking; it’s about crafting an experience that brings joy to those around you. With its perfect blend of sweet, spicy, and savory flavors, this dish is sure to become a favorite at your table. So go ahead, indulge in this delicious sandwich, and create memories that will last a lifetime. Happy cooking!
Related update: Pulled Pork Sandwich with Mango BBQ sauce
Related update: Green Beans with Pearl Onions and Salmon