Mediterranean Orzo Salad | Made by Meaghan Moineau

Mediterranean Orzo Salad | Made by Meaghan Moineau

Title: Savoring Tradition: A Mediterranean Orzo Salad That Brings Family Together
Description: Dive into the flavors of the Mediterranean with our vibrant and refreshing Orzo Salad recipe. Infused with the zest of lemon, the crunch of fresh vegetables, and the creamy tang of feta cheese, this salad is the perfect dish to transport you to a sunny coastal escape. Rated 4 out of 10 in difficulty, this dish is an ideal appetizer or light main dish for any gathering. Discover how this recipe became a cherished family tradition.

---


A Journey of Flavors: Mediterranean Orzo Salad


There's something undeniably special about a dish that transcends mere ingredients and becomes a bridge to cherished memories. Our Mediterranean Orzo Salad is one such recipe—a symphony of flavors that not only delights the palate but also stirs the heart with nostalgia.
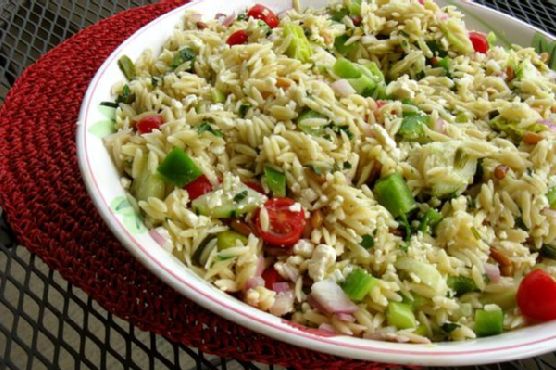

Ingredients:


- 1 cup orzo


- Kosher salt


- 1/4 cup pine nuts


- 8 tablespoons extra virgin olive oil (EVOO), divided


- 3 green onions, chopped


- 1/4 cup Italian parsley, chopped


- Zest and juice of 1 lemon


- 1 diced cucumber


- 1 green bell pepper, diced


- 1 cup cherry tomatoes, halved


- 1/4 cup red onion, finely chopped


- 1/4 cup pepperoncinis, sliced


- 1/2 cup feta cheese, crumbled


- 2 tablespoons red wine vinegar


Instructions:


1. Cooking the Orzo: Begin by bringing a pot of water to a rapid boil. Generously salt the water and add orzo, cooking until tender, approximately 7-9 minutes. Drain and set aside.
2. Toasting the Pine Nuts: While the orzo is cooking, spread pine nuts on a baking sheet and toast lightly in an oven preheated to 400 degrees Fahrenheit. Remove from oven and set aside.
3. Sautéing for Flavor: Heat two tablespoons of EVOO over medium heat in a non-stick pan. Sauté the chopped green onions for about 2 minutes. Add parsley, lemon juice, lemon zest, toasted pine nuts, and cooked orzo. Sauté for an additional 3-4 minutes, allowing the flavors to meld and absorb into the orzo. Remove from heat.
4. Combining Ingredients: In a large mixing bowl, combine the cucumber, green bell pepper, cherry tomatoes, red onion, and pepperoncinis with the orzo mixture. Add crumbled feta cheese, red wine vinegar, and the remaining six tablespoons of EVOO. Mix well until all ingredients are evenly coated.
5. Serving Suggestions: This salad can be refrigerated for later enjoyment or served immediately for a fresh and vibrant appetizer or light main dish.

A Taste of Tradition


Every time I prepare this Mediterranean Orzo Salad, I'm transported back to a sun-drenched summer afternoon at my grandmother's house. Her kitchen, filled with the fragrant aroma of fresh herbs and the warmth of family laughter, was the heart of our gatherings. She would meticulously prepare this salad, her hands deftly chopping vibrant vegetables and crumbling feta with care.


We would gather around her large wooden table, a motley crew of aunts, uncles, and cousins, eagerly anticipating the first bite. The salad, with its blend of tangy, crunchy, and creamy elements, was always the star of our meals, a testament to the simple yet profound joy of sharing food with loved ones.


This recipe, passed down through generations, remains a cherished symbol of our family heritage, a reminder of those joyful days spent together. It’s more than just a dish; it’s a celebration of tradition, love, and the enduring power of food to bring people together.


---


Difficulty: 4/10
Classification: Appetizer / Light Main Dish

Embrace the warmth of Mediterranean flavors and create new memories with this beloved Orzo Salad—a timeless dish sure to delight both your taste buds and your heart.

Read more about Appetizers

Read more about Main Dishes

Read more about Desserts

Easy Parmesan Knots | Made by Meaghan Moineau

Easy Parmesan Knots | Made by Meaghan Moineau

Title: "A Taste of Home: Easy Parmesan Knots That Bring Back Sweet Memories"
Description:

Discover the simple delight of Easy Parmesan Knots, a recipe that not only tantalizes your taste buds but also warms your heart with nostalgia. Perfect as an appetizer, this dish is rated 3/10 in difficulty, making it an ideal choice for both novice and seasoned cooks. Join me as I share a cherished family memory tied to this savory treat, and learn how to create these delicious knots in no time.


---


There’s something truly magical about the aroma of freshly baked bread wafting through the kitchen. It has an uncanny ability to transport you back to simpler times, evoking memories of family gatherings and the comforting presence of loved ones. For me, Easy Parmesan Knots are more than just a delicious appetizer; they are a cherished link to my grandmother's kitchen, where love was always the main ingredient.


Growing up, Sundays were reserved for family dinners at Grandma's house. Her kitchen was a sanctuary of delightful scents and warm smiles, where everyone was welcome and no one ever left hungry. Among the many dishes that graced her table, her Parmesan Knots were an undisputed favorite. These golden, cheesy delights were always the first to disappear, eagerly devoured by everyone from the youngest cousin to the eldest uncle.


Ingredients:

- Refrigerated buttermilk biscuits


- Canola oil


- Dried parsley flakes


- Garlic powder


- Dried oregano


- Canned green Parmesan cheese


Instructions:

1. Preheat your oven to 400°F (200°C).


2. Roll each biscuit into a 12-inch rope and tie it into a knot, tucking the ends under. Place the knots 2 inches apart on a greased baking sheet.


3. Bake for 8-10 minutes or until they are golden brown and fragrant.


4. In a large bowl, combine canola oil, dried parsley flakes, garlic powder, dried oregano, and Parmesan cheese.


5. Once the knots are baked, brush them with the mixture while they are still warm, allowing the flavors to meld beautifully.


As the knots baked, Grandma would regale us with stories from her youth, her eyes twinkling with mischief and nostalgia. She’d speak of summer picnics by the lake, where these Parmesan Knots were a staple, easily carried in a basket and shared among friends. Each bite was a reminder of those sun-drenched days, filled with laughter and the simple joy of being together.


The beauty of this recipe lies in its simplicity and the way it brings people together, just as it did in Grandma’s kitchen. Whether you’re hosting a dinner party or simply craving a taste of home, these Easy Parmesan Knots are sure to please. They’re a testament to the power of food to evoke memories and create new ones, all while being effortlessly delicious.


So why not bring a piece of my family tradition into your home? With just a few ingredients and a little love, you can create a dish that’s bound to become a beloved part of your own culinary repertoire. After all, the best recipes are the ones that remind us of where we’ve been and inspire us to create new memories with those we hold dear.

Read more about Appetizers

Read more about Main Dishes

Read more about Desserts

Broccoli Tartar | Made by Meaghan Moineau

Broccoli Tartar | Made by Meaghan Moineau

A Taste of Memories: Crafting the Perfect Broccoli Tartar


Description: Dive into the vibrant world of Broccoli Tartar, a colorful and nutritious appetizer that brings together the essence of fresh vegetables and aromatic herbs. This delightful dish not only pleases the palate but also rekindles cherished family memories, making it a perfect starter for any gathering.

---


Ingredients


- 1 head of broccoli


- 2 medium tomatoes, peeled


- 1 red bell pepper


- 1 small onion


- 1 tablespoon apple vinegar


- 2 tablespoons olive oil


- 1 tablespoon soy sauce


- 1 tablespoon fresh parsley, chopped


- 1 teaspoon herbs de Provence


- 1 teaspoon red chili powder


- Sea salt, to taste


- 2 tablespoons sesame seeds, toasted


- 1/4 cup soaked arame seaweed


- Fresh vegetables for serving


---


Instructions


1. Preparation: Begin by soaking the arame seaweed in a bowl of pure water. Meanwhile, bring a pot of water to a boil with a pinch of sea salt.
2. Vegetable Prep: Wash the broccoli, red bell pepper, parsley, and tomatoes. Carve a cross on the bottom of each tomato and halve the bell pepper to remove the seeds.
3. Blanching: Once the water is boiling, immerse the tomatoes for a quick blanch, then shock them in cold water to easily remove the skins. Next, let the broccoli swim in the boiling water for 6 minutes. Refresh under cold water to maintain their vibrant green color.
4. Roasting: Place the bell pepper under the grill until its skin is charred. Let it cool before peeling.
5. Blending: In a long narrow bowl, blend the cooled broccoli with a hand blender, adding olive oil, apple vinegar, and sea salt to taste. Incorporate half of the chopped parsley to achieve a smooth puree.
6. Mixing: Dice the peeled tomatoes and roasted bell pepper into tiny pieces. Finely chop the onion and mix all the vegetables with the broccoli puree. Season with soy sauce, a hint of red chili powder, and herbs de Provence.
7. Finishing Touch: Drain and finely chop the soaked arame seaweed, gently folding it into the mixture. Shape the tartar into small balls with an ice cream scoop and garnish with toasted sesame seeds.
8. Serving: Serve the Broccoli Tartar on a bed of fresh vegetables. Bon appétit!

---


Nostalgic Family Memory


Growing up, Sunday afternoons at my grandmother's house were always special. Her kitchen was a haven of delightful aromas and heartfelt laughter. Among her many culinary masterpieces, Broccoli Tartar held a unique place. It was a dish that brought us together, a vibrant green bowl of goodness that perfectly mirrored her love and care.


I remember sitting at the kitchen table, watching her nimble fingers expertly peel tomatoes and chop parsley. She would hum softly, a tune that resonated with warmth and comfort. The tartar was always the first dish to disappear at family dinners, a testament to its simple yet captivating taste.


Every time I prepare this dish, I'm transported back to those cherished Sundays, surrounded by family, sharing stories and creating memories. It's not just a recipe; it's a legacy of love, passed down through generations.


---


Difficulty Rating


- Difficulty: 6/10
- Classification: Appetizer

---


Broccoli Tartar is more than just a dish; it's a sensory journey that celebrates the harmony of fresh ingredients and nostalgic flavors. Perfect for any occasion, it invites you to create lasting memories with every bite.

Read more about Appetizers

Read more about Main Dishes

Read more about Desserts

Heirloom Tomato Basil and Olive Oil Wine Sauce over Pasta | Made by Meaghan Moineau

Heirloom Tomato Basil and Olive Oil Wine Sauce over Pasta | Made by Meaghan Moineau

Title: A Taste of Tradition: Heirloom Tomato Basil and Olive Oil Wine Sauce over Pasta
Description: Dive into the heart of Italian cuisine with our Heirloom Tomato Basil and Olive Oil Wine Sauce over Pasta. This dish combines the rich, vibrant flavors of heirloom tomatoes, fresh basil, and extra virgin olive oil with a touch of dry white wine. Perfect as a main dish, this recipe is not only a feast for the senses but also a nostalgic journey back to family gatherings and the comforting warmth of homemade meals. Rated 5/10 for difficulty, it's accessible for home cooks seeking to create a memorable dining experience.

---


A Taste of Tradition: Heirloom Tomato Basil and Olive Oil Wine Sauce over Pasta

In the world of culinary delights, few dishes evoke the warmth and comfort of family gatherings like a lovingly prepared pasta. One such dish that holds a special place in my heart is the Heirloom Tomato Basil and Olive Oil Wine Sauce over Pasta. Each bite is a harmonious blend of rich flavors and cherished memories.


Growing up, Sundays were always reserved for family. The kitchen would buzz with activity, filled with laughter and the tantalizing aromas of fresh ingredients. My grandmother, the heart of our family, would preside over the stove, her hands deftly transforming simple ingredients into a feast. This recipe, passed down through generations, was always the highlight of our Sunday dinners.


Ingredients:

- 400g of your favorite pasta


- 5 heirloom tomatoes


- A generous bunch of fresh basil


- 4 cloves of garlic


- 1/2 cup of extra virgin olive oil


- 1/2 cup of dry white wine


- Sea salt, to taste


Instructions:

1. Begin by grating two heirloom tomatoes using a cheese grater, capturing all the juice and pulp. Dice the remaining three tomatoes and set them aside.


2. Chop a generous handful of basil and set it aside for later.


3. Mince the garlic cloves and sauté them in a tablespoon of olive oil over medium heat until they turn a light golden color, stirring often to prevent burning.


4. Add the dry white wine to the garlic and allow it to reduce until it reaches a syrupy consistency. This step imparts a rich depth of flavor to the sauce.


5. While the wine is reducing, bring a pot of salted water to a boil. Add a splash of olive oil to prevent the pasta from sticking, then cook the pasta according to the package directions.


6. Incorporate the grated and diced tomatoes into the reduced wine, adding a pinch of sea salt to enhance the flavors. Pour in half a cup of extra virgin olive oil and reduce the heat to medium-low.


7. Gradually stir in the chopped basil, allowing the flavors to meld together. Cook until the tomatoes are hot and soft, creating a thick, luscious sauce.


8. Once the pasta is al dente, drain it and combine it with the sauce, ensuring every strand is coated in the vibrant mixture.


This dish, with its rating of 5/10 in difficulty, is a perfect main dish for those seeking to create a heartfelt meal. The simplicity of the ingredients belies the complexity of flavors, making it a testament to the beauty of traditional cooking.


Every time I prepare this pasta, I'm transported back to those cherished Sundays, surrounded by family and the warmth of shared meals. It's more than just a recipe; it's a piece of my heritage, a reminder of the love and togetherness that food can bring. So gather your loved ones, and savor the taste of tradition with every delightful bite.

Read more about Appetizers

Read more about Main Dishes

Read more about Desserts

Brussel Sprouts in Bacon and Garlic Sauce | Made by Meaghan Moineau

Brussel Sprouts in Bacon and Garlic Sauce | Made by Meaghan Moineau

Title: Savoring Simplicity: Brussel Sprouts in Bacon and Garlic Sauce


Description: Unveil the magic of a dish that marries simplicity with flavor: Brussel Sprouts in Bacon and Garlic Sauce. This easy recipe transforms humble brussel sprouts into a mouthwatering delight that even the pickiest eaters will love. Join me on a nostalgic culinary journey, reliving cherished family memories tied to this vibrant dish.

---


A Taste of Home: Brussel Sprouts in Bacon and Garlic Sauce


Brussel sprouts, often misunderstood and overlooked, have been a staple in my family’s kitchen for as long as I can remember. As a child, I would watch in awe as my grandmother transformed these mini cabbages into a dish that was nothing short of art. The aroma of garlic and bacon wafting through the air was the cue that something special was happening in the kitchen.


Ingredients:

- 250g whole brussel sprouts


- 1/2 teaspoon salt


- 4 cups water


- 1 tablespoon salted butter


- 1 tablespoon minced garlic


- 1 tablespoon bacon bits


- Salt and pepper, to taste


- 1 teaspoon lemon juice


- Optional: Fresh lemons and toasted almond flakes for garnish


Instructions:
1. Prepare the Sprouts: Begin by washing 250g of brussel sprouts thoroughly, removing any old or hard outer leaves. This step always reminds me of how my grandmother would meticulously clean each sprout while sharing stories of her own childhood.
2. Boil to Perfection: In a large saucepan, bring 4 cups of water to a boil, adding 1/2 teaspoon of salt. Once boiling, add the brussel sprouts and cook over medium heat for about 4 minutes, or until they’re tender yet crunchy. Drain the sprouts and set them aside.
3. Create the Garlic-Bacon Magic: Return the saucepan to the stove and melt 1 tablespoon of salted butter. As it melts, halve the brussel sprouts. Add 1 tablespoon of minced garlic to the butter and sauté for just a few seconds until it’s fragrant, evoking that warm, inviting smell that signals home.
4. Toss and Season: Return the halved brussel sprouts to the saucepan, tossing them lightly in the garlic-butter sauce. Stir in 1 tablespoon of bacon bits. (For a quick fix, I always have a jar of ready-to-use bacon bits in the fridge, a trick I picked up from my grandmother.)
5. Season to Perfection: Season with salt and pepper to taste. I prefer using Masterfoods Garlic Pepper for an added depth of flavor. Finish with a squeeze of fresh lemon juice to brighten the dish, mixing everything together until well-coated.
6. Serve and Enjoy: Serve immediately, with fresh lemon wedges on the side for those who love an extra tangy flavor. For a touch of elegance, garnish with toasted almond flakes.
Nostalgic Notes:

This dish holds a special place in my heart, not just for its flavor but for the memories it brings back. Every family gathering, holiday, or simple Sunday dinner included a platter of these beautifully cooked brussel sprouts. They were my grandmother's way of bringing everyone together, a dish that transcended generations and was always met with eager hands and satisfied smiles.


Difficulty Rating: 3/10
Classification: Appetizer

This recipe is a testament to the power of simple ingredients and the love that goes into cooking for family. Whether you're a seasoned chef or a novice in the kitchen, this dish is approachable, quick, and incredibly rewarding. Enjoy the blend of nostalgia and flavor as you bring a piece of my family's tradition to your table.

Read more about Appetizers

Read more about Main Dishes

Read more about Desserts

Salmon Quinoa Risotto | Made by Meaghan Moineau

Salmon Quinoa Risotto | Made by Meaghan Moineau

Title: A Taste of Comfort: Salmon Quinoa Risotto
Description: Discover the heartwarming flavors of our Salmon Quinoa Risotto—a dish that marries the wholesome goodness of quinoa with the rich, savory taste of poached salmon and vibrant kale. This delightful recipe is not just a main dish; it’s a nostalgic journey back to cherished family moments, perfect for a cozy dinner at home. With a difficulty rating of 6 out of 10, it's an ideal choice for both seasoned cooks and kitchen novices alike.

---


In the heart of every beloved dish lies a story, a memory that stirs emotions as much as the flavors excite the palate. Our Salmon Quinoa Risotto is a culinary journey that not only delights your taste buds but also evokes the warmth of family gatherings.


Growing up, Sundays were reserved for family dinners at my grandmother's house. Her kitchen was a symphony of sizzling sounds and fragrant aromas, a place where love was the secret ingredient in every dish she prepared. Among her repertoire of comforting meals, her salmon risotto was a standout—a dish that brought everyone together around the table, sharing stories and laughter.


Inspired by those cherished evenings, I’ve recreated this classic dish with a modern twist by incorporating quinoa—a nutrient-rich superfood that adds a delightful texture and nutty flavor. The process begins in a 4-quart saucepan, where the fragrance of diced onions sizzling in olive oil fills the air. As the onions turn transparent, quinoa is introduced, toasting gently to enhance its flavor.


The art of risotto lies in patience and the gradual addition of vegetable stock, stirring lovingly until each ladleful is absorbed. This slow process allows the quinoa to soak up the aromatic stock, resulting in a creamy and satisfying base.


While the quinoa simmers, a separate pan is dedicated to the vibrant kale, infused with the robust essence of garlic sautéed in olive oil. The kale is turned until fragrant, its deep green hue a testament to its freshness.


As the quinoa reaches its perfect consistency, the sautéed kale and tender, poached salmon are folded in, uniting the dish in a harmonious blend of flavors. A sprinkle of salt and pepper to taste completes this masterpiece.


Every bite of this Salmon Quinoa Risotto is a nostalgic nod to those treasured family dinners, where each mouthful was accompanied by a story, a laugh, or a moment of connection. It's a dish that not only nourishes the body but also feeds the soul, embodying the spirit of togetherness that only a lovingly prepared meal can offer.


Whether you’re recreating this memory for your own family or introducing it as a new tradition, this risotto is more than just a main dish—it’s a celebration of the simple joys that bring us together. So gather your loved ones, share this meal, and create your own memories around the table.

Read more about Appetizers

Read more about Main Dishes

Read more about Desserts

Pasta With Chicken and Broccoli | Made by Meaghan Moineau

Pasta With Chicken and Broccoli | Made by Meaghan Moineau

Title: Savoring Tradition: Pasta with Chicken and Broccoli


Description:

Discover a comforting, family-favorite recipe for Pasta with Chicken and Broccoli. This easy-to-make main dish combines succulent chicken, vibrant broccoli, and savory parmesan cheese, all tossed perfectly with lasagna noodles in a flavorful wine and broth sauce. Delight in the nostalgia of a cherished family memory while preparing this simple yet delicious meal. Rated 6/10 in difficulty, this main dish is perfect for any dinner table.

---


Pasta with Chicken and Broccoli: A Family Affair

There's something undeniably heartwarming about a dish that not only satisfies your taste buds but also stirs up fond memories of family gatherings. Pasta with Chicken and Broccoli is one such recipe that has been passed down through my family, each iteration adding a new layer of flavor and love. As I prepare this dish in my own kitchen, I am transported back to bustling family dinners where laughter was as abundant as the food.


I recall a particular evening at my grandmother's house, where the aroma of garlic sautéing in olive oil filled the air. My cousins and I would crowd around the kitchen, eager to sneak a taste of the crisp, yet tender broccoli florets before they made their way into the skillet. My grandmother, with her gentle yet firm command, orchestrated the kitchen like a maestro, ensuring each ingredient was added with precision and care.


Ingredients:

- 2 tablespoons olive oil


- 2 boneless chicken breasts, cut into bite-sized pieces


- 1/2 teaspoon red pepper flakes


- 8 cooked lasagna noodles, cut into strips


- 3 garlic cloves, minced


- 2 cups broccoli florets


- 1 teaspoon dried basil leaves


- 1/2 cup white wine


- 1/2 cup chicken broth


- Salt and pepper to taste


- Grated parmesan cheese for topping


Instructions:

1. Begin by heating the olive oil in a large skillet over medium heat. Once shimmering, add the minced garlic, sautéing for about one minute while stirring constantly to prevent burning.


2. Add the chicken pieces to the skillet, cooking until they are well done and golden brown on the outside.


3. Introduce the broccoli florets to the pan, cooking until they reach a perfect crisp-tender stage.


4. Season the mixture with dried basil leaves, red pepper flakes, and a pinch of salt and pepper to taste.


5. Pour in the white wine and chicken broth, allowing the flavors to meld as the mixture simmers for about five minutes.


6. Add the cooked and drained lasagna noodles to the skillet, tossing everything to combine and heating for an additional 1 to 2 minutes.


7. Serve hot, garnished with grated parmesan cheese if desired.


A Nostalgic Twist:

This dish always reminds me of the laughter and love that filled my grandmother's kitchen. It was there that I learned the importance of patience and attention to detail, as she gently taught me how to sauté garlic without burning it and the perfect timing for adding the broccoli. The kitchen was our haven, where stories were shared and bonds were strengthened over the simple, yet profound act of cooking together.


Difficulty: 6/10
Classification: Main Dish

As you prepare this delightful dish, may it not only nourish your body but also create lasting memories with your loved ones. After all, the best recipes are those that bring family together, making each meal a celebration of tradition and love. Enjoy your Pasta with Chicken and Broccoli, and may it become a cherished part of your family's culinary journey.

Read more about Appetizers

Read more about Main Dishes

Read more about Desserts

Farfalle with Peas, Ham and Cream | Made by Meaghan Moineau

Farfalle with Peas, Ham and Cream | Made by Meaghan Moineau

Title: "A Taste of Nostalgia: Farfalle with Peas, Ham, and Cream"
Description: Discover the comfort and joy of a classic Italian-inspired dish, Farfalle with Peas, Ham, and Cream. Perfectly blending simple ingredients with cherished memories, this easy-to-make main dish is sure to become a family favorite.

---


There's something enchantingly comforting about dishes that transport us back to cherished family gatherings. Farfalle with Peas, Ham, and Cream is one such recipe that not only delights the palate but also warms the soul. This dish, rich in both flavor and nostalgia, has been a staple at our family dinners, where laughter and love were always the main ingredients.


A Stroll Down Memory Lane

Growing up, Sunday dinners at my grandmother's house were a sacred ritual. The aroma of hearty dishes would greet us at the door, promising an afternoon of indulgence and togetherness. Among the myriad of recipes she crafted with love, Farfalle with Peas, Ham, and Cream stood out not just for its taste, but for the warmth it brought to our hearts.


I vividly recall the sight of my grandmother bustling around her cozy kitchen, her apron dusted with flour and her face glowing with the joy of cooking for her family. As the farfalle pasta danced in the boiling pot, she would hum a tune that was as comforting as the meal itself. The sizzle of butter in the skillet, the vibrant green of the peas, and the savory aroma of ham melded together to create a symphony of flavors that was simply irresistible.


After a day filled with conversation and laughter, we would gather around the dining table. Bowls of Farfalle with Peas, Ham, and Cream were passed around, each serving a testament to the love that went into its making. The creaminess of the sauce, the saltiness of the ham, and the subtle sweetness of the peas perfectly complemented the al dente farfalle, making every bite a delight.


The Recipe
This dish, with its Italian roots and heartwarming simplicity, is a breeze to prepare. Here's how you can recreate this beloved family treasure:
Ingredients:

- 2 tablespoons butter


- 1 cup diced ham


- 12 ounces farfalle pasta


- 1 cup canned heavy cream


- 1 cup parmesan cheese, grated


- 1 cup frozen peas


- Salt and pepper to taste


Instructions:

1. Cook the farfalle pasta according to the package directions until al dente. Drain and set aside.


2. In a skillet over medium heat, melt the butter. Add the diced ham and frozen peas, sautéing them together for about 5 minutes.


3. Pour in the heavy cream, season with salt and pepper, and let the mixture cook for 5 to 10 minutes, or until the cream begins to thicken slightly.


4. Remove the skillet from heat. Add the cooked pasta to the pan and gently stir to coat the farfalle with the creamy sauce.


5. Sprinkle the grated parmesan cheese over the pasta, stirring until the cheese melts and blends into the sauce.


6. Serve immediately, ensuring each plate is filled with love, warmth, and a sprinkle of nostalgia.


Difficulty Rating: 3/10
Classification: Main Dish

This recipe's simplicity is not just in its preparation but also in its ability to bring people together. It serves as a gentle reminder that the most cherished moments are often found in the simplest of meals, shared with those we love. So, gather your family and create new memories with this timeless dish that has been a cherished part of ours for generations. Enjoy!

Read more about Appetizers

Read more about Main Dishes

Read more about Desserts

Warm Duck Salad With Roasted Beetroot | Made by Meaghan Moineau

Warm Duck Salad With Roasted Beetroot | Made by Meaghan Moineau

Title: Embrace the Seasons with a Warm Duck Salad and Roasted Beetroot Melody
Description: Discover the delightful fusion of rich flavors in our Warm Duck Salad with Roasted Beetroot. This comforting dish, with its blend of succulent duck breast, earthy beets, and vibrant citrus notes, is a true celebration of seasonal ingredients. Join us as we share not only a step-by-step guide to creating this culinary masterpiece but also a heartwarming family memory that makes this dish even more special.

---


Warm Duck Salad with Roasted Beetroot: A Taste of Tradition

As the leaves turn golden and the air grows crisp, there’s nothing like gathering around the table with family, sharing stories, and savoring the warmth of a lovingly prepared meal. One such dish that brings back the fondest memories in our family is the Warm Duck Salad with Roasted Beetroot. It’s a recipe that has been passed down through generations, always gracing our table during special fall gatherings.


Ingredients:

- Duck breast meat (skin left on)


- Baby beets


- Orange zest


- Honey


- Salt


- Arugula greens


- Pine nuts


- Canned mandarin orange segments


- Fresh mint


- Feta cheese


- Orange (juice)


- Extra virgin olive oil


- Balsamic vinegar


- Salt and pepper


Instructions:
1. Roast the Beets: Preheat your oven to 200°C (400°F). Clean the beets thoroughly, wrap them in aluminum foil, and roast for 30-40 minutes until tender.
2. Prepare Orange Zest: While the beets cook, peel an orange, ensuring you capture the zest without the bitter pith. Cut into fine strips and set aside.
3. Cook the Duck: Clean and dry the duck breasts, score the skin, and rub with salt. Place in a cold pan and cook on medium heat to render fat and brown the skin. Flip and cook until golden brown on both sides. Rest the duck under foil for half the cooking time.
4. Make the Vinaigrette: Squeeze the orange juice into a bowl, add olive oil, balsamic vinegar, and season with salt and pepper. Whisk well.
5. Prepare the Beets: Once cooled, peel and cut the beets into small pieces. Toss with vinaigrette and honey.
6. Assemble the Salad: Slice the duck thinly and layer with arugula, pine nuts, mandarin segments, mint, and feta cheese. Add beets and garnish with orange zest. Drizzle the remaining vinaigrette over the top.
A Nostalgic Family Memory:

Every autumn, my grandmother would gather the family for a weekend brunch, where this Warm Duck Salad was the star of the meal. I remember her bustling around the kitchen, sharing snippets of wisdom as she cooked. She taught me the art of perfecting duck breast and the importance of letting it rest, just as life sometimes requires us to pause and savor the moment.


This dish not only filled our bellies but also our hearts. We’d sit around the table, the vibrant colors of the salad matching the hues of the falling leaves, and share stories of our day. The scent of roasted beets mingling with citrusy notes of orange would fill the air, creating an atmosphere of warmth and love.


Difficulty: 6/10
Classification: Main Dish

This dish is more than just a meal; it’s a cherished family tradition, a tapestry of flavors woven with love and nostalgia. Whether you’re cooking for family or friends, this Warm Duck Salad with Roasted Beetroot is sure to create lasting memories and a sense of togetherness. Enjoy every bite and every moment.

Read more about Appetizers

Read more about Main Dishes

Read more about Desserts

Dutch Babies With Mulberry-Rhubarb Compote | Made by Meaghan Moineau

Dutch Babies With Mulberry-Rhubarb Compote | Made by Meaghan Moineau

Title: Delightful Nostalgia: Dutch Babies with Mulberry-Rhubarb Compote
Description: Dive into the comforting embrace of Dutch Babies, topped with a vibrant Mulberry-Rhubarb Compote. This recipe blends tradition and flavor, perfect for a special breakfast or a sweet family gathering. Join us as we explore the warmth of shared memories and the joy of creating something delicious together.

---


The Charm of Dutch Babies with Mulberry-Rhubarb Compote

There's something undeniably enchanting about a dish that stirs up fond memories, and Dutch Babies with Mulberry-Rhubarb Compote does just that. It's a recipe that not only brings together delightful flavors but also weaves in a tapestry of nostalgia, making every bite a journey back to simpler times.


Growing up, Sundays at my grandmother's house were a cherished ritual. The smell of freshly brewed coffee mingled with the sweet, tangy aroma of her mulberry trees, which lined the backyard. Our family would gather around the kitchen table, eagerly awaiting the magic that was about to unfold.


Ingredients:
- Compote:

- 2 cups rhubarb, diced


- 1 cup mulberries, chopped


- 1/4 cup orange juice


- 1/2 cup sugar


- 1/4 teaspoon salt


- 1 tablespoon cornstarch


- Fresh mint leaves, to taste


- Dutch Babies:

- 6 tablespoons butter, divided


- 3 large eggs


- 1/2 cup all-purpose flour


- 1/2 cup milk


- 2 tablespoons sugar


- 1/4 teaspoon salt


- 1 teaspoon vanilla sugar


Instructions:
For the Compote:

1. Pulse the rhubarb in a food processor 5-6 times until diced. Pulse the mulberries 3-4 times to chop.


2. In a saucepan, combine the rhubarb, mulberries, orange juice, sugar, salt, and cornstarch. Simmer over medium heat for 10-15 minutes, stirring occasionally, until the mixture thickens.


3. Remove from heat and stir in fresh mint leaves. This compote makes approximately 2 cups.


For the Dutch Babies:

1. Preheat your oven to 375°F (190°C).


2. In a blender, combine flour, sugar, salt, milk, and eggs. Blend for about 10 seconds until smooth.


3. Add 2 tablespoons of melted butter to the blender and blend again briefly.


4. Use the remaining 4 tablespoons of butter to thoroughly coat 24 muffin tins.


5. Pour the batter into the muffin tins, filling each about halfway.


6. Bake for 12-14 minutes until the edges are golden brown and the centers are puffed.


7. Remove immediately from the muffin tins and top with the mulberry-rhubarb compote.


This recipe serves 6+ and can also be prepared traditionally using two cast-iron skillets.


A Taste of Family and Tradition

Each Sunday morning, my grandmother would whip up her famous Dutch Babies, but it wasn't just about the food. It was the laughter echoing through the kitchen, the stories shared, and the simple act of being together. She would often say, "Food tastes better when it's shared with those you love." I couldn't agree more.


As a child, my favorite part was the moment the Dutch Babies emerged from the oven, their golden edges crisp and inviting. We would eagerly top them with spoonfuls of the tangy-sweet mulberry-rhubarb compote, a symphony of flavors that perfectly complemented the soft, eggy base.


Difficulty Rating: 4/10
This dish is relatively simple to prepare, making it an excellent choice for both novice and seasoned cooks. It's classified as a Dessert, though it can easily make a delightful breakfast or brunch centerpiece.
A Sweet Conclusion

Dutch Babies with Mulberry-Rhubarb Compote is more than a dish; it's a celebration of flavors and family traditions. As you savor each bite, may it bring you as much joy and warmth as it has brought to my family over the years. Whether shared with loved ones or enjoyed in solitude, this recipe is a beautiful reminder of the power of food to connect us to our past and create new memories for the future.

Read more about Appetizers

Read more about Main Dishes

Read more about Desserts

Farmer’s Market Wild Mushroom Risotto | Made by Meaghan Moineau

Farmer's Market Wild Mushroom Risotto | Made by Meaghan Moineau

Title: Savoring the Seasons: Farmer's Market Wild Mushroom Risotto
Description: Dive into the heart of homemade comfort with our Farmer's Market Wild Mushroom Risotto. This dish, rich in flavor and family history, brings together the earthy taste of fresh mushrooms with creamy arborio rice, making it a perfect main dish for any season. With a difficulty rating of 6 out of 10, this recipe is accessible yet rewarding, inviting you to create a symphony of flavors that echo cherished memories.

---


Savoring the Seasons: Farmer's Market Wild Mushroom Risotto

There's something undeniably special about a trip to the farmer's market on a crisp autumn morning. The vibrant colors of fresh produce, the earthy aroma of wild mushrooms, and the bustling energy of locals gathering their weekly essentials create an environment that is both nostalgic and invigorating. It's in these moments that the recipe for Farmer's Market Wild Mushroom Risotto comes to life, a dish that not only delights the palate but also stirs cherished family memories.


This recipe is an ode to my grandmother, who had an uncanny ability to transform simple ingredients into gourmet experiences. Every Sunday, she would send us off to the local market with a list of ingredients. Her love for mushrooms was unparalleled, and she believed that the secret to a perfect risotto lay in the freshness of its ingredients. The dish became a Sunday staple, a tradition that brought our family together around the dining table, where laughter and stories were shared.


Ingredients:

- Arborio rice


- 2 bay leaves


- 3 tablespoons of butter


- 1 cup parmesano-reggiano cheese, grated


- 6 cups chicken broth


- 1 cup crimini mushrooms, sliced


- 1/2 cup dry white wine


- 2 cloves garlic, minced


- 1 cup morel mushrooms, cleaned and sliced


- 3 tablespoons olive oil


- 1 medium onion, finely chopped


- Fresh Italian parsley, chopped


- Salt and pepper to taste


- Fresh thyme


- Truffle oil for drizzling


Instructions:
1. Prepare the Broth: Begin by heating the chicken broth in a medium saucepan over low heat, keeping it warm throughout the cooking process.
2. Sauté the Aromatics: In a large skillet, heat 1 tablespoon of olive oil over medium heat. Add 1/2 of the chopped onion and 1 clove of minced garlic. Cook, stirring, until translucent, about 5 minutes.
3. Cook the Mushrooms: Add the crimini and morel mushrooms, along with the bay leaves, fresh thyme, and butter. Sauté for 3-5 minutes until lightly browned. Season with salt and fresh cracked pepper. Set aside.
4. Prepare the Risotto Base: In a separate saucepan, heat the remaining 2 tablespoons of olive oil over medium heat. Add the remaining onion and garlic. Sauté until the onion is translucent.
5. Toast the Rice: Add the arborio rice to the saucepan, stirring quickly to coat and toast the grains, about 2-3 minutes.
6. Deglaze and Cook: Add the dry white wine, cooking until it is nearly evaporated. Begin adding the warm chicken broth, one cup at a time, stirring constantly and allowing each addition to be absorbed before adding the next. This process should take about 20 minutes.
7. Combine and Finish: Once the rice is creamy and slightly firm, transfer the sautéed mushrooms to the risotto. Stir in the grated Parmesan cheese until melted.
8. Serve: Drizzle with truffle oil and garnish with freshly chopped Italian parsley before serving.

This dish, classified as a main course, boasts a difficulty level of 6 out of 10. It requires patience and a gentle hand, much like the way my grandmother used to coax each grain of rice into a state of perfect creaminess. As you savor each bite, let the flavors transport you to your own family gatherings, where food is more than sustenance; it's a celebration of togetherness. Enjoy the warmth of this risotto, enriched by both its ingredients and the memories it evokes.

Read more about Appetizers

Read more about Main Dishes

Read more about Desserts

Grilled Lemon Garlic Artichokes | Made by Meaghan Moineau

Grilled Lemon Garlic Artichokes | Made by Meaghan Moineau

Title: Savoring Summer: Grilled Lemon Garlic Artichokes that Transport You Home
Description: Dive into the flavors of summer with our Grilled Lemon Garlic Artichokes recipe. Perfect for a family gathering, this dish blends the zest of lemon, the warmth of garlic, and the earthy aroma of thyme to create an unforgettable appetizer. Rated 6/10 in difficulty, this dish is ideal for those seeking a new culinary challenge that promises to evoke cherished family memories.

---


Savoring Summer: Grilled Lemon Garlic Artichokes that Transport You Home


As the summer sun begins to set, casting a golden hue across the backyard, there's a familiar scent in the air that draws family members to the kitchen. It's the aroma of my grandmother's Grilled Lemon Garlic Artichokes—a dish that has graced our family table for generations, turning ordinary summer nights into memorable gatherings.


Ingredients:


- 4 fresh artichokes


- Fresh thyme leaves


- 4 cloves of garlic, minced


- Fresh ground black pepper


- A handful of fresh herbs such as rosemary


- Kosher salt


- 1 lemon, juiced and zested


- Olive oil


Instructions:


1. Infuse the Oil: In a glass bowl, mix chopped thyme, lemon juice and zest, and minced garlic. Microwave on high heat for 30 seconds. Allow the herbs to seep in the warm olive oil while you prepare the artichokes.
2. Prepare the Artichokes: Set up a large pot with an inch of water at the bottom and a steamer rack. Prepare lemon wedges for rubbing. For a refined look, use scissors to snip away the pointy tips of the artichoke leaves. Rub the cut areas with lemon juice to prevent browning. Use a vegetable peeler to remove the thick outer layer from the stems, trimming them to 2 inches from the base. Cut off and discard the top 1/2 inch of the artichokes, then halve them. Scoop out the fuzzy chokes and small inner leaves with a strong metal spoon. Coat the exposed areas with lemon juice.
3. Steam the Artichokes: Bring the water in the pot to a boil, then reduce to medium-high. Place the artichoke halves cut-side down on the steamer rack. Cover and steam for 20 minutes, or until the outer leaves pull off easily and the heart is tender when pierced with a knife. The artichokes should be slightly undercooked as they will finish cooking on the grill.
4. Grill to Perfection: Preheat your grill for direct, high heat. Toss the steamed artichokes in the infused oil, coating them generously. Sprinkle with salt and pepper. Place cut-side down on the grill grates, cover, and grill for 5 to 10 minutes until grill marks appear.

---


The process of preparing these artichokes always takes me back to my childhood when my grandmother would invite us to her sun-drenched patio. As kids, we were tasked with snipping the artichoke leaves and rubbing them with lemon wedges—a small but significant ritual that made us feel part of the culinary adventure.


There was magic in watching the artichokes transform on the grill, the heat creating beautiful char marks that hinted at the smoky flavors within. As we sat around the table, passing the artichokes and sharing stories, the dish became more than just food; it was a vessel for connection, laughter, and the creation of new memories.


Whether you're looking to recreate a piece of family tradition or simply explore new flavors, these Grilled Lemon Garlic Artichokes promise to deliver a taste of nostalgia and a touch of elegance to your summer gatherings. As an appetizer, they set the stage for a meal filled with warmth and joy—a reminder that the best moments in life are often shared around the table.


Difficulty: 6/10
Classification: Appetizer

Read more about Appetizers

Read more about Main Dishes

Read more about Desserts

Thai Green Mango Salad | Made by Meaghan Moineau

Thai Green Mango Salad | Made by Meaghan Moineau

Title: Discover the Zesty Allure of Thai Green Mango Salad: A Family Tradition
Description: Dive into the vibrant flavors of Thai cuisine with our Thai Green Mango Salad recipe. Simple yet bursting with zest and freshness, this dish is not just a feast for the taste buds but also a cherished family tradition. Whether you're a seasoned cook or a kitchen novice, this recipe will transport you to the bustling streets of Thailand, right from your dining table.

---


Thai Green Mango Salad: A Nostalgic Journey Through Flavorful Memories

There's something uniquely enchanting about Thai Green Mango Salad—a symphony of flavors that not only tantalizes the palate but also stirs the soul. Every time I prepare this dish, I'm transported back to my childhood, to warm summer afternoons spent in my grandmother's kitchen.


The Alluring Ingredients
To recreate this flavorful journey, you'll need the following ingredients:

- Fish sauce


- Thai palm sugar


- Limes


- 2 to 3 chili padis


- Garlic


- Shallots


- Dried shrimps


- Tomatoes


- Shredded carrots


- Raw green shredded mangoes


- Long beans


- Roasted coarse peanuts


The Art of Preparation

In the traditional Thai kitchens, the preparation of this salad is as much a part of the experience as the dish itself. Begin by gathering a clay mortar and a wooden pestle. There's a certain magic in the rhythmic pounding of ingredients—a dance between the pestle and the mortar, as they blend the raw, vibrant flavors into a cohesive masterpiece.


Gently pound the fish sauce, Thai palm sugar, lime juice, chili padis, garlic, shallots, and dried shrimps together, allowing each ingredient to meld into the next. The aroma alone is enough to send your senses on a whirlwind tour of Thailand. Once the paste is ready, add the tomatoes, shredded carrots, and raw green mangoes. The final touch is a generous sprinkle of roasted coarse peanuts, adding a delightful crunch to the salad. Serve chilled, letting the flavors marry even further.


A Nostalgic Story

This dish is more than just a salad; it's a cherished family tradition. I remember sitting on the worn-out wooden stools in my grandmother's modest kitchen, eagerly watching her deft hands work their magic. She would tell stories of her own childhood in a small Thai village, where this salad was a staple at every gathering. It was a dish that brought people together, celebrated during both good times and bad, always a reminder of home and family.


I recall one particular summer when, after a long day of playing in the sun, we gathered around the kitchen table, waiting for our turn to help pound the ingredients. My grandmother, with her gentle smile, would teach us the art of balancing flavors—a little more lime, a hint of palm sugar, a dash more chili. Each bite was a burst of tangy, spicy, and sweet, a testament to her culinary wisdom.


Difficulty Rating and Classification

This dish is classified as an Appetizer and is rated a 4 out of 10 on the difficulty scale. It's approachable for beginners yet rewarding for those with a seasoned palate.


Conclusion

The Thai Green Mango Salad is more than just a recipe; it's a passage into a world of vibrant flavors and heartwarming memories. As you recreate this dish in your own kitchen, may you find the same joy and connection that it has brought to countless families, including my own. Enjoy this zesty, refreshing appetizer, and let it become a part of your own family's culinary story.

Read more about Appetizers

Read more about Main Dishes

Read more about Desserts

Couscous Salad With Roasted Vegetables | Made by Meaghan Moineau

Couscous Salad With Roasted Vegetables | Made by Meaghan Moineau

Title: "Savoring Summer: Couscous Salad with Roasted Vegetables"
Description: Dive into a vibrant and wholesome dish that captures the essence of summer with every bite. Our Couscous Salad with Roasted Vegetables is not only a feast for the senses but also a cherished family tradition. Perfect as a main dish, this recipe is bursting with flavors and memories, rated at an easy 5 out of 10 on the difficulty scale.

---


A Taste of Tradition: Couscous Salad with Roasted Vegetables


As the sun begins to dip into the horizon, casting a golden hue over our backyard, I am reminded of the countless summer evenings spent gathered around the family table. The aroma of roasted vegetables mingling with the fragrant notes of basil pesto would waft through the air, a prelude to the delicious meal ahead. My grandmother, the culinary artist of our family, would orchestrate these gatherings with a dish that has since become a treasured family tradition: Couscous Salad with Roasted Vegetables.


Ingredients:


- 1 cup regular couscous


- 2 cups chicken stock


- 3 tablespoons olive oil


- 1/4 cup sun-dried tomatoes, chopped


- 2 tablespoons basil pesto


- 2 tablespoons balsamic vinegar


- Salt and pepper, to taste


- 1/2 cup feta cheese, crumbled


- 2 medium-sized zucchinis


- 3 yellow squashes


- 1 red bell pepper


- 1 cup brown mushrooms, sliced


- 3 garlic cloves, minced


- 1 small butternut squash, cubed


- 2 red onions, sliced


- 1 bunch asparagus, trimmed


Instructions:


1. Prepare the Couscous: In a pot, add the couscous and pour over the hot chicken stock. Simmer for 15 to 20 minutes until the stock is fully absorbed. This step infuses the couscous with a savory depth, a secret my grandmother swore by.
2. Roast the Vegetables: Preheat your oven to 400°F. Grease an ovenproof dish with non-stick spray. Arrange zucchinis, yellow squash, red bell pepper, mushrooms, garlic, butternut squash, and red onions in a single layer. Drizzle with olive oil and roast for about 20 to 25 minutes. Add the asparagus after the first 10 minutes and gently stir. Once done, drizzle with a touch of balsamic vinegar.
3. Mix the Salad: Stir in the extra-virgin olive oil, sun-dried tomatoes, and basil pesto into the cooked couscous, making it moist and fragrant. Season with balsamic vinegar, salt, and pepper. Add the roasted vegetables and mix well. Finally, sprinkle with feta cheese and gently fold everything together.
4. Serve: This salad can be enjoyed warm or cooled to room temperature. It pairs beautifully with grilled beef or chicken, making it a versatile addition to any meal.

A Nostalgic Touch:


Every bite of this salad takes me back to those balmy evenings in my grandmother's garden, where laughter was as abundant as the food on our plates. She would tell stories of her childhood, where the simple joys of life were celebrated with food that nourished both body and soul. The Couscous Salad with Roasted Vegetables was her way of bringing us together, a dish that transcended generations and became a staple at our family gatherings.


So, the next time you’re looking for a dish that is both nourishing and heartwarming, try this Couscous Salad with Roasted Vegetables. Let it be more than just a meal; let it be a bridge to cherished memories and the creation of new ones.


Difficulty: 5/10
Classification: Main Dish

---


Whether it's a family reunion or a quiet dinner at home, this Couscous Salad with Roasted Vegetables is sure to become a beloved part of your culinary repertoire. Enjoy the vibrant flavors and the warm memories it brings to your table.

Read more about Appetizers

Read more about Main Dishes

Read more about Desserts

Tomato Stack Salad | Made by Meaghan Moineau

Tomato Stack Salad | Made by Meaghan Moineau

Title: "Tomato Stack Salad: A Taste of Summer Nostalgia"
Description: Dive into the freshness of summer with our Tomato Stack Salad, a delightful appetizer that brings together the vibrant flavors of ripe tomatoes, creamy goat cheese, and aromatic herbs. Rated an easy 3 out of 10 on the difficulty scale, this dish is perfect for beginners and seasoned cooks alike. Join us as we explore this simple yet elegant recipe, infused with the warmth of family memories.

---


Tomato Stack Salad: A Taste of Summer Nostalgia


As the sun casts its golden hue over the garden, the vibrant colors of ripe tomatoes become the centerpiece of summer meals. The Tomato Stack Salad, with its simple elegance, is more than just a dish; it's a cherished family tradition that brings back memories of warm gatherings and laughter-filled afternoons.


Ingredients:


- 4 ripe tomatoes


- 4 oz goat cheese


- A handful of fresh herbs (such as basil, parsley, or chives)


- Salt, to taste


- Balsamic vinegar, for drizzling


Instructions:


1. Prepare the Goat Cheese: Begin by mixing the fresh herbs into the goat cheese until well combined. The herbs add a burst of flavor, turning the cheese into a creamy, aromatic spread.
2. Slice the Tomatoes: Carefully slice each tomato into four thick rounds. Choose tomatoes that are firm yet ripe, ensuring they hold their shape when stacked.
3. Season the Tomatoes: Sprinkle each tomato slice lightly with salt to enhance its natural sweetness.
4. Assemble the Salad: Gently slather each tomato round with the herbed goat cheese. Stack the rounds to reassemble each tomato, creating a tower of alternating red and white layers.
5. Finish with Balsamic Vinegar: Drizzle the stacked tomatoes with balsamic vinegar, allowing it to cascade down the layers, adding a tangy contrast to the creamy cheese.

A Nostalgic Family Memory


This Tomato Stack Salad takes me back to my grandmother's kitchen, where the air was always filled with the aroma of fresh herbs. Every summer, my family would gather at her house, a quaint cottage surrounded by a lush garden. My siblings and I would help her pick the ripest tomatoes, our fingers stained with their juicy red hues.


Grandma had a way with simple ingredients, turning them into something magical. As she showed us how to mix the herbs into the goat cheese, her stories of summers past would unfold, each tale woven with laughter and a touch of nostalgia. The kitchen was our haven, a place where time slowed, and the outside world faded away.


The Tomato Stack Salad was always the highlight of our meal, a dish that captured the essence of summer in each bite. Even now, as I recreate this recipe, I can almost hear Grandma's voice, her laughter echoing through the years. This salad is more than just a recipe; it's a bridge to cherished memories and a testament to the power of family traditions.


Conclusion


The Tomato Stack Salad is a delightful appetizer that captures the essence of summer. With a difficulty rating of just 3 out of 10, it's an inviting dish for cooks of all levels. As you savor the flavors of fresh tomatoes, creamy goat cheese, and tangy balsamic vinegar, may you also find a connection to the warmth of family memories and the simple joys of sharing a meal together.


---


Embrace the simplicity and nostalgia of the Tomato Stack Salad, and let it become a cherished part of your summer gatherings.

Read more about Appetizers

Read more about Main Dishes

Read more about Desserts

Rigatoni With Sweet Sausages In Creamy Tomato Sauce | Made by Meaghan Moineau

Rigatoni With Sweet Sausages In Creamy Tomato Sauce | Made by Meaghan Moineau

Title: "Nostalgic Comfort: Rigatoni with Sweet Sausages in Creamy Tomato Sauce"


Description: Dive into the heartwarming flavors of Italy with our Rigatoni with Sweet Sausages in Creamy Tomato Sauce. This recipe combines the savory essence of sweet sausages with the aromatic richness of fresh sage and leeks, all enveloped in a luscious, creamy tomato sauce. Join us as we share a cherished family memory that's bound to make this dish even more special. With a difficulty rating of 4/10, this main dish is perfect for a cozy family dinner or a nostalgic culinary journey.


---


Rigatoni with Sweet Sausages in Creamy Tomato Sauce: A Taste of Home


There's something undeniably comforting about a bowl of pasta, especially when it's infused with the rich flavors of sweet sausages and a creamy tomato sauce. This dish not only tantalizes the taste buds but also carries a legacy of family gatherings and nostalgic memories.


Ingredients You’ll Need:


- Sweet sausages


- 1 leek (cut in half lengthwise and rinsed thoroughly)


- Fresh sage


- 3 garlic cloves


- 1 onion


- Canned tomatoes


- Rigatoni pasta


- Milk


- Dried thyme


- Cayenne pepper


- Butter


- Extra virgin olive oil


- Sugar


- Salt & pepper


Cooking Instructions:


1. Prepare Your Ingredients: Begin by bringing a large pot of salted water to a boil. Chop the onion and garlic, setting them aside. Slice the leek in half lengthwise, rinse thoroughly, and chop. Chop the fresh sage and set it aside separately.
2. Cook the Sausages: To easily remove the casings, lightly slice each sausage lengthwise and peel them off with your fingers. In a large pan over medium-high heat, cook the sausages until they turn a beautiful golden brown, breaking them apart until they resemble ground meat. Remove the meat from the pan and set it aside in a bowl.
3. Sauté the Aromatics: Add 2 tablespoons of olive oil to the same pan and toss in the fresh sage. Cook for about a minute before adding the leeks and a pinch of cayenne pepper. Cook for an additional 2 to 3 minutes until the leeks soften. Return the sausage mixture to the pan, turn off the heat, and let the flavors meld.
4. Create the Sauce: In a separate pot, combine canned tomatoes, a splash of milk, and a sprinkle of dried thyme. Add a pinch of sugar to balance the acidity of the tomatoes. Season with salt and pepper to taste. Simmer the sauce for 10 minutes until it thickens.
5. Combine and Serve: Add the cooked rigatoni to the sausage and leek mixture, pouring the creamy tomato sauce over everything. Toss gently to combine and serve hot.

A Nostalgic Family Memory


Every time I prepare this dish, I'm transported back to my grandmother's cozy kitchen. The smell of sweet sausages sizzling in the pan and the sight of her expertly chopping leeks with the precision of years of practice. Sunday dinners were sacred in our family, with three generations gathered around the dining table, sharing stories and laughter. This rigatoni dish was always a staple, making an appearance at every family gathering. It was my grandmother's way of bringing us all together, each bite infused with love and tradition. Now, as I cook it for my family, I hope to pass on that same feeling of warmth and togetherness.


Difficulty Rating: 4/10


This main dish is perfect for home cooks looking to create something special without the stress of a complex recipe. The steps are simple and straightforward, ensuring a delightful meal that's sure to become a family favorite.


Conclusion


Rigatoni with Sweet Sausages in Creamy Tomato Sauce is more than just a meal; it's a connection to cherished memories and traditions. Whether you're cooking for your family or seeking comfort in a bowl, this dish promises to deliver warmth and satisfaction. Enjoy every bite and the stories that come with it.

Read more about Appetizers

Read more about Main Dishes

Read more about Desserts

Peppery Absorption-Cooked Red-Wine Capellini | Made by Meaghan Moineau

Peppery Absorption-Cooked Red-Wine Capellini | Made by Meaghan Moineau

A Taste of Memories: Peppery Absorption-Cooked Red-Wine Capellini


Description

Indulge in the flavors of tradition with our Peppery Absorption-Cooked Red-Wine Capellini, a dish that combines the elegance of angel hair pasta with the robust notes of Spanish red wine and fresh herbs. Perfect as a main dish, this recipe not only tantalizes the taste buds but also evokes cherished family memories. With a difficulty rating of 6/10, this dish is both a culinary adventure and a nostalgic journey.

---


Ingredients


- Angel hair pasta: A delicate base that absorbs rich flavors.
- Olive oil: For a Mediterranean touch.
- White onion and garlic cloves: Aromatic essentials that form the backbone of flavor.
- Kosher salt: To enhance the natural taste of ingredients.
- Diced zucchini and trimmed asparagus: Fresh vegetables that add texture and nutrition.
- Cherry tomatoes: Juicy bursts of sweetness.
- Smoked paprika, black pepper, cayenne pepper: For that peppery kick.
- Fresh oregano and rosemary leaves: Fragrant herbs that elevate the dish.
- Spanish red wine and water: A bold liquid for absorption cooking.
- Fresh flat parsley leaves: A vibrant garnish to finish.

---


Instructions


1. Preheat and Toast: Preheat your oven to 375°F. Break the capellini into 3-inch lengths and spread them on a baking sheet. Toast in the oven, tossing occasionally, until golden brown, about 12 minutes.
2. Sauté Aromatics: In a large pot, heat olive oil over medium heat. Add the onion, garlic, and a pinch of salt. Cook until the onion and garlic are soft and aromatic, approximately 5 minutes.
3. Brown the Zucchini: Increase heat to medium-high. Add zucchini with another pinch of salt, and sauté until well browned, about 5 minutes.
4. Layer and Flavor: Place the toasted noodles atop the zucchini mixture. Layer asparagus and 1 cup of cherry tomatoes over the pasta. Sprinkle smoked paprika, black pepper, cayenne pepper, oregano, and rosemary.
5. Cook with Wine: Pour the red wine and ½ cup of water over the mixture. Toss gently with tongs. Cover the pot, reduce heat to medium, and cook for 8-12 minutes, tossing every 3 minutes. Add more wine or water if needed until noodles are cooked to your liking.
6. Final Touches: Adjust seasoning if necessary. Transfer to serving bowls. Garnish with remaining cherry tomatoes, parsley, and an extra grind of black pepper. Serve immediately.

---


Family Memory: A Dish from the Heart


The aroma of garlic sizzling in olive oil instantly transports me back to my grandmother’s kitchen. Every Sunday, the family would gather around her worn wooden table, eager to savor her latest creation. Among all her dishes, the Peppery Absorption-Cooked Red-Wine Capellini was a perennial favorite.


I remember the laughter and stories shared as we toasted the pasta, a simple task that somehow became an event in itself. My grandmother would let me sprinkle the smoked paprika, declaring that a “dash of love” was the secret ingredient. The dish was more than just a meal; it was a tapestry of flavors woven with love, laughter, and the warmth of family.


This recipe is my homage to those cherished Sundays. It’s a reminder that food is not just sustenance but a bridge to our past, connecting generations through taste and tradition.


---


Conclusion


The Peppery Absorption-Cooked Red-Wine Capellini is more than a dish; it’s a culinary experience infused with the flavors of memory and love. As you savor each bite, may it evoke the warmth of family gatherings and the joy of shared stories. Whether you’re crafting it for a special occasion or a simple dinner, this dish promises to bring a touch of nostalgia and a burst of flavor to your table. Enjoy this main dish with a 6/10 difficulty rating, and let it become a part of your family tradition.

Read more about Appetizers

Read more about Main Dishes

Read more about Desserts

Apple Brown Betty | Made by Meaghan Moineau

Apple Brown Betty | Made by Meaghan Moineau

Title: "A Taste of Nostalgia: The Timeless Comfort of Apple Brown Betty"
Description: Dive into the heartwarming world of Apple Brown Betty, a classic dessert that has graced family tables for generations. With its simple yet flavorful ingredients, discover how this dish weaves together memories and tastes that are sure to delight both young and old. Rated 4/10 in difficulty, this dessert is perfect for any occasion that calls for a touch of sweetness and a sprinkle of nostalgia.

---


There’s something undeniably comforting about the aroma of apples and cinnamon wafting through the house, wrapping around you like a warm embrace on a chilly autumn evening. For many, including myself, this comforting aroma is synonymous with Apple Brown Betty, a dessert that has become a cherished family tradition.


The Magic of Apple Brown Betty


Apple Brown Betty is a dessert that celebrates simplicity while delivering robust flavors. The combination of diced apples, bread, and warm spices like cinnamon and nutmeg creates a delightful symphony of taste and texture. The addition of butter and a hint of lemon juice enhances the dish, while the golden-brown crust adds a satisfying crunch.


Ingredients:

- Diced apples


- Bread, cubed


- Butter


- Cinnamon


- Lemon juice


- Nutmeg


- White sugar


Instructions:

1. Preheat your oven to 375°F (190°C).


2. In a buttered 1-1/2 quart souffle dish, start with a layer of cubed bread.


3. Mix the diced apples with sugar, cinnamon, and nutmeg.


4. Cover the bread with a layer of the apple mixture.


5. Dot with butter and drizzle with a little lemon juice and rind.


6. Repeat the layering process, ending with a layer of bread cubes.


7. Cover and bake for 30 minutes.


8. Uncover and bake for an additional 30 minutes, until the apples are tender and the crust is golden brown.


A Journey Down Memory Lane


For me, Apple Brown Betty is more than just a dessert; it’s a portal to cherished memories. I recall the first time my grandmother and I made this delightful dish together. It was a crisp October afternoon, the kind when the leaves danced in the wind and painted the ground in hues of amber and gold. My grandmother, with her apron tied snugly around her waist, guided my small hands through the process of layering the bread and apples.


As the dish baked, we sat by the kitchen table, sipping hot cocoa and sharing stories. She spoke of her childhood, weaving tales of her own mother making the same dessert in a small country kitchen. The anticipation grew with every tick of the clock, and when the timer finally chimed, the kitchen was enveloped in an intoxicating scent that remains etched in my memory.


A Dessert for All Occasions


Rated at 4/10 in terms of difficulty, Apple Brown Betty is an ideal dessert for both novice and seasoned bakers. The straightforward preparation and familiar ingredients make it an accessible choice for any home cook. Whether it’s a cozy family dinner or a festive holiday gathering, this dessert is sure to be a beloved staple on your table.


The Apple Brown Betty is more than just a dish; it’s a treasured part of family history. With every bite, you’re not only savoring a delicious dessert but also indulging in a rich tapestry of memories and love. So why not gather your loved ones, roll up your sleeves, and create your own lasting memories with this timeless treat?

Read more about Appetizers

Read more about Main Dishes

Read more about Desserts

Citrus Beet Salad | Made by Meaghan Moineau

Citrus Beet Salad | Made by Meaghan Moineau

Title: A Taste of Sunshine: Creating a Nostalgic Citrus Beet Salad
Description: Dive into a world of vibrant flavors and cherished memories with our Citrus Beet Salad recipe. This delightful dish combines earthy beets, tangy grapefruit, and creamy goat cheese for an unforgettable culinary experience. Perfect as an appetizer or light main dish, this salad is sure to brighten any meal. Join us as we explore the simple joys of cooking and the heartfelt memories that come with it.

---


There's something magical about the fusion of colors and flavors that the Citrus Beet Salad brings to the table. With its earthy beets, tangy grapefruit, and creamy goat cheese, this dish is a symphony of tastes that dance on your palate. Rated 4 out of 10 in difficulty, it’s a perfect appetizer or light main dish that’s both visually stunning and incredibly delicious.


Ingredients:

- Beets


- Olive oil


- Balsamic vinegar


- Grapefruit


- Sprouts


- Pumpkin seeds


- Goat cheese


Instructions:

1. Begin by washing the beets thoroughly and patting them dry. Place them on a sheet of aluminum foil and drizzle generously with olive oil.


2. Fold the foil around the beets to create a sealed pouch, ensuring no steam will escape. Place this pouch on a cookie sheet and bake in the oven.


3. The cooking time will vary depending on the size of the beets. After 30 minutes, pierce them with a fork. If they remain firm, continue baking, checking every 15 minutes until they reach tenderness.


4. Once tender, remove the beets from the oven and allow them to cool until they can be handled safely. Use your hands to gently peel away the skins.


5. Slice the beets into bite-sized wedges and drizzle with balsamic vinegar for an added layer of flavor.


6. In a large bowl, create a base with fresh sprouts. Arrange the beet wedges and grapefruit segments on top.


7. Finish with a sprinkle of pumpkin seeds and crumbled goat cheese, then serve this vibrant salad immediately.


Nostalgic Memory:

Every time I prepare this Citrus Beet Salad, I am transported back to my grandmother's kitchen, filled with the aroma of roasting beets and the laughter of family gatherings. As a child, I remember sitting on a stool, watching her masterfully slice the grapefruit, her fingers sticky with its tangy juice. She would hand me a piece, and the burst of citrus was a delightful surprise every time.


Grandma believed that food was more than sustenance; it was a way to bring people together, to share stories, and to create lasting memories. Her beet salad, with its vibrant colors and contrasting flavors, was always the star of our summer picnics. We would gather around the table, the sun casting a golden hue over everything, and savor each bite as if it were a piece of sunshine itself.


Today, as I recreate this beloved dish, I am reminded of those carefree days and the warmth of family bonds. The Citrus Beet Salad is more than just a recipe; it’s a cherished heirloom, a link to the love and joy that filled my grandmother's kitchen.


---


This Citrus Beet Salad is not only a feast for the senses but also a joyful journey down memory lane. Whether you're recreating family traditions or starting new ones, this dish is sure to be a treasured part of your culinary repertoire.

Read more about Appetizers

Read more about Main Dishes

Read more about Desserts

Vegetarian Christmas wreath | Made by Meaghan Moineau

Vegetarian Christmas wreath | Made by Meaghan Moineau

Title: A Festive Centerpiece: Creating a Vegetarian Christmas Wreath
Description:

Embrace the spirit of the holiday season with this stunning Vegetarian Christmas Wreath. A delightful blend of fresh vegetables and cheese, this appetizer is not only a feast for the eyes but also a treat for the taste buds. Perfect for festive gatherings, this dish is sure to spark joy and create cherished memories with loved ones. Discover the recipe, reminisce with a nostalgic family story, and learn how to craft this beautiful and delicious centerpiece for your holiday table.


---


As the holiday season approaches, kitchens fill with the tantalizing aromas of festive cooking. One dish that stands out as both a visual and culinary delight is the Vegetarian Christmas Wreath. This vibrant appetizer combines the natural beauty of broccoli florets, cherry tomatoes, and cheese with the rich flavors of a creamy dip. It’s a recipe that not only pleases the palate but also becomes a conversation starter at any gathering.


Ingredients:


- Broccoli florets


- Cherry tomatoes


- Cheese


- Red bell pepper


- Cream cheese


- Mayonnaise


- Dried dill


- Dried garlic


- Olives


- Scallion


Instructions:


1. Prepare the Broccoli: Begin by washing and cutting the broccoli into florets. Fill a large pan with water, bring it to a boil, and add the broccoli. Have a bowl of ice-cold water ready. After two minutes of boiling, transfer the broccoli to the cold water to preserve its vibrant green color.
2. Prepare the Dip: While the broccoli cools, combine cream cheese, mayonnaise, dried dill, dried garlic, and chopped scallion to create a creamy dip. Chill in the refrigerator for at least three hours to let the flavors meld together.
3. Assemble the Wreath: On a large white plate, place a ramekin in the center for the dip. Arrange the cooled broccoli florets around it to form a wreath. Add cherry tomatoes for festive color and cut cheese into star shapes to sprinkle across the wreath. Finish by slicing red bell pepper into ribbon shapes and olives for added flair.

A Nostalgic Memory:


Every Christmas Eve, our family gathers in the cozy warmth of my grandmother's living room. As children, we would sit eagerly by the fireplace, waiting for our favorite holiday tradition—the unveiling of the Christmas Wreath. My grandmother, with her gentle hands and keen eye for detail, would transform simple ingredients into a masterpiece.


I remember the first time I helped her; I was entrusted with cutting the cheese into stars. Despite my clumsy attempts, she praised my efforts, making me feel like an artist contributing to her canvas. This tradition has become a cherished memory, as we all gather around the table, savoring each bite and reliving stories of past Christmases. The wreath symbolizes more than just a dish; it embodies the love and togetherness that defines our family.


Difficulty Rating: 4/10


Classification: Appetizer

With its vibrant colors and delightful flavors, the Vegetarian Christmas Wreath is a must-have addition to your holiday menu. Its ease of preparation and ability to bring people together make it a standout choice for any festive occasion. Gather your loved ones, share stories, and enjoy this beautiful, edible centerpiece that captures the essence of the season. Buon appetito!

Read more about Appetizers

Read more about Main Dishes

Read more about Desserts