Almond Butter Slices | Made by Meaghan Moineau

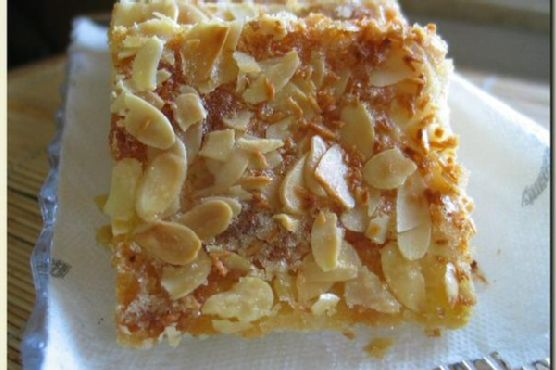
Almond Butter Slices: A Delightful Treat

Intro

There’s something magical about the aroma of freshly baked almond butter slices wafting through the house. It takes me back to my grandmother’s cozy kitchen, where I would spend countless afternoons watching her expertly mix ingredients. Her baking tin, slightly worn but full of stories, was always ready for another batch of these delightful slices. This recipe, a cherished family tradition, combines the comforting flavors of almonds and butter with a hint of nostalgia. Today, I’m thrilled to share this beloved recipe so you can create your own warm memories and enjoy these delicious treats with your loved ones.

Why You’ll Love It

These Almond Butter Slices are incredibly easy to make and perfect for any occasion. Whether you’re hosting a tea party or simply craving a sweet treat, this recipe is a crowd-pleaser. Here’s why you’ll fall in love with this dessert:

  • Quick and Easy: With simple ingredients and minimal prep time, you’ll have delicious slices ready in under an hour.
  • Delightfully Crunchy: The almond topping provides a satisfying crunch, perfectly complementing the buttery dough.
  • Versatile: This recipe allows for creative variations and substitutions to suit your taste preferences or dietary needs.
  • Nostalgic Flavor: The combination of almonds and butter creates a timeless taste reminiscent of traditional European bakeries.

Ingredients

  • 100g almond slices
  • 1 teaspoon saffron baking powder
  • 150g Kerrygold butter, softened
  • 300g German #405 flour
  • 200g German Quark
  • 2 tablespoons safflower oil
  • 1/4 teaspoon salt
  • 100g sugar
  • 1 packet vanilla sugar
  • 50ml whole milk

Instructions

  1. Preheat the oven to 180°C (350°F). Line a 30x40cm baking tray with baking paper.
  2. In a small bowl, combine the sugar, vanilla sugar, and almond slices for the topping. Set aside.
  3. Sift the flour and baking powder into a large mixing bowl.
  4. Add the Quark, milk, safflower oil, sugar, and salt to the flour mixture.
  5. Mix all the ingredients with a hand mixer fitted with dough hooks for 1 minute on high speed. Be careful not to over-mix, as this will make the dough sticky.
  6. Transfer the dough onto the prepared tray and roll it out evenly.
  7. Spread the softened Kerrygold butter all over the surface of the dough.
  8. Sprinkle the almond topping mixture evenly over the dough.
  9. Bake on the upper rack of the preheated oven for about 20 minutes, until the slices are golden and crispy.

Tips

Here are some tips to ensure your Almond Butter Slices turn out perfectly every time:

  • Softened Butter: Make sure the butter is softened to room temperature for easy spreading over the dough.
  • Even Rolling: Roll the dough evenly on the baking tray to ensure consistent baking and a uniform texture.
  • Don’t Overmix: Mix the dough just until combined to prevent it from becoming sticky and difficult to handle.

Variations & Substitutions

This recipe is quite versatile, allowing for numerous variations and substitutions:

  • Flour: Substitute German #405 flour with all-purpose flour if it’s not available.
  • Quark: Replace Quark with Greek yogurt or ricotta cheese for a slightly different texture.
  • Oil: Use sunflower oil or melted coconut oil instead of safflower oil for a different flavor profile.
  • Sugar Alternatives: Swap sugar with coconut sugar or other sweeteners for a healthier option.

Storage

Store any leftover Almond Butter Slices in an airtight container at room temperature for up to 3 days. For longer storage, keep them in the refrigerator for up to a week. If you wish to enjoy them warm, reheat the slices in a preheated oven at 150°C (300°F) for about 5 minutes.

FAQ

Can I make these slices gluten-free?

Yes, you can substitute the German #405 flour with a gluten-free all-purpose flour blend. Ensure that the blend includes a binding agent like xanthan gum for best results.

What can I use instead of Quark?

If you don’t have access to Quark, you can use Greek yogurt or ricotta cheese as a substitute. These will provide a similar texture and flavor to the dough.

How can I make this recipe vegan?

To make this recipe vegan, you can replace the Kerrygold butter with a plant-based butter and use a dairy-free yogurt as a substitute for Quark. Ensure that all other ingredients are also vegan-friendly.

Nutrition

The Almond Butter Slices are not only delicious but also provide some nutritional benefits. Each slice contains a good amount of protein and healthy fats from almonds, making them a satisfying treat. However, they do contain sugar and butter, so it’s best to enjoy them in moderation as part of a balanced diet.

Conclusion

Baking these Almond Butter Slices is a delightful experience, filling your kitchen with warmth and the inviting aroma of almonds and butter. Whether you’re a seasoned baker or just starting, this recipe is straightforward and rewarding. I hope these slices bring as much joy to your home as they have to mine. So, gather your ingredients, preheat your oven, and enjoy the process of creating a delicious treat that echoes the nostalgia of cherished family traditions.

Related update: Almond Butter Slices

Cheesy Bacon Burger with Spicy Chipotle Aiolo Sauce | Made by Meaghan Moineau

Cheesy Bacon Burger with Spicy Chipotle Aioli Sauce

Intro

There’s something magical about the smell of burgers grilling on a warm summer evening. It takes me back to those lazy Sunday afternoons at my grandparents’ house, where the whole family gathered around the backyard grill. My grandfather, with his well-worn apron and his signature chef’s hat, was the burger maestro. He always said the secret to a perfect burger was a little “surprise” inside. Inspired by his culinary wisdom and my love for a little heat, I’ve created a burger that combines the creamy goodness of cheese with the smoky allure of turkey bacon, all wrapped up in a spicy, tantalizing aioli. This Cheesy Bacon Burger with Spicy Chipotle Aioli Sauce is my homage to those cherished memories, with a contemporary twist that will make your taste buds dance with delight.

Why You’ll Love It

This burger isn’t just another patty on a bun; it’s a flavor explosion waiting to happen. The juicy beef patty is stuffed with creamy Swiss cheese that melts to perfection as it grills. The turkey bacon adds a savory crunch, while the spicy chipotle aioli brings just the right amount of heat to keep things exciting. Served on a wholesome whole wheat bun, this burger balances indulgence with nutrition. Whether you’re cooking for a backyard barbecue or a cozy family dinner, this recipe is sure to impress.

Ingredients

  • 1 can of chipotle chiles in adobo sauce
  • 1/2 cup fat free mayonnaise
  • 2 cloves garlic, minced
  • 1 teaspoon garlic powder
  • 1/2 cup Greek yogurt
  • 1 green bell pepper, diced
  • 1 teaspoon ground cumin
  • 1 teaspoon black ground pepper
  • 1 pound lean ground beef
  • 1 tablespoon fresh lime juice
  • 1 onion, diced
  • 4 whole wedges of Laughing Cow Swiss cheese
  • 4 slices cooked turkey bacon
  • 4 whole wheat hamburger buns

Instructions

  1. In a pan, cook the turkey bacon according to the directions on the package. Once cooked, remove the bacon and set it aside.
  2. In the same pan, add the diced bell pepper and onion, cooking until tender, about 10 minutes.
  3. In a small bowl, combine the ground beef with garlic powder and black ground pepper. Mix well.
  4. Divide the beef mixture into eight equal pieces, about 2 ounces each. Flatten each piece into a patty.
  5. Place half a wedge of cheese onto four patties, then top with the remaining patties. Press the edges to seal the cheese inside.
  6. Grill the burgers until cooked through, about 5 minutes per side.
  7. To make the spicy chipotle aioli sauce, combine chipotle chiles, mayonnaise, minced garlic, Greek yogurt, ground cumin, and lime juice in a small bowl. Whisk until smooth.
  8. Assemble the burgers by placing each patty on a whole wheat bun. Top with turkey bacon, sautéed peppers and onions, and a generous dollop of the spicy chipotle aioli sauce.

Tips

For the best results, use a meat thermometer to ensure your burgers reach an internal temperature of 160°F. This ensures they’re cooked safely without being overdone. If you prefer a less spicy aioli, reduce the number of chipotle chiles or substitute with smoked paprika for a milder flavor.

Variations & Substitutions

If you’re looking to switch things up, try using ground turkey or chicken instead of beef for a lighter option. You can also swap out Swiss cheese for cheddar or pepper jack for an extra kick. For a gluten-free version, use gluten-free hamburger buns or serve the burgers wrapped in lettuce leaves for a low-carb alternative.

Storage

Store any leftover burgers in an airtight container in the refrigerator for up to three days. The spicy chipotle aioli can be stored separately in a sealed jar for up to a week. For longer storage, consider freezing the cooked patties without the buns or toppings.

FAQ

Can I make the burgers ahead of time?

Yes, you can prepare the patties in advance and store them in the refrigerator for up to 24 hours before grilling. This can help save time during meal prep.

What can I serve with these burgers?

These burgers pair well with a variety of sides, such as sweet potato fries, a fresh green salad, or grilled corn on the cob. For a truly indulgent meal, consider serving them with a creamy coleslaw or homemade potato chips.

Is there a vegetarian version of this recipe?

Absolutely! You can substitute the beef with a plant-based protein like black bean patties or a store-bought vegetarian burger. Use a plant-based cheese alternative and skip the turkey bacon for a delicious vegetarian option.

Nutrition

While this recipe is a flavorful indulgence, it aims to maintain a balance with healthier ingredients. Opting for lean ground beef and whole wheat buns increases the nutritional value, while Greek yogurt in the aioli sauce provides a protein boost with reduced fat content. Adjust portions to suit your dietary needs.

Conclusion

Our Cheesy Bacon Burger with Spicy Chipotle Aioli Sauce is more than just a meal; it’s an experience. With each bite, you’ll savor the melty cheese, the crisp turkey bacon, and the zesty aioli. Whether you’re creating new memories with friends and family or enjoying a quiet dinner for one, this burger promises to deliver satisfaction and joy. So fire up the grill, gather your ingredients, and get ready to enjoy a delightful taste journey!

Related update: Cheesy Bacon Burger with Spicy Chipotle Aiolo Sauce

Roasted Endive Salad With Prosciutto, Figs and Pistachios | Made by Meaghan Moineau

Roasted Endive Salad With Prosciutto, Figs and Pistachios | Made by Meaghan Moineau

A Taste of Nostalgia: Roasted Endive Salad With Prosciutto, Figs, and Pistachios


An Ode to Family Gatherings and Flavorful Traditions


Description: Dive into the harmonious blend of flavors in our Roasted Endive Salad with Prosciutto, Figs, and Pistachios. This dish brings together the crisp texture of roasted red and green endive, the rich saltiness of prosciutto, the sweet chewiness of figs, and the crunchy delight of pistachios, all drizzled with a touch of honey. Perfect as an appetizer, this recipe is a testament to how simple ingredients can transform into an unforgettable culinary experience.
Difficulty: 5/10
Category: Appetizer

---


A Culinary Journey Down Memory Lane


Growing up, family gatherings were the highlight of every season. Whether it was a holiday celebration or a simple weekend get-together, the kitchen was always bustling with activity. My grandmother, the heart and soul of our family, had a knack for turning ordinary ingredients into extraordinary dishes. One of her signature creations was the Roasted Endive Salad, a dish that never failed to bring a smile to our faces.


I remember one particular autumn afternoon, the air crisp and leaves painting the ground in hues of gold and crimson. My cousins and I would play outside, our laughter echoing through the trees, while the aroma of roasting endive wafted from the kitchen window. The anticipation of savoring that first bite was almost as delightful as the dish itself.


My grandmother would meticulously prepare the endives, her hands moving with the grace and precision that only years of practice could bring. She'd roast them to perfection, their edges turning a beautiful golden brown. Meanwhile, the prosciutto sizzled in the skillet, its savory scent mingling with the sweet fragrance of dried figs.


When the time came to sit around the table, the Roasted Endive Salad was always a centerpiece. Each bite was a symphony of flavors—the bitterness of the endive balanced by the sweetness of figs, the crunch of pistachios, and the delicate saltiness of prosciutto, all enveloped in the warm embrace of honey.


The Recipe


Ingredients:

- Red and green endive


- Olive oil


- Prosciutto


- Dried figs


- Pistachio nuts


- Honey


Instructions:

1. Preheat your oven (*ding, this is a great toaster oven candidate) to 350°F. Line a rimmed baking sheet with aluminum foil.


2. Wash the endive and remove any unsightly outer leaves. Slice each endive head in half from the stem to the tip.


3. Arrange the endive cut side up on the foil-lined baking sheet. Coat generously with olive oil.


4. Bake at 350°F for 30 minutes, or until the outer edges are golden brown.


5. Meanwhile, fry the prosciutto in a skillet until crispy. Drain onto paper towels, then crumble and set aside.


6. When the endive is done roasting, arrange three pieces on a plate alongside a handful of sliced dried figs and pistachio nuts.


7. Drizzle a spoonful of honey over the plate, then sprinkle the endive with about 1/4th of the crumbled prosciutto.


Conclusion


This Roasted Endive Salad with Prosciutto, Figs, and Pistachios is more than just a dish—it's a bridge to cherished memories and a testament to the power of simple, quality ingredients. Whether you're recreating a family tradition or starting a new one, may each bite bring warmth and joy to your table, just as it has to mine.

Read more about Appetizers

Read more about Main Dishes

Read more about Desserts

Rocky Road Rice Krispie Treats | Made by Meaghan Moineau

Rocky Road Rice Krispie Treats | Made by Meaghan Moineau

**Title: Rocky Road Rice Krispie Treats: A Nostalgic Twist on a Classic Dessert**


**Description: Dive into the sweet and crunchy world of Rocky Road Rice Krispie Treats. This delightful dessert combines the rich flavors of bittersweet chocolate, almonds, and marshmallows with the crispy texture of rice cereal. Perfect for family gatherings or a nostalgic treat, this recipe is sure to become a cherished favorite.**


---


### Rocky Road Rice Krispie Treats: A Sweet Trip Down Memory Lane


Ah, the sweet nostalgia of childhood desserts. There's something about the combination of chocolate, marshmallows, and almonds that never fails to transport me back to those carefree days. Growing up, my family had a tradition of gathering in the kitchen on Sunday afternoons to whip up sweet treats. The laughter, the scent of melting chocolate, and the joy of creating something delicious together are memories I cherish dearly. One particular favorite was our own twist on the classic rice krispie treats: the Rocky Road Rice Krispie Treats.


#### Ingredients:


- **Butter**: Essential for that rich, creamy base.


- **Chocolate Vanilla Swirl Marshmallows**: The star of our show, adding a delightful twist.


- **Almond Extract & Vanilla Extract**: These extracts enhance the flavor, providing a depth that complements the chocolate beautifully.


- **Rice Krispies**: The foundation of this treat, offering that iconic crunch.


- **Almonds**: One cup mixed in and an additional 1/3 cup for topping, these add a delightful crunch and nutty flavor.


- **Bittersweet Chocolate**: Melted and drizzled on top, it adds a layer of decadence.


- **Kosher Salt**: Just a sprinkle to heighten all the flavors.


#### Instructions:


1. **Melt and Combine**: In a large soup pot, melt the butter and chocolate vanilla swirl marshmallows over a low flame, stirring constantly to create a smooth, creamy mixture.


2. **Flavor Infusion**: Stir in the almond extract and vanilla extract, allowing their rich scents to fill the kitchen and blend into the marshmallow mixture.


3. **Mix It Up**: Add the rice krispies and 1 cup of almonds into the pot. Stir well, ensuring each piece of cereal is coated with the marshmallow blend.


4. **Shape and Set**: Spread the mixture into a 9x13 dish prepped with baking spray. Press down with a spatula until the surface is smooth and even.


5. **Decadent Toppings**: Drizzle the melted bittersweet chocolate over the top and sprinkle with the remaining 1/3 cup of almonds. Finish with a light sprinkle of kosher salt (about 1/2 teaspoon) to enhance the flavors.


6. **Cool and Cut**: Allow the treats to cool completely. For ease of cutting, place them in the fridge for about an hour once they reach room temperature.


#### A Sweet Memory


I recall one particular Sunday when I was around ten years old. It was a rainy afternoon, the kind where you could hear the gentle patter of raindrops against the kitchen window. My mom, my siblings, and I were gathered around the kitchen island, each of us assigned a task. I was in charge of stirring the marshmallows and butter—a task I took very seriously. As we worked, my mom would regale us with stories of her own childhood, sharing how her mother taught her to bake. It was in those moments, surrounded by family and the comforting aroma of chocolate and almonds, that I learned the true meaning of love and tradition.


#### Difficulty: 3/10


**Classification: Dessert**


This Rocky Road Rice Krispie Treats recipe is not only simple to make but also a delightful journey down memory lane. It's perfect for bringing a touch of nostalgia to any gathering, reminding us of the warmth and joy found in family traditions. Whether you're enjoying them on a rainy afternoon or sharing them at a festive gathering, these treats promise to bring smiles and sweet memories to all who indulge.

Read more about Appetizers

Read more about Main Dishes

Read more about Desserts